An interactive map of England, the main of the lands available in Assassin's Creed Valhalla, which consists of Mercia, East Anglia, Wessex and Northumbria regions. The map shows the locations of opals, artefacts, mysteries and wealth such as: Roman Artifacts, Flying Papers, Rigsogur Fragments, Treasure Hoard Maps, Cursed Symbols, Books of Knowledge / Abilities, Gear Items, Ingots, Lost Drengr, Legendary Animals, Raids, World Events, Animus Anomalies, Cairns, Flyting, Standing Stones, Tresures of Britain and other points of interest.
England
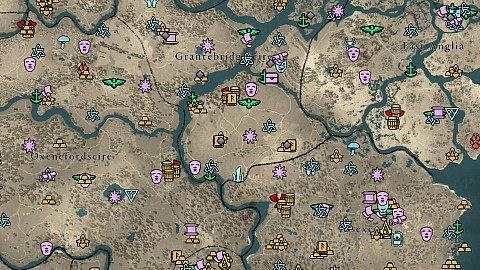
Markers on the map
- Animus Anomalies9
- Books of Knowledge31
- Cairns9
- Carbon Ingots19
- Cargo65
- Cursed Symbols40
- Daughters of Lerion3
- Fly Agaric13
- Flying Papers35
- Flyting12
- Gear and Weapons63
- Harbors42
- Hidden One Bureaus6
- Highpoints57
- Legendary Animals7
- Locations112
- Lost Drengr4
- Mastery Challenges5
- Nickel Ingots69
- Offering altars9
- Opals350
- Order of the Ancients Members15
- Orlog Players17
- Raids20
- Rigsogur Fragments10
- Roman Arfifacts52
- Standing Stones12
- Traders28
- Treasure Hoard Map Treasures20
- Treasure Hoard Maps20
- Treasures of Britain8
- Tungsten Ingots49
- World Events104
- Zealots15
- Other2
Points of interest
 ExcaliburThe sword can be found in the ancient dungeon which can be accessed from Myrddin's Cave. To obtain Excalibur you must first collect 11 mysterious tablets. Eight of them you will find in the Treasures of Britain caves and the other three you will get when you kill three specific Zealots.
 RavensthorpeThe settlement, called Ravensthorpe, is the Raven Clan's first established colony in England and the base of operations for their push into the territories beyond. It is also home to Randvi's alliance table, Gunnar's forge, Yanli's shop, Rowan's stable, and other useful services, including hunting, fishing, tattoos, and exotic trading. Related quests: Carrying the Torch, In a Strange Land, Man of Mystery, The Baker's Plaint, The Huntress.
Mastery Challenges

Hidden One Bureaus
There are a total of six Hidden One Bureaus in England. These are the places where you will find the documents you need to complete the quest "A Brief History of the Hidden Ones" and the chests containing the parts of the Hidden Ones Set.
 Camulodunum BureauTake one of the oil jars that stand slightly north of the marker and climb up the fallen tree trunk.
Related quests: A Brief History of the Hidden Ones.
Eboracum BureauDestroy the boards blocking the entrance and jump down.
Related quests: A Brief History of the Hidden Ones.
Londinium BureauTo get inside you must first make a leap of faith.
Related quests: A Brief History of the Hidden Ones.
Ratae BureauTo get to the room where the chest is located, shoot the pulley on which a net with rocks is attached.
Related quests: A Brief History of the Hidden Ones.
Temple of Ceres BureauTo get to the bureau go down to the basement of the Roman ruins.
Related quests: A Brief History of the Hidden Ones.
Venta Belgarum BureauJump down into the "large well".
Related quests: A Brief History of the Hidden Ones.
Camulodunum BureauTake one of the oil jars that stand slightly north of the marker and climb up the fallen tree trunk.
Related quests: A Brief History of the Hidden Ones.
Eboracum BureauDestroy the boards blocking the entrance and jump down.
Related quests: A Brief History of the Hidden Ones.
Londinium BureauTo get inside you must first make a leap of faith.
Related quests: A Brief History of the Hidden Ones.
Ratae BureauTo get to the room where the chest is located, shoot the pulley on which a net with rocks is attached.
Related quests: A Brief History of the Hidden Ones.
Temple of Ceres BureauTo get to the bureau go down to the basement of the Roman ruins.
Related quests: A Brief History of the Hidden Ones.
Venta Belgarum BureauJump down into the "large well".
Related quests: A Brief History of the Hidden Ones.
Treasure Hoard Maps
Treasure Hoard Maps contain tips that will lead you to hidden, unique customisation items. After finding the map you can go to the place shown or described on the map and take the treasure. Treasure Hoard Maps count as ARTIFACTS.
 Essexe Hoard MapThe map is located on top of Sancta Helena's Church tower. To get to this tower you must enter through the door on the ground level of the church. To open this door you will need a key.
Hamtunscire Hoard MapThe map is located in the basement of Fearnhamme Ruins. To get there you must drop the candlestick, which will destroy the stones blocking the access.
Jorvik Hoard MapThe map is located in a secret room behind the altar. The entrance to it is hidden behind a rack in the room on the left.
Ledecestrescire Hoard MapThe map is located in a hidden tomb, the entrance to which is located by the river.
Lincolnscire Hoard MapThe map is lying on a table inside a small shack that is locked. You will find the key at the bottom of a nearby pond.
Oxenefordscire Hoard MapThe map is located in an underground cave. The entrance to it is located south of the marker in the Eatun Barn camp. To enter the cave you have to blow up the entrance with an oil jar. You will find a lot of them in the camp.
Sciropescire Caustow Castle Hoard MapThe map is located in a hidden underground library. The entrance to this room is inside the nearby tower with a highpoint on top of it. You must shoot the pulley on which the net with stones is attached.
Suthsexe Treehouse Shoppe Hoard MapBonus Map. To receive this map, complete the "Tiny Black Market" world event.
Suthsexe Witch's House Hoard MapThe map is on a shelf inside the hut. To get inside, you must destroy the barrier blocking the small entrance at the back of the hut and then throw one or two torches inside to burn off the toxic gas inside.
Essexe Hoard MapThe map is located on top of Sancta Helena's Church tower. To get to this tower you must enter through the door on the ground level of the church. To open this door you will need a key.
Hamtunscire Hoard MapThe map is located in the basement of Fearnhamme Ruins. To get there you must drop the candlestick, which will destroy the stones blocking the access.
Jorvik Hoard MapThe map is located in a secret room behind the altar. The entrance to it is hidden behind a rack in the room on the left.
Ledecestrescire Hoard MapThe map is located in a hidden tomb, the entrance to which is located by the river.
Lincolnscire Hoard MapThe map is lying on a table inside a small shack that is locked. You will find the key at the bottom of a nearby pond.
Oxenefordscire Hoard MapThe map is located in an underground cave. The entrance to it is located south of the marker in the Eatun Barn camp. To enter the cave you have to blow up the entrance with an oil jar. You will find a lot of them in the camp.
Sciropescire Caustow Castle Hoard MapThe map is located in a hidden underground library. The entrance to this room is inside the nearby tower with a highpoint on top of it. You must shoot the pulley on which the net with stones is attached.
Suthsexe Treehouse Shoppe Hoard MapBonus Map. To receive this map, complete the "Tiny Black Market" world event.
Suthsexe Witch's House Hoard MapThe map is on a shelf inside the hut. To get inside, you must destroy the barrier blocking the small entrance at the back of the hut and then throw one or two torches inside to burn off the toxic gas inside.
Treasure Hoard Map Treasures
Treasure locations shown or described on Treasure Hoard Maps.
 East Anglia Hoard Map (Treasure)It's a Snakebite Scheme (Tailpiece).
Glowecestrescire Hoard Map (Treasure)It's a Seer Scheme (Hull). To get to this item, you need to remove the small rock that is blocking the large rock from being moved and then move the large rock towards you.
Jorvik Hoard Map (Treasure)The item is in a bowl held by a statue. It's a Huginn Call Scheme (Head).
Lincolnscire Hoard Map (Treasure)The item is located at the very top of a ruined tower. It's a Speki Symbol Scheme (Front).
Oxenefordscire Hoard Map (Treasure)The item is placed at the bottom of the well. It's a Snakebite Scheme (Figurehead).
Sciropescire Caustow Castle Hoard Map (Treasure)The treasure is located at the bottom of the lake. It's a Vidarr Scheme (Head).
East Anglia Hoard Map (Treasure)It's a Snakebite Scheme (Tailpiece).
Glowecestrescire Hoard Map (Treasure)It's a Seer Scheme (Hull). To get to this item, you need to remove the small rock that is blocking the large rock from being moved and then move the large rock towards you.
Jorvik Hoard Map (Treasure)The item is in a bowl held by a statue. It's a Huginn Call Scheme (Head).
Lincolnscire Hoard Map (Treasure)The item is located at the very top of a ruined tower. It's a Speki Symbol Scheme (Front).
Oxenefordscire Hoard Map (Treasure)The item is placed at the bottom of the well. It's a Snakebite Scheme (Figurehead).
Sciropescire Caustow Castle Hoard Map (Treasure)The treasure is located at the bottom of the lake. It's a Vidarr Scheme (Head).
Flying Papers
Pieces of paper floating in the air. When you get close to them they will start to fly away. Follow them until they stop and then collect them before they reset and return to the starting position. After collecting each of them you will receive a new tattoo design. Flying Papers count as ARTIFACTS.
 Cent / Canterbury #1The starting point is located on a rope spanned between the church and the theater. The end point is located in a haystack in the center of the theater. If, instead of jumping along the walls of the theater, you run through the hallway inside the theater, you can catch up with the paper much earlier.
Cent / Canterbury #2To get near the starting point you have to climb the pole. The end point is located above the pole near the tavern (Drinking Challenge).
Cent / FolcanstanThe paper will fly to a nearby small island and then it will fall into the water and stop there for a while. So get to the island, climb a tree and jump down into the water and you will find yourself near the paper.
Essexe / Colcestre #2The starting point is near the high point. The paper will fly a bit of a detour, but you can directly head along the ropes to the arch on the other side of the square, because that's where the paper is supposed to go.
Eurvicscire / Donecaestre #1Depending on which side you approach the paper from, it will fly to two different places.
Eurvicscire / Donecaestre #2The starting point is on the roof of the guard tower. You do not have to climb to the roof just get a little closer to the paper and it will start its journey.
Glowecestrescire / Glowecestre #1Jump off the bridge onto the wooden platform floating on the water and then the paper should set off. Eventually it will fly along the banks of the river to the southeast where it will stop near a destroyed boat.
Glowecestrescire / Glowecestre #2Climb up the pole and jump towards the paper and it will set off. The paper will go around the settlement and finally stop at the top of the Roman ruins. To catch it, you will have to make a leap of faith.
Grantebridgescire / GrantebridgeAvailable after completing the "Glory Regained" quest. The paper is on top of the longhouse. The destination to which the paper flies is in the settlement, between the horn and the middle gate, ground level.
Hamtunscire / AethelnayThe starting point is on the roof of one of the houses in the settlement. The paper will stop near the roof of another of the houses in the settlement. If you go there directly then you will be able to catch the paper a little earlier.
Hamtunscire / Calleva OutpostNo matter from which side you approach it, the paper will fly towards the nearby ruined walls and stop there.
Jorvik #1Depending on which side you approach it from, the paper may fly in two different directions.
Jorvik #2Depending on which side you approach it from, the paper may fly in two different directions.
Ledecestrescire / LedecestreThe paper is on the roof of one of the buildings. You will have to run and jump on ropes, etc. until you reach the top of the Roman ruins in the central part of the settlement.
Ledecestrescire / ReptonA piece of paper floating in the air near the watchtower. When you get close to it, it will fly away. Follow it along the tents, etc until it stops at the top of the crane and then collect it before it resets.
Ledecestrescire / Tamworth FortressTo get close to this sheet of paper, jump down from a nearby platform. It will stop at the eastern wall of the fortress. You do not have to jump on branches, roofs, etc., it will be easier to chase it on the ground.
Lincolnscire / BotolphstonTo make it very easy, approach the paper from the side of the rope and try to catch it as it moves past you.
Lincolnscire / LincolnThe starting point is above a wooden pole that you must climb. The paper will fly through a large part of the city. Instead of following it, you can directly run towards the ruined walls on the right and then you will be able to collect it before it reaches its destination point.
Lunden #1The paper will stop over the chimney on the roof of one of the houses near the river. You can run directly there.
Lunden #3First, follow the paper. At some point, jump down on the ground, run to the wall on which the statue stands and climb on it. This way you will get to the statue, over which the paper will stop a little faster.
Oxenefordscire / BuckinghamThe starting point is on the roof of the longhouse and the ending point above the cross on the roof of the nearby church.
Oxenefordscire / OxenefordaThe starting point is above the chimney of one of the houses. The paper will stop over the chimney of the house located south of the church, you can run directly there.
SciropescireThe starting point is near one of the walls of the building and the end point is on top of the tower so you can go there directly.
Sciropescire / QuatfordThe starting point is on the roof of the house where you can play Orlog and the ending point is on the roof of the house where the trader lives.
Snotinghamscire / HemthorpeThe paper will fly to the other side of the harbor. If you approach it from the roof of the hull-shaped building, the paper will make a small circle and after a while it will fly above the roof of this building, so you can just wait for it there. The end point of the paper is at the end of the southernmost dock.
Suthsexe / Cicestre AbbeyThe paper will fly along the wall and stop on a beam near the statue standing at the end of the wall. If you are fast enough then you may be able to grab the paper right after it starts moving.
Suthsexe / CroindeneThe starting point is above a pole standing in the eastern part of the village and the end point is on the western side of the long house.
Wincestre #1As you approach the paper it will fly clockwise over the Roman ruins and stop near the rope on the other side. If you run counter-clockwise, you can intercept it while it is on its way.
Cent / Canterbury #1The starting point is located on a rope spanned between the church and the theater. The end point is located in a haystack in the center of the theater. If, instead of jumping along the walls of the theater, you run through the hallway inside the theater, you can catch up with the paper much earlier.
Cent / Canterbury #2To get near the starting point you have to climb the pole. The end point is located above the pole near the tavern (Drinking Challenge).
Cent / FolcanstanThe paper will fly to a nearby small island and then it will fall into the water and stop there for a while. So get to the island, climb a tree and jump down into the water and you will find yourself near the paper.
Essexe / Colcestre #2The starting point is near the high point. The paper will fly a bit of a detour, but you can directly head along the ropes to the arch on the other side of the square, because that's where the paper is supposed to go.
Eurvicscire / Donecaestre #1Depending on which side you approach the paper from, it will fly to two different places.
Eurvicscire / Donecaestre #2The starting point is on the roof of the guard tower. You do not have to climb to the roof just get a little closer to the paper and it will start its journey.
Glowecestrescire / Glowecestre #1Jump off the bridge onto the wooden platform floating on the water and then the paper should set off. Eventually it will fly along the banks of the river to the southeast where it will stop near a destroyed boat.
Glowecestrescire / Glowecestre #2Climb up the pole and jump towards the paper and it will set off. The paper will go around the settlement and finally stop at the top of the Roman ruins. To catch it, you will have to make a leap of faith.
Grantebridgescire / GrantebridgeAvailable after completing the "Glory Regained" quest. The paper is on top of the longhouse. The destination to which the paper flies is in the settlement, between the horn and the middle gate, ground level.
Hamtunscire / AethelnayThe starting point is on the roof of one of the houses in the settlement. The paper will stop near the roof of another of the houses in the settlement. If you go there directly then you will be able to catch the paper a little earlier.
Hamtunscire / Calleva OutpostNo matter from which side you approach it, the paper will fly towards the nearby ruined walls and stop there.
Jorvik #1Depending on which side you approach it from, the paper may fly in two different directions.
Jorvik #2Depending on which side you approach it from, the paper may fly in two different directions.
Ledecestrescire / LedecestreThe paper is on the roof of one of the buildings. You will have to run and jump on ropes, etc. until you reach the top of the Roman ruins in the central part of the settlement.
Ledecestrescire / ReptonA piece of paper floating in the air near the watchtower. When you get close to it, it will fly away. Follow it along the tents, etc until it stops at the top of the crane and then collect it before it resets.
Ledecestrescire / Tamworth FortressTo get close to this sheet of paper, jump down from a nearby platform. It will stop at the eastern wall of the fortress. You do not have to jump on branches, roofs, etc., it will be easier to chase it on the ground.
Lincolnscire / BotolphstonTo make it very easy, approach the paper from the side of the rope and try to catch it as it moves past you.
Lincolnscire / LincolnThe starting point is above a wooden pole that you must climb. The paper will fly through a large part of the city. Instead of following it, you can directly run towards the ruined walls on the right and then you will be able to collect it before it reaches its destination point.
Lunden #1The paper will stop over the chimney on the roof of one of the houses near the river. You can run directly there.
Lunden #3First, follow the paper. At some point, jump down on the ground, run to the wall on which the statue stands and climb on it. This way you will get to the statue, over which the paper will stop a little faster.
Oxenefordscire / BuckinghamThe starting point is on the roof of the longhouse and the ending point above the cross on the roof of the nearby church.
Oxenefordscire / OxenefordaThe starting point is above the chimney of one of the houses. The paper will stop over the chimney of the house located south of the church, you can run directly there.
SciropescireThe starting point is near one of the walls of the building and the end point is on top of the tower so you can go there directly.
Sciropescire / QuatfordThe starting point is on the roof of the house where you can play Orlog and the ending point is on the roof of the house where the trader lives.
Snotinghamscire / HemthorpeThe paper will fly to the other side of the harbor. If you approach it from the roof of the hull-shaped building, the paper will make a small circle and after a while it will fly above the roof of this building, so you can just wait for it there. The end point of the paper is at the end of the southernmost dock.
Suthsexe / Cicestre AbbeyThe paper will fly along the wall and stop on a beam near the statue standing at the end of the wall. If you are fast enough then you may be able to grab the paper right after it starts moving.
Suthsexe / CroindeneThe starting point is above a pole standing in the eastern part of the village and the end point is on the western side of the long house.
Wincestre #1As you approach the paper it will fly clockwise over the Roman ruins and stop near the rope on the other side. If you run counter-clockwise, you can intercept it while it is on its way.
Roman Arfifacts
Roman Arfifacts are hidden Roman masks that you must find and collect. Once you have built the museum in your settlement you can bring the artifacts back to Octavian and receive rewards for that. Roman Artifacts count as ARTIFACTS.
 Cent #1To get to the tower where the mask is located you have to shoot the lock on the door through the hole on the other side.
Cent #2The mask is located in the basement of the theater. To get there you have to blow up the blocked passageway.
Cent #3You will find the artifact at the top of the columns, just climb up there and pick up one of the stones under which the mask is placed.
East Anglia #1The mask is underwater. You can get to it through an underwater tunnel. Dive in the place shown in the picture below.
East Anglia #2The mask hangs on the wall.
East Anglia #3The mask is located in the underground of the ruins. To get there you have to blow up the entrance.
Essexe #1
Essexe #3The artifact lies in a bird's nest located on a tree. Jump to the tree branch from the top of the wall of the nearby ruins.
Essexe #4
Essexe #5
Eurvicscire #1Destroy the boards blocking the way down. Then throw the torch on the oil patch and the explosion that follows will destroy the stones blocking the passage.
Glowecestrescire #2The mask lies in the middle of the ruins, and to get it you will have to get rid of two bears.
Glowecestrescire #3The mask lies next to a corpse that you will find near a tree growing a few steps from the ruins.
Glowecestrescire #4You will find the artifact on top of the Roman columns.
Glowecestrescire #5Access to the artifact is blocked by a pile of stones. If you need a jar of oil to remove the stones, you will find it nearby.
Grantebridgescire #1
Grantebridgescire #2Kill the snakes and pick up the stone. You will then be able to take the mask lying underneath it.
Grantebridgescire #3The mask is located in a building which you can get to after blowing up the back door.
Hamtunscire #1Approach and take the mask that is lying on the log.
Hamtunscire #2The artifact is located at the bottom of a disused well. To destroy the stone wall blocking access, throw a torch at the hay on the floor, in front of it.
Hamtunscire #3The artifact is on top of the net with rocks. Shoot the pulley to make the net fall down and then, being aware of the snakes, go down and get the mask.
Jorvik #1The artifact is located inside the walls. The entrance is on the river side. To get inside you have to destroy the stone wall.
Jorvik #2
Ledecestrescire #1Move the rack that blocks access to the mask and then collect it.
Ledecestrescire #3The artifact is located in the cave. The entrance to it is in the ruins located north of the marker.
Ledecestrescire #4The artifact is located under rock rubble. You have to use explosives to access it. Find a vase with explosives and relocate it to the rubble.
Ledecestrescire #5The artifact is located on top of the giant columns and is guarded by two soldiers.
Lincolnscire #1
Lincolnscire #2The artifact lies at the bottom of a disused well.
Lincolnscire #3
Oxenefordscire #1The mask is underground. To get there, you must first climb the scaffolding and shoot from the bow to the pulley on which the net with stones hangs. Falling stones will open the passage.
Oxenefordscire #2To get to the room where the artifact is located, you first have to pass through a crack in the rocks to the room behind it.
Oxenefordscire #3The mask is located inside the ruins, but the door is locked so you need to find the key.
Oxenefordscire #4The mask is in the basement of the ruins, to get to it you have to blow up the entrance. You will find an oil jar on top of the ruins. Pick it up, walk along the rope and jump to the adjacent column and then throw the jar to hit the blocked passageway.
Oxenefordscire #5To get to the room where the artifact is located you have to go through a tunnel that starts in the neighboring ruins.
Sciropescire #1The artifact is located in a room which can be accessed by passing through a gap in the wall. Beware of snakes inside.
Sciropescire #2
Sciropescire #4To get access to this artifact you have to shoot the rope on which the net with stones is attached.
Cent #1To get to the tower where the mask is located you have to shoot the lock on the door through the hole on the other side.
Cent #2The mask is located in the basement of the theater. To get there you have to blow up the blocked passageway.
Cent #3You will find the artifact at the top of the columns, just climb up there and pick up one of the stones under which the mask is placed.
East Anglia #1The mask is underwater. You can get to it through an underwater tunnel. Dive in the place shown in the picture below.
East Anglia #2The mask hangs on the wall.
East Anglia #3The mask is located in the underground of the ruins. To get there you have to blow up the entrance.
Essexe #1
Essexe #3The artifact lies in a bird's nest located on a tree. Jump to the tree branch from the top of the wall of the nearby ruins.
Essexe #4
Essexe #5
Eurvicscire #1Destroy the boards blocking the way down. Then throw the torch on the oil patch and the explosion that follows will destroy the stones blocking the passage.
Glowecestrescire #2The mask lies in the middle of the ruins, and to get it you will have to get rid of two bears.
Glowecestrescire #3The mask lies next to a corpse that you will find near a tree growing a few steps from the ruins.
Glowecestrescire #4You will find the artifact on top of the Roman columns.
Glowecestrescire #5Access to the artifact is blocked by a pile of stones. If you need a jar of oil to remove the stones, you will find it nearby.
Grantebridgescire #1
Grantebridgescire #2Kill the snakes and pick up the stone. You will then be able to take the mask lying underneath it.
Grantebridgescire #3The mask is located in a building which you can get to after blowing up the back door.
Hamtunscire #1Approach and take the mask that is lying on the log.
Hamtunscire #2The artifact is located at the bottom of a disused well. To destroy the stone wall blocking access, throw a torch at the hay on the floor, in front of it.
Hamtunscire #3The artifact is on top of the net with rocks. Shoot the pulley to make the net fall down and then, being aware of the snakes, go down and get the mask.
Jorvik #1The artifact is located inside the walls. The entrance is on the river side. To get inside you have to destroy the stone wall.
Jorvik #2
Ledecestrescire #1Move the rack that blocks access to the mask and then collect it.
Ledecestrescire #3The artifact is located in the cave. The entrance to it is in the ruins located north of the marker.
Ledecestrescire #4The artifact is located under rock rubble. You have to use explosives to access it. Find a vase with explosives and relocate it to the rubble.
Ledecestrescire #5The artifact is located on top of the giant columns and is guarded by two soldiers.
Lincolnscire #1
Lincolnscire #2The artifact lies at the bottom of a disused well.
Lincolnscire #3
Oxenefordscire #1The mask is underground. To get there, you must first climb the scaffolding and shoot from the bow to the pulley on which the net with stones hangs. Falling stones will open the passage.
Oxenefordscire #2To get to the room where the artifact is located, you first have to pass through a crack in the rocks to the room behind it.
Oxenefordscire #3The mask is located inside the ruins, but the door is locked so you need to find the key.
Oxenefordscire #4The mask is in the basement of the ruins, to get to it you have to blow up the entrance. You will find an oil jar on top of the ruins. Pick it up, walk along the rope and jump to the adjacent column and then throw the jar to hit the blocked passageway.
Oxenefordscire #5To get to the room where the artifact is located you have to go through a tunnel that starts in the neighboring ruins.
Sciropescire #1The artifact is located in a room which can be accessed by passing through a gap in the wall. Beware of snakes inside.
Sciropescire #2
Sciropescire #4To get access to this artifact you have to shoot the rope on which the net with stones is attached.
Rigsogur Fragments
Rigsogur Fragments count as ARTIFACTS and there are 10 of them in total.
 The Rigsogur, Page 2Available after completing the "Glory Regained" quest. The page is inside the longhouse in Grantebridge.
Cursed Symbols
This area is cursed. Find and destroy the source which looks like a skull and is usually surrounded by a red aura. The Cursed Symbols will very often be in a place that requires using a bow. The symbols count sa ARTIFACTS.
 Cent #1The symbol is located inside the tree. You can shoot it down when you step on one of the stones.
Cent #2The symbol will be in range of the shot from the bow when you climb on one of the wooden posts.
Cent #3Take one of the oil jars standing nearby, climb over a fallen trunk and throw the jar onto the stones. Explosion and flames should destroy the stones and symbol hidden under them.
Cent #4The symbol is on top of a strange tower. To shoot at it you have to climb the ropes to one of the wooden posts. The place where you can step on the ropes is east of the marker.
East Anglia #1Look up. The symbol is on a tree.
East Anglia #2The symbol is located inside the walls. You can get to it from two sides.
Eurvicscire #1
Eurvicscire #2To open the door to the room with the symbol you will need a key. You will find this key in the frozen pond next to the ruins. To dive into the pond you will need to destroy one of the ice floes.
Glowecestrescire #2The symbol is located in a locked house. You will find the key to the door on a corpse lying not far from the house.
Glowecestrescire #3The symbol hangs on the tree. All you have to do is shoot at it with your bow.
Grantebridgescire #1The symbol is located above one of the corpses hanging from the tree.
Grantebridgescire #2The symbol is located in an old mine, the entrance to which is to the east of the marker.
Hamtunscire #1Kill the lynxes you come across in the area, then carry the soldier's corpse and move the boulder behind which the symbol is hidden.
Hamtunscire #2You can climb the pole by one of the red tents and then jump / walk along the ropes to the symbol that is on the platform on the treetop.
Ledecestrescire #1Climb onto the roof of the building and shoot the symbol with a bow.
Ledecestrescire #2Look up. The symbol hangs from a tree.
Ledecestrescire #3Destroy the planks blocking access to the well and jump in. The symbol is located at the bottom of the dried well.
Lincolnscire #1To get to the islet in the middle of the pond safely, walk over the branches of the trees.
Lincolnscire #2
Lincolnscire #3The symbol is located in the basement of one of the houses. To get there you must blow up the stone wall blocking the entrance.
Oxenefordscire #2The symbol is located in a small cave on the largest island on the lake. To get there you have to blow up the entrance. You will find an oil jar on a smaller island.
Oxenefordscire #3The symbol is underground. The entrance is near the marker. Get rid of the poisonous gas by throwing a torch at it.
Snotinghamscire #3The symbol is in the same room as the Snotinghamscire Ingot #9 chest, on the rock shelf above it.
Suthsexe #1Throw the torch to burn off the poisonous gas, jump down and move the boulder blocking access to the symbol.
Suthsexe #2Go down to one of the underground rooms and move the racks blocking access to the symbol.
Cent #1The symbol is located inside the tree. You can shoot it down when you step on one of the stones.
Cent #2The symbol will be in range of the shot from the bow when you climb on one of the wooden posts.
Cent #3Take one of the oil jars standing nearby, climb over a fallen trunk and throw the jar onto the stones. Explosion and flames should destroy the stones and symbol hidden under them.
Cent #4The symbol is on top of a strange tower. To shoot at it you have to climb the ropes to one of the wooden posts. The place where you can step on the ropes is east of the marker.
East Anglia #1Look up. The symbol is on a tree.
East Anglia #2The symbol is located inside the walls. You can get to it from two sides.
Eurvicscire #1
Eurvicscire #2To open the door to the room with the symbol you will need a key. You will find this key in the frozen pond next to the ruins. To dive into the pond you will need to destroy one of the ice floes.
Glowecestrescire #2The symbol is located in a locked house. You will find the key to the door on a corpse lying not far from the house.
Glowecestrescire #3The symbol hangs on the tree. All you have to do is shoot at it with your bow.
Grantebridgescire #1The symbol is located above one of the corpses hanging from the tree.
Grantebridgescire #2The symbol is located in an old mine, the entrance to which is to the east of the marker.
Hamtunscire #1Kill the lynxes you come across in the area, then carry the soldier's corpse and move the boulder behind which the symbol is hidden.
Hamtunscire #2You can climb the pole by one of the red tents and then jump / walk along the ropes to the symbol that is on the platform on the treetop.
Ledecestrescire #1Climb onto the roof of the building and shoot the symbol with a bow.
Ledecestrescire #2Look up. The symbol hangs from a tree.
Ledecestrescire #3Destroy the planks blocking access to the well and jump in. The symbol is located at the bottom of the dried well.
Lincolnscire #1To get to the islet in the middle of the pond safely, walk over the branches of the trees.
Lincolnscire #2
Lincolnscire #3The symbol is located in the basement of one of the houses. To get there you must blow up the stone wall blocking the entrance.
Oxenefordscire #2The symbol is located in a small cave on the largest island on the lake. To get there you have to blow up the entrance. You will find an oil jar on a smaller island.
Oxenefordscire #3The symbol is underground. The entrance is near the marker. Get rid of the poisonous gas by throwing a torch at it.
Snotinghamscire #3The symbol is in the same room as the Snotinghamscire Ingot #9 chest, on the rock shelf above it.
Suthsexe #1Throw the torch to burn off the poisonous gas, jump down and move the boulder blocking access to the symbol.
Suthsexe #2Go down to one of the underground rooms and move the racks blocking access to the symbol.
Books of Knowledge
Books of Knowledge unlock new Abilities and upgrade current ones. When you find a second Book of Knowledge with the same ability, that ability is upgraded / improved. Books of Knowledge count as WEALTH.
 Axe BlizzardRanged ability. The book is in the room you need to visit while doing "The Reeve of Wincestre" quest.
Blinding RushMelee ability. The book is located on the upper level of the tower. To get there you must lower the ladder and get rid of the large net with crates blocking the passage.
Dive of the ValkyriesMelee ability. The book is located in the basement of the monastery. The entrance is located in a building in the south-eastern part of the monastery.
Dive of the ValkyriesMelee ability. The part of the building where you will find the book can be accessed through the neighboring part of the building. You have to kill a few enemies on your way and then walk along the ropes to the platform where the book is located.
Feign DeathMelee ability. The book is located in the library building, which is locked. The key can be found on a table in the main building of the villa.
Focus of the NornirRanged ability. The book is located in the upper castle. You visit this place during the "In the Absence of an Ealdorman" quest.
Focus of the NornirRanged ability. The book is located in the cave which can be accessed through a crack in one of the basement rooms.
Harpoon ImpalementMelee ability. The book is underground. The entrance is located northeast of the marker.
Harpoon ImpalementMelee ability. The book is located on top of Sancta Helena's Church tower. To get to this tower you must enter through the door on the ground level of the church. To open this door you will need a key.
Incendiary Powder TrapRanged ability. The book is located in the church you will visit during the "Unholy Father" quest.
Incendiary Powder TrapRanged ability. The book is in the room on top of the keep. The door is barred from inside so to get there you have to move the rack and enter through a hole in the wall.
Kick of TyrMelee ability. The book is located in the basement of one of the buildings, in a locked room. To get the key you have to slide down the zip line and jump onto the tower at the right moment.
Man's Best FriendRanged ability. This book is in one of the buildings of Crepelgate Fort. The door is barricaded so you have to find another way in.
Mark of DeathRanged ability. Kill the pikeman who has the key and then unlock the door to the tower where the book is located.
Piercing ShotRanged ability. The book is located in the barracks in the central part of the fortress, you will visit this place while doing "The Walls of Templebrough" quest.
Piercing ShotRanged ability. You can get to the building where the book is located through the roof.
Poisonous Powder TrapRanged ability. The book is inside Odin Mine Hideout. Move the rack blocking the entrance to the side tunnel.
Poisonous Powder TrapRanged ability. The book is located in the basement. You visit this place during the quest "Road to Hamartia".
Rage of HelheimMelee ability. The book is on the upper floor of the archive tower. To get there you must first get rid of the platform with boards blocking the passage. To do this, climb up the scaffolding outside the tower and through the window shoot the pulley on which the platform is hooked.
Raven DistractionRanged ability. The book is located in an underground cave (small side cave) with an entrance in the middle of the Tonnastadir camp. To get there you need a key.
Raven DistractionRanged ability. To get to the room where the book is, you must first destroy the wooden wall on the west side of the church.
Rush & BashMelee ability. You visit this place during "A Triumphant Return" quest. Use an oil jar to unblock the passage to the lower level.
Rush & BashMelee ability. The book is located in one of the buildings on top of the stronghold. To open the door you have to pick up the key from the corpse of one of the guards. You will visit this place during the "Storming Ravensburg" quest.
Thorn of SlumberRanged ability. The book is located in the chapel in the upper part of the fortress. There are no soldiers nearby. To get inside you must have a key.
Throwing Axe FuryMelee ability. This book is best collected during the "King Killer" quest after Ivarr defeats the king. It is in one of the rooms of the castle. You have to blow up a blocked passageway from the adjacent room to get to.
Axe BlizzardRanged ability. The book is in the room you need to visit while doing "The Reeve of Wincestre" quest.
Blinding RushMelee ability. The book is located on the upper level of the tower. To get there you must lower the ladder and get rid of the large net with crates blocking the passage.
Dive of the ValkyriesMelee ability. The book is located in the basement of the monastery. The entrance is located in a building in the south-eastern part of the monastery.
Dive of the ValkyriesMelee ability. The part of the building where you will find the book can be accessed through the neighboring part of the building. You have to kill a few enemies on your way and then walk along the ropes to the platform where the book is located.
Feign DeathMelee ability. The book is located in the library building, which is locked. The key can be found on a table in the main building of the villa.
Focus of the NornirRanged ability. The book is located in the upper castle. You visit this place during the "In the Absence of an Ealdorman" quest.
Focus of the NornirRanged ability. The book is located in the cave which can be accessed through a crack in one of the basement rooms.
Harpoon ImpalementMelee ability. The book is underground. The entrance is located northeast of the marker.
Harpoon ImpalementMelee ability. The book is located on top of Sancta Helena's Church tower. To get to this tower you must enter through the door on the ground level of the church. To open this door you will need a key.
Incendiary Powder TrapRanged ability. The book is located in the church you will visit during the "Unholy Father" quest.
Incendiary Powder TrapRanged ability. The book is in the room on top of the keep. The door is barred from inside so to get there you have to move the rack and enter through a hole in the wall.
Kick of TyrMelee ability. The book is located in the basement of one of the buildings, in a locked room. To get the key you have to slide down the zip line and jump onto the tower at the right moment.
Man's Best FriendRanged ability. This book is in one of the buildings of Crepelgate Fort. The door is barricaded so you have to find another way in.
Mark of DeathRanged ability. Kill the pikeman who has the key and then unlock the door to the tower where the book is located.
Piercing ShotRanged ability. The book is located in the barracks in the central part of the fortress, you will visit this place while doing "The Walls of Templebrough" quest.
Piercing ShotRanged ability. You can get to the building where the book is located through the roof.
Poisonous Powder TrapRanged ability. The book is inside Odin Mine Hideout. Move the rack blocking the entrance to the side tunnel.
Poisonous Powder TrapRanged ability. The book is located in the basement. You visit this place during the quest "Road to Hamartia".
Rage of HelheimMelee ability. The book is on the upper floor of the archive tower. To get there you must first get rid of the platform with boards blocking the passage. To do this, climb up the scaffolding outside the tower and through the window shoot the pulley on which the platform is hooked.
Raven DistractionRanged ability. The book is located in an underground cave (small side cave) with an entrance in the middle of the Tonnastadir camp. To get there you need a key.
Raven DistractionRanged ability. To get to the room where the book is, you must first destroy the wooden wall on the west side of the church.
Rush & BashMelee ability. You visit this place during "A Triumphant Return" quest. Use an oil jar to unblock the passage to the lower level.
Rush & BashMelee ability. The book is located in one of the buildings on top of the stronghold. To open the door you have to pick up the key from the corpse of one of the guards. You will visit this place during the "Storming Ravensburg" quest.
Thorn of SlumberRanged ability. The book is located in the chapel in the upper part of the fortress. There are no soldiers nearby. To get inside you must have a key.
Throwing Axe FuryMelee ability. This book is best collected during the "King Killer" quest after Ivarr defeats the king. It is in one of the rooms of the castle. You have to blow up a blocked passageway from the adjacent room to get to.
Gear and Weapons
Gear and Weapons that can be found by exploring different locations across England.
 Battle SparthThe chest stands in the middle of the camp. To open it you will need a key that Lucian has.
Blacksmith's HammerThe chest is located on the upper floor of the main building. To open it you need a key.
Brigandine ArmorTorso. Bear-aligned gear. The chest is located on the lower floor of the church but you will get to it if you open the door located on the upper floor.
Brigandine CapeCloak. Bear-aligned gear. The chest is located in an underground cave, which you can get to by passing through a tunnel that starts near the river, to the southwest of the marker. To unlock the entrance to the tunnel, shoot the oil jar that stands on a nearby boat.
Brigandine GauntletsBracers. Bear-aligned gear. The chest is located on the floor of the tavern. To unlock it you will need two keys.
Brigandine HelmHelmet. Bear-aligned gear. The chest is located in a small cave which you can get to by moving the rock blocking the entrance.
Brigandine TrousersPants. Bear-aligned gear. The chest is located in a room located in the cave under the fortress. It is best to get here from the sea side.
Briton ShieldThe chest is located in the basement of the Temple of Mithras. You will visit this place during the "Walls and Shadows" quest.
Drekar ShieldThe chest is in an underground room. Move the rack to reveal a breakable wall. There are oil jugs in the arena you can use to blow it up. Once inside smash the pots and crates and move another rack to uncover the passage into the room with the chest.
Fyrd AxeMove the rack, destroy the box and take the key hidden in it. Then climb up, destroy the wooden wall and use the key to unlock the chest.
Fyrd SpearThe chest is located in a flooded side corridor. To get there you should shoot an oil jar to blow up one of the walls.
Galloglach ArmorTorso. Wolf-aligned gear. You can get inside the house by opening the locked door. The key is in the possession of one of the bandits in the camp.
Galloglach CapeCloak. Wolf-aligned gear. The key to the hut with the chest is on the table standing next to the nearby cages.
Galloglach HelmHelmet. Wolf-aligned gear. To get to the room where the chest is you have to blow up the wall.
Galloglach TrousersPants. Wolf-aligned gear. The chest is located in a well-guarded part of the castle. To get there you can open the front door, but you will need a key that one of the elite opponents has. You can also use the alternative entrance from the side of the drawbridge.
Hidden Ones' MaskThe chest is located inside the Londinium Bureau. Check its description to find out how to get here.
Housecarl's AxeThe chest is located in one of the camp buildings. It is locked. One of the soldiers outside has a key you need to open it.
Hrafn GuardThe door to the building is barred from the inside. To unlock them, go over the ropes to the platform at the back of the building and shoot the door lock through a hole in the wall.
Huntsman ArmorTorso. Wolf-aligned gear. The chest is located in one of the buildings on top of the stronghold. You visit this place during the "Storming Ravensburg" quest.
Huntsman HelmHelmet. Wolf-aligned gear. The chest is located in an underground cave with an entrance in the middle of the Tonnastadir camp. To get there you need a key.
Huntsman VambracesBracers. Wolf-aligned gear. You can get to the cave where the chest is, through an underwater tunnel or you will be moved here during the "Skal to Your Wealth" world event.
Iron-CloudThe chest is located in a building which you will need a key to get to. The key lies on a barrel standing next to the neighboring house.
Magister's CloakCloak. Raven-aligned gear. You will visit this place during "The Measure of a Norseman" quest. The chest is located in one of the tents. You will need a key to open it.
Magister's MaskHelmet. Raven-aligned gear. The chest is located in the church. You visit this place during the "Raising Iron" quest.
Magister's RobesTorso. Raven-aligned gear. To get to the building where the chest is located you have to blow up the rocks blocking the door. You will find an oil jar in the nearby building which you can get to by moving the rack.
Magister's TrousersPants. Raven-aligned gear. The chest is located on the upper floor of the church. To enter the church you have to break one of the windows on the middle floor.
Magister's VambracesBracers. Raven-aligned gear. The chest is located on the upper floor of the church tower. To get there you need a key that lies on a bench on the south side of the church.
Mentor's CloakCloak. Raven-aligned gear. The chest is located in a small round hut. A warrior who is also in this hut has the key needed to unlock it.
Mentor's MaskHelmet. Raven-aligned gear. The chest stands in a small hut right next to the camp fence. Using the breach in the palisade you should be able to get to it very easily.
Mentor's RobesTorso. Raven-aligned gear. You can get inside the church through the window in the tower. For this to be possible you must first shoot down the platform with boards.
Mentor's TrousersPants. Raven-aligned gear. The chest is located inside a barred room in one of the buildings in the garrison. To enter it, you must first shoot the lock through a small window. You visit this building during "The Reeve of Wincestre" quest.
Mentor's VambraceBracers. Raven-aligned gear. To reach the chest you must pass through the underground. It's best to kill the enemy guarding the entrance, take his key and enter normally through the door. Alternatively, you can go down via the shaft.
Oaken Kite ShieldThe chest is located in one of the houses in the village and to get to it you must destroy the stone wall. Oil jars can be found in another building in the village, which you can get to through a window.
Sagittarius BowThe chest is located in the underground.The entrance to the underground is at the bottom of the Multangular Tower located south of the marker.
Sarcophagus ShieldThe chest is located in a small cave which can be accessed by passing through a gap near one of the prisoner cages at the bottom of the quarry and then passing through a flooded tunnel.
Sepulcher AxeThe chest is located in the room where Burgred was hiding. You will be able to get here during quest "Tilting the Balance" or later.
Shishi GuardYou will visit this place during "The Saga Stone" quest. The chest is at the ground floor of the main building.
Skadi's WrathThe chest is located in the basement of the church. How to get there is explained in the description of the "Rumors of Ledecestre" quest.
Soldier's FlailYou can get to the chest by climbing over the beams supporting the roof or through the hole in the wall, but in this case you must first shoot the pulley on which the net that covers this passage is hanging.
Spartan ShieldThe chest is located in the span of the bridge. To get inside you have to blow up the passage located on the western side of the bridge.
Spinning-DeathThe chest is located in the trade depot. You visit this place during the quest "Pricking the Needle".
The Morrigan's GuardTo get to the room where the chest is you have to blow up the wall. You will find the jar of oil at the top of the hill.
Thegn's BracersBracers. Bear-aligned gear. The chest is located inside one of the buildings in the upper part of the stronghold.
Thegn's BreechesPants. Bear-aligned gear. To get to the cave where the chest is located you must have a key. To get it you must kill one of the opponents that are nearby.
Thegn's CloakCloak. Bear-aligned gear. The chest is located in one of the rooms on the upper level of the residence. In order to get to the room where it is located, you must first reach the room where the Wincestre Bishopric Hoard Map is. Then move the rack and expose the hole behind it.
Thegn's Great HelmHelmet. Bear-aligned gear. To get to the room where the crate is just break the window and climb up the wall. However, the chest is locked and it is locked with three keys.
Thegn's Heavy TunicTorso. Bear-aligned gear. The chest is located in an underwater tunnel. You can use one of two entrances.
Thor's HelmetTo get to the room where the helmet is located you have to beat all of Daughters of Lerion. One of the entrances to the underground is located in the ruins north of the marker.
Battle SparthThe chest stands in the middle of the camp. To open it you will need a key that Lucian has.
Blacksmith's HammerThe chest is located on the upper floor of the main building. To open it you need a key.
Brigandine ArmorTorso. Bear-aligned gear. The chest is located on the lower floor of the church but you will get to it if you open the door located on the upper floor.
Brigandine CapeCloak. Bear-aligned gear. The chest is located in an underground cave, which you can get to by passing through a tunnel that starts near the river, to the southwest of the marker. To unlock the entrance to the tunnel, shoot the oil jar that stands on a nearby boat.
Brigandine GauntletsBracers. Bear-aligned gear. The chest is located on the floor of the tavern. To unlock it you will need two keys.
Brigandine HelmHelmet. Bear-aligned gear. The chest is located in a small cave which you can get to by moving the rock blocking the entrance.
Brigandine TrousersPants. Bear-aligned gear. The chest is located in a room located in the cave under the fortress. It is best to get here from the sea side.
Briton ShieldThe chest is located in the basement of the Temple of Mithras. You will visit this place during the "Walls and Shadows" quest.
Drekar ShieldThe chest is in an underground room. Move the rack to reveal a breakable wall. There are oil jugs in the arena you can use to blow it up. Once inside smash the pots and crates and move another rack to uncover the passage into the room with the chest.
Fyrd AxeMove the rack, destroy the box and take the key hidden in it. Then climb up, destroy the wooden wall and use the key to unlock the chest.
Fyrd SpearThe chest is located in a flooded side corridor. To get there you should shoot an oil jar to blow up one of the walls.
Galloglach ArmorTorso. Wolf-aligned gear. You can get inside the house by opening the locked door. The key is in the possession of one of the bandits in the camp.
Galloglach CapeCloak. Wolf-aligned gear. The key to the hut with the chest is on the table standing next to the nearby cages.
Galloglach HelmHelmet. Wolf-aligned gear. To get to the room where the chest is you have to blow up the wall.
Galloglach TrousersPants. Wolf-aligned gear. The chest is located in a well-guarded part of the castle. To get there you can open the front door, but you will need a key that one of the elite opponents has. You can also use the alternative entrance from the side of the drawbridge.
Hidden Ones' MaskThe chest is located inside the Londinium Bureau. Check its description to find out how to get here.
Housecarl's AxeThe chest is located in one of the camp buildings. It is locked. One of the soldiers outside has a key you need to open it.
Hrafn GuardThe door to the building is barred from the inside. To unlock them, go over the ropes to the platform at the back of the building and shoot the door lock through a hole in the wall.
Huntsman ArmorTorso. Wolf-aligned gear. The chest is located in one of the buildings on top of the stronghold. You visit this place during the "Storming Ravensburg" quest.
Huntsman HelmHelmet. Wolf-aligned gear. The chest is located in an underground cave with an entrance in the middle of the Tonnastadir camp. To get there you need a key.
Huntsman VambracesBracers. Wolf-aligned gear. You can get to the cave where the chest is, through an underwater tunnel or you will be moved here during the "Skal to Your Wealth" world event.
Iron-CloudThe chest is located in a building which you will need a key to get to. The key lies on a barrel standing next to the neighboring house.
Magister's CloakCloak. Raven-aligned gear. You will visit this place during "The Measure of a Norseman" quest. The chest is located in one of the tents. You will need a key to open it.
Magister's MaskHelmet. Raven-aligned gear. The chest is located in the church. You visit this place during the "Raising Iron" quest.
Magister's RobesTorso. Raven-aligned gear. To get to the building where the chest is located you have to blow up the rocks blocking the door. You will find an oil jar in the nearby building which you can get to by moving the rack.
Magister's TrousersPants. Raven-aligned gear. The chest is located on the upper floor of the church. To enter the church you have to break one of the windows on the middle floor.
Magister's VambracesBracers. Raven-aligned gear. The chest is located on the upper floor of the church tower. To get there you need a key that lies on a bench on the south side of the church.
Mentor's CloakCloak. Raven-aligned gear. The chest is located in a small round hut. A warrior who is also in this hut has the key needed to unlock it.
Mentor's MaskHelmet. Raven-aligned gear. The chest stands in a small hut right next to the camp fence. Using the breach in the palisade you should be able to get to it very easily.
Mentor's RobesTorso. Raven-aligned gear. You can get inside the church through the window in the tower. For this to be possible you must first shoot down the platform with boards.
Mentor's TrousersPants. Raven-aligned gear. The chest is located inside a barred room in one of the buildings in the garrison. To enter it, you must first shoot the lock through a small window. You visit this building during "The Reeve of Wincestre" quest.
Mentor's VambraceBracers. Raven-aligned gear. To reach the chest you must pass through the underground. It's best to kill the enemy guarding the entrance, take his key and enter normally through the door. Alternatively, you can go down via the shaft.
Oaken Kite ShieldThe chest is located in one of the houses in the village and to get to it you must destroy the stone wall. Oil jars can be found in another building in the village, which you can get to through a window.
Sagittarius BowThe chest is located in the underground.The entrance to the underground is at the bottom of the Multangular Tower located south of the marker.
Sarcophagus ShieldThe chest is located in a small cave which can be accessed by passing through a gap near one of the prisoner cages at the bottom of the quarry and then passing through a flooded tunnel.
Sepulcher AxeThe chest is located in the room where Burgred was hiding. You will be able to get here during quest "Tilting the Balance" or later.
Shishi GuardYou will visit this place during "The Saga Stone" quest. The chest is at the ground floor of the main building.
Skadi's WrathThe chest is located in the basement of the church. How to get there is explained in the description of the "Rumors of Ledecestre" quest.
Soldier's FlailYou can get to the chest by climbing over the beams supporting the roof or through the hole in the wall, but in this case you must first shoot the pulley on which the net that covers this passage is hanging.
Spartan ShieldThe chest is located in the span of the bridge. To get inside you have to blow up the passage located on the western side of the bridge.
Spinning-DeathThe chest is located in the trade depot. You visit this place during the quest "Pricking the Needle".
The Morrigan's GuardTo get to the room where the chest is you have to blow up the wall. You will find the jar of oil at the top of the hill.
Thegn's BracersBracers. Bear-aligned gear. The chest is located inside one of the buildings in the upper part of the stronghold.
Thegn's BreechesPants. Bear-aligned gear. To get to the cave where the chest is located you must have a key. To get it you must kill one of the opponents that are nearby.
Thegn's CloakCloak. Bear-aligned gear. The chest is located in one of the rooms on the upper level of the residence. In order to get to the room where it is located, you must first reach the room where the Wincestre Bishopric Hoard Map is. Then move the rack and expose the hole behind it.
Thegn's Great HelmHelmet. Bear-aligned gear. To get to the room where the crate is just break the window and climb up the wall. However, the chest is locked and it is locked with three keys.
Thegn's Heavy TunicTorso. Bear-aligned gear. The chest is located in an underwater tunnel. You can use one of two entrances.
Thor's HelmetTo get to the room where the helmet is located you have to beat all of Daughters of Lerion. One of the entrances to the underground is located in the ruins north of the marker.
Carbon Ingots
You can use Carbon Ingots to enhance the quality of your Gear and Weapons at the settlement's blacksmith from Fine to Superior. The carbon ingots count as WEALTH.
 Grantebridgescire Ingot #1Kill the Cutthroat and loot his corpse.
Grantebridgescire Ingot #3Kill the Brandisher and loot his corpse. He also has a key to the "Housecarl's Axe" gear chest.
Grantebridgescire Ingot #4Kill the Hurler and loot her corpse.
Grantebridgescire Ingot #5Kill the Pikeman and loot his corpse. You will visit this village during the "Razing Earnningstone" quest.
Grantebridgescire Ingot #6The chest is inside the house.
Grantebridgescire Ingot #7Kill the Yeoman and loot his corpse.
Ledecestrescire Ingot #1Kill the Goliath and loot his corpse.
Ledecestrescire Ingot #2Kill the Arbalist and loot his corpse.
Ledecestrescire Ingot #3Kill the Pikeman and loot his corpse.
Ledecestrescire Ingot #4The chest is located on top of the fortress.
Ledecestrescire Ingot #5Kill the Murderer and loot his corpse.
Ledecestrescire Ingot #6Kill the Goliath and loot his corpse.
Ledecestrescire Ingot #7Kill the Yeoman and loot his corpse.
Ledecestrescire Ingot #8Kill the Skirmisher and loot his corpse.
Ledecestrescire Ingot #9To get to the room where the chest is located you have to make a hole in the ground by shooting a pulley on which a large rock block is attached.
Ledecestrescire Ingot #10The chest is located in a tent in the enemy camp.
Ledecestrescire Ingot #12Kill the Murderer and loot his corpse.
Grantebridgescire Ingot #1Kill the Cutthroat and loot his corpse.
Grantebridgescire Ingot #3Kill the Brandisher and loot his corpse. He also has a key to the "Housecarl's Axe" gear chest.
Grantebridgescire Ingot #4Kill the Hurler and loot her corpse.
Grantebridgescire Ingot #5Kill the Pikeman and loot his corpse. You will visit this village during the "Razing Earnningstone" quest.
Grantebridgescire Ingot #6The chest is inside the house.
Grantebridgescire Ingot #7Kill the Yeoman and loot his corpse.
Ledecestrescire Ingot #1Kill the Goliath and loot his corpse.
Ledecestrescire Ingot #2Kill the Arbalist and loot his corpse.
Ledecestrescire Ingot #3Kill the Pikeman and loot his corpse.
Ledecestrescire Ingot #4The chest is located on top of the fortress.
Ledecestrescire Ingot #5Kill the Murderer and loot his corpse.
Ledecestrescire Ingot #6Kill the Goliath and loot his corpse.
Ledecestrescire Ingot #7Kill the Yeoman and loot his corpse.
Ledecestrescire Ingot #8Kill the Skirmisher and loot his corpse.
Ledecestrescire Ingot #9To get to the room where the chest is located you have to make a hole in the ground by shooting a pulley on which a large rock block is attached.
Ledecestrescire Ingot #10The chest is located in a tent in the enemy camp.
Ledecestrescire Ingot #12Kill the Murderer and loot his corpse.
Nickel Ingots
You can use Nickel Ingots to enhance the quality of your Gear and Weapons at the settlement's blacksmith from Superior to Flawless. The nickel ingots count as WEALTH.
 Cent Ingot #1The chest is located in the span of the bridge. You will get there through a crack in the wall from the east side.
Cent Ingot #2Kill the Madman and take the ingot from his corpse. You will find him in the same room as the "Dive of the Valkyries" book.
Cent Ingot #3The chest is located in a small cave, the entrance to which is located in a cave that is a hideout of bandits. The front entrance to the main cave is guarded but you can also enter through a tunnel whose entrance is located north of the marker. While in the main cave, find a path down.
Cent Ingot #4The chest is located inside the chapel. To get inside you have to destroy the boards covering the gap in one of the walls. To open the chest you need a key.
Cent Ingot #5The chest is located at the top floor of the church tower. To get there you have to lower the ladder. To open the chest you will need two keys.
Cent Ingot #6The chest is located in the room you need to get to while playing "The Man Behind the Man" quest. See the description of this quest to learn how to get there.
Cent Ingot #7The chest is on a wagon in the camp. It is secured and the key is in the possession of one of the soldiers.
Cent Ingot #8The chest is located in the church. In order not to have to use the main entrance next to which the soldiers stand you can enter through the roof and kill the soldiers in the church by dropping a chandelier on them.
Cent Ingot #9The chest is located in the basement of the theater. First get to the room where the roman artifact - Cent #2, is located. Then, in one of the side rooms, move the rack that covers the passage to the room where the chest is located.
Cent Ingot #10The chest is located in a building which you have to blow up the passage to enter. The chest is locked with a key that is held by a soldier, which is in the same room as the chest.
Cent Ingot #11The chest is located inside Cavern of Trials. The entrance to the room is at the bottom of the cave where you will find the first fireweed, but to get there you will need keys that can be found in other caves. Check the "Cavern of Trials" description to find out how to get there.
Cent Ingot #12The chest is located in a boat wreck lying on the bottom of the sea. The key needed to unlock it can be found in the wreck of another boat.
Cent Ingot #13The chest is located on the first floor of the tower standing in the central part of the fortress.
Cent Ingot #14Kill the Skirmisher and loot his corpse.
East Anglia Ingot #1The chest is located in the basement of one of the buildings. The door is barred from the inside but you can simply destroy it. To open the door that is in the basement you will need a key.
East Anglia Ingot #2Kill the Hell-Raiser and loot his corpse.
East Anglia Ingot #4The chest is located in the building next to the church. To enter it you will need a key.
East Anglia Ingot #5The chest is located in one of the castle buildings. It is best to take its contents after completing "A Fury from the Sea" quest.
East Anglia Ingot #6Kill the Woe-Bringer and loot his corpse. You must do this during "A Triumphant Return" quest.
Essexe Ingot #1The box in is one of the houses in the camp. To enter it you will need a key which you will find in a nearby house.
Essexe Ingot #2Kill the Marksman and loot his corpse.
Essexe Ingot #3Kill the Marksman and loot his corpse.
Essexe Ingot #4The chest is located at the bottom of the tower and is locked. You can get inside the tower through the door at the top of it, but first you must destroy the lock by shooting at it through the small window on the other side.
Essexe Ingot #5To unlock the door to the house, you need to climb the post on the other side and shoot the lock through the small hole below the roof.
Essexe Ingot #6Kill the Hurler and loot his corpse. He also has the key you need to open the house where the other ingot is.
Essexe Ingot #7The chest is located inside one of the houses. To get inside you will need a key which one of the enemies who also has another ingot has.
Essexe Ingot #8The chest is in the Camulodunum Bureau. After getting the key from the central room, you will be able to swim to the side corridor and open the door located there.
Essexe Ingot #9The chest is located in one of the buildings in the camp, to get inside you will need a key.
Essexe Ingot #10The chest is located inside the tomb. An oil jar needed to blow up the wall blocking the passage can be found near the entrance.
Essexe Ingot #11The chest is located inside the tower. To get inside, you must swim through the underwater tunnel. The beginning of the tunnel is in the place marked on the picture below.
Essexe Ingot #12The chest is located inside the building. To get inside you must shoot down the doorblock through the window. You can get the key required to open the chest by killing a nearby soldier who also has another ingot.
Essexe Ingot #13Kill the Standard Bearer and loot his corpse. He also has the key needed to open another chest located in a nearby building.
Lincolnscire Ingot #1The chest is located inside the house. The key to the door lies on the bench right next to it.
Lincolnscire Ingot #2Kill the Yeoman and loot her corpse.
Lincolnscire Ingot #3The chest is located on the lower level of the Old Lincoln Sewers.
Lincolnscire Ingot #4Kill the Gedriht and loot her corpse. You visit this place during the "In the Absence of an Ealdorman" quest.
Lincolnscire Ingot #5The chest is located in one of the buildings in the camp. To get to the room with chest you need to move the rack blocking the entrance. The key needed to open the chest is held by one of the soldiers, an Arbalist guarding the walls.
Lincolnscire Ingot #6The chest is inside a small shack that is locked. You will find the key at the bottom of a nearby pond.
Lincolnscire Ingot #7The chest is locked and you will find it inside the largest round hut in the camp. The key is held by the Murderer who you will find in the camp.
Lunden Ingot #1The chest is in a small pit full of vipers. It's locked. You can loot the key from a corpse of one of the guards in the area.
Lunden Ingot #2Kill the Goliath and take the key from his corpse. Dive, destroy the wooden barrier, enter the flooded tunnel and take the contents of the chest.
Lunden Ingot #3The chest is located in the tunnel leading to the Londinium Bureau. Check its description to find out how to get here. Dive into the place shown in the picture and take the contents of the chest.
Lunden Ingot #4Get to the room above the wealth icon and shoot the hook to drop the block of concrete. Get down and loot the chest. Beware, there is also a panther in the room with the chest.
Oxenefordscire Ingot #1The chest is located in the hut. The door is barred but you can get inside through a hole in the rear wall.
Oxenefordscire Ingot #2The chest is located in the basement of one of the houses. The house is locked and you need a key that you will find near another of the houses in the village.
Oxenefordscire Ingot #3First you have to get to the room where the Feign Death book is located. To unlock the door to the room where the chest is located you have to use a bow and by shooting through the window destroy the lock.
Oxenefordscire Ingot #4Kill the Skirmisher and loot his corpse.
Oxenefordscire Ingot #5The chest is located inside the house and the key to it lies on a barrel standing in a red tent.
Oxenefordscire Ingot #6Kill the Cutthroat and loot his corpse.
Oxenefordscire Ingot #7The chest is located in the basement of the main part of the ruins. It can be accessed through a gap in the wall. You need two keys to unlock it.
Oxenefordscire Ingot #9The chest is located in the main building, in one of the rooms where you can get to as long as you have a key.
Sciropescire Ingot #1The chest is in the central building of the settlement and you will need a key to open it.
Sciropescire Ingot #2The chest is in the cave. The entrance to the cave is situated near the small pond south of the marker.
Sciropescire Ingot #3Kill the Skirmisher and loot his corpse.
Sciropescire Ingot #4The chest is located in a small room, the entrance to which is located behind the rack that needs to be moved. You will have to get rid of two bears that are nearby.
Sciropescire Ingot #5The chest is located in a small cave at the bottom of the quarry, next to one of the prisoner cages. To get access to it you have to blow up the rocks blocking access.
Sciropescire Ingot #6The chest is located at the bottom of the quarry. To get access to it you have to blow up the rocks blocking access.
Suthsexe Ingot #1The chest is located inside a hut which you can easily enter, but you will need a key to unlock it. You will find the key when you do "A Prayer for Vengeance" world event which is located to the east.
Suthsexe Ingot #2The chest is located inside the tower standing in the docks. Tower can be accessed through a hole on its top.
Suthsexe Ingot #3The chest is located in a small cave, the entrance to which is at the bottom of the pit next to The Cistern Tower. To get there you must blow up the stone wall blocking access. The easiest way to do it is to use the Incendiary Powder Trap, but if you don't have this ability yet, you will find the oil jar near the other exit and you will have to carry it here by jumping over crates, logs, etc.
Suthsexe Ingot #4The chest stands on a platform on a tree. Lower the ladder, shoot down the platform with the boards, which is blocking the path and then move the rack so you can climb up and reach the ladder.
Suthsexe Ingot #5Kill the Goliath and loot his corpse.
Suthsexe Ingot #6Kill the Banneret and loot his corpse.
Suthsexe Ingot #7Kill the Gedriht and loot his corpse.
Suthsexe Ingot #8The chest is located in the basement of the warehouse and you will need a key to open it. You will find the key attached to a corpse that is hanging on a tree in front of the warehouse.
Suthsexe Ingot #9Ingot is located in the undergrounds. It is possessed by the Goliath, who you will find in the largest room. To enter the undergrounds, use the path described for Mentor's Vambrace.
Cent Ingot #1The chest is located in the span of the bridge. You will get there through a crack in the wall from the east side.
Cent Ingot #2Kill the Madman and take the ingot from his corpse. You will find him in the same room as the "Dive of the Valkyries" book.
Cent Ingot #3The chest is located in a small cave, the entrance to which is located in a cave that is a hideout of bandits. The front entrance to the main cave is guarded but you can also enter through a tunnel whose entrance is located north of the marker. While in the main cave, find a path down.
Cent Ingot #4The chest is located inside the chapel. To get inside you have to destroy the boards covering the gap in one of the walls. To open the chest you need a key.
Cent Ingot #5The chest is located at the top floor of the church tower. To get there you have to lower the ladder. To open the chest you will need two keys.
Cent Ingot #6The chest is located in the room you need to get to while playing "The Man Behind the Man" quest. See the description of this quest to learn how to get there.
Cent Ingot #7The chest is on a wagon in the camp. It is secured and the key is in the possession of one of the soldiers.
Cent Ingot #8The chest is located in the church. In order not to have to use the main entrance next to which the soldiers stand you can enter through the roof and kill the soldiers in the church by dropping a chandelier on them.
Cent Ingot #9The chest is located in the basement of the theater. First get to the room where the roman artifact - Cent #2, is located. Then, in one of the side rooms, move the rack that covers the passage to the room where the chest is located.
Cent Ingot #10The chest is located in a building which you have to blow up the passage to enter. The chest is locked with a key that is held by a soldier, which is in the same room as the chest.
Cent Ingot #11The chest is located inside Cavern of Trials. The entrance to the room is at the bottom of the cave where you will find the first fireweed, but to get there you will need keys that can be found in other caves. Check the "Cavern of Trials" description to find out how to get there.
Cent Ingot #12The chest is located in a boat wreck lying on the bottom of the sea. The key needed to unlock it can be found in the wreck of another boat.
Cent Ingot #13The chest is located on the first floor of the tower standing in the central part of the fortress.
Cent Ingot #14Kill the Skirmisher and loot his corpse.
East Anglia Ingot #1The chest is located in the basement of one of the buildings. The door is barred from the inside but you can simply destroy it. To open the door that is in the basement you will need a key.
East Anglia Ingot #2Kill the Hell-Raiser and loot his corpse.
East Anglia Ingot #4The chest is located in the building next to the church. To enter it you will need a key.
East Anglia Ingot #5The chest is located in one of the castle buildings. It is best to take its contents after completing "A Fury from the Sea" quest.
East Anglia Ingot #6Kill the Woe-Bringer and loot his corpse. You must do this during "A Triumphant Return" quest.
Essexe Ingot #1The box in is one of the houses in the camp. To enter it you will need a key which you will find in a nearby house.
Essexe Ingot #2Kill the Marksman and loot his corpse.
Essexe Ingot #3Kill the Marksman and loot his corpse.
Essexe Ingot #4The chest is located at the bottom of the tower and is locked. You can get inside the tower through the door at the top of it, but first you must destroy the lock by shooting at it through the small window on the other side.
Essexe Ingot #5To unlock the door to the house, you need to climb the post on the other side and shoot the lock through the small hole below the roof.
Essexe Ingot #6Kill the Hurler and loot his corpse. He also has the key you need to open the house where the other ingot is.
Essexe Ingot #7The chest is located inside one of the houses. To get inside you will need a key which one of the enemies who also has another ingot has.
Essexe Ingot #8The chest is in the Camulodunum Bureau. After getting the key from the central room, you will be able to swim to the side corridor and open the door located there.
Essexe Ingot #9The chest is located in one of the buildings in the camp, to get inside you will need a key.
Essexe Ingot #10The chest is located inside the tomb. An oil jar needed to blow up the wall blocking the passage can be found near the entrance.
Essexe Ingot #11The chest is located inside the tower. To get inside, you must swim through the underwater tunnel. The beginning of the tunnel is in the place marked on the picture below.
Essexe Ingot #12The chest is located inside the building. To get inside you must shoot down the doorblock through the window. You can get the key required to open the chest by killing a nearby soldier who also has another ingot.
Essexe Ingot #13Kill the Standard Bearer and loot his corpse. He also has the key needed to open another chest located in a nearby building.
Lincolnscire Ingot #1The chest is located inside the house. The key to the door lies on the bench right next to it.
Lincolnscire Ingot #2Kill the Yeoman and loot her corpse.
Lincolnscire Ingot #3The chest is located on the lower level of the Old Lincoln Sewers.
Lincolnscire Ingot #4Kill the Gedriht and loot her corpse. You visit this place during the "In the Absence of an Ealdorman" quest.
Lincolnscire Ingot #5The chest is located in one of the buildings in the camp. To get to the room with chest you need to move the rack blocking the entrance. The key needed to open the chest is held by one of the soldiers, an Arbalist guarding the walls.
Lincolnscire Ingot #6The chest is inside a small shack that is locked. You will find the key at the bottom of a nearby pond.
Lincolnscire Ingot #7The chest is locked and you will find it inside the largest round hut in the camp. The key is held by the Murderer who you will find in the camp.
Lunden Ingot #1The chest is in a small pit full of vipers. It's locked. You can loot the key from a corpse of one of the guards in the area.
Lunden Ingot #2Kill the Goliath and take the key from his corpse. Dive, destroy the wooden barrier, enter the flooded tunnel and take the contents of the chest.
Lunden Ingot #3The chest is located in the tunnel leading to the Londinium Bureau. Check its description to find out how to get here. Dive into the place shown in the picture and take the contents of the chest.
Lunden Ingot #4Get to the room above the wealth icon and shoot the hook to drop the block of concrete. Get down and loot the chest. Beware, there is also a panther in the room with the chest.
Oxenefordscire Ingot #1The chest is located in the hut. The door is barred but you can get inside through a hole in the rear wall.
Oxenefordscire Ingot #2The chest is located in the basement of one of the houses. The house is locked and you need a key that you will find near another of the houses in the village.
Oxenefordscire Ingot #3First you have to get to the room where the Feign Death book is located. To unlock the door to the room where the chest is located you have to use a bow and by shooting through the window destroy the lock.
Oxenefordscire Ingot #4Kill the Skirmisher and loot his corpse.
Oxenefordscire Ingot #5The chest is located inside the house and the key to it lies on a barrel standing in a red tent.
Oxenefordscire Ingot #6Kill the Cutthroat and loot his corpse.
Oxenefordscire Ingot #7The chest is located in the basement of the main part of the ruins. It can be accessed through a gap in the wall. You need two keys to unlock it.
Oxenefordscire Ingot #9The chest is located in the main building, in one of the rooms where you can get to as long as you have a key.
Sciropescire Ingot #1The chest is in the central building of the settlement and you will need a key to open it.
Sciropescire Ingot #2The chest is in the cave. The entrance to the cave is situated near the small pond south of the marker.
Sciropescire Ingot #3Kill the Skirmisher and loot his corpse.
Sciropescire Ingot #4The chest is located in a small room, the entrance to which is located behind the rack that needs to be moved. You will have to get rid of two bears that are nearby.
Sciropescire Ingot #5The chest is located in a small cave at the bottom of the quarry, next to one of the prisoner cages. To get access to it you have to blow up the rocks blocking access.
Sciropescire Ingot #6The chest is located at the bottom of the quarry. To get access to it you have to blow up the rocks blocking access.
Suthsexe Ingot #1The chest is located inside a hut which you can easily enter, but you will need a key to unlock it. You will find the key when you do "A Prayer for Vengeance" world event which is located to the east.
Suthsexe Ingot #2The chest is located inside the tower standing in the docks. Tower can be accessed through a hole on its top.
Suthsexe Ingot #3The chest is located in a small cave, the entrance to which is at the bottom of the pit next to The Cistern Tower. To get there you must blow up the stone wall blocking access. The easiest way to do it is to use the Incendiary Powder Trap, but if you don't have this ability yet, you will find the oil jar near the other exit and you will have to carry it here by jumping over crates, logs, etc.
Suthsexe Ingot #4The chest stands on a platform on a tree. Lower the ladder, shoot down the platform with the boards, which is blocking the path and then move the rack so you can climb up and reach the ladder.
Suthsexe Ingot #5Kill the Goliath and loot his corpse.
Suthsexe Ingot #6Kill the Banneret and loot his corpse.
Suthsexe Ingot #7Kill the Gedriht and loot his corpse.
Suthsexe Ingot #8The chest is located in the basement of the warehouse and you will need a key to open it. You will find the key attached to a corpse that is hanging on a tree in front of the warehouse.
Suthsexe Ingot #9Ingot is located in the undergrounds. It is possessed by the Goliath, who you will find in the largest room. To enter the undergrounds, use the path described for Mentor's Vambrace.
Tungsten Ingots
You can use Tungsten Ingots to enhance the quality of your Gear and Weapons at the settlement's blacksmith from Flawless to Mythical. The nickel ingots count as WEALTH.
 Eurvicscire Ingot #2Kill the Man at Arms and loot her corpse. It's best to do this before you complete the "Honor Has Two Edges" quest because it can get bugged.
Note: This ingot has been moved to another location! See full description for more information.
Eurvicscire Ingot #3Kill the Brigand and loot his corpse.
Eurvicscire Ingot #4The chest is located under the boards that you must destroy and is locked. One of the soldiers in the area has the key to open it.
Eurvicscire Ingot #5Kill the Man at Arms and loot his corpse.
Eurvicscire Ingot #6The crate is located under one of the buildings in the village. To get inside you must destroy the stones blocking the entrance. You can do it by setting fire to the silo standing next to it.
Eurvicscire Ingot #8The chest is located on the upper floor of the building which can be accessed through a small opening just under the roof.
Eurvicscire Ingot #9The house can be accessed through a hole in the wall on the water side.
Eurvicscire Ingot #10Kill the Dead Eye and loot his corpse.
Glowecestrescire Ingot #1Kill the Goliath and loot his corpse.
Glowecestrescire Ingot #3The chest is located under the floor in one of the tents. The key needed to open it lies on a table next to another tent.
Glowecestrescire Ingot #4The chest is located in the dugout. To get to it you must destroy the vases and move the rack.
Glowecestrescire Ingot #5You can grap this ingot on your way to Temple of Ceres Bureau. To get to the chest you must blow up the stone wall in the large gas-filled room. You can find the oil jars in the adjacent room.
Glowecestrescire Ingot #6To get to the chest, you have to blow up the stone wall. You can find the explosives next to a cart standing on a hill southwest of the chest location.
Glowecestrescire Ingot #7The chest is located in a small chapel. To get inside, destroy the crates and move the rack covering the window. Break the glass and through the window shoot the red jar standing inside. The explosion will destroy the window on the other side and the rocks covering it, allowing you to get inside that way.
Glowecestrescire Ingot #9The chest is at the bottom of the pond, in its part surrounded by a palisade. To get to it, you must jump from a branch of a nearby tree.
Hamtunscire Ingot #1The chest is located on the upper floor of one of the buildings. At first, you need to climb up the side wall and shoot the lock on the door through the hole near the roof.
Hamtunscire Ingot #2To get inside the house you must unlock the door. You can do this by shooting at the door lock through the hole near the roof.
Hamtunscire Ingot #3Kill the Banneret and loot his corpse.
Hamtunscire Ingot #4The chest is located in the dugout in the middle of the camp and the key needed to open it is held by the Man at Arms.
Hamtunscire Ingot #5The chest is located in one of the buildings and you will need two keys to unlock it.
Hamtunscire Ingot #6The chest is located in the room below the ruins. The door is barred from inside and to unblock it you must first get to the room where the Hamtunscire Hoard Map is.
Hamtunscire Ingot #7Kill the Gedriht and loot his corpse. You visit this place during the "Kingdom's End" quest.
Hamtunscire Ingot #8The entrance to the room where the chest is located is blocked by a pile of stones.
Hamtunscire Ingot #9Kill the Goliath and loot his corpse.
Hamtunscire Ingot #10The chest is located in the lower room of the ruined tower and you can get there through the hole in its ceiling. You must also get the key that the Goliath has.
Jorvik Ingot #1To get to the room with the chest you have to go underground. Entrance is in Multangular Tower located a little to the south of the marker, it's the same way as you do with the Sagittarius Bow. Blow up the wall with two guards next to it and in the next corridor, turn into a side room. You will need to move a rack.
Jorvik Ingot #2You will find the chest in the church, near the altar.
Jorvik Ingot #3You can get to the house where the chest is located through a window on the river side. You will need three keys to open it. You'll need to visit three cursed areas in Eurvicscire for each of the keys.
Jorvik Ingot #5To get to the chest you must first unlock one of the two doors. You can do this by shooting at the door lock through a small window.
Snotinghamscire Ingot #1The chest is inside Odin Mine Hideout. To get to the platform on which the chest is located you have to move the rack, climb on it and jump onto the platform.
Snotinghamscire Ingot #3The chest is located between the double walls of the stone building standing in the middle of the village.
Snotinghamscire Ingot #4The chest is located inside the house and a key is needed to open it. You can get inside the house through the small opening under the roof.
Snotinghamscire Ingot #5The chest is located between the double walls of the round building in the center.
Snotinghamscire Ingot #6Kill the Macbeth and loot his corpse.
Snotinghamscire Ingot #8The chest is located in a room you can access from a small balcony. The key needed to open it drops from one of the enemy soldiers.
Snotinghamscire Ingot #9The chest is located in a cave. The entrance to the cave is slightly south of the Minninglow marker.
Wincestre Ingot #1You can get to the inside of the building where the chest is undetected through the opening under the roof. You just need to destroy the boards that cover it first.
Wincestre Ingot #2To get to the building where the chest is, destroy the wicker window and go inside this way.
Wincestre Ingot #3The chest is located in a military warehouse and is locked with two keys. The first key can be found on top of the building where the chest is located.
Wincestre Ingot #4The chest is located on the upper floor of the tower. You can open the tower door with the key, which lies literally three steps from the door.
Wincestre Ingot #5To reach the room with the chest, you must enter the seminary through the window located in the upper part of the building - the same one you used for the Wincestre Seminary Hoard Map. Then destroy the boards in the ceiling that cover the opening through which you can enter the upper level.
Eurvicscire Ingot #2Kill the Man at Arms and loot her corpse. It's best to do this before you complete the "Honor Has Two Edges" quest because it can get bugged.
Note: This ingot has been moved to another location! See full description for more information.
Eurvicscire Ingot #3Kill the Brigand and loot his corpse.
Eurvicscire Ingot #4The chest is located under the boards that you must destroy and is locked. One of the soldiers in the area has the key to open it.
Eurvicscire Ingot #5Kill the Man at Arms and loot his corpse.
Eurvicscire Ingot #6The crate is located under one of the buildings in the village. To get inside you must destroy the stones blocking the entrance. You can do it by setting fire to the silo standing next to it.
Eurvicscire Ingot #8The chest is located on the upper floor of the building which can be accessed through a small opening just under the roof.
Eurvicscire Ingot #9The house can be accessed through a hole in the wall on the water side.
Eurvicscire Ingot #10Kill the Dead Eye and loot his corpse.
Glowecestrescire Ingot #1Kill the Goliath and loot his corpse.
Glowecestrescire Ingot #3The chest is located under the floor in one of the tents. The key needed to open it lies on a table next to another tent.
Glowecestrescire Ingot #4The chest is located in the dugout. To get to it you must destroy the vases and move the rack.
Glowecestrescire Ingot #5You can grap this ingot on your way to Temple of Ceres Bureau. To get to the chest you must blow up the stone wall in the large gas-filled room. You can find the oil jars in the adjacent room.
Glowecestrescire Ingot #6To get to the chest, you have to blow up the stone wall. You can find the explosives next to a cart standing on a hill southwest of the chest location.
Glowecestrescire Ingot #7The chest is located in a small chapel. To get inside, destroy the crates and move the rack covering the window. Break the glass and through the window shoot the red jar standing inside. The explosion will destroy the window on the other side and the rocks covering it, allowing you to get inside that way.
Glowecestrescire Ingot #9The chest is at the bottom of the pond, in its part surrounded by a palisade. To get to it, you must jump from a branch of a nearby tree.
Hamtunscire Ingot #1The chest is located on the upper floor of one of the buildings. At first, you need to climb up the side wall and shoot the lock on the door through the hole near the roof.
Hamtunscire Ingot #2To get inside the house you must unlock the door. You can do this by shooting at the door lock through the hole near the roof.
Hamtunscire Ingot #3Kill the Banneret and loot his corpse.
Hamtunscire Ingot #4The chest is located in the dugout in the middle of the camp and the key needed to open it is held by the Man at Arms.
Hamtunscire Ingot #5The chest is located in one of the buildings and you will need two keys to unlock it.
Hamtunscire Ingot #6The chest is located in the room below the ruins. The door is barred from inside and to unblock it you must first get to the room where the Hamtunscire Hoard Map is.
Hamtunscire Ingot #7Kill the Gedriht and loot his corpse. You visit this place during the "Kingdom's End" quest.
Hamtunscire Ingot #8The entrance to the room where the chest is located is blocked by a pile of stones.
Hamtunscire Ingot #9Kill the Goliath and loot his corpse.
Hamtunscire Ingot #10The chest is located in the lower room of the ruined tower and you can get there through the hole in its ceiling. You must also get the key that the Goliath has.
Jorvik Ingot #1To get to the room with the chest you have to go underground. Entrance is in Multangular Tower located a little to the south of the marker, it's the same way as you do with the Sagittarius Bow. Blow up the wall with two guards next to it and in the next corridor, turn into a side room. You will need to move a rack.
Jorvik Ingot #2You will find the chest in the church, near the altar.
Jorvik Ingot #3You can get to the house where the chest is located through a window on the river side. You will need three keys to open it. You'll need to visit three cursed areas in Eurvicscire for each of the keys.
Jorvik Ingot #5To get to the chest you must first unlock one of the two doors. You can do this by shooting at the door lock through a small window.
Snotinghamscire Ingot #1The chest is inside Odin Mine Hideout. To get to the platform on which the chest is located you have to move the rack, climb on it and jump onto the platform.
Snotinghamscire Ingot #3The chest is located between the double walls of the stone building standing in the middle of the village.
Snotinghamscire Ingot #4The chest is located inside the house and a key is needed to open it. You can get inside the house through the small opening under the roof.
Snotinghamscire Ingot #5The chest is located between the double walls of the round building in the center.
Snotinghamscire Ingot #6Kill the Macbeth and loot his corpse.
Snotinghamscire Ingot #8The chest is located in a room you can access from a small balcony. The key needed to open it drops from one of the enemy soldiers.
Snotinghamscire Ingot #9The chest is located in a cave. The entrance to the cave is slightly south of the Minninglow marker.
Wincestre Ingot #1You can get to the inside of the building where the chest is undetected through the opening under the roof. You just need to destroy the boards that cover it first.
Wincestre Ingot #2To get to the building where the chest is, destroy the wicker window and go inside this way.
Wincestre Ingot #3The chest is located in a military warehouse and is locked with two keys. The first key can be found on top of the building where the chest is located.
Wincestre Ingot #4The chest is located on the upper floor of the tower. You can open the tower door with the key, which lies literally three steps from the door.
Wincestre Ingot #5To reach the room with the chest, you must enter the seminary through the window located in the upper part of the building - the same one you used for the Wincestre Seminary Hoard Map. Then destroy the boards in the ceiling that cover the opening through which you can enter the upper level.
Lost Drengr
Lost Drengr are human boss enemies. They are powerful vikings that want to duel you. Speak to them and then fight them. Lost Drengr count as MYSTERIES. After killing them all, you will receive the quest "The Lost Drengir of Ragnar Lothbrok".
 Gotafrid Fair-RobesPower: 310.
Nokkfylla Shine-EyePower: 280.
Skegjold Frenzy-SeekerPower: 310. The duel will begin when you drink from the cauldron standing nearby.
Thor The Fish MongerPower: 160.
Gotafrid Fair-RobesPower: 310.
Nokkfylla Shine-EyePower: 280.
Skegjold Frenzy-SeekerPower: 310. The duel will begin when you drink from the cauldron standing nearby.
Thor The Fish MongerPower: 160.
Legendary Animals
While roaming the world, you can encounter Legendary Animals.They are bigger, stronger, and far more dangerous than any other animals. After defeating them, you will get rare trophies. Return these trophies to the Hunter in your settlement and you will receive rewards. Legendary Animals count as MYSTERIES.
 Aelfred's Battle-SowPower: 250.
Beast of the HillsPower: 190. The animal is in the cave. Entrance is east of the marker (Uriconium Ruins).
Black ShuckPower: 160.
Gemad-WulfPower: 220.
The Blood SwinePower: 310.
The Corpse FeedersPower: 160.
Wildcats of the WealdPower: 340.
Aelfred's Battle-SowPower: 250.
Beast of the HillsPower: 190. The animal is in the cave. Entrance is east of the marker (Uriconium Ruins).
Black ShuckPower: 160.
Gemad-WulfPower: 220.
The Blood SwinePower: 310.
The Corpse FeedersPower: 160.
Wildcats of the WealdPower: 340.
World Events
World Events are some kind of side quests that can be found in Assassin's Creed: Valhalla. They are usually short, do not have log entries, and you will receive experience points for their completion.
 A Blood Hymn for EdmundSpeak to the nun standing near the altar. After a short talk she will attack you. Take her down and then speak to her to complete this short event.
A Cordial InvitationTalk to the man named Ryce who you find near the bridge, and who was the only survivor of the ambush. After a moment you will be attacked by three Pict warriors.
A Dog's RescueTalk to the woman you find near the burning house. She will ask you to save her dog. Destroy one of the weakened walls and enter the burning house through a hole.
A Prayer for VengeanceWhen you get here you will find a tomb whose entrance is blocked by a rack. To move the rack you must first go to the other side of the hill and through the small window shoot the crate that hinders you from doing so.
A Skald's LamentTalk to a man who appears to be less than reasonable. When he starts running, run after him and help him kill all opponents he attacks.
Aelfred's JewelTalk to the man knocking on the door of the house to find out what is going on. Then you need to get inside the house. You can do this in two ways.
Aflanc the TerribleFree the woman and talk to her and her father to find out why the woman was tied up.
Alisa in WunderlandscireHere you will find a small cave entrance and hear the voice of a child crying for help. Head inside and you will find a girl there. Pick her up, and carry her out of the cave to complete this event.
An Althing for the Half-GrownHelp a group of children make three choices. To do this you must sit on one of the two stools. Which you choose is irrelevant. When you make the third choice, this event will end.
An Efficient CremationApproach the man trying to burn the corpses. He will ask you to help him increase the fire. Near his house you will find two jars of oil that can help you with this task, only one will do.
Art-ScopTalk to the bard. If you pay him 295 silver, he will sing a flattering song about you. Otherwise it will not be a song pleasing to your ears. The event will end when the bard finishes singing the song.
BewitchedThe front door to the house is barred from inside. The boy trapped inside asks you to free him. Go to the back of the house, destroy the weak wall and go inside.
Bridges of OppressionTalk to the blind man lying down on the scaffolding underneath the bridge. Pick up the man and carry him to the other side of the river by jumping across a few planks and jars floating in the river.
Dearly Bee-LovedTalk to the man named Gill standing on top of the destroyed wall. He will ask you to deliver a letter to the man he fell in love with.
Degolas the BeautifulTalk to the boy in front of the house. To help him, carry four boxes out of the house. You can get rid of the poison gas for a while by burning it with a torch.
Devil's HoleTalk to the monk in front of the cave. Then enter the cave and you will find a man and a bear there. The bear will not attack you so talk to the man. If you decide to kill the man in the cave, then you will have to kill both him and the bear and then inform the monk about it.
Deviled WaterWhen you talk to the men on the shore you will find out that the man on the boat should fall into the water. The easiest way to do this is to shoot the boat on which the man is standing with a bow and destroy it.
Edmund's ArrowsEnter the longhouse and approach the throne. Collect at least one arrow then a woman standing nearby will want to buy them from you. Agree to sell her the arrows.
Falling StarsTo start this event read the note lying on the stool. Then you have to find three musicians.
Fishing LessonTalk to the little girl by the pond. She will tell you that her brother was turned by a goblin into a fish and ask you to fish him.
Green Children of AngliaYou have to complete the "Cedd's Stone" offering altar first. Sit down and listen to the children's story. Then give them 65 silver. They will give you St. Martin's Seal Necklace.
Hide and HuntTalk to three kids. They want you to play hide and seek with them. One of the kids will be seeking and you and the other two kids have to hide.
Historia de Cordibus PatheticTalk to the woman standing outside the house. If you select "Speak of his beauty and charm" then this event will end but you will not be able to help the woman. However, there are two other endings.
King of ShitsbyEnter the church and interact with the throne. Pick any dialogue option and then kill the five enemies that will attack you.
King of the Hay PeopleKill the Goliath sitting on the hay throne and take the contents of the chest next to him.
King of the HillTalk to the man in the camp at the top of the hill and then beat him in a duel. When you defeat him, get out of the camp and the man should start screaming again. Go back to him and beat him again, and then leave the camp again. You will have to defeat him three times. Then you can talk to him to end this event.
Lady of the LakeWhen the strange singing woman stops, talk to her and then the door to her house will open.
Lamb ChopsTalk to the man and he will ask you to get back the brooch that one of the sheep ate. In order not to kill the sheep, take the hay and carry it to the corral where the sheep are standing.
Last Flight of the Gyldan SparrowTalk to the woman at the docks, she will tell you about the treasure in the nearby wreck.
Madness of the StonesSpeak to the man near the circle of stones. He'll tell you to count the stones. Count the stones and tell him that there are 21. He will tell you to count again. This time answer is 26. Count the stones for the third time. This time there will be 23 stones.
Mildberg the Miracle LegsTalk to a girl who is looking for someone to race with her. When you finish talking the girl will start running. Chase her. Whether you catch up with her or not does not matter. Once the race is over, this event will end.
MiracleIn place of the marker you will only find a small spring. The notes next to it show that it is a healing spring.
MotherFirst, kill a few wolves that you come across near the house. Then climb up to the roof and get the flowers that the female voice inside the locked house demands. Then the door to the house will be unlocked.
NostalgiaTalk to a blind farmer who thinks you are his daughter. When he gets to work, move three crates near him.
Of Fist-Dances and Sweaty OathsIn order for a man to let you in, you must have charisma on level 3 or know the password.
Otta, Son of SluggaTalk to the children and the man and then shoot five dummies from a bow. You have limited amount of time for this.
Paola's DreamTalk to a man named Jason and then listen to what he has to say. This is all you have to do to complete the event.
Path to the Wind-BlueTalk to a man. Equip your torch and approach the brazier to light it. Then follow the man and light two more braziers. Cross the river and kill all bandits in Soham Hideout. Then you will be able to talk to the man again.
Permission to WeepTalk to the warrior standing next to the funeral pyre. To complete this event you must have charisma at level 3. If you choose to fight, you will only relieve the warrior a little, but it will not take away his grief.
Pig of ProphecySpeak to the man and he will tell you what's going on here. Drink from the bucket and you will start to hallucinate. Talk to the pig. Drink from the bucket again and talk to the pig one more time, this will end this event.
Red in Tooth and ClawWhen you arrive here, you'll hear a man screaming from inside the locked house. First kill the boar, then find a key lying on the ground near the well. Use the key to unlock the house and go inside. Examine the dead body lying on the floor. It will complete this event.
Rock of FertilitySpeak to the woman and she'll ask you to escort her to the rock of fertility at the top of the hill. Follow her up the hill and kill any wolves that will try to attack you.
Romeo and AethelflaedClimb to the top of the church and talk to the boy and you will find out that he is trying to get a flower for the girl.
Saint FaithTalk to the priest and prepare for a fight because after a while you will be attacked by the nun named Faith.
Silver Wind ElderTalk to the baker who had his cake stolen. Then follow him until you finally find his stolen cake.
Sisters of the AxeTo get inside the church you have to get the key. You will find it near the church.
Skal to Your WealthTalk to the alchemist. He will tell you about the mixture he needs two ingredients to create. You will find the first ingredient at the bottom of the well, which is a few steps away.
Splitting HaresTalk to the woman complaining about the hares eating her turnips and then kill all the rabbits.
Sunken HopeInside the tower you will find two children looking for their father who has dived in search for a treasure.
Take Me a HusbandSpeak to the woman. She will ask you to bring her beloved to her. Then, go to the house up the hill with red flowers surrounding it.
The AnchoressThere is a small chapel here. The door is blocked from the inside, but you can use a bow and destroy the lock by shooting through the window at the back of the chapel.
The Arrow in the TreeTalk to the man named Kenrick. He will tell you that he needs to get an arrow stuck in a tree branch hanging from a cliff.
The BansheeTalk to the grieving man inside the ruins. It seems that the man is being tormented by some strange voices. Shoot the wooden planks located at the top of one of the walls.
The Boar with the Golden NoseSpeak to the boarmaster sitting by the fire, then follow his pig. The pig will take you to four different places. At each stop, examine the ground near the pig to find a "treasure".
The BodyTalk to the children near the dead body. You will need to find an axe to help the dead Dane warrior reach Valhalla.
The Devil Has All the Best TunesTalk to the bard accompanying the Nordic warriors. Then talk to one of the warriors and agree to take part in a drinking contest.
The Devout TrollTalk to the monk. Kill his cow, destory the things inside and outside his house, and set his house on fire.
The Doom Book of CatsTalk to a man working in the field. He will tell you that he has a problem with rats.
The False EaldormancyRead the note pinned to the tree. If you wait a moment a horseman carrying another man on horseback should pass along the nearby road.
The Farewell MeowTalk to the woman who is mourning her cat and offer to help her build a shrine. The woman will give you a key that will allow you to enter her house.
The GleewomanUntie the woman you find in the ruins and talk to her. She will begin to follow you and comment on what you are doing. After some time you will be able to talk to her again. To complete this event you must give her 165 silver.
The Goddess of BirthTalk to a woman who is about to give birth. She will ask you to help her get to the ruins on the hill.
The Good Men of SherwoodWhen you reach the camp shoot one of the shooting targets and then you will be able to speak with the trainer.
The Horn of RagnarTalk to the man who says he has lost the key to his house and asks for help by promising the legendary horn of Ragnar Lothbrok in return. Help him to open the door by force.
The Ignominious BanditTalk to the man kneeling by the tree and calling for help. When you do this it will turn out to be a trap and you will be attacked by a group of bandits. This event will end when you kill them all.
The Infinite Noise of MenTalk to two guys arguing over barley and who should get paid more for harvesting and selling it. When asked by them who should get paid more, choose any of the answers.
The Last RaidTalk to a man building a boat in the middle of a clearing. Then interact with three of the possible objects. This could be ore, planks, hay, fish, or arrows.
The Lighthouse TwinsSpeak to the man at the bottom of the tower and he'll tell you that his brother is stuck at the top of the tower. Kill every snake as you climb your way up the tower, lower one of the ladders and then speak to the man at the top. Lead him down to his brother to complete this event.
The Lord of NorsexeTalk to a man who claims to be the king of the small island he is on. He will ask you to recover his arm ring for him.
The Myth in the MountainsRead the note lying on the stump and then go to the top of the mountain and set fire to the straw dummy there.
The Old GuardSit on a bench and talk to a man. He will give you the key and tell you that you can take whatever you want from his house.
The Pardoner's TaleTalk to a man in a black cloak and listen to his story. Then head towards the big oak tree you will find to the northeast of the man.
The ProdigyTalk to the man named Keith and he will tell you what the problem is. Then talk to the monk and defeat him in a fist fight (try to parry one of his attacks). This will end the quest - "smack my bit.. up!" ;-)
The PuppeteerFind a dead body. As you approach it the body will start talking to you. You can choose any dialog option.
The RiddlerTalk to the man. You must answer his riddles correctly. The correct answers are: "A lock and key", "Bagpipes", and "A storm". +40 silver.
The Stink-BrewThere is an entrance to the sewers here.On the river bank on both sides of the entrance you will find several snakes, kill them and collect their eggs. You will find a few more snakes inside the canals.
The Twit Saga, Part ITo make men want to talk to you, throw a torch on the roof and set the house on fire.
The WalloperTalk to the kids then agree to fistfight with they grandpa. If you are hit, you will have to try again. The quickest way to win is to stun him by parrying his wallop. When you beat him, the man will give you the key to his house. Enter the house and loot his treasure.
The White Lady of TamworthAttack the man standing in front of the tower. You will not kill him, because he will escape. Then talk to the imprisoned woman.
The Wound-Wands of FriendsTalk to a man who has an axe stuck in his head. You can tell him the truth or lie to him. When you pull the axe out, the man will die.
Tiny Black MarketClimb into the tree house. When the boy asks you for the password answer "Apple", but you can also answer something else. Then buy everything that the girl has to sell (you will pay 105 silver in total) and you will get these items from her and also a treasure map - Suthsexe Treehouse Shoppe Hoard Map.
War of the CollectorsTo start this event you must build the Museum in your settlement first. This event is a part of the quest "A Rivalry for the Ages".
Related quests: A Rivalry for the Ages.
Warmth of WinterTalk to the girl and agree to buy a goat from her for 100 silver. When you give her the money the girl will start running away.
Will o' the WispYou will find a large bonfire here and when you approach it you will hear a mysterious voice. Use Odin's Sight to locate a second bonfire nearby.
A Blood Hymn for EdmundSpeak to the nun standing near the altar. After a short talk she will attack you. Take her down and then speak to her to complete this short event.
A Cordial InvitationTalk to the man named Ryce who you find near the bridge, and who was the only survivor of the ambush. After a moment you will be attacked by three Pict warriors.
A Dog's RescueTalk to the woman you find near the burning house. She will ask you to save her dog. Destroy one of the weakened walls and enter the burning house through a hole.
A Prayer for VengeanceWhen you get here you will find a tomb whose entrance is blocked by a rack. To move the rack you must first go to the other side of the hill and through the small window shoot the crate that hinders you from doing so.
A Skald's LamentTalk to a man who appears to be less than reasonable. When he starts running, run after him and help him kill all opponents he attacks.
Aelfred's JewelTalk to the man knocking on the door of the house to find out what is going on. Then you need to get inside the house. You can do this in two ways.
Aflanc the TerribleFree the woman and talk to her and her father to find out why the woman was tied up.
Alisa in WunderlandscireHere you will find a small cave entrance and hear the voice of a child crying for help. Head inside and you will find a girl there. Pick her up, and carry her out of the cave to complete this event.
An Althing for the Half-GrownHelp a group of children make three choices. To do this you must sit on one of the two stools. Which you choose is irrelevant. When you make the third choice, this event will end.
An Efficient CremationApproach the man trying to burn the corpses. He will ask you to help him increase the fire. Near his house you will find two jars of oil that can help you with this task, only one will do.
Art-ScopTalk to the bard. If you pay him 295 silver, he will sing a flattering song about you. Otherwise it will not be a song pleasing to your ears. The event will end when the bard finishes singing the song.
BewitchedThe front door to the house is barred from inside. The boy trapped inside asks you to free him. Go to the back of the house, destroy the weak wall and go inside.
Bridges of OppressionTalk to the blind man lying down on the scaffolding underneath the bridge. Pick up the man and carry him to the other side of the river by jumping across a few planks and jars floating in the river.
Dearly Bee-LovedTalk to the man named Gill standing on top of the destroyed wall. He will ask you to deliver a letter to the man he fell in love with.
Degolas the BeautifulTalk to the boy in front of the house. To help him, carry four boxes out of the house. You can get rid of the poison gas for a while by burning it with a torch.
Devil's HoleTalk to the monk in front of the cave. Then enter the cave and you will find a man and a bear there. The bear will not attack you so talk to the man. If you decide to kill the man in the cave, then you will have to kill both him and the bear and then inform the monk about it.
Deviled WaterWhen you talk to the men on the shore you will find out that the man on the boat should fall into the water. The easiest way to do this is to shoot the boat on which the man is standing with a bow and destroy it.
Edmund's ArrowsEnter the longhouse and approach the throne. Collect at least one arrow then a woman standing nearby will want to buy them from you. Agree to sell her the arrows.
Falling StarsTo start this event read the note lying on the stool. Then you have to find three musicians.
Fishing LessonTalk to the little girl by the pond. She will tell you that her brother was turned by a goblin into a fish and ask you to fish him.
Green Children of AngliaYou have to complete the "Cedd's Stone" offering altar first. Sit down and listen to the children's story. Then give them 65 silver. They will give you St. Martin's Seal Necklace.
Hide and HuntTalk to three kids. They want you to play hide and seek with them. One of the kids will be seeking and you and the other two kids have to hide.
Historia de Cordibus PatheticTalk to the woman standing outside the house. If you select "Speak of his beauty and charm" then this event will end but you will not be able to help the woman. However, there are two other endings.
King of ShitsbyEnter the church and interact with the throne. Pick any dialogue option and then kill the five enemies that will attack you.
King of the Hay PeopleKill the Goliath sitting on the hay throne and take the contents of the chest next to him.
King of the HillTalk to the man in the camp at the top of the hill and then beat him in a duel. When you defeat him, get out of the camp and the man should start screaming again. Go back to him and beat him again, and then leave the camp again. You will have to defeat him three times. Then you can talk to him to end this event.
Lady of the LakeWhen the strange singing woman stops, talk to her and then the door to her house will open.
Lamb ChopsTalk to the man and he will ask you to get back the brooch that one of the sheep ate. In order not to kill the sheep, take the hay and carry it to the corral where the sheep are standing.
Last Flight of the Gyldan SparrowTalk to the woman at the docks, she will tell you about the treasure in the nearby wreck.
Madness of the StonesSpeak to the man near the circle of stones. He'll tell you to count the stones. Count the stones and tell him that there are 21. He will tell you to count again. This time answer is 26. Count the stones for the third time. This time there will be 23 stones.
Mildberg the Miracle LegsTalk to a girl who is looking for someone to race with her. When you finish talking the girl will start running. Chase her. Whether you catch up with her or not does not matter. Once the race is over, this event will end.
MiracleIn place of the marker you will only find a small spring. The notes next to it show that it is a healing spring.
MotherFirst, kill a few wolves that you come across near the house. Then climb up to the roof and get the flowers that the female voice inside the locked house demands. Then the door to the house will be unlocked.
NostalgiaTalk to a blind farmer who thinks you are his daughter. When he gets to work, move three crates near him.
Of Fist-Dances and Sweaty OathsIn order for a man to let you in, you must have charisma on level 3 or know the password.
Otta, Son of SluggaTalk to the children and the man and then shoot five dummies from a bow. You have limited amount of time for this.
Paola's DreamTalk to a man named Jason and then listen to what he has to say. This is all you have to do to complete the event.
Path to the Wind-BlueTalk to a man. Equip your torch and approach the brazier to light it. Then follow the man and light two more braziers. Cross the river and kill all bandits in Soham Hideout. Then you will be able to talk to the man again.
Permission to WeepTalk to the warrior standing next to the funeral pyre. To complete this event you must have charisma at level 3. If you choose to fight, you will only relieve the warrior a little, but it will not take away his grief.
Pig of ProphecySpeak to the man and he will tell you what's going on here. Drink from the bucket and you will start to hallucinate. Talk to the pig. Drink from the bucket again and talk to the pig one more time, this will end this event.
Red in Tooth and ClawWhen you arrive here, you'll hear a man screaming from inside the locked house. First kill the boar, then find a key lying on the ground near the well. Use the key to unlock the house and go inside. Examine the dead body lying on the floor. It will complete this event.
Rock of FertilitySpeak to the woman and she'll ask you to escort her to the rock of fertility at the top of the hill. Follow her up the hill and kill any wolves that will try to attack you.
Romeo and AethelflaedClimb to the top of the church and talk to the boy and you will find out that he is trying to get a flower for the girl.
Saint FaithTalk to the priest and prepare for a fight because after a while you will be attacked by the nun named Faith.
Silver Wind ElderTalk to the baker who had his cake stolen. Then follow him until you finally find his stolen cake.
Sisters of the AxeTo get inside the church you have to get the key. You will find it near the church.
Skal to Your WealthTalk to the alchemist. He will tell you about the mixture he needs two ingredients to create. You will find the first ingredient at the bottom of the well, which is a few steps away.
Splitting HaresTalk to the woman complaining about the hares eating her turnips and then kill all the rabbits.
Sunken HopeInside the tower you will find two children looking for their father who has dived in search for a treasure.
Take Me a HusbandSpeak to the woman. She will ask you to bring her beloved to her. Then, go to the house up the hill with red flowers surrounding it.
The AnchoressThere is a small chapel here. The door is blocked from the inside, but you can use a bow and destroy the lock by shooting through the window at the back of the chapel.
The Arrow in the TreeTalk to the man named Kenrick. He will tell you that he needs to get an arrow stuck in a tree branch hanging from a cliff.
The BansheeTalk to the grieving man inside the ruins. It seems that the man is being tormented by some strange voices. Shoot the wooden planks located at the top of one of the walls.
The Boar with the Golden NoseSpeak to the boarmaster sitting by the fire, then follow his pig. The pig will take you to four different places. At each stop, examine the ground near the pig to find a "treasure".
The BodyTalk to the children near the dead body. You will need to find an axe to help the dead Dane warrior reach Valhalla.
The Devil Has All the Best TunesTalk to the bard accompanying the Nordic warriors. Then talk to one of the warriors and agree to take part in a drinking contest.
The Devout TrollTalk to the monk. Kill his cow, destory the things inside and outside his house, and set his house on fire.
The Doom Book of CatsTalk to a man working in the field. He will tell you that he has a problem with rats.
The False EaldormancyRead the note pinned to the tree. If you wait a moment a horseman carrying another man on horseback should pass along the nearby road.
The Farewell MeowTalk to the woman who is mourning her cat and offer to help her build a shrine. The woman will give you a key that will allow you to enter her house.
The GleewomanUntie the woman you find in the ruins and talk to her. She will begin to follow you and comment on what you are doing. After some time you will be able to talk to her again. To complete this event you must give her 165 silver.
The Goddess of BirthTalk to a woman who is about to give birth. She will ask you to help her get to the ruins on the hill.
The Good Men of SherwoodWhen you reach the camp shoot one of the shooting targets and then you will be able to speak with the trainer.
The Horn of RagnarTalk to the man who says he has lost the key to his house and asks for help by promising the legendary horn of Ragnar Lothbrok in return. Help him to open the door by force.
The Ignominious BanditTalk to the man kneeling by the tree and calling for help. When you do this it will turn out to be a trap and you will be attacked by a group of bandits. This event will end when you kill them all.
The Infinite Noise of MenTalk to two guys arguing over barley and who should get paid more for harvesting and selling it. When asked by them who should get paid more, choose any of the answers.
The Last RaidTalk to a man building a boat in the middle of a clearing. Then interact with three of the possible objects. This could be ore, planks, hay, fish, or arrows.
The Lighthouse TwinsSpeak to the man at the bottom of the tower and he'll tell you that his brother is stuck at the top of the tower. Kill every snake as you climb your way up the tower, lower one of the ladders and then speak to the man at the top. Lead him down to his brother to complete this event.
The Lord of NorsexeTalk to a man who claims to be the king of the small island he is on. He will ask you to recover his arm ring for him.
The Myth in the MountainsRead the note lying on the stump and then go to the top of the mountain and set fire to the straw dummy there.
The Old GuardSit on a bench and talk to a man. He will give you the key and tell you that you can take whatever you want from his house.
The Pardoner's TaleTalk to a man in a black cloak and listen to his story. Then head towards the big oak tree you will find to the northeast of the man.
The ProdigyTalk to the man named Keith and he will tell you what the problem is. Then talk to the monk and defeat him in a fist fight (try to parry one of his attacks). This will end the quest - "smack my bit.. up!" ;-)
The PuppeteerFind a dead body. As you approach it the body will start talking to you. You can choose any dialog option.
The RiddlerTalk to the man. You must answer his riddles correctly. The correct answers are: "A lock and key", "Bagpipes", and "A storm". +40 silver.
The Stink-BrewThere is an entrance to the sewers here.On the river bank on both sides of the entrance you will find several snakes, kill them and collect their eggs. You will find a few more snakes inside the canals.
The Twit Saga, Part ITo make men want to talk to you, throw a torch on the roof and set the house on fire.
The WalloperTalk to the kids then agree to fistfight with they grandpa. If you are hit, you will have to try again. The quickest way to win is to stun him by parrying his wallop. When you beat him, the man will give you the key to his house. Enter the house and loot his treasure.
The White Lady of TamworthAttack the man standing in front of the tower. You will not kill him, because he will escape. Then talk to the imprisoned woman.
The Wound-Wands of FriendsTalk to a man who has an axe stuck in his head. You can tell him the truth or lie to him. When you pull the axe out, the man will die.
Tiny Black MarketClimb into the tree house. When the boy asks you for the password answer "Apple", but you can also answer something else. Then buy everything that the girl has to sell (you will pay 105 silver in total) and you will get these items from her and also a treasure map - Suthsexe Treehouse Shoppe Hoard Map.
War of the CollectorsTo start this event you must build the Museum in your settlement first. This event is a part of the quest "A Rivalry for the Ages".
Related quests: A Rivalry for the Ages.
Warmth of WinterTalk to the girl and agree to buy a goat from her for 100 silver. When you give her the money the girl will start running away.
Will o' the WispYou will find a large bonfire here and when you approach it you will hear a mysterious voice. Use Odin's Sight to locate a second bonfire nearby.
Fly Agaric
Hallucination Challenges. Eat the Fly Agaric mushrooms to start the hallucination. These can be challenges where you have to follow the clues and activate or go through the gates in the correct order. Other challenges can involve defeating enemies that will attack you. Fly Agaric count as MYSTERIES.
 CentA spiral made of stones hanging in the air is the source of the clues. The correct order is: Fish Gate > Fire Gate > Roots Gate > Birds Gate.
East AngliaEat mushrooms. Clues are around you, these are: statue, shield and flowers. First enter the portal on the right, next to which the statue stands.
EssexeThe three pyres must burn with a blue flame. (LEFT) - Blue - Red - Red - Blue - Blue - Red - (RIGHT)
EurvicscireKill three wolves and two boar-like beasts.
GlowecestrescireShoot with your bow at the four braziers by which the banner of the Raven Clan is located. They should turn blue.
GrantebridgescireTo open the gate you need to light three braziers. This solution can be found by looking behind the braziers, three of them have "stone gates" behind them.
HamtunscireYou must defeat three Jotnar warriors and their pet.
LedecestrescireEnter those gates that one of the seals will be approaching. It will be 5 gates in total.
LincolnscireYou must kill five bears that attack you moments after you eat the mushrooms. There are many plants around that you can use to heal yourself.
OxenefordscireThere are five portals. There are a few crosses standing next to each of the portals. First you have to enter the portal with one cross, then the portal with two crosses, and so on. (LEFT) - 3 - 4 - 1 - 2 - 5 - (RIGHT)
SciropescireThere are 5 flames around the tree. Swap these three, around which circles of stones are arranged into blue flames. When you do this, the portal will activate and you will be able to pass through it.
SnotinghamscireYou must defeat the three elite enemies that will appear when you eat the mushrooms.
SuthsexeThis Fly Agaric hallucination challenge starts with the three wolves, a lynx, and a bear attacking you. As you deal with them, the bear and the lynx can transform into Jotnar warriors.
CentA spiral made of stones hanging in the air is the source of the clues. The correct order is: Fish Gate > Fire Gate > Roots Gate > Birds Gate.
East AngliaEat mushrooms. Clues are around you, these are: statue, shield and flowers. First enter the portal on the right, next to which the statue stands.
EssexeThe three pyres must burn with a blue flame. (LEFT) - Blue - Red - Red - Blue - Blue - Red - (RIGHT)
EurvicscireKill three wolves and two boar-like beasts.
GlowecestrescireShoot with your bow at the four braziers by which the banner of the Raven Clan is located. They should turn blue.
GrantebridgescireTo open the gate you need to light three braziers. This solution can be found by looking behind the braziers, three of them have "stone gates" behind them.
HamtunscireYou must defeat three Jotnar warriors and their pet.
LedecestrescireEnter those gates that one of the seals will be approaching. It will be 5 gates in total.
LincolnscireYou must kill five bears that attack you moments after you eat the mushrooms. There are many plants around that you can use to heal yourself.
OxenefordscireThere are five portals. There are a few crosses standing next to each of the portals. First you have to enter the portal with one cross, then the portal with two crosses, and so on. (LEFT) - 3 - 4 - 1 - 2 - 5 - (RIGHT)
SciropescireThere are 5 flames around the tree. Swap these three, around which circles of stones are arranged into blue flames. When you do this, the portal will activate and you will be able to pass through it.
SnotinghamscireYou must defeat the three elite enemies that will appear when you eat the mushrooms.
SuthsexeThis Fly Agaric hallucination challenge starts with the three wolves, a lynx, and a bear attacking you. As you deal with them, the bear and the lynx can transform into Jotnar warriors.
Standing Stones
Standing Stones are visual puzzles. On one of the stones you will find a symbol that is assigned to the place. Your task is to find a place from which you can see the whole symbol composed of fragments. To reveal fragments of the puzzle you have to use Odin's Sight. Standing Stones count as MYSTERIES.
 Aescforda Stones / SnotinghamscireThe reflection in the water will be part of the symbol. To see the full symbol, you must destroy some ice floes on the lake.
Cosintun / LedecestrescireRead the text on one of the stones and then use Odin's Sight to see the fragments of the symbol on the other stones. Find a place from where you can see the whole symbol.
Devil's Quoits / GlowecestrescireThe spot is located on the river. To stand in the right place you must reposition a nearby boat.
Eorthburg Hlaw / SnotinghamscireThe right place is in one of the caves (middle one). You have to break the ice barrier blocking the entrance and go inside.
Lord and Lady / GrantebridgescireRead the text on one of the stones and then use Odin's Sight to see the fragments of the symbol on the other stones. Climb onto a sloping tree nearby.
Rodestan Monolith / EurvicscireBreak a nearby patch of ice and stand at the bottom of the pit hidden beneath it.
Aescforda Stones / SnotinghamscireThe reflection in the water will be part of the symbol. To see the full symbol, you must destroy some ice floes on the lake.
Cosintun / LedecestrescireRead the text on one of the stones and then use Odin's Sight to see the fragments of the symbol on the other stones. Find a place from where you can see the whole symbol.
Devil's Quoits / GlowecestrescireThe spot is located on the river. To stand in the right place you must reposition a nearby boat.
Eorthburg Hlaw / SnotinghamscireThe right place is in one of the caves (middle one). You have to break the ice barrier blocking the entrance and go inside.
Lord and Lady / GrantebridgescireRead the text on one of the stones and then use Odin's Sight to see the fragments of the symbol on the other stones. Climb onto a sloping tree nearby.
Rodestan Monolith / EurvicscireBreak a nearby patch of ice and stand at the bottom of the pit hidden beneath it.
Daughters of Lerion
Daughters of Lerion are three extremely powerful witches. When you defeat them you will receive three pieces of Thor's Set and daggers which will serve as the keys to the room where another piece of this set is located. The Daughters of Lerion count as MYSTERIES.

Animus Anomalies
Animus Anomalies are platforming sections. The goal of each Animus Anomaly is to reach its top. If you fall or touch certain objects, you will be desynchronized and respawn at a checkpoint a few steps back. Animus Anomalies count as MYSTERIES.
 Briudun Hill Anomaly
Needles Anomaly
Thornburg Henges Anomaly
Briudun Hill Anomaly
Needles Anomaly
Thornburg Henges Anomaly
Cairns
The Cairns are challenges in which we have to stack rocks one on top of the other so that we can create a balanced pile of a certain height. The Cairns count as MYSTERIES.
 Cernewood / Ledecestrescire
Cleeve Hill / Glowecestrescire
East Cape Peak / East Anglia
Heald Tor / Hamtunscire
High Rocks / Suthsexe
Ingelborg / Eurvicscire
Maen Ceti / Glowecestrescire
Titterstone Clee Hill / Sciropescire
Cernewood / Ledecestrescire
Cleeve Hill / Glowecestrescire
East Cape Peak / East Anglia
Heald Tor / Hamtunscire
High Rocks / Suthsexe
Ingelborg / Eurvicscire
Maen Ceti / Glowecestrescire
Titterstone Clee Hill / Sciropescire
Flyting
Win flyting duels to increase your charisma. Flyting is a contest consisting of the exchange of three insults between you and your opponent, often conducted in verse. When you accept a flyting duel, you must place a wager to begin - 100 silver, 150, or 200 silver. Flyting duels count as MYSTERIES.
 Augusta the Cheerful / LundenA. You're the picture of elegance, beauty and grace.
B. O, your valor's the subject of story and song.
C. It is truly a pleasure, my partner's sublime.
Borghild the Alewife's Bane / Picheringa / EurvicscireA. Your face brings to mind the arse-end of a horse.
B. Now to look upon you leaves both my eyes in pain.
C. You've drunk far too much ale, now, you're just telling lies.
Brother Quiescis / Canterbury / CentA. Though you speak through another, your flyting's still poor.
B. Though you choose to be quiet, your folly is loud.
C. With such drivel to speak, I see why you keep mum.
Chadwick, Monger of Gossip / Northwic / East AngliaA. Then you're speaking to fools, and their knowledge is flawed.
B. And they're sorely mistaken, I'm known for my might.
C. Then you've clearly misheard them, my wit is immense.
Fenn the Wistful / HamtunscireA. Nay, one thousand's a pittance, it's closer to ten.
B. It is not mine to judge, only fill up the graves.
C. To ensure that I'll sit in Valhalla one day.
Fergal the Faceless / Grantebridge / GrantebridgescireAvailable after completing the "Glory Regained" quest. Talk to a woman standing near the house. She will give you the key to enter the house. To start the duel, sit on the stool. No wager is placed here. Choose any answers you want, this duel is a joke.
Hertha the Very High / JorvikTo start the duel interact with the pots standing on the barrel below.
A. The one fool that I see here is up on that wall.
B. Then enjoy while you can, a great fall is at hand.
C. What's it like feigning hugeness? You're naught but a gnome.
Hogg the Burly / Oxeneforda / OxenefordscireA. O, you're barely an insect, a fly that I'll swat.
B. You're possessed of a baldness that's scared off your hair.
C. You've the brain of a donkey, to challenge a Norse.
Jungulf / Repton / LedecestrescireA. O, to beat such a braggart, will surely be fun!
B. You're a weakling, a milksop, a cadger, a louse.
C. Your pride is appalling, and your rhyming is worse.
Lady Ellette of Colchester / Colcestre / EssexeA. For they put all who hear them to sleep.
B. I'll defeat you and banish all doubt.
C. Lend a salve, for your words make me ill.
Ove the Scarred / Quatford / SciropescireA. And your thick little skull's fit for grinding my axe on.
B. Test your might against mine and we'll see how you do.
C. If it's fighting you want, I shall take you on now.
As soon as you're done with the duel on lyrics, you'll have to fistfight him.
Stigr the Amorous / Hemthorpe / SnotinghamscireA. Yes, with words I'll ensnare you and put you to bed.
B. I'm as good with my lips as I am with my tongue.
C. While I doubt you can take me, I'll give you a go.
After winning the duel, you can have a little fun with him.
Augusta the Cheerful / LundenA. You're the picture of elegance, beauty and grace.
B. O, your valor's the subject of story and song.
C. It is truly a pleasure, my partner's sublime.
Borghild the Alewife's Bane / Picheringa / EurvicscireA. Your face brings to mind the arse-end of a horse.
B. Now to look upon you leaves both my eyes in pain.
C. You've drunk far too much ale, now, you're just telling lies.
Brother Quiescis / Canterbury / CentA. Though you speak through another, your flyting's still poor.
B. Though you choose to be quiet, your folly is loud.
C. With such drivel to speak, I see why you keep mum.
Chadwick, Monger of Gossip / Northwic / East AngliaA. Then you're speaking to fools, and their knowledge is flawed.
B. And they're sorely mistaken, I'm known for my might.
C. Then you've clearly misheard them, my wit is immense.
Fenn the Wistful / HamtunscireA. Nay, one thousand's a pittance, it's closer to ten.
B. It is not mine to judge, only fill up the graves.
C. To ensure that I'll sit in Valhalla one day.
Fergal the Faceless / Grantebridge / GrantebridgescireAvailable after completing the "Glory Regained" quest. Talk to a woman standing near the house. She will give you the key to enter the house. To start the duel, sit on the stool. No wager is placed here. Choose any answers you want, this duel is a joke.
Hertha the Very High / JorvikTo start the duel interact with the pots standing on the barrel below.
A. The one fool that I see here is up on that wall.
B. Then enjoy while you can, a great fall is at hand.
C. What's it like feigning hugeness? You're naught but a gnome.
Hogg the Burly / Oxeneforda / OxenefordscireA. O, you're barely an insect, a fly that I'll swat.
B. You're possessed of a baldness that's scared off your hair.
C. You've the brain of a donkey, to challenge a Norse.
Jungulf / Repton / LedecestrescireA. O, to beat such a braggart, will surely be fun!
B. You're a weakling, a milksop, a cadger, a louse.
C. Your pride is appalling, and your rhyming is worse.
Lady Ellette of Colchester / Colcestre / EssexeA. For they put all who hear them to sleep.
B. I'll defeat you and banish all doubt.
C. Lend a salve, for your words make me ill.
Ove the Scarred / Quatford / SciropescireA. And your thick little skull's fit for grinding my axe on.
B. Test your might against mine and we'll see how you do.
C. If it's fighting you want, I shall take you on now.
As soon as you're done with the duel on lyrics, you'll have to fistfight him.
Stigr the Amorous / Hemthorpe / SnotinghamscireA. Yes, with words I'll ensnare you and put you to bed.
B. I'm as good with my lips as I am with my tongue.
C. While I doubt you can take me, I'll give you a go.
After winning the duel, you can have a little fun with him.
Offering altars
 Cedd's Stone200 x Silver. After the offering is made, a nearby world event will be activated - Green Children of Anglia.
Cerneley Offering AltarYou need 3 x Hare's Foot. You will find rabbits around the altar. Use Odin's Sight to locate them. Don't get too close to them because you'll frighten them. Shoot from a distance. If you run out of arrows, you will find some by the altar.
Dobby's Altar5 x Fabric
Elisdon Altar10 x Bullhead (small). These fish can be easily found in the rivers of Ledecestrescire or Grantebridgescire, as well as in other regions, and obtaining them will not be a problem.
Mam Tor Stone3 x Titanium
Nymdesfelda10 x Bullhead (small). This, along with Elisdon Altar, is the second of the altars on which this type of fish should be offered in sacrifice.
Saint Leonard's Altar50 x Leather
The Wroeken5 x Brown Trout (small). Finding these fish will require some effort. I have found them for example in Bomer Lake in Sciropescire or in Trent River on the border of Sciropescire and Snotinghamscire.
Walhdenu Altar50 x Iron Ore
Cedd's Stone200 x Silver. After the offering is made, a nearby world event will be activated - Green Children of Anglia.
Cerneley Offering AltarYou need 3 x Hare's Foot. You will find rabbits around the altar. Use Odin's Sight to locate them. Don't get too close to them because you'll frighten them. Shoot from a distance. If you run out of arrows, you will find some by the altar.
Dobby's Altar5 x Fabric
Elisdon Altar10 x Bullhead (small). These fish can be easily found in the rivers of Ledecestrescire or Grantebridgescire, as well as in other regions, and obtaining them will not be a problem.
Mam Tor Stone3 x Titanium
Nymdesfelda10 x Bullhead (small). This, along with Elisdon Altar, is the second of the altars on which this type of fish should be offered in sacrifice.
Saint Leonard's Altar50 x Leather
The Wroeken5 x Brown Trout (small). Finding these fish will require some effort. I have found them for example in Bomer Lake in Sciropescire or in Trent River on the border of Sciropescire and Snotinghamscire.
Walhdenu Altar50 x Iron Ore
Treasures of Britain
Treasures of Britain are caves that hide the eight tablets needed to acquire Excalibur, the legendary sword. Treasures of Britain count as MYSTERIES.
 Cavern of TrialsThe entrance is located inside the house. The item you are looking for here is a Mysterious Chessboard Tablet. As you can easily guess, you will find it when you reach the end of the large cave system.
Related quests: Going Deeper….
Deoraby Spar CavernAt the end of this cave, which is relatively short, you will find the Mysterious Whetstone Tablet.
Grime's GravesThe treasure is located at the very end of the mine. Break the jars standing on the table and in one of them you will find a Mysterious Hilt Tablet.
Related quests: Ever As Fate Must.
Red Lichen CavernIn this cave you will find the Mysterious Mantle Tablet. The greatest danger to you in this cave will be the poisonous gas.
Santlache MineThe treasure, the Mysterious Cauldron Tablet, is located at the very end of the mine. To get there, you'll have to climb, jump, slide and eventually swim a significant distance through flooded tunnels.
Wiccan's CaveYou visit this cave during the quest "Honor Has Two Edges". When you get to the place shown in the picture below, turn right.
Related quests: Honor Has Two Edges.
Cavern of TrialsThe entrance is located inside the house. The item you are looking for here is a Mysterious Chessboard Tablet. As you can easily guess, you will find it when you reach the end of the large cave system.
Related quests: Going Deeper….
Deoraby Spar CavernAt the end of this cave, which is relatively short, you will find the Mysterious Whetstone Tablet.
Grime's GravesThe treasure is located at the very end of the mine. Break the jars standing on the table and in one of them you will find a Mysterious Hilt Tablet.
Related quests: Ever As Fate Must.
Red Lichen CavernIn this cave you will find the Mysterious Mantle Tablet. The greatest danger to you in this cave will be the poisonous gas.
Santlache MineThe treasure, the Mysterious Cauldron Tablet, is located at the very end of the mine. To get there, you'll have to climb, jump, slide and eventually swim a significant distance through flooded tunnels.
Wiccan's CaveYou visit this cave during the quest "Honor Has Two Edges". When you get to the place shown in the picture below, turn right.
Related quests: Honor Has Two Edges.
Order of the Ancients Members
Order of the Ancients members who can be encountered as you free roam the game world.
 Beneseck of Bath (The Bell)Warden of Faith. He can be found overseeing the graveyard at Brimclif Monastery along the southern coast of Suthsexe, south of Cyning Vale.
Eanbhert (The Vellum)Warden of Law. He can be found in a house overgrown with vegetation near the dock in Glowecestre in Glowecestrescire.
Gifle (The Ash-Spear)Warden of Wealth. He can be found in the Forest Hideout, southwest of the Roman ruins near Britannia's Watch in East Anglia.
Havelok (The Billhook)Warden of Wealth. He can be found in his villa at the foot of a wall near Lincoln's town hall in Lincolnscire.
Heika of Friesland (The Sickle)Warden of Faith. She can be found at the bakery in Colcestre market in Essexe.
Hunta, son of Hunta (The Baldric)Warden of War. He will be automatically revealed after the Hidden Ones Bureau is built in Ravensthorpe. He can be found at the marketplace in the town of Ledecestre, Ledecestrescire.
Leofgifu (The Scabbard)Warden of War. She will be automatically revealed after the Hidden Ones Bureau is built in Ravensthorpe. She can be found in the Saxon military camp at Utbech, across the river north of the town of Grantebridge, Grantebridescire.
Mucel, Heir to What He Tells (The Lathe)Warden of Wealth. He can be found repairing ships near the dock of Buckingham in Oxenefordscire.
Patrick (The Anvil)Warden of Wealth. He's a blacksmith. He can be found at his forge in the town of Oxeneforda on the western border of Oxenefordscire.
Reeve Derby (The Vice)Warden of Law. He can be found near a waterfall in the village of Picheringa, Eurvicscire. To find out his identity you must kill all six "minor" Wardens of Law.
Sister Blaeswith, The Archbishop's Shadow (The Rake)Warden of Faith. She can be found at St. Martin's Church in Canterbury in Cent. To find out her identity you must kill all six "minor" Wardens of Faith.
Tata, Defender of Otta's Wyrd (The Dart)Warden of Law. He can be found at Quatford's stables in eastern Sciropescire.
Tatfrid (The Lyre)Warden of Wealth. He can be found in the marketplace or playing music on stage in Grantebridge, Grantebridgescire. To find out his identity you must kill all six "minor" Wardens of Wealth.
Yohanes Loukas (The Oil)Warden of Faith. He can be found in the hamlet of Fearnhamme in Hamtunscire.
Beneseck of Bath (The Bell)Warden of Faith. He can be found overseeing the graveyard at Brimclif Monastery along the southern coast of Suthsexe, south of Cyning Vale.
Eanbhert (The Vellum)Warden of Law. He can be found in a house overgrown with vegetation near the dock in Glowecestre in Glowecestrescire.
Gifle (The Ash-Spear)Warden of Wealth. He can be found in the Forest Hideout, southwest of the Roman ruins near Britannia's Watch in East Anglia.
Havelok (The Billhook)Warden of Wealth. He can be found in his villa at the foot of a wall near Lincoln's town hall in Lincolnscire.
Heika of Friesland (The Sickle)Warden of Faith. She can be found at the bakery in Colcestre market in Essexe.
Hunta, son of Hunta (The Baldric)Warden of War. He will be automatically revealed after the Hidden Ones Bureau is built in Ravensthorpe. He can be found at the marketplace in the town of Ledecestre, Ledecestrescire.
Leofgifu (The Scabbard)Warden of War. She will be automatically revealed after the Hidden Ones Bureau is built in Ravensthorpe. She can be found in the Saxon military camp at Utbech, across the river north of the town of Grantebridge, Grantebridescire.
Mucel, Heir to What He Tells (The Lathe)Warden of Wealth. He can be found repairing ships near the dock of Buckingham in Oxenefordscire.
Patrick (The Anvil)Warden of Wealth. He's a blacksmith. He can be found at his forge in the town of Oxeneforda on the western border of Oxenefordscire.
Reeve Derby (The Vice)Warden of Law. He can be found near a waterfall in the village of Picheringa, Eurvicscire. To find out his identity you must kill all six "minor" Wardens of Law.
Sister Blaeswith, The Archbishop's Shadow (The Rake)Warden of Faith. She can be found at St. Martin's Church in Canterbury in Cent. To find out her identity you must kill all six "minor" Wardens of Faith.
Tata, Defender of Otta's Wyrd (The Dart)Warden of Law. He can be found at Quatford's stables in eastern Sciropescire.
Tatfrid (The Lyre)Warden of Wealth. He can be found in the marketplace or playing music on stage in Grantebridge, Grantebridgescire. To find out his identity you must kill all six "minor" Wardens of Wealth.
Yohanes Loukas (The Oil)Warden of Faith. He can be found in the hamlet of Fearnhamme in Hamtunscire.
Zealots
In most cases, Zealots travel through the region on predefined paths. So you can try to catch up with them or go to a marked place and wait patiently for them there.
 BeorhtsigeSuggested Power: 280. A burly Norseman, Joy-Canker takes pride in his red beard. "It's dyed with the blood of my kills!" he likes to say. He is a stalwart friend of The Vellum.
BercthunSuggested Power: 340. Bercthun serves as a messenger and factotum to The Bell. He likes to crush tortoises with his bare hands. If no tortoises are about, run!
CallinSuggested Power: 280. A hermit who lives deep in the woods, Long-Sorrow holds himself motionless until small birds wander his way. He then throttles them and eats their flesh with joyous abandon.
ColaSuggested Power: 90. Scrappy and surprisingly tough, Cola likes to fight close-in but can handle a bow as well. His motto is, "Blood speaks true." Cola delivers emergency communications to The Adze.
CudberctSuggested Power: 160. An intense and deep-feeling man, Cudberct mourns his victims, often contributing silver toward their funerals. He is a trusted adjutant of The Anvil.
EorforwineSuggested Power: 90. A powerful warrior, Eorforwine forges her own armor. An apprentice druid, she chants charms and incantations to bring woe upon her adversaries.
HeikeSuggested Power: 250. Stalwart, brave, true, none too bright, and lethal.
HorsaSuggested Power: 130. The unsmiling visage of Horsa, called Frown-Hoard, strikes icy fear into the souls of all who look upon it. With good reason. Horsa is highly reliable and often serves The Lathe.
HrothgarSuggested Power: 280. Enemies panic upon seeing Hrothgar's shiny pate approaching. He takes particular joy in the sound of crunching bones, the skull best of all. The Oil employs Hrothgar for any tasks requiring brutality.
KendallSuggested Power: 90. Wily and quick, Kendall the Blood Brewer made her name by slitting enough throats to fill vats with blood. She is one of the favorites of the Order, who assign her important targets.
OsgarSuggested Power: 220. The thin and duplicitous Osgar comes from a family of vintners. He likes a tipple after a good stabbing. The Billhook relies on him to implement his schemes.
RedwaldaSuggested Power: 90. Redwalda's father was a wealthy lord, whom Redwalda murdered in his bed. Not for any inheritance, for the pleasure of it.
WealdmaerSuggested Power: 160. Perhaps the most thoughtful of the Order's Zealots, Wealdmaer has written a series of poems on the topic "heads lopped from shoulders." He is a boon companion of The Dart, with whom he enjoys a good chess game.
WodenSuggested Power: 220. Left for dead in a burial bit full of pagans, Woden clambered out and spent the next two years tracking down those who killed his fellow villagers one by one. None survived the meeting. A much-trusted courier, Woden often relays messages for The Sickle.
WuffaSuggested Power: 160. Lithe and agile, Wuffa prefers only to mortally wound her targets, as opposed to killing them outright. "I enjoy watching them bleed to death," she says. "You have to savor the moment." Wuffa is a frequent drinking companion of The Ash-Spear.
BeorhtsigeSuggested Power: 280. A burly Norseman, Joy-Canker takes pride in his red beard. "It's dyed with the blood of my kills!" he likes to say. He is a stalwart friend of The Vellum.
BercthunSuggested Power: 340. Bercthun serves as a messenger and factotum to The Bell. He likes to crush tortoises with his bare hands. If no tortoises are about, run!
CallinSuggested Power: 280. A hermit who lives deep in the woods, Long-Sorrow holds himself motionless until small birds wander his way. He then throttles them and eats their flesh with joyous abandon.
ColaSuggested Power: 90. Scrappy and surprisingly tough, Cola likes to fight close-in but can handle a bow as well. His motto is, "Blood speaks true." Cola delivers emergency communications to The Adze.
CudberctSuggested Power: 160. An intense and deep-feeling man, Cudberct mourns his victims, often contributing silver toward their funerals. He is a trusted adjutant of The Anvil.
EorforwineSuggested Power: 90. A powerful warrior, Eorforwine forges her own armor. An apprentice druid, she chants charms and incantations to bring woe upon her adversaries.
HeikeSuggested Power: 250. Stalwart, brave, true, none too bright, and lethal.
HorsaSuggested Power: 130. The unsmiling visage of Horsa, called Frown-Hoard, strikes icy fear into the souls of all who look upon it. With good reason. Horsa is highly reliable and often serves The Lathe.
HrothgarSuggested Power: 280. Enemies panic upon seeing Hrothgar's shiny pate approaching. He takes particular joy in the sound of crunching bones, the skull best of all. The Oil employs Hrothgar for any tasks requiring brutality.
KendallSuggested Power: 90. Wily and quick, Kendall the Blood Brewer made her name by slitting enough throats to fill vats with blood. She is one of the favorites of the Order, who assign her important targets.
OsgarSuggested Power: 220. The thin and duplicitous Osgar comes from a family of vintners. He likes a tipple after a good stabbing. The Billhook relies on him to implement his schemes.
RedwaldaSuggested Power: 90. Redwalda's father was a wealthy lord, whom Redwalda murdered in his bed. Not for any inheritance, for the pleasure of it.
WealdmaerSuggested Power: 160. Perhaps the most thoughtful of the Order's Zealots, Wealdmaer has written a series of poems on the topic "heads lopped from shoulders." He is a boon companion of The Dart, with whom he enjoys a good chess game.
WodenSuggested Power: 220. Left for dead in a burial bit full of pagans, Woden clambered out and spent the next two years tracking down those who killed his fellow villagers one by one. None survived the meeting. A much-trusted courier, Woden often relays messages for The Sickle.
WuffaSuggested Power: 160. Lithe and agile, Wuffa prefers only to mortally wound her targets, as opposed to killing them outright. "I enjoy watching them bleed to death," she says. "You have to savor the moment." Wuffa is a frequent drinking companion of The Ash-Spear.
Raids
Raid these locations with your crew to gain its wealth and materials for your settlement's growth.
 Alcestre MonasterySuggested Power: 20
Brimclif MonasterySuggested Power: 160
Cicestre AbbeySuggested Power: 160
Elmet MonasterySuggested Power: 190
Evesham AbbeySuggested Power: 90
FiscartunSuggested Power: 190
Flaneburg PriorySuggested Power: 190
Isle of Ely MonasterySuggested Power: 20
Medeshamstede AbbeySuggested Power: 160
MeldeburneSuggested Power: 20
Raculf MonasterySuggested Power: 130
Readingum AbbeySuggested Power: 340
Runcwuda AbbeySuggested Power: 340
Sancta Maria's AbbeySuggested Power: 160
Sudwella MonasterySuggested Power: 20
Tonbridge MonasterySuggested Power: 130
Wenlocan AbbeySuggested Power: 130
Wenloch AbbeySuggested Power: 250
Alcestre MonasterySuggested Power: 20
Brimclif MonasterySuggested Power: 160
Cicestre AbbeySuggested Power: 160
Elmet MonasterySuggested Power: 190
Evesham AbbeySuggested Power: 90
FiscartunSuggested Power: 190
Flaneburg PriorySuggested Power: 190
Isle of Ely MonasterySuggested Power: 20
Medeshamstede AbbeySuggested Power: 160
MeldeburneSuggested Power: 20
Raculf MonasterySuggested Power: 130
Readingum AbbeySuggested Power: 340
Runcwuda AbbeySuggested Power: 340
Sancta Maria's AbbeySuggested Power: 160
Sudwella MonasterySuggested Power: 20
Tonbridge MonasterySuggested Power: 130
Wenlocan AbbeySuggested Power: 130
Wenloch AbbeySuggested Power: 250
Orlog Players
You must beat all Orlog Players for the "Orlog Champion" achievement / trophy.
 Cent Player
East Anglia Player
Essexe Player
Eurvicscire Player #1
Eurvicscire Player #2
Glowecestrescire Player
Grantebridgescire Player
Hamtunscire Player
Jorvik Player
Ledecestrescire Player
Lincolnscire Player
Lunden Player
Oxenefordscire Player
Ravensthorpe Player
Sciropescire Player
Suthsexe Player
Wincestre Player
Cent Player
East Anglia Player
Essexe Player
Eurvicscire Player #1
Eurvicscire Player #2
Glowecestrescire Player
Grantebridgescire Player
Hamtunscire Player
Jorvik Player
Ledecestrescire Player
Lincolnscire Player
Lunden Player
Oxenefordscire Player
Ravensthorpe Player
Sciropescire Player
Suthsexe Player
Wincestre Player
Traders
 Buckingham Trader
Canterbury Trader
Colcestre Trader
Crawleah Trader
Donecaestre Trader
Elmenham Trader
Fearnhamme Trader
Folcanstan Trader
Glowecestre Trader
Grantebridge Trader
Grimsby Trader
Guildford Trader
Hemthorpe Trader
Jorvik Trader
Jorvik Trader
Lincoln Trader
Lunden Trader
Lunden Trader
Lunden Trader
Maeldun Trader
Northwic Trader
Oxeneforda Trader
Picheringa Trader
Quatford Trader
Repton Trader
Tamworth Fortress Trader
Wincestre Trader
Wincestre Trader
Buckingham Trader
Canterbury Trader
Colcestre Trader
Crawleah Trader
Donecaestre Trader
Elmenham Trader
Fearnhamme Trader
Folcanstan Trader
Glowecestre Trader
Grantebridge Trader
Grimsby Trader
Guildford Trader
Hemthorpe Trader
Jorvik Trader
Jorvik Trader
Lincoln Trader
Lunden Trader
Lunden Trader
Lunden Trader
Maeldun Trader
Northwic Trader
Oxeneforda Trader
Picheringa Trader
Quatford Trader
Repton Trader
Tamworth Fortress Trader
Wincestre Trader
Wincestre Trader
Highpoints
Highpoints can be synchronized by climbing them and pressing the interaction button. They can then be used as the FAST TRAVEL points.
 Agnitum Tower
Bardon Lookout
Black Peak
Britannia's Watch
Brunton Turret
Caistor Lupus
Canterbury Cathedral
Cent
Cent
Cragstone Watchtower
Cruwland
Edmund's Hope
Foris Turre
Glowcestre
Glowecestrescire
Hamtunscire
Hamtunscire
Hamtunscire
Hill Gate Remnants
Jorvik
Jorvik
Lacestone
Ledecestre
Lincoln
Lincolnscire
Lunden
Lundenwic Abbey
Manstone Rock
Mercian Tower
Northwic
Olikana Tower
Ragnarsson Lookout
Repton
Ruined Tower
Ruined Tower
Sciropescire
Sciropescire
Snotinghamscire
Suthsexe
Suthsexe
Tamworth Fortress
Thaerelea Ruins
The Cistern Tower
The Nun's Minster
Venonis
Werham
Wincestre
Wincestre
Wycham
Agnitum Tower
Bardon Lookout
Black Peak
Britannia's Watch
Brunton Turret
Caistor Lupus
Canterbury Cathedral
Cent
Cent
Cragstone Watchtower
Cruwland
Edmund's Hope
Foris Turre
Glowcestre
Glowecestrescire
Hamtunscire
Hamtunscire
Hamtunscire
Hill Gate Remnants
Jorvik
Jorvik
Lacestone
Ledecestre
Lincoln
Lincolnscire
Lunden
Lundenwic Abbey
Manstone Rock
Mercian Tower
Northwic
Olikana Tower
Ragnarsson Lookout
Repton
Ruined Tower
Ruined Tower
Sciropescire
Sciropescire
Snotinghamscire
Suthsexe
Suthsexe
Tamworth Fortress
Thaerelea Ruins
The Cistern Tower
The Nun's Minster
Venonis
Werham
Wincestre
Wincestre
Wycham
Locations
Interesting places that play a certain role, for example you have to visit them while doing certain quests, etc.
 Botolphston
Crawleah Dock
Cweornric
Eatun Barn
Embert Blockade
Fearnhamme
Forest Hideout
GlowecestreRelated quests: Clues and Riddles, The Burning of the Wicker Man, The First Night of Samhain.
Henge Farm
Linforda
Maeldun's Saltern Camp
Myrddin's Cave
Oxeneforda
Soham Hideout
Temple of Pluto
Uriconium Ruins
Botolphston
Crawleah Dock
Cweornric
Eatun Barn
Embert Blockade
Fearnhamme
Forest Hideout
GlowecestreRelated quests: Clues and Riddles, The Burning of the Wicker Man, The First Night of Samhain.
Henge Farm
Linforda
Maeldun's Saltern Camp
Myrddin's Cave
Oxeneforda
Soham Hideout
Temple of Pluto
Uriconium Ruins
Opals
Opals are rare resources that can be found while exploring the Assassin's Creed Valhalla world and earned by completing daily and weekly challenges. They serve as currency to purchase from special merchants.
Summary of the regions of England
- Ledecestrescire (Power: 20) - 28 Wealth (4 Books of Knowledge, 7 Gear and Weapons, 12 Ingots, 5 Cargo), 16 Mysteries (10 World Events, 1 Fly Agaric, 1 Standing Stones, 1 Cairn, 1 Flyting, 1 Offering Altar, 1 Animus Anomaly), 13 Artifacts (1 Treasure Hoard Map, 3 Flying Papers, 5 Roman Artifacts, 1 Rigsogur Fragment, 3 Cursed Symbols)
- Grantebridgescire (Power: 20) - 21 Wealth (4 Books of Knowledge, 5 Gear and Weapons, 7 Ingots, 5 Cargo), 15 Mysteries (10 World Events, 1 Fly Agaric, 1 Standing Stones, 1 Flyting, 1 Offering Altar, 1 Daughter of Lerion), 10 Artifacts (1 Treasure Hoard Map, 2 Flying Papers, 3 Roman Artifacts, 1 Rigsogur Fragment, 3 Cursed Symbols)
- East Anglia (Power: 55) - 17 Wealth (3 Books of Knowledge, 5 Gear and Weapons, 6 Ingots, 3 Cargo), 18 Mysteries (7 World Events, 1 Fly Agaric, 1 Standing Stones, 1 Cairn, 1 Flyting, 1 Offering Altar, 1 Animus Anomaly, 1 Lost Drengr, 1 Legendary Animal, 2 Daughters of Lerion, 1 Treasure of Britain), 10 Artifacts (1 Treasure Hoard Map, 2 Flying Papers, 3 Roman Artifacts, 1 Rigsogur Fragment, 3 Cursed Symbols)
- Oxenefordscire (Power: 90) - 22 Wealth (3 Books of Knowledge, 4 Gear and Weapons, 9 Ingots, 6 Cargo), 10 Mysteries (6 World Events, 1 Fly Agaric, 1 Flyting, 1 Animus Anomaly, 1 Legendary Animal), 13 Artifacts (2 Treasure Hoard Maps, 2 Flying Papers, 5 Roman Artifacts, 1 Rigsogur Fragment, 3 Cursed Symbols)
- Lunden (Power: 90) - 8 Wealth (4 Gear and Weapons, 4 Ingots), 5 Mysteries (4 World Events, 1 Flyting), 3 Artifacts (3 Flying Papers)
- Cent (Power: 130) - 27 Wealth (2 Books of Knowledge, 3 Gear and Weapons, 14 Ingots, 8 Cargo), 11 Mysteries (7 World Events, 1 Fly Agaric, 1 Standing Stones, 1 Flyting, 1 Treasure of Britain), 13 Artifacts (1 Treasure Hoard Map, 3 Flying Papers, 4 Roman Artifacts, 1 Rigsogur Fragment, 4 Cursed Symbols)
- Sciropescire (Power: 130) - 12 Wealth (1 Book of Knowledge, 3 Gear and Weapons, 6 Ingots, 2 Cargo), 14 Mysteries (7 World Events, 1 Fly Agaric, 1 Standing Stones, 1 Cairn, 1 Flyting, 1 Offering Altar, 1 Animus Anomaly, 1 Legendary Animal), 11 Artifacts (1 Treasure Hoard Map, 2 Flying Papers, 4 Roman Artifacts, 1 Rigsogur Fragment, 3 Cursed Symbols)
- Essexe (Power: 160) - 23 Wealth (2 Books of Knowledge, 5 Gear and Weapons, 13 Ingots, 3 Cargo), 12 Mysteries (8 World Events, 1 Fly Agaric, 1 Flyting, 1 Offering Altar, 1 Treasure of Britain), 12 Artifacts (1 Treasure Hoard Map, 2 Flying Papers, 5 Roman Artifacts, 1 Rigsogur Fragment, 3 Cursed Symbols)
- Lincolnscire (Power: 160) - 18 Wealth (2 Books of Knowledge, 5 Gear and Weapons, 8 Ingots, 3 Cargo), 10 Mysteries (7 World Events, 1 Fly Agaric, 1 Animus Anomaly, 1 Legendary Animal), 13 Artifacts (1 Treasure Hoard Map, 2 Flying Papers, 6 Roman Artifacts, 1 Rigsogur Fragment, 3 Cursed Symbols)
- Suthsexe (Power: 160) - 21 Wealth (2 Books of Knowledge, 2 Gear and Weapons, 9 Ingots, 8 Cargo), 14 Mysteries (8 World Events, 1 Fly Agaric, 1 Cairn, 1 Offering Altar, 1 Animus Anomaly, 1 Legendary Animal, 1 Treasure of Britain), 13 Artifacts (3+1 Treasure Hoard Maps, 2 Flying Papers, 3 Roman Artifacts, 1 Rigsogur Fragment, 4 Cursed Symbols)
- Jorvik (Power: 190) - 11 Wealth (1 Book of Knowledge, 5 Gear and Weapons, 5 Ingots), 5 Mysteries (4 World Events, 1 Flyting), 5 Artifacts (1 Treasure Hoard Map, 2 Flying Papers, 2 Roman Artifacts)
- Eurvicscire (Power: 190) - 24 Wealth (2 Books of Knowledge, 3 Gear and Weapons, 10 Ingots, 9 Cargo), 16 Mysteries (6 World Events, 1 Fly Agaric, 1 Standing Stones, 1 Cairn, 1 Flyting, 1 Offering Altar, 1 Animus Anomaly, 2 Lost Drengr, 1 Legendary Animal, 1 Treasure of Britain), 8 Artifacts (1 Treasure Hoard Map, 2 Flying Papers, 2 Roman Artifacts, 3 Cursed Symbols)
- Glowecestrescire (Power: 220) - 14 Wealth (2 Books of Knowledge, 3 Gear and Weapons, 9 Ingots), 11 Mysteries (5 World Events, 1 Fly Agaric, 2 Standing Stones, 2 Cairns, 1 Offering Altar), 11 Artifacts (1 Treasure Hoard Map, 2 Flying Papers, 5 Roman Artifacts, 3 Cursed Symbols)
- Snotinghamscire (Power: 250) - 17 Wealth (2 Books of Knowledge, 2 Gear and Weapons, 10 Ingots, 3 Cargo), 15 Mysteries (6 World Events, 1 Fly Agaric, 2 Standing Stones, 1 Cairn, 1 Flyting, 1 Offering Altar, 1 Animus Anomaly, 1 Lost Drengr, 1 Treasure of Britain), 8 Artifacts (1 Treasure Hoard Map, 1 Flying Paper, 2 Roman Artifacts, 1 Rigsogur Fragment, 3 Cursed Symbols)
- Wincestre (Power: 250) - 10 Wealth (1 Book of Knowledge, 4 Gear and Weapons, 5 Ingots), 4 Mysteries (4 World Events), 5 Artifacts (2 Treasure Hoard Maps, 3 Flying Papers)
- Hamtunscire (Power: 340) - 23 Wealth (3 Gear and Weapons, 10 Ingots, 10 Cargo), 14 Mysteries (5 World Events, 1 Fly Agaric, 2 Standing Stones, 1 Cairn, 1 Flyting, 1 Animus Anomaly, 1 Legendary Animal, 2 Treasures of Britain), 8 Artifacts (1 Treasure Hoard Map, 2 Flying Papers, 3 Roman Artifacts, 2 Cursed Symbols)