Reaper's Coast - Map Markers Summary
Misc x24, Obelisks x7, Unique Items x12, Locations x21, Scrolls and Letters x13, Blackroot Plants x3, Books x14, Locked Passages x29, Keys x17, Levers / Switches x21, Altars x3, Mirrors x2, Source x17, Spirits x30, NPCs x104, Animals x16, Special Chests x15, Ornate Chests x18, Chests x39, Buried Treasure x6, Fights x36, Waypoints x14, Transitions x83, Up or Down x14, Other x2
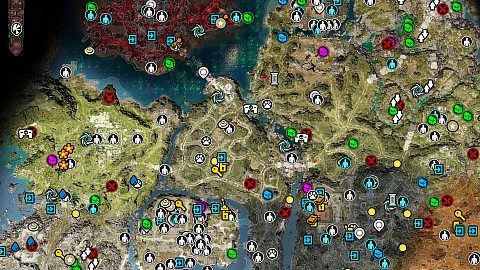
The following legend of Reaper's Coast interactive game map defines the points of interest / markers displayed on the map. Each marker corresponds to a specific element to facilitate efficient navigation and interaction with the map.
 Console
Dreamer Pipe
Eternal Plate
Explosive Rats
They explode on contact. Destroy the holes in the walls to stop them from constantly spawning.
Hidden Storage
It's hidden behind the painting. You need a key to open it.
Reliquary
Inside you will find Eternal Artefact.
Rotten Egg Cluster
Ryker's Desk
It's locked. It can be unlocked with Ryker's Desk Key. Inside you will find Assassination Contract.
Related quests: A Generous Offer.
Surrey Family Tomb
In the tomb you will find Unusual Artefact.
Related quests: All in the Family.
Tomb
Some loot inside. Don't stand close to explosive mine in front of it!
Unusual Skeleton
 Broken Angelic Figure
You need to fix this figure if you want to open the crypt. To fix the statue you need Head of Angelic Statue.
Broken Angelic Figure
You need to fix this figure if you want to open the crypt. To fix the statue you need Head of Angelic Statue.
The Figurehead
The Pedestal
The Stone Relic
Use it (req. 1 source point) to get a new recipe - Mask of the Shapeshifter.
The Towering Relic
Use it (req. 1 source point) to get a new recipe - Armour of the Eternals.
Unique quality armour parts and weapons that can be found and picked up. This list does not include items that drop from killed NPC's, etc.
 Captain Ablewether's Hat
It's in the wardrobe. It grants Healing Ritual skill.
Captain Ablewether's Hat
It's in the wardrobe. It grants Healing Ritual skill.
Captain's Compass Amulet
Fog is deadly (not for undead). The easiest way will be to use teleportation and teleport the amulet to the location near you.
Related quests: Drowning her Sorrows.
Copper Ring
When you pick it up, you will be attacked by several voidwoken (lvl 10).
Related quests: Lost and Found.
Face Ripper
Metal Shield
Reaver's Axe
Two-Handed Axe. It's in the corpse of a Dead Black Ring Reaver.
Source Weapons
Inside the locked barrel (lock lvl 3). Soulforged Crossbow and Soulforged Blade (Two-Handed Sword). When you pick them up, you will be attacked by several volatile and viscous voidlings (lvl 11).
Related quests: The Law of the Order.
Sourcerer's Ring
Stonecrusher Armour
Chest Armour. It's in the corpse of a Dead Dwarf.
 Bloodmoon Island Bridge
Cast Spirit Vision to see it.
Bloodmoon Island Bridge
Cast Spirit Vision to see it.
Cullwoods Mill
Damaged Oil Pump
You can repair it and use to create oil barrels. Correct order is: Yellow, Blue, Green.
Driftwood
Eithne's Rendezvous Point
Mordus' House
Puzzle of Glyphs
The Ancestor Tree
2 x Black Ring Fearmaiden + 2 x Black Ring Painweaver + Undead Black Ring Destroyer.
Undead Black Ring Destroyer drops The Destroyer's Gloves. In the corpse of the Black Ring Painweaver you will find A Mysterious Letter and Ornate Hymnal in the corpse of another one.
Related quests: The Advocate, The Druid, The Secrets of Bloodmoon Island.
The Black Bull Tavern
The Bridgekeepers' House
Void-tainted Ancestor Tree
Related quests: Sebille.
 Black Ring Instructions
In the corpse of Dead Black Ring Painweaver.
Black Ring Instructions
In the corpse of Dead Black Ring Painweaver.
Most Wanted List
Torn Diary Pages
 Blackroot Plant
Blackroot Plant
Blackroot Plant
 Grasp of the Starved Skillbook
Onslaught Skillbook
Shabby Ledger
It's in a cupboard.
Related quests: The Covenant.
 Crumbling Wall
Use the oil barrels to destroy it.
Crumbling Wall
Use the oil barrels to destroy it.
Crypt Door
It's locked (lock lvl 2) but you should use lever.
Door
Locked. You have to use Lever.
Door
It's locked (lock lvl 1). You must first move or destroy boxes.
Door
It's locked (lock lvl 4). It can be unlocked with Skeleton Key.
Door
It's locked (locl lvl 2).
Door
It's locked (lock lvl 4) but you can open it by placing your characters on three small plates.
Door
It's locked. To open it you shuld tell it that you are Godwoken.
Door
It's locked. To open it you shuld tell it that you are Godwoken.
Door
Locked (lock lvl 3).
Door to Magisters' Cave Armoury
It's locked (lock lvl 1). You can use Key from Magisters' Cave Armoury to open it.
Door to the Webbed Room
It's locked (lock lvl 3).
Fish Storage Door
Locked
Hidden passage
Depending on which side you are located on, use the Lever or Shrine to Duna to open it.
Palisade Gates
It's locked (lock lvl 2).
Petrified Gate
Use your weapon and destroy it. Watch out for petrifying steam in the next room.
Puzzle of Glyphs Door
It's locked. you need to solve Puzzle of Glyphs to open it.
The Witch House Cellar Door
It's locked (lock lvl 2). Use the lever to open it.
Weapon Chamber Door
It's locked (lock lvl 4).
Worn Gate
It's locked (lock lvl 1). You can use Worn Key to unlock it.
 Acid-Stained Key
It's under water barrel.
Acid-Stained Key
It's under water barrel.
An Oil-Stained Key
It's under the oil barrel. It unlocks Door.
Barrel Chamber Key
Private Chamber Key
Reinforced Crate
Inside the crate you will find Gold Key. You can use it to open nearby Ornate Chest.
Skeleton Key
It's hidden behind the Painting of a Man, examine it. The key will drop on the ground.
 Big Switch
Broken Lever (Vault #1)
To fix it, combine it with Silver Lever Shaft.
Related quests: Bound by Pain.
Broken Lever (Vault #3)
To fix it, combine it with Silver Lever Shaft.
Related quests: Delusions of Grandeur.
Gated Crypt Lever
Lever
It unlocks the Door.
Lever
Lever
It deactivates the traps.
Lever (Vault #1)
Ornate Skull
Locked (lock lvl5?). you can use Glowing Eye that can be found in the corpse of Dead Dwarf to unlock it.
Related quests: A Taste of Freedom.
Pressure Plate
Pressure Plate
Pressure Plate
Shrine to Duna
First look at the Schematic found inside Row of Books to find out about the existence of the button.
Switch (Charnel House)
One of the two switches you have to press to open the hidden passage.
Switch (Charnel House)
One of the two switches you have to press to open the hidden passage.
Three Switches
You need to cast Spirit Vision to be able to see them. Place one of your charaters on the switch in the adjoining room then press the middle button until water appears, press the left button until Electrified Water appears, and finally press the right button to create Blessed Fire.
Valve
It turns off petryfying steam.
 Magic Mirror
 Source
Source
Source
Source
Source
Source
Source
Source
Source
Source
Source
Source
Source
Source
Source
Source
Source Fountain
 Log
You have to cast Spirit Vision to be able to see it.
Related quests: The Bark's Bite.
Log
You have to cast Spirit Vision to be able to see it.
Related quests: The Bark's Bite.
Seim and Sirrah
And 2 x Spirit of Dwarf.
Spirit of a Black Ring Reaver
Spirit of a Deer
You have to cast Spirit Vision and click on Deer Trophy. It's an animal so you need Pet Pal talent to be able to talk to it.
Related quests: A Prize Kill.
Spirit of a Lizard
Spirit of Baran Levere
Spirit of Black Ring Wizard
Spirit of Magister Harrick
You need Spirit Vision to be able to see it.
Related quests: The Missing Magisters.
Spirit of the Black Widowmaker
Related quests: Bitter Tonic.
Spirit of Zimski
Talk to him, he can give you Source Potion (x3).
Spirits of Conway Pryce and Lyn Pryce
You have to cast Spirit Vision to be able to see them.
Related quests: Burying the Past.
 Baran Levere
He drops Fancy Key, Mysterious Orders, Lone Wolf Mark (Amulet), Baran's Electryfying Dagger and Baran's Burning Dagger.
Related quests: A Rare Prey, Ifan ben-Mezd, Sebille.
Baran Levere
He drops Fancy Key, Mysterious Orders, Lone Wolf Mark (Amulet), Baran's Electryfying Dagger and Baran's Burning Dagger.
Related quests: A Rare Prey, Ifan ben-Mezd, Sebille.
Basatan, The Wishmaster
He sells Emrach (Chest Armour).
Brayton Barnes
Tell him lohar send you, he will give you Putrid Key.
Corpse of Master Awen
In the corpse you will find Bloodied Dwarven Flesh. It grants Bone Cage skill when eaten.
Dorotya, The Decadent One
She walks around.
Related quests: A Web of Desire.
Dorotya, The Decadent One (Spider)
Dorotya will move here and will be waiting for you here for some time after you accept her offer - A Web of Desire quest.
Related quests: A Web of Desire.
Earnan and Aileen
Eithne
She sells Necromancer, Polymorph and Summoning skillbooks and An Mey Falin (Belt).
Related quests: Eithne the Trader.
Firewater
There is Firewater's Staff lying here. Take it!
Related quests: Old Flames.
Fletcher Corbin Day
He sells Huntsman skillbooks.
Related quests: Press-ganged.
Gareth
He sells Geomancer and Warfare skillbooks. When you leave the ship, he will also go to the mainland.
Han
He can fetch some stuff you need (ingredients).
Higba The Tinkerer
He hides in a barrel.
Related quests: Strange Cargo.
Mabel
You have to first turn her back into human - Treated like Cattle quest. She sells books about crafting.
Magister Axeman
Magister Caryl
He travels all over Driftwood. If Ifan ben-Mezd is in your team then he will want to arrest him. 75 gold can prevent this.
Magister Colwyn
Magister Grimes (lvl 13)
Magister Grimes + Magister Marksman + Magister Markswoman.
You can convince him to open the gate and let you pass or kill him.
Magisters (lvl 13)
Magister Knight + Magister Ranger + Magister Priest.
Related quests: Window of Opportunity.
Magisters Telyn and Idris
Source Hounds can detect Source. You can persuade them that you are not a Sourcerer.
If you freed the Lich - A Taste of Freedom quest - they will be dead.
Malady
Mummie Dearest
In ther corpse you will find Severed Head.
Related quests: Finder's Fee.
Naptooth
He drops Assassination Contract.
Paladins Willym and Jhad
if you persuade them then they will give you Farmhouse Key.
Related quests: Burying the Past.
Pressley
Qanna
She is pertified. Cast Bless on her to remove that state. In her corpse you will find Shadowed Tomb Key and Ripped Page. Pickpocketing her will also work.
Related quests: All in the Family.
Quartermistress Anna
Ryker (lvl 12)
Source-infused Cellar Key, Ryker's Desk Key and Ancient Stone Tablet (if you gave it to him).
Snakeroot
In the corpse you will find Ancient Empire Tome.
Related quests: Bitter Tonic.
The Dead Ferryman
He can take you to Bloodmoon Island, but only undead characters will survive this journey.
The Idle Beggar and Rusty
Beggar and his dog named Rusty.
Related quests: A Man and His Dog.
Trader Bree
She sells Necromancer Skillbooks, Summoning Skillbooks and Hydrosophist Skillbooks.
Trader Haran
He sells Weapons, Armor, including Amadio (Shield), Huntsman and Warfare skillbooks.
Trader Ovis
He sells Aerotheurge Skillbooks, Geomancer Skillbooks, Pyrokinetic Skillbooks, Polymorph Skillbooks and Chamore Doran (Wand).
Trader Thun
He sells fish.
White Magister Jonathan
He drops Jonathan's Ring.
Related quests: Burying the Past.
 Andras
It will attack you when you try to open nearby crypt. Ignore its minions, focus dps on it.
Andras
It will attack you when you try to open nearby crypt. Ignore its minions, focus dps on it.
Featherfall
Persuade it. You will learn Summon Condor spell.
Kabu and Brun the Honeybears
Rusty
He will move here after you help him at the Driftwood square.
The Weaver
You can talk to it but to be able to do it you need Pet Pal talent and you need to persuade it. Otherwise you will be attacked.
Related quests: The Weaver.
Zppt
 Baran Levere's Chests
Two locked chests. Right one can be unlocked with Fancy Key which drops from Baran Levere. Left one can be unlocked with Gaudy Key. Inside you will find Baran Levere's Ring of Bartering.
Baran Levere's Chests
Two locked chests. Right one can be unlocked with Fancy Key which drops from Baran Levere. Left one can be unlocked with Gaudy Key. Inside you will find Baran Levere's Ring of Bartering.
Bromley's Buried Valuables
Inside you should find Justinia's Favour (Gloves).
Related quests: Heroes' Rest.
Cow's Secret Chest
You should check Treated like Cattle quest description for more information.
Druid's Hidden Stash
It's hidden / buried.
Related quests: The Druid.
Garrick's Buried Valuables
Flashing Footsteps (Boots).
Related quests: Heroes' Rest.
Halla's Buried Valuables
Inside you should find Halla's Shiny Ribbon (Belt).
Related quests: Heroes' Rest.
Lone Wolf's Cache
It's hidden. You need 18(?) Wits to be able to find it. Inside you will find Damp Wooden Chest (lvl 14).
Magic Chest
It's locked. Where is key? 4 points of Thievery is enough to open it. Inside you will find the Teleporter Pyramid (Green).
It drains one source point when touched.
Ryker's Chest
It's locked. You need Odd Metal Key. Inside you will find Teleporter Pyramid (Yellow).
Storage Chest
*Store on Lady Vengance*
The Treasury of the One Chests
In one of the chests you will find Key of the One. It can be used to open the door to the next arena located on The Nameless Isle.
Thrice-Bound Chest (lvl 12)
Locked (lock lvl 6). Teleport it out of the fire. It has low hp!
Related quests: Speaking in Forked Tongues.
Vydia's Buried Valuables
Inside the chest you will find Visha's Helm.
Related quests: Heroes' Rest.
 Energy Chest
Ornate Chest
Ornate Chest
Ornate Chest
Ornate Chest
Locked. You need Gold Key to open it. The key is inside the nearby Reinforced Crate.
Ornate Chest (lvl 10)
Ornate Chest (lvl 10)
Ornate Chest (lvl 11)
Ornate Chest (lvl 11)
Inside you will find Brittle Spear.
Ornate Chest (lvl 11)
Ornate Chest (lvl 12)
Ornate Chest (lvl 13)
Ornate Chest (lvl 14)
Ornate Chest and Ironbound Chest (lvl 9)
Ornate Chests (lvl 10)
Two ornate chests.
 Abandoned Box (lvl 14)
Abandoned Chest (lvl 10)
Abandoned Chest (lvl 12)
Teleport one of your characters into the ruined house.
Abandoned Chest (lvl 14)
Abandoned Chest (lvl 15)
Chest (lvl 12)
Chest (lvl 12)
It's buried and locked (lock lvl 4).
Chest (lvl 12)
It's hidden / buried.
Chest (lvl 14)
Chest (lvl 14)
Chest (lvl 14)
Chest (lvl 14)
Chest (lvl 15)
Chest (lvl 9)
Chest (lvl 9)
Vard d'Layal (Bow).
Chest (lvl 9)
Chest (lvl 9)
It's locked (lock lvl 2). You can use the Key to unlock it. Hanal Lechet (Two-Handed Axe) inside.
Dead Worker's Chest (lvl 15)
It's locked (lock lvl 4). you can use the Key to unlock it.
Energy Chest
Lost Chest (lvl 13)
Mari Pruitt's Chest (lvl 9)
Overseer's Chest (lvl 14).
It's locked (lock lvl 4) but you can use Rusty Key to unlock it.
Steel-Banded Chest
It's hidden/ buried.
Weapon Chest (lvl 12)
Weapon Chests (lvl 12)
Two weapon chests. Excruciating Echo (Bow), Stormforger (One-Handed Mace).
d
Well-Worn Chest (lvl 10)
It's locked (lock lvl 3) but you can use the Key that can be found in the corpse of Dead Dwarf.
Well-Worn Chest (lvl 11)
Well-Worn Chest (lvl 12)
Well-Worn Chest (lvl 12)
Well-Worn Chest (lvl 12)
Well-Worn Chest (lvl 13)
Well-Worn Chest (lvl 13)
Well-Worn Chest (lvl 14)
Well-Worn Chest (lvl 14)
It's locked (lock lvl3). It can be unlocked with Key.
Well-Worn Chest (lvl 14)
Well-Worn Chest (lvl 14) / Elven Chest
It's buried. Inside you will find Rainwater Amulet.
Well-Worn Chest (lvl 15)
Well-Worn Chest (lvl 8)
Locked (lock lvl 1)
 Adventurer's Hidden Stash
It's hidden/buried.
Adventurer's Hidden Stash
It's hidden/buried.
Burial Place of a Stag
It's hidden / buried. There are Chaucer and body of Deer Hunter inside. In the body you will find nice bow - Antler Bow.
Related quests: A Prize Kill.
Cat Skeleton
It's hidden / buried.
Pouch
It's hidden / buried. Some loot.
Sack
It's hidden / buried. Some loot.
Sack
It's hidden / buried. Some loot.
 Ambush Site (lvl 12)
If The Red Prince is in your party then here you will be attacked by 2 x Shadow Sniper + 2 x Shadow Assassin.
Related quests: The Red Prince.
Ambush Site (lvl 12)
If The Red Prince is in your party then here you will be attacked by 2 x Shadow Sniper + 2 x Shadow Assassin.
Related quests: The Red Prince.
Apprentice's House
If you saved Gwydian Rince then he will be here and will help you.
Magister Inquisitor (lvl 13) + Magister Executioner + 2 x Silent Watcher + Magister Brute.
Related quests: On the Ropes.
Cold-Crawler Voidwoken (11)
Cold-Crawler Voidwoken (11)
Cold-Crawler Voidwoken (lvl 11)
Cold-Crawler Voidwoken (lvl 11)
Corpse of Alice Alisceon (lvl 15)
She drops Witch's Cellar Key.
Related quests: Treated like Cattle.
Demons (lvl 15)
Virkdn Spellbinder + Lrm The Accursed + Myrvl The Accursed + Puxk Bloodspawn + Feygr Bloodspawn + Gryst Bloodspawn.
Desiccated Undead (Outside)
He will be here after you release him - A Taste of Freedom quest.
Elders (lvl 14)
Elder of Mending + Elder of Enkindling + Elder of Passing.
Elder of Passing drops Wand of the Elder.
Enemies (lvl 15)
Enelrahc the Baleful + Kortan The Stalker + Quisvilius The Malevolent + Zerachial The Accursed + Huld The Stalker.
Lamenting Abomination (lvl 14)
Lamenting Abomination + 4 x Black Wolf + Old Gray wolf.
Looters (lvl 14)
Chief Looter + Crossbowman Looter + Assassin Looter + Alchemist Looter.
Magisters (lvl 13)
White Magister + Magister Knight + 2 x Weaponised Monk + Silent Watcher + 2 x Possessed Black Ring Reaver.
You can persuade them but they will attack you when you try to destroy crumbling wall. In the corpse of White Magister you will find Magister's Cloak (Chest Armour).
Magisters (lvl 13)
Magister Inquisitor + Magister Ranger + Magister Assassin.
Related quests: No Way Out.
Magisters (lvl 16)
Magister Vorrh + Magister Reimond + 2 x Silent Watcher (lvl 14) + 2 x Source Hound (lvl 12).
Magisters vs Voidwoken (lvl 13)
Magister Gremory + 3 x Silent Watcher vs 2 x Vampiric Voidwoken + 2 x Fluorescent Voidling + Armoured Voidling.
Magister Gremory drops Key from Magisters' Cave Armoury and Excavation Log.
Related quests: The Aeteran, The Midnight Oil.
Martyred Monk
Shrieker.
Mordus (lvl 11)
Mordus + 4 x Possessed Sourcerer.
You can spare or kill him. In the corpse you will find Mordus' Amulet and Key.
Related quests: Beast.
Possessed Dwarves (lvl 10)
Possessed Warmaiden + Possessed Battlemage + Possessed Cleric + 2 x Possessed Arbalist. Do not come close until the Venom-Wing Voidwoken goes away.
Possessed Dwarves (lvl 10)
Possessed Elementalist + Possessed Marksman.
Possessed Dwarves (lvl 10)
Possessed Elementalist + 2 x Possessed Summoner + Possessed Markswoman.
Possessed Dwarves (lvl 11)
Possessed Rogue + Possessed Elementalist.
Restless Scarecrow (lvl 12)
Undead Scarecrow + 4 x Enchanted Scarecrow.
Shrieker
Shrieker
Small Viscous Eggs (lvl 9)
Venom-Wing Voidwoken + 5 x Void Hatchlings.
Related quests: Counting your Chickens.
Storm-Wing Voidwoken (lvl 11)
Storm-Wing Voidwoken + 2 x Vampiric Voidwoken.
Vampiric Voidwoken (lvl 11)
Viscous Eggs (lvl 11)
3 x Viscous Eggs + Possessed Markswoman + Possessed Elementalist.
Void-Touched Deer (lvl 14)
4 x Void-Touched Deer.
Voidlings (lvl 13)
2 x Fluoroscent Voidling + 3 x Armoured Voidling.
Voidlings (lvl 9)
3 x Volatile Voidling + 3 x Viscous Voidlings.
Voidwoken (lvl 13)
2 x Venom-Wing Voidwoken + 2 x Void-touched Boar.
Voidwoken (lvl 9)
2x Venom-Wing Voidwoken + 2 x Noxious Voidwoken.
Related quests: They Shall Not Pass.
 Blackpits - Gates
Blackpits - Mines
Bloodmoon Island
Cloisterwood
Driftwood - Dunes
Driftwood - Fields
Driftwood - Square
Paladin Bridgehead
Paradise Downs
Stonegarden Graveyard
The Lady Vengeance
Waypoint and a boat to the beach.
Undertavern
Wreckers' Cave - Depths
Wreckers' Cave - Reaper's Cove
 Back to The Blackpits
Blackpits Cavers (Entrance)
Blackpits Cellar (East)
Blackpits Cellar (West)
Bloodmoon Vault #1 (Entrance/Exit)
Bloodmoon Vault #2 (Entrance/Exit)
Bloodmoon Vault #4 (Entrance/Exit)
Boat to the Lady Vengeance
Bridge House Cellar (Exit)
Dead Sourcerer
Come to the corpse then try to move back. You wil be attacked by a Voidwoken creatures, and dragged deeper into the cave. Each character goes to different place.
Driftwood Prison (Exit)
Exit from Mordus' Cave
Fisherworks Cellar (Exit)
Gated Crypt (In/Out)
Healer's House Cellar (In/Out)
Ladder up to Mordus' Cave
Lich Crypt (Entrance)
Mordus' Cave (Entrance)
Mordus' Cave (Exit)
Morgus' House Cellar (Exit)
Ryker's Rest - Private Chambers (Entrance/Exit)
Second Floor of Magisters' Barracks
Shadowed Tomb / Charnel House (Entrance/Exit)
Small Cave (In/Out)
Stairs back to The Black Bull
Stairs to the First Floor of the Black Bull
Stairs to the ground floor of the Black Bull
Stairs to the Suite
Stairs to the upper floor of the Black Bull
Surrey Family Crypt (Entrance/Exit)
The Archive (Entrance/Exit)
The Treasury of the One (Entrance/Exit)
The Witch House Cellar (Entrance/Exit)
To Blackpits Cellar
To Blackpits Cellar
To Bloodmoon Vault #1
To uncover the entrance to the vault located under the Blazing Sculpture, you must first read the book called Ornate Hymnal. Only the character with Scholar talent will be able to understand what is written in it.
Related quests: Bound by Pain, The Forgotten and the Damned.
To Bloodmoon Vault #2
To uncover the entrance to the vault located under the Blazing Sculpture, you must first read the book called Ornate Hymnal. Only the character with Scholar talent will be able to understand what is written in it.
Related quests: The Forgotten and the Damned, The Silent One.
To Bloodmoon Vault #3
To uncover the entrance to the vault located under the Blazing Sculpture, you must first read the book called Ornate Hymnal. Only the character with Scholar talent will be able to understand what is written in it.
Related quests: Delusions of Grandeur, The Forgotten and the Damned.
To Bridge House Cellar
To Bridgekeepers' House
To Burning House Cellar
Related quests: No Way Out.
To Cullwoods Mill - Ground Floor
To Cullwoods Mill - Upper Floor
To Driftwood Prison
To Effie's Emporium
To Fishworks Cellar
Locked (lock lvl 3). It can be unlocked with Putrid Key given by Brayton Barnes.
To Gated Crypt
You have to kill Andras before you enter the crypt.
To Healer's House Cellar
To Lich Crypt
To Lower Level
To Mordus' Cave
To Ryker's Rest
To Ryker's Rest - Cellar
To Ryker's Rest - Ground Floor
To Ryker's Rest - Private Chambers
To Ryker's Rest - Upper Floor
To Secret Mordus' Cave
You need Mordus' Amulet to open it.
To Shadowed Tomb / Charnel House
It's locked but you can kill Qanna and take Shadowed Tomb Key from her corpse.
To Small Cave
To Surrey Family Crypt
Use three switches to move the tomb and to uncover it.
Related quests: All in the Family.
To the Treasury of the One
It can be unlocked with Driftwood Arena Champion Key (The Driftwood Arena quest reward).
To the wreck of the Peacemaker
To Upper Level
To Wreckers' Cave
Tunnel
Tunnel
Underground Tunnel A
Underground Tunnel A
The entrance is buried.
Underground Tunnel B Entrance
It's hidden. Come close to uncover it and dig here.
Underground Tunnel B Exit
Vault - Right (Entrance/Exit)
Wreck of the Peacemaker
Wreckers' Cave #1
The first of your characters will be moved here by Voidwoken creature.
Wreckers' Cave #2
The second of your characters will be moved here by Voidwoken creature.
Wreckers' Cave #3
The third of your characters will be moved here by Voidwoken creature.
Wreckers' Cave #4
The fourth of your characters will be moved here by Voidwoken creature.
Wreckers' Cave (Exit)
How to quickly reunite your team in Wreckers' Cave?
Make sure you have at least two Teleporter Pyramids. You can find them on Lady Vengeance - Teleporter Pyramid (Blue), Teleporter Pyramid (Red).
Open the inventory and use the "send to ..." option to move one of the pyramids to the first character's inventory and the other pyramid to the second character's inventory. You can do this even if the characters are far apart!. Now you can use one of the pyramids to teleport the character to the other pyramid holder.
Where can I get Spirit Vision spell? Is it important spell?
Spirit Vision is a very important spell becouse it allows you to see spirits. There are a lot of quests on Reaper's Coast, where you have to communicate with them.
Cast this spell regularly to reveal a hidden world of ghosts lingering in the mortal realm.
To get this spell you need to visit Hall of Echoes, and you can get it relatively quickly. To do this, you need to do a dozen or so steps in the Powerful Awakening quest. See the description of this quest for more information.