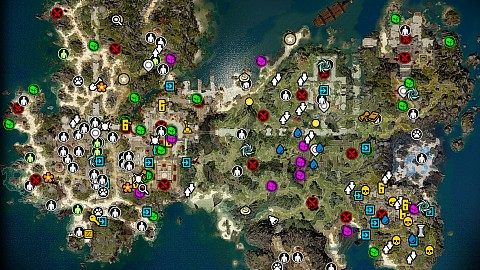
Fort Joy - Map Markers Summary
Showels x2, Identifying Glasses x2, Soul Jars x6, Unique Items x9, Common Gear x5, Scrolls and Letters x3, Key Locations x7, Obelisk x1, Crumbling Skulls x6, Books x8, Party Members x6, Yarrow flowers x3, Locked Passages x19, Keys x3, Levers x7, NPCs x65, Animals x7, Source x7, Ornate Chests x22, Ordinary Chests x31, Misc Loot x4, Fights x26, Waypoint Shrines x8, Transitions x44, Up or Down x14, Other x8
The following legend of Fort Joy interactive game map defines the points of interest / markers displayed on the map. Each marker corresponds to a specific element to facilitate efficient navigation and interaction with the map.
Lockpicks
Rose
Rose
Rusted Bell
Ring the bell, Bahara will come.
Starting point
Here you start your adventure on the Fort Joy island after escaping the prison ship.
Related quests: The Escape, The Voices.
Well
It needs some water! I casted Hail Strike on it but I think that any "water damage" skill will be ok. I also tested Water Baloon. You should agree to pay a fare (15/80/150). The more you pay, the better the prize (ring or belt) you will get in return. You can talk to the well each of your characters.
Shovel
Another shovel can be found here.
Shovel
You can find one shovel here. It lets your character dig.
Identifying Glass
It's in the skeleton.
Identifying Glass
It allows you to identify items.
Unique quality weapons, armour parts, etc.
Corrupted Tyrant's Helm
Helmet. One of the parts of the Artefacts of the Tyrant set. It's inside the Shrine of Braccus Rex. You need a source point to open the shrine.
Related quests: Artefacts of the Tyrant, The Armoury.
Darling Bow
Bow. It's inside the Dusty Pouch which is hidden / buried.
Heart of the Tyrant
Chest Armour. One of the parts of the Artefacts of the Tyrant set.
Related quests: Artefacts of the Tyrant.
Houndmaster's Crossbow
Crossbow.
Simple Pendant
Amulet. It's in the Skeleton.
The Hands of the Tyrant
Gloves. One of the parts of the Artefacts of the Tyrant set. Item is hidden inside the tomb. You need 18 strength to open the tomb.
Related quests: Artefacts of the Tyrant.
The Viper's Tongue
One-Handed Sword.
Tracks of the Tyrant
Boots. One of the parts of the Artefacts of the Tyrant set. This item is in one of the corpses located at the top of the tower. It is possible to teleport one of the party members to the top of the tower. You can also teleport corpses down to the beach.
Related quests: Artefacts of the Tyrant.
Tyrant's Stride
Pants. One of the parts of the Artefacts of the Tyrant set. To get the item you have to interact with the statue. You need 15 Wits to be able to interact with the statue!
Related quests: Artefacts of the Tyrant.
Common quality weapons and armor parts as they may be useful at an early stage of the game.
Bloodied Chain Gloves
Dwarven Dagger
Magister's Leather Armour
Magister's Sword
One-Handed Sword.
Orivand's Spare Mace
One-Handed Mace.
Flaming Pigs
Cast Bless skill on one of the pigs, then Scapor will appear. Persuade or kill her, you will find The Illuminator (One-Handed Mace, Braccus Rex weapon) in her corpse.
Related quests: The Burning Pigs.
Fort Joy Ghetto
Hidden Alcove
Invisible Bridge
Come close to see it.
The Flenser's Playground
Statue
Use the statue, it will teleport you back to the entrance to the maze.
Skulls needed to open the passage in the maze.
Corpse of Jimfred
In his corpse you will find another Crumbling Skull.
Related quests: The Gargoyle's Maze.
Crumbling Skull
To be able to take this skull you must place one of your characters on a nearby tile.
Related quests: The Gargoyle's Maze.
Crumbling Skull
To be able to take this skull you must place one of your characters on a nearby tile.
Related quests: The Gargoyle's Maze.
Crumbling Skull
To be able to take this skull you must place one of your characters on a nearby tile.
Related quests: The Gargoyle's Maze.
Human Skeleton
Inside the skeleton you will find Crumbling Skull.
Related quests: The Gargoyle's Maze.
Skillbooks, books containing information for quests, etc.
Battle Stomp Skillbook
Enrage Skillbook
Legend of the Blood Rose
Soggy Diary
It's in the Bloated Corpse.
Supernova Skillbook
Worm Tremor Skillbook
The list of characters that can join your party, as long as there is an empty slot for them and you don't start the game with them.
Beast
Race: Dwarf (Male)
Default class: Battlemage
Related quests: Beast.
Fane
Race: Undead (Male)
Default class: Wizard
Related quests: Fane.
Ifan ben-Mezd
Race: Human (Male)
Default class: Wayfarer
Related quests: Ifan ben-Mezd.
Lohse
Race: Human (Female)
Default class: Enchanter
Related quests: Lohse.
Sebille
Race: Elf (Female)
Default class: Rogue
If your character is a Lizard, or you are travelling with The Red Prince, you need to persuade her first.
Ih she is not here then you shoud go and check Camp Kitchen. She should be there.
Related quests: Sebille.
The Red Prince
Race: Lizard (Male)
Default class: Fighter
Related quests: The Red Prince.
Places on the west side of the island, where you can find Yarrow Flowers. You need one of them if you want to peacefully complete The Murderous Gheist quest.
Barricade
Destroy it.
Blocking Field
Door
Use the Lever to open it.
Door
Locked. Use the Lever located in the hidden room to open it.
Door
Door is locked but you can unlock and open it by placing one of your characters onto nearby tile. You can set it in such a way that it does not get hurt from passing fireballs.
Door
Lock Level 1
Door
Locked.
Door
Locked.
Door (locked)
Level 20
You need Filthy Iron Key to open it.
Door to the Fort
You need Magister's Key to open it.
The easies way to get here is to use Teleportation skill then you can lower the nearby ladder.
Related quests: The Murderous Gheist.
Door to the Houndmaster's Room
You need Buddy's Key to unlock it.
Related quests: Finding Emmie.
Door to the Ruined Tower
It's locked (lock lvl 1).
Energy Field
It's controlled by Mysterious Tech device.
Holding Cells Door
It's locked (lock lvl 0). All you need to open this door are lockipcks. It can be unlocked with the Prison Key.
Holding Cells Door
It's locked (lock lvl 0). It can be unlocked with the Prison Key.
Locked Gate
Need Captain Trippel's Key to unlock.
The Door
To unlock it give correct answers to Statue of Illusions questions.
Buddy's Key
Dig here (you need shovel of Lizard) or let Buddy do it. In that case you need to talk to him fist and offer your help.
Related quests: Finding Emmie.
Elaborate Cage Key
Drawbridge Wheel
Guardian Lever
Cast Bless spell on it to remove the curse.
Related quests: The Armoury.
Lever
It opens the nearby locked door.
Lever
Use it to unlock Door.
Mysterious Tech
*Call up your Source powers and focus them on the relic.* You need a Source Point to do it!. It will disable the field. If you helped Lord Withermoore and destroyed his soul jar, he will appear here and remove the barrier.
Bahara
Show her your collar, she will let you enter Sanctuary of Amadia. She sells Huntsman skillbooks.
Related quests: The Red Prince.
Coral
Be nice then she will give you Electric Discharge Scroll.
Corpse of Magister Atusa
When you come here for the first time, you will witness the meeting of Magister Atusa with Dallis, the Hammer and Bishop Alexandar, which will end with the death of the first of them.
You will find Atusa's Leg in the corpse - eat it as an elf to begin [quest]693[/quest] quest.
Related quests: A Wolf Alone, Signs of Resistance, The Escape.
Corpse of Magister Swordsman
In the corpse you will find Orders from Dallis.
Related quests: Signs of Resistance.
Dain
He is almost dead, lying on the ground next to the bonfire.
Heal him (before you talk to Doctor Leste) and during converation choose *Ask what he did to get himself laid out so badly.* - he will give you The Sparkler Card. You need that card if you want to win while playing with Ralvo, Slug, Bottle Top.
Doctor Leste
She can teach you how to make Minor Healing Potion.
She sells Polymorph Skillbooks.
Elodi
She has problem with two thugs trying to recover their money. You can not interfere, help Elodie, or stand on the side of the thugs. Make your decision relatively quickly because after some time you will find only Elodi corpse here, and you will not be able to begin the quest associated with her.
Related quests: The Shakedown.
Elodi (Caverns)
She will move here after you help her with the thughs trying to recover the money - The Shakedown quest. Talk to her, she will give you Severed Head - eat it as an elf to get First Aid skill.
Related quests: The Shakedown.
Hilde
She moves around.
She sells armor parts, weapons, etc.
Injured Seekers
Simone, who is trying to help Jules, Klaud and Matis. Heal them.
Related quests: Healing Touch.
Kerban
He sells Summoning Skillbooks and Necromancer Skillbooks. He also sells weapons and armor.
Related quests: Most Dangerous When Cornered.
Laslor
Lohre's friend. Gives Laslor's Lute
Lord Withermoore
Destroy or remove Spear of Braccus Rex from his chest. This action will begin Withermoore's Soul Jar quest. In his corpse you will find Withermoore's Girdle (Belt).
Related quests: Withermoore's Soul Jar.
Magister Alise
In her corpse you will find Large Divine Order Key. You can use it to open the main gate.
Magister Borris
In his corpse you will find Large Divine Order Key. You can use it to open the main gate.
Related quests: A Wolf Alone, Ifan ben-Mezd.
Magister Holind
He drops Holind's Bow.
Magister Loke
Try to convince him to go back to fort. If you fail you will be attacked by Decomposing (lvl 6): Swordsman, Axeman, Hunter, Aeromancer
Magister Sang
If you kill him then you will get some XP.
Related quests: The Armoury.
Magister Timery
In his corpse you will find the Magister's Key.
Magisters (lvl 5)
Swordsman + Knight + 2 x Ranger.
You can convince them to leave the area and let you go.
Magisters Carin and Goa
If you saved Delorus they will let you pass without fight. Magister Carin drops Magister Carin's Shield.
Malady
She will appear in this place when you kill Bishop Alexandar and his assistants. You should talk to her if you want to complete The Escape quest and leave the island.
Related quests: The Escape.
Maol
Tell him *Say you hope to find something you've lost.* then he will give you a Ruby.
He sells Geomancer Skillbooks.
Margo
Listen to her story, as a reward she will give you Restoration Scroll. You can do it with every character.
She sells Restoration Skillbook.
Myra
Necromancers (lvl 7)
Necromancer Tamsyn, Necromancer Rask, and Necromancer Gwick.
You can intimidate them and offer your help so they won't attack you.
If they aggro you, they will spawn 3 x Walking Corpse.
In corpse of Necromancer Tamsyn you will find Filthy Iron Key.
Related quests: A Fate Worse than Death.
Paladin Cork
When you approach, he will be attacked by Magisters. It is possible to save him, but you must act fast.
Related quests: The Escape.
Radeka the Witch (lvl 6)
+ 4 x Bloody Corpse + 3 x Carrion Beetle + Undead Medat.
In her corpse you will find Radeka's Purging Wand, Radeka's Thorn (Wand) and Blood Rose.
Related quests: The Purged Dragon, The Shriekers.
Ralvo, Slug, Bottle Top
They want you to play cards with them. You can win 100g only if you have The Sparkler Card from Dain. Otherwise you lose and you will have to give them all your equipment, kill them or convince them that you have nothing of value on you.
Rezik
Sells Hydrosophist Skillbooks.
Sir Lora
Added in Definitive Edition. He will follow you through your adventure, sharing his wit, wisdom, apocalyptic warnings, and even some skill-crafting secrets.
Statue of Illusions
Correct answers are:
1. *Finish the sentence with 'very awful, rotten.'*
2. A hex, a misery, a blight, a curse.
Verdas
Your God
Rhalic for humans, Tir-Cendelius for elves, etc. He will teach you a new source skill - Bless.
Related quests: Champion of the Gods.
Zillik
Related quests: Lohse.
Birdie
Dog is locked in a cage. It can be unlocked with Elaborate Cage Key. Convince the dog that he does not deserve to die.
Black Cat
He will follow you. If you escape Fort Joy without it getting killed by magisters, it gives you the Summon Cat Familiar skill.
Buddy
It's a dog. To be able to speak with it, you need Pet Pal talent.
Related quests: Finding Emmie.
Feder
It will be here if you blessed one of the flaming pigs.
Related quests: The Burning Pigs.
Feder (Sanctuary)
It will move here after you talk to Feder and tell it about Sanctuary.
Related quests: The Burning Pigs.
Rat
It is moving around.
Source puddles and fountains.
Source Fountain
Aan inexhaustible source of the Source.
Source Puddle
Gives +1 Source Point on contact.
Source Puddle
Gives +1 Source Point on contact.
Source Puddle
Gives +1 Source Point on contact.
Source Puddle
Gives +1 Source Point on contact.
Source Puddle
Source Puddle
Gives +1 Source Point on contact.
Chest (lvl 6)
Evidence Chest
Ornate Chest
Locked (lock lvl 1)
Ornate Chest
It's hidden / buried.
Ornate Chest
Level 20
Open it during the fight.
Ornate Chest
Level 20
Open it during the fight.
Ornate Chest
You can't reach it but you can use the teleportation skill to teleport the chest closer to you.
Ornate Chest
Opening it will trigger explosions around the chest. Inside you will find Severed Head, it grants Peace of Mind skill when eaten.
Ornate Chest
Level 20
Use teleportation skill to get this chest.
Ornate Chest (lvl 2)
It's hidden / buried.
Ornate Chest (lvl 3)
You can't reach it, but you can use the teleportation skill to teleport the chest to you.
Ornate Chest (lvl 4)
Use teleportation or move or destroy a dressing panel to get here.
Ornate Chest (lvl 5)
This chest is hidden / buried.
Ornate Chest (lvl 5)
Ornate Chest (lvl 6)
It's hidden / buried.
Ornate Chest (lvl 7)
Steel-Banded Chest
If you are thrown into jail, you will find your gear in this chest.
Chest (lvl 2)
Locked (lock lvl 1)
Chest (lvl 2)
Chest (lvl 3)
Chest (lvl 3)
It's locked (lock lvl 1).
Chest (lvl 4)
Chest (lvl 7)
Chest (lvl 7)
It's locked (lock lvl 2). It hidden / buried.
Curious Chest (lvl 2)
Use teleportation skill to get it down.
Note: I can't climb up, why?
Well-Worn Chest (lvl 1)
Locked (Thievery 1).
Well-Worn Chest (lvl 2)
To be able to reach it you need to first open the gate to the tower. You can also use teleportation skill.
Well-Worn Chest (lvl 2)
Well-Worn Chest (lvl 3)
Well-worn Chest (lvl 3)
Well-Worn Chest (lvl 3)
You need to use teleportation skill to get here.
Well-Worn Chest (lvl 3)
It's hidden / buried.
Well-Worn Chest (lvl 4)
It's locked (lock lvl 1). It can be unlocked with Harbour Key.
Well-Worn Chest (lvl 5)
Well-worn Chest (lvl 5)
Well-Worn Chest (lvl 5)
Well-Worn Chest (lvl 6)
Two chests but only left one is real.
Well-Worn Chest (lvl 6)
Well-Worn Chest (lvl 7)
It's a trap. Inside you will find Note with Divine Order Seal.
Well-Worn Chest (lvl 8)
You have to use teleportation to get here.
Worn-Out Chest
Level 5
Worn-Out Chest (lvl 4)
It's locked (lock lvl 1).
Buried Skeleton
It's hidden / buried. Random loot.
Magister's Severed Head
It's in he body of Magister Inquisitor. It grants Spread Your Wings skill.
Skeleton
I've found a nice loot here.
Skeleton
Dig here. Some loot.
Places where you will surely have to fight against the opponent(s).
Amphibians (lvl 3)
Charged Amphibian + 2 x Venomous Amphibian + Poison Slug.
Bishop Alexandar (lvl 8)
Bishop Alexandar + Gheist + Magister Metamorph + Magister Markswoman + Magister Knight + Magister Assassin
Voidwoken Drillworm (lvl 9) will spawn in the middle of the fight.
In the corpse of Bishop Alexandar you will find Alexandar's Cloak and Alexandar's Journal.
Related quests: A Rare Prey, Ifan ben-Mezd, The Escape.
Crocodiles (lvl 3)
3 x Saltwater Crocodile
In the corpse of one of the crocodiles you will find Gloves of Teleportation.
Related quests: The Teleporter.
Fire Slugs (lvl 4)
Royal Fire Slug + Courteous Slug (lvl 3) + Fire Slug (lvl 3).
Freshly Burried Corpse (lvl 1)
Wooden Cross, a grave. Dig here and get ready for the fight.
High Judge Orivand (lvl 4)
High Judge Orivand + Magister Cryomancer + Magister Pyromancer + 2 x Magister Swordsman.
In the corpse of High Judge Orivand you will find Magister Orivand's Mace (Two-Handed Mace).
Kniles the Flenser (lvl 4)
Kniles the Flenser + 3 x Agitated Silent Monk + 3 x Meat Golem (in cages).
He drops Face Ripper, Chastity (Dagger), Abstinence (Dagger).
Related quests: Fane.
Magister Captain Trippel (lvl 4)
Magister Captain Trippel + Magister Swordsman + 3 x Magister Ranger.
In his corpse you will find Captain Trippel's Key and Magister Trippel's Twohander.
Magister Dayva (lvl 4)
+ Inquisitor + Ranger + Knight. She drops Magister's Mantle. Magister Knight drops Harbour Key, it unlocks nearby chest.
If you helped Gawin then you will find his corpse here - Gawin's Robe.
Magister Houndmaster (lvl 3) and Delorus
Magister Houndmaster + Magister Swordsman + 2 x Magister Ranger + Source Hound.
Try to make Delorus, who is lying on the ground, not killed in battle.
Magister Swordsman
In his corpse you will find Large Divine Order Key.
Magisters (lvl 5)
Magister Inquisitor + Magister Swordsman + 2 x Magister Ranger. Magister Swordsman drops Magister's Sword (One-Handed Sword).
Narin (lvl 3)
If you have The Red Prince / Lizard in your team then he will attack you, otherwise he will not even want to talk to you.
Salamanders (lvl 6)
Noxious Salamander + 2 x Void Salamander. In the corpse of Void Salamander you will find Amulet of the Void.
Skeletal Undeads (lvl 4)
2 x Decomposing Swashbuckler + Decomposing Marksman + Decomposing Markswoman.
Skeletal Undeads (lvl 4)
Decomposing Terramancer + Decomposing Swashbuckler + Decomposing Assassin.
Decomposing Terramancer should drop Decomposing Terramancer's Belt.
Related quests: The Covenant.
The Historian (lvl 6)
The Historian himself is neutral but when you approach him, you will be attacked by: Incandescent Scorcher + Incandescent Marksman + Incandescent Decapitator.
Trompdoy (lvl 5)
Trompdoy and his 2 illusions. He will attack you here.
After the fight Ornate Chest (level 5) will be spawned (empty, another illusion).
Turtles (lvl 2)
Ancient Tainted Turtle + 2 x Void-touched Turtles. Ancient Tainted Turtle drops Turtle's Claw (Wand).
Voidlings (lvl 1)
2 x Viscous Voidling
The corpse of Magister Jalen is also here.
Related quests: The Escape.
Voidlings (lvl 4)
Viscous Voidling x 12. They come in "waves". Kill a few to get another one.
Related quests: The Voices.
Voidwoken Deep-Dweller (lvl 6)
Voidwoken Deep-Dweller + Decomposing Marksman + Decomposing Aeromancer + Decomposing Cryomancer + 2x Decomposing Swashbuckler.
He drops Amulet of the Deep.
Related quests: Champion of the Gods.
Waypoint Shrines let you quickly travel between waypoints you've discovered. Fleeing combat will bring you to the nearest waypoint.
Abandoned Camp
Ancient Statue of Braccus Rex
Dragon's Beach
Ruined Castle
Shrine to Amadia / Underground Shrine
Shrine to Lucian
Transitions between map levels, locations, etc.
1st Portal to Realm of Orobas
Teleport on of your characters to the platform with portal then click on the gargoyle's head above it.
2nd Portal to Realm of Orobas
3rd Portal to Realm of Orobas
It will be visible after you help The Historian.
Battered Raft
Dark Cavern Exit
Decrepit Ruins Exit
Door to the Main Floor
Locked. To the Fort Joy Prison.
Entrance to Underground Tunnel
It's hidden, get close to see it. You need to dig here so you need a showel or a Lizard.
Hall of Echoes (Start)
Your main character will be teleported here after you use Shrine to the Seven in Dark Cavern.
Holding Cells (Start)
You will start here when you enter a cave south of Hidden Alcove.
Ladder Back to Caverns
Ladder to Fort Joy Ghetto
Ladder to Fort Joy Prison
Pipe
Pipe
Pipe to the Swamp
Portal to the Lower Part of Realm of Orobas
Portal to the Upper Part of Realm of Orobas
Sewage Pipe
Shrine to the Seven
It will teleport you to the Hall of Echoes if you have not been there yet.
Shrine to the Seven
Click it then your main character will be teleported to Hall of Echoes.
Shrine to the Seven
If you have not visited Hall of Echoes yet, then you will be teleported there.
Skull Cave
Skull Cave Exit
Stairs down to the Holding Cells
Locked. You need Prison Key to unlock it.
The Gargoyle's Maze Tower Exit
To Decrepit Ruins
Metal Door.
To Fort Joy
To Fort Joy Courtyard
To Fort Joy Prison
To Fort Joy Prison
To: Arena of the One
From: Fort Joy Ghetto.
Type: Hatch on the ground.
Related quests: The Arena of Fort Joy.
To: Caverns
From: Fort Joy Ghetto.
Entrance to the cave.
To: Forgotten Cell
From: Caverns.
Ancient Stone Hatch. It's buried. Come close to discover it.
If you first play hide and seek with Mody then he will uncover it for you.
Related quests: Withermoore's Soul Jar.
To: Fort Joy Ghetto
From: Caverns
Type: Cave exit.
To: Fort Joy Ghetto
From: Arena of the One.
Type: Ladder.
To: Holding Cells
From: Hidden Enclave.
Type: Entrance to the cave.
Warning: You can not go back this way!
Underground Tunnel (Entrance)