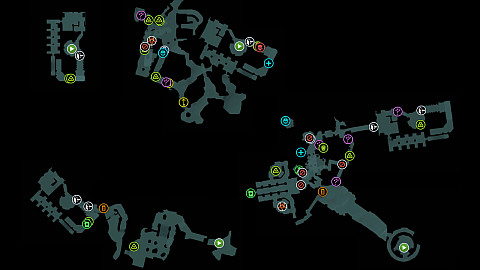
The interactive map for "The Holy City of Aratum," the fifth chapter of Doom: The Dark Ages, details collectibles and secrets in the level where the Doom Slayer rides a dragon named Serrat to battle demonic forces and destroy four Hell Carriers besieging the city. It includes 9 Secret Areas, 240 Gold, 2 (+1) Rubies, 2 Demonic Essences (Health and Ammo), and 4 Collectibles (2 Codex Entries, 1 Toy, and 1 Weapon Skin), plus Weapons, Life Sigils, Cultist Circles, Sentinel Shrines, Keys, Locked Gates, Encounters, and more. The map guides players to 100% completion through mission challenges like "Countercult" and "Layover," while warning of careful exploration to avoid missing secrets due to inaccessible areas after points of no return.
Note: The order in which you destroy the hell carriers and visit the secret platforms is up to you, but keep in mind that you must visit two secret platforms before heading to the Heart Chamber.
Cat and Mouse - Chase and destroy 3 Hell Fighter ships. Reward: 50 Gold.
Markers on the map
Starting Points7
Secret Areas9
Codex Entries2
Collectible Toy1
Weapon Skin1
Arsenal2
Life Sigils2
Soul Spheres2
Sentinel Shrines2
Demonic Essences2
Rubies3
Gold240
Keys2
Switches3
Locked Passages2
Metal Locks11
Cultist Circles3
Demonic Leaders2
Encounter (Large)1
Points of No Return9
Points of interest
Starting Points
The Starting Points in this chapter are the locations where players begin the game after landing on the hell carriers or secret platforms.
Starting Point (Chapter 5, Hell Carrier #1)This is where you start when you land on one of the Hell Carriers in Chapter 5.
Starting Point (Chapter 5, Hell Carrier #2)This is where you start when you land on one of the Hell Carriers in Chapter 5.
Starting Point (Chapter 5, Hell Carrier #3)This is where you start when you land on one of the Hell Carriers in Chapter 5.
Starting Point (Chapter 5, Hell Carrier #4)This is where you start when you land on one of the Hell Carriers in Chapter 5.
Starting Point (Chapter 5, Platform A)Secret Landing Zone. This is where you start when you land on one of the secret platforms in Chapter 5.
Starting Point (Chapter 5, Platform B)Secret Landing Zone. This is where you start when you land on one of the secret platforms in Chapter 5.
Starting Point (Chapter 5, Heart Chamber)This is where you start when you land on the Heart Chamber platform in Chapter 5.
Secret Areas
Secret Areas are hidden level sections containing collectibles like Codex Entries, Toys, Life Sigils, Gold, or Weapon Skins. To reach them, you will have to find hidden paths, obtain the necessary key, and so on.
Secret Area (The Holy City of Aratum #1)
Secret Area (The Holy City of Aratum #2)
Secret Area (The Holy City of Aratum #3)
Secret Area (The Holy City of Aratum #4)
Secret Area (The Holy City of Aratum #5)
Secret Area (The Holy City of Aratum #6)
Secret Area (The Holy City of Aratum #7)
Secret Area (The Holy City of Aratum #8)
Secret Area (The Holy City of Aratum #9)
Codex Entries
Codex Entries are collectible items that provide lore and background information about the game's world, characters, enemies, weapons, and story. They are typically found in the Secret Areas or hidden locations within levels, rewarding exploration.
Collectible Toys, also referred as "Dolls," are hidden items scattered throughout the game's levels, typically found in the Secret Areas or in hard-to-reach spots. These toys are small, detailed models of characters or enemies from the game, serving as collectibles that reward exploration.
Skins are cosmetic items that alter the appearance of the Doom Slayer's weapons, offering no gameplay advantages. They are collectibles often found in the Secret Areas, hidden paths, or as rewards for completing specific challenges or levels.
The Doom Slayer's arsenal includes ranged firearms, melee weapons, a runic shield, and temporary Atlan mech weapons. All are acquired automatically through campaign progression, typically via pod drops or story events, ensuring no weapon is missable.
Arsenal can be upgraded at Sentinel Shrines with Gold, Rubies, and Wraithstones, enhancing damage, fire rate, ammo, or adding alternate modes.
CyclerClass: Plasma Rifle.
The Cycler fires powerful plasma spikes at a moderate rate of fire. As a Plasma weapon, it can also quickly overload Energy Shields to generate a damaging explosion.
Super ShotgunClass: Shotgun.
The Super Shotgun deals devastating damage at close-range. It reloads slowly and is much less effective at long range.
Life Sigils
Life Sigils are collectible power-ups that function as extra lives, allowing the Doom Slayer to instantly recover upon death without losing progress or restarting at a checkpoint. They are typically found in the Secret Areas or hidden locations.
Life Sigil (The Holy City of Aratum #1)
Life Sigil (The Holy City of Aratum #2)
Soul Spheres
Soul Spheres function as health and armor boosters. Picking up a Soul Sphere refills the player's health and armor to their maximum values.
Soul Sphere (The Holy City of Aratum #1)
Soul Sphere (The Holy City of Aratum #2)
Sentinel Shrines
Sentinel Shrines are special locations in levels where players upgrade weapons, shield, and melee abilities. Players use Gold, Rubies, and Wraithstones to unlock enhancements that boost combat effectiveness.
Sentinel Shrine (The Holy City of Aratum #1)
Sentinel Shrine (The Holy City of Aratum #2)
Demonic Essences
Demonic Essences are collectible resources obtained by defeating specific enemies called Leaders. These powerful enemies drop Demonic Essences when executed, which permanently upgrade the Doom Slayer's Health, Armor, or Ammo capacity.
Demonic Essence - Ammo #1 (Shell)Maximum Shell Ammo increased.
Demonic Essence - Health #2Maximum Health +10.
Rubies
Rubies are rarer, often hidden in tough-to-reach spots or gained from difficult encounters resources used to unlock higher-tier upgrades at Sentinel Shrines.
Keys are collectible items used to unlock specific doors, areas, or secrets within the game's levels. Keys are typically color-coded (e.g., blue) or labeled as "Secret Key".
Metal Locks that can be shattered by hurling a Shield Saw at them, which usually allows you to clear a blocked path. They can only be targeted when approached from the proper side.
Cultist Circles are hidden groups of cultists found in secret areas, often engaged in rituals, as part of mission challenges like "Countercult" or "Extreme Prejudice." Players must locate and eliminate all cultists in these circles to earn rewards such as Rubies or weapon skins.
Cultist Circle (The Holy City of Aratum #1)One of the three cultist circles you must destroy to complete the "Countercult" challenge.
Cultist Circle (The Holy City of Aratum #2)One of the three cultist circles you must destroy to complete the "Countercult" challenge. In the Secret Area (The Holy City of Aratum #5).
Cultist Circle (The Holy City of Aratum #3)One of the three cultist circles you must destroy to complete the "Countercult" challenge. In the Secret Area (The Holy City of Aratum #6).
Demonic Leaders
Demonic Leaders are formidable demons in Doom: The Dark Ages. Defeating them rewards players with a Demonic Essence, granting a permanent boost to health, armor, or ammo capacity.
Leader (The Holy City of Aratum #1)Destroy the portal to start the event. This leader drops: Demonic Essence - Health #2.
Encounters refer to combat scenarios where the Doom Slayer faces large groups of demons or specific enemies in the game's levels. These are intense, action-packed battles that test players' combat skills, often requiring strategic use of weapons, shields, and movement.
Large Encounter (The Holy City of Aratum)
Points of No Return
Points of No Return are specific locations in chapters where, once crossed, the Doom Slayer cannot backtrack to previous areas without restarting the chapter or reloading a checkpoint.
End of Chapter 5After defeating all enemies, approach the gate to complete Chapter 5.
Point of No Return (The Holy City of Aratum #1)
Point of No Return (The Holy City of Aratum #2)
Point of No Return (The Holy City of Aratum #3)
Point of No Return (The Holy City of Aratum #4)
Point of No Return (The Holy City of Aratum #5)
Point of No Return (The Holy City of Aratum #6)
SerratThe dragon will land on the platform after defeating the leader.