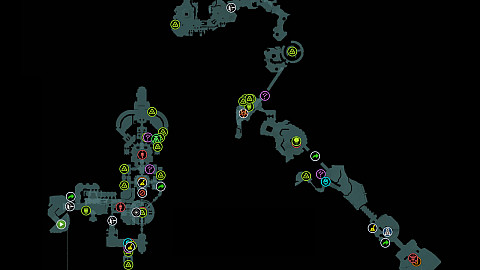
An interactive map for the Sentinel Barracks in Doom: The Dark Ages. It details the locations of various collectibles and secrets in this level, which is the fourth chapter of the game. The map highlights 6 Secret Areas, 212 Gold, 2 Rubies, 1 Demonic Essence - Armor, and 3 Collectibles (1 Codex Entry, 1 Collectible Toy, and 1 Weapon Skin). Additional elements include Weapons, Life Sigils, Sentinel Shrines, Leader, Large & Small Encounters, Points of No Return, and other. The map serves as a guide for players aiming for 100% completion by tracking these items and providing a visual reference for navigation through the Sentinel Barracks, a stronghold filled with enemies and challenges.
With the transdimensional barrier destroyed, King Novik awaits Prince Ahzrak's next move.
Challenges
Rip and Tear - Kill 40 demons. Reward: 50 Gold.
Plunderer - Find 150 gold. Reward: 50 Gold.
Prize Fighter - Execute a 3 hit Melee Combo 3 times. Reward: 50 Gold.
Markers on the map
Starting Point1
Secret Areas6
Codex Entry1
Collectible Toy1
Weapon Skin1
Arsenal2
Life Sigils2
Sentinel Shrines2
Demonic Essence1
Rubies2
Gold212
Switches3
Metal Lock1
Shield Recall Jumps4
Cultist Circle1
Demonic Leader1
Encounters (Large)2
Encounters (Small)4
Mission Objective1
Points of No Return4
Points of interest
Starting Points
Starting Points are specific locations where players begin each of the game's 22 chapters. These points serve as the initial spawn or entry point for the Doom Slayer.
Starting Point (Chapter 4)The place where you start the game at the beginning of Chapter 4.
Secret Areas
Secret Areas are hidden level sections containing collectibles like Codex Entries, Toys, Life Sigils, Gold, or Weapon Skins. To reach them, you will have to find hidden paths, obtain the necessary key, and so on.
Secret Area (Sentinel Barracks #1)Use the shield charge to break through the wooden barrier.
Secret Area (Sentinel Barracks #3)Use the Switch (Sentinel Barracks) to unlock the door, then find your way to the upper level.
Secret Area (Sentinel Barracks #4)To reach this hidden place, jump from the cliff over the abyss onto the rock ledge below.
Secret Area (Sentinel Barracks #5)Jump over the gap in the bridge, then turn around and jump onto the platform below.
Secret Area (Sentinel Barracks #6)Climb the stairs to the plaza above.
Codex Entries
Codex Entries are collectible items that provide lore and background information about the game's world, characters, enemies, weapons, and story. They are typically found in the Secret Areas or hidden locations within levels, rewarding exploration.
Sentinel BarracksSentinel Barracks Collectible.
Collectible Toys
Collectible Toys, also referred as "Dolls," are hidden items scattered throughout the game's levels, typically found in the Secret Areas or in hard-to-reach spots. These toys are small, detailed models of characters or enemies from the game, serving as collectibles that reward exploration.
Skins are cosmetic items that alter the appearance of the Doom Slayer's weapons, offering no gameplay advantages. They are collectibles often found in the Secret Areas, hidden paths, or as rewards for completing specific challenges or levels.
The Doom Slayer's arsenal includes ranged firearms, melee weapons, a runic shield, and temporary Atlan mech weapons. All are acquired automatically through campaign progression, typically via pod drops or story events, ensuring no weapon is missable.
Arsenal can be upgraded at Sentinel Shrines with Gold, Rubies, and Wraithstones, enhancing damage, fire rate, ammo, or adding alternate modes.
ImpalerClass: Rail Spike.
The Impaler is a precision weapon that delivers high damage with a slow rate of fire. Headshots will deal significant bonus damage.
PulverizerClass: Skullcrusher.
The Pulverizer throws shards of bone in a wide arc. It can damage several demons at once, making it effective agains groups.
Life Sigils
Life Sigils are collectible power-ups that function as extra lives, allowing the Doom Slayer to instantly recover upon death without losing progress or restarting at a checkpoint. They are typically found in the Secret Areas or hidden locations.
Sentinel Shrines are special locations in levels where players upgrade weapons, shield, and melee abilities. Players use Gold, Rubies, and Wraithstones to unlock enhancements that boost combat effectiveness.
Sentinel Shrine (Sentinel Barracks #1)
Sentinel Shrine (Sentinel Barracks #2)
Demonic Essences
Demonic Essences are collectible resources obtained by defeating specific enemies called Leaders. These powerful enemies drop Demonic Essences when executed, which permanently upgrade the Doom Slayer's Health, Armor, or Ammo capacity.
Rubies are rarer, often hidden in tough-to-reach spots or gained from difficult encounters resources used to unlock higher-tier upgrades at Sentinel Shrines.
Various types of switches, levers, valves, and similar mechanisms that need to be activated to open a passage, remove a barrier blocking a path, etc.
Pressure Plate (Sentinel Barracks #1)On the upper floor. Stand on it, then throw the shield saw to shatter the Metal Lock (Sentinel Barracks).
Pressure Plate (Sentinel Barracks #2)Use the Shield Recall Jump (Sentinel Barracks #3) and then push the crate which will stop on the plate, pressing it permanently.
Switch (Sentinel Barracks)Unlocks the door it is located next to.
Metal Locks
Metal Locks that can be shattered by hurling a Shield Saw at them, which usually allows you to clear a blocked path. They can only be targeted when approached from the proper side.
Hurl the Shield Saw at green flash nodes to lodge the shield into them. While the shield is embedded in the green flesh, press the shield throw button again to pull yourself toward it. Using the Shield Recall jump enables you to traverse wide gaps and reach higher elevations with ease.
Shield Recall Jump (Sentinel Barracks #1)
Shield Recall Jump (Sentinel Barracks #2)
Shield Recall Jump (Sentinel Barracks #3)
Shield Recall Jump (Sentinel Barracks #4)
Cultist Circles
Cultist Circles are hidden groups of cultists found in secret areas, often engaged in rituals, as part of mission challenges like "Countercult" or "Extreme Prejudice." Players must locate and eliminate all cultists in these circles to earn rewards such as Rubies or weapon skins.
Cultist Circle (Sentinel Barracks)
Demonic Leaders
Demonic Leaders are formidable demons in Doom: The Dark Ages. Defeating them rewards players with a Demonic Essence, granting a permanent boost to health, armor, or ammo capacity.
Leader (Sentinel Barracks)Kill the demons until their leader shows up. This leader drops: Demonic Essence - Armor #1.
Encounters (Large)
Encounters refer to combat scenarios where the Doom Slayer faces large groups of demons or specific enemies in the game's levels. These are intense, action-packed battles that test players' combat skills, often requiring strategic use of weapons, shields, and movement.
Large Encounter (Sentinel Barracks)The fight will begin when you pick up the Impaler.
Vagary Champion (Sentinel Barracks)Champions have Gold Armor which takes reduced damage from your weapons.
Parrying Hell Surge attacks will build up Stun. Once the Stun Meter is full, attack the Vagary's exposed flesh to deal heavy damage.
Encounters (Small)
Encounters refer to combat scenarios where the Doom Slayer faces groups of demons in the game's levels. These are intense, action-packed battles that test players' combat skills, often requiring strategic use of weapons, shields, and movement.
Small Encounter (Sentinel Barracks #1)At the lower level. The event will start when you pick up the Pulverizer.
Small Encounter (Sentinel Barracks #2)At the top level. The event will start when you enter the platform.
Places related to the main story in a particular chapter, etc.
Mission ChallengesWhen you reach this point, which will happen shortly after the start of Chapter 4, the mission challenges will be unlocked.
Points of No Return
Points of No Return are specific locations in chapters where, once crossed, the Doom Slayer cannot backtrack to previous areas without restarting the chapter or reloading a checkpoint.