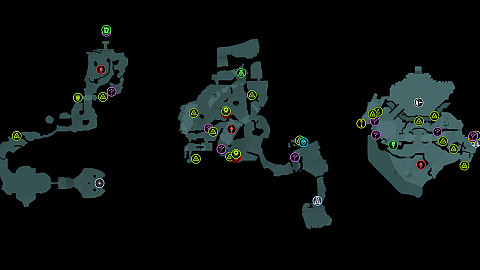
An interactive map for Chapter 17 of Doom: The Dark Ages, focusing on the Temple of Lomarith level. There are 9 Secret Areas, 194 Gold, 2 Rubies, 1 Wraithstone, 2 Demonic Essences - Ammo, and 3 Collectibles - 1 Codex Entry, 1 Collectible Toy, and 1 Skin - hidden on this map.
The Slayer's journey continues towards Thira's life signal.
Starting Points are specific locations where players begin each of the game's 22 chapters. These points serve as the initial spawn or entry point for the Doom Slayer.
Starting Point (Chapter 17)The place where you start the game at the beginning of Chapter 17.
Secret Areas
Secret Areas are hidden level sections containing collectibles like Codex Entries, Toys, Life Sigils, Gold, or Weapon Skins. To reach them, you will have to find hidden paths, obtain the necessary key, and so on.
Secret Area (Temple of Lomarith #1)
Secret Area (Temple of Lomarith #2)
Secret Area (Temple of Lomarith #3)Underwater tunnel.
Secret Area (Temple of Lomarith #4)
Secret Area (Temple of Lomarith #5)
Secret Area (Temple of Lomarith #6)
Secret Area (Temple of Lomarith #7)
Secret Area (Temple of Lomarith #8)
Secret Area (Temple of Lomarith #9)
Codex Entries
Codex Entries are collectible items that provide lore and background information about the game's world, characters, enemies, weapons, and story. They are typically found in the Secret Areas or hidden locations within levels, rewarding exploration.
Temple of LomarithTemple of Lomarith Collectible.
Collectible Toys
Collectible Toys, also referred as "Dolls," are hidden items scattered throughout the game's levels, typically found in the Secret Areas or in hard-to-reach spots. These toys are small, detailed models of characters or enemies from the game, serving as collectibles that reward exploration.
Cacodemon HybridTemple of Lomarith Collectible.
Weapon Skins
Skins are cosmetic items that alter the appearance of the Doom Slayer's weapons, offering no gameplay advantages. They are collectibles often found in the Secret Areas, hidden paths, or as rewards for completing specific challenges or levels.
Chainshot: ReverentIt's a reward for completing the "Water Logged" mission challenge.
Rocket Launcher: NightmareTemple of Lomarith Collectible.
Life Sigils
Life Sigils are collectible power-ups that function as extra lives, allowing the Doom Slayer to instantly recover upon death without losing progress or restarting at a checkpoint. They are typically found in the Secret Areas or hidden locations.
Life Sigil (Temple of Lomarith #1)
Life Sigil (Temple of Lomarith #2)You will come across this Life Sigil as you traverse the secret area maze.
Soul Spheres
Soul Spheres function as health and armor boosters. Picking up a Soul Sphere refills the player's health and armor to their maximum values.
Soul Sphere (Temple of Lomarith #1)
Soul Sphere (Temple of Lomarith #2)
Sentinel Shrines
Sentinel Shrines are special locations in levels where players upgrade weapons, shield, and melee abilities. Players use Gold, Rubies, and Wraithstones to unlock enhancements that boost combat effectiveness.
Sentinel Shrine (Temple of Lomarith #1)
Sentinel Shrine (Temple of Lomarith #2)
Demonic Essences
Demonic Essences are collectible resources obtained by defeating specific enemies called Leaders. These powerful enemies drop Demonic Essences when executed, which permanently upgrade the Doom Slayer's Health, Armor, or Ammo capacity.
Demonic Essence - Ammo #8 (Spike)Maximum Spike Ammo increased.
Demonic Essence - Ammo #9 (Cell)Maximum Cell Ammo increased.
Wraithstones
Wraithstones are the rarest currency in the game. They can usually be found in secret locations, accessible after obtaining the appropriate key or completing specific tasks. They are used at Sentinel Shrines to unlock advanced upgrades for your arsenal.
Rubies are rarer, often hidden in tough-to-reach spots or gained from difficult encounters resources used to unlock higher-tier upgrades at Sentinel Shrines.
Ruby (Temple of Lomarith #1)
Ruby (Temple of Lomarith #2)
Gold
Gold chests, stacks, and bars provide gold, a base currency you gather to purchase most upgrades at Sentinel Shrines.
Gold Bars (3)
Gold Bars (4)
Gold Bars (5)
Gold Bars (6)
Gold Bars (6)
Gold Bars (6)
Gold Bars (8)
Gold Chest (50)
Gold Chest (50)
Gold Stack (8)
Gold Stack (8)
Gold Stack (8)
Gold Stacks (16)
Gold Stacks (16)
Keys
Keys are collectible items used to unlock specific doors, areas, or secrets within the game's levels. Keys are typically color-coded (e.g., blue) or labeled as "Secret Key".
Secret Key (Temple of Lomarith)
Switches
Various types of switches, levers, valves, and similar mechanisms that need to be activated to open a passage, remove a barrier blocking a path, etc.
Cosmic Eye (Temple of Lomarith #1)
Cosmic Eye (Temple of Lomarith #2)Available once you move the box with the Cacodemon Hybrid toy.
Cosmic Eye (Temple of Lomarith #3)
Energy Node (Temple of Lomarith #1)
Locked Passages
Closed passages, such as gates that require a key or specific actions to open.
Metal Locks that can be shattered by hurling a Shield Saw at them, which usually allows you to clear a blocked path. They can only be targeted when approached from the proper side.
Metal Lock (Temple of Lomarith #1)
Shield Recall Jumps
Hurl the Shield Saw at green flash nodes to lodge the shield into them. While the shield is embedded in the green flesh, press the shield throw button again to pull yourself toward it. Using the Shield Recall jump enables you to traverse wide gaps and reach higher elevations with ease.
Shield Recall Jump (Temple of Lomarith #1)
Shield Recall Jump (Temple of Lomarith #2)
Demonic Leaders
Demonic Leaders are formidable demons in Doom: The Dark Ages. Defeating them rewards players with a Demonic Essence, granting a permanent boost to health, armor, or ammo capacity.
Leader (Temple of Lomarith #1)Break morale to disable its shield.
Encounters refer to combat scenarios where the Doom Slayer faces groups of demons in the game's levels. These are intense, action-packed battles that test players' combat skills, often requiring strategic use of weapons, shields, and movement.
Small Encounter (Temple of Lomarith #1)
Small Encounter (Temple of Lomarith #1)
Small Encounter (Temple of Lomarith #2)
Small Encounter (Temple of Lomarith #3)
Points of No Return
Points of No Return are specific locations in chapters where, once crossed, the Doom Slayer cannot backtrack to previous areas without restarting the chapter or reloading a checkpoint.