Welcome to guides4gamers.com

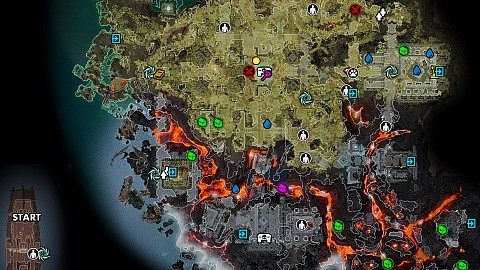
The Nameless Isle, Divinity: Original Sin 2 Map

Map of The Nameless Isle and its sub-zones such as The Council Academy, Arena of the Ages, The Impish Pocket Realm, Temple of Amadia, Vrogir's Enclave, Murky Cave, Duna's Sanctum, Heart of the Mother Tree, Black Ring Encampment, etc. The main quests to be completed on this island are called The Nameless Isle and The Academy.

The Nameless Isle

The Nameless Isle - Map Markers Summary

Mirrors x4, Phase Capacitors x4, Runes x2, Scrolls and Letters x2, Unique Items x3, Altars x8, Locations x2, Books x4, Spirits x6, NPCs x23, Animals x2, Keys x2, Levers and Switches x20, Locked / Hidden Passages x14, Fights x4, Ornate Chests x6, Chests x34, Waypoints x8, Transitions x27, Source x18, Up or Down x6, Other x13

Quests that begin on this map

An alphabetical list of quests that begin on this map.

Legend / Points of interest

The following legend of The Nameless Isle interactive game map defines the points of interest / markers displayed on the map. Each marker corresponds to a specific element to facilitate efficient navigation and interaction with the map.

Icon of Other Ancient Conductor Place a Phase Capacitor here.
Icon of Other Emergency Flush Protocol Don't touch this! It will activate a deathfog.
Icon of Other Engraved Jewel
Icon of Other Essential Engineering It's in the corpse of the Knight of Xantezza.
Icon of Other Eternal Artefact It's buried / hidden.
Icon of Other Hyperdrive Protocol It will grant Hasted to all party members.
Icon of Other Large Ruby Use it (Grasp the Gem Firmly) to get teleported to The Impish Pocket Realm. Related quests: Running like Clockwork.
Icon of Other Paladin Searle's Arm Eat it - new skill Corrosive Touch.
Icon of Other Purging Wand In the corpse of a Fallen Black Ring Mage.
Icon of Other Purging Wand It's in the corpse of Dead Black Fearmaiden.
Icon of Other Shrine of Xantezza Pedestal
Icon of Other Starting point Related quests: The Nameless Isle.
Icon of Other The Core Related quests: Running like Clockwork.

Mirrors

Icon of Other A Mirror of Blackest Glass Related quests: The Red Prince.
Icon of Other Eternal Reflector #1 You can rotate it.
Icon of Other Eternal Reflector #2
Icon of Other Eternal Reflector #3

Phase Capacitors

Icon of Other Phase Capacitor In the corpse of Master Tremly.
Icon of Other Phase Capacitor

Runes

Icon of Other Giant Thunder Rune
Icon of Other Large Venom Rune

Scrolls and Letters

Icon of Other Isbeil's Missive Related quests: Beast, The Secrets of the Dwarves.
Icon of Other Letter from Windigo Related quests: Mercy is Power.

Unique Items

Icon of Other Eternal Stormblade Four guards will be activated when you take it. They drop Phase Capacitors.
Icon of Other Fran the Bicorne Hat Related quests: Beast.
Icon of Other Haft of the Swornbreaker It's in the chest. Chest is locked and you need the Key. Related quests: The Key to Freedom.

Altars

Icon of Altar Altar of Xantezza Related quests: The Nameless Isle.
Icon of Altar Altar to Amadia Related quests: The Nameless Isle.
Icon of Altar Altar to Duna Related quests: The Nameless Isle.
Icon of Altar Altar to Rhalic Related quests: The Nameless Isle.
Icon of Altar Altar to Tir-Cendelius Related quests: The Nameless Isle.
Icon of Altar Altar to Vrogir Related quests: The Nameless Isle.
Icon of Altar Altar to Zorl-Stissa Related quests: The Nameless Isle.
Icon of Other Decrepit Altar

Locations

Icon of Other Entrance to Elven Temple Related quests: A Familiar Face.
Icon of Other Temple of Vrogir Related quests: The Drowned Temple.

Books

Icon of Other Impish Handbook It's in the corpse of Imp. Related quests: Running like Clockwork.
Icon of Other Magister's Diary It's in the Purged Corpse. Related quests: The Nameless Isle.
Icon of Other Reclaiming the Council of Seven Related quests: The Nameless Isle.
Icon of Other Soaked Book It's inside the Ancient Depository.

Spirits

Icon of NPC Ghechswol the Arena Master Related quests: Proving Ground.
Icon of NPC Knight of Xantezza He is a spirit so you have to cast Spirit Vision to see him. Related quests: Running like Clockwork.
Icon of NPC Spirit of Lennard Rawl Related quests: Unscholarly Pursuits.
Icon of NPC Spirit of Raedalus
Icon of NPC Spirit of Taryan Graye Related quests: Unscholarly Pursuits.
Icon of NPC Spirits of the Masters Authority, Intelligence, Wits, Finesse, Constitution, Strength. They can boost selected skill (+5), but at the cost of lowering another (-5).

NPCs

Icon of NPC Almira Related quests: Invaders, The Key to Freedom, The Sallow Man.
Icon of NPC Bishop Alexandar You can convince him to help you. Related quests: The Academy, The Sallow Man.
Icon of NPC Bishop Alexandar (lvl 16) He drops Cowl of True Sight (Helmet), Divine Reckoning (Staff) and Alexandar's Severed Head. Related quests: An Unlikely Patron, Seeking Revenge, The Nameless Isle.
Icon of NPC Black Ring Captain (lvl 16) Black Ring Captain + Black Ring Painweaver + Black Ring Portalmaster + Black Ring Defiler. Black Ring Captain drops Purging Wand and Black Mirror. Related quests: The Drowned Temple.
Icon of NPC Black Ring Portalmaster Related quests: The Drowned Temple.
Icon of NPC Cursed Knight of Duna He drops Knight of Duna's Helm when killed. Related quests: The Watcher's Mercy.
Icon of NPC Delorus He will be here if you saved him in the Fort Joy prison(?). He can join your team. Related quests: A Familiar Face, The Nameless Isle.
Icon of NPC Elven High Priestess Related quests: The Mother Tree.
Icon of NPC Elven Scion (lvl 17) Related quests: Sebille.
Icon of NPC Forktongue (lvl 16) He will give you Black Mirror. Forktongue + Black Ring Painweaver + + Black Ring Defiler + Black Ring Fearmaiden + Black Ring Reaver + Black Ring Warg. Related quests: Invaders, The Sallow Man.
Icon of NPC Jawbone the Merchant He sells Necromancer and Polymorph skillbooks, some weapons and armor parts.
Icon of NPC Krug the Troll He is guarding the entrance to the cave. Persuade or kill him.
Icon of NPC Lizard Dreamer
Icon of NPC Saheila You will meet her here after you leave The Heart of the Mother Tree. Related quests: Sebille, The Mother Tree.
Icon of NPC The Eternal Arbiter Related quests: The Academy.
Icon of NPC The Lost Knight He sells Huntsman and Warfare skillbooks.
Icon of NPC The Sallow Man The Sallow Man (lvl 17) + Black Ring Defiler + Black Ring Fearmaiden + Black Ring Reaver. The Sallow Man drops Sallow Chainmail (Chest Armour), The Sallow Man's Hand and Phase Capacitor. Black Ring Reaver drops a Key. Related quests: A Rare Prey, An Unlikely Patron, Invaders, The Sallow Man.
Icon of NPC The Seneschal You need a Phase Capacitor to activate the automaton. Related quests: The Academy.
Icon of NPC The Shadow Prince The Shadow Prince + 2 x Shadow Assassin + 2 x Shadow Sniper + Shadow Alchemist. He drops The Shadow Prince's Signet and The Heart of the Shadow Prince. Related quests: Sebille, The Mother Tree, The Red Prince.
Icon of NPC The Watcher Related quests: The Watcher's Mercy.
Icon of NPC Trayde the Merchant He sells Aerotheurge and Hydrosophist skillbooks and giant runes.
Icon of NPC Voidwoken Delegate Related quests: Fane.
Icon of NPC Wordless (lvl 16) Wordless + Black Ring Quartermaster + Black ring Alchemist + Black Ring Reaver + Black Ring Fearmaiden. Black Ring Quartermaster sells Pyrokinetic, Scoundrel and Warfare skillbooks. Black Ring Reaver sells Huntsman and Summoning skillbooks. Wordless drops Black Mirror.

Animals

Icon of NPC Dagger and Snout (lvl 17) You can give them some meat / flesh and feed them or kill them. Related quests: Running like Clockwork.
Icon of NPC The Last Forest Tiger

Keys

Icon of Locked Passage Ancient Key It's in a Purged Corpse.
Icon of Locked Passage Storage Room Key It unlocks Storage Room Door.

Levers and Switches

Icon of Locked Passage Energy Barrier Lever To be able to use it, you have to redirect energy beam and put two Phase Capacitors on Eternal Conductors.
Icon of Locked Passage Eternal Conductor Place Phase Capacitor onto it. Phase Capacitors drop from elementals guarding Eternal Stormblade in Murky Cave. Related quests: The Nameless Isle.
Icon of Locked Passage Hovering Rune #1 Related quests: Up in the Clouds.
Icon of Locked Passage Hovering Rune #2 Related quests: Up in the Clouds.
Icon of Locked Passage Hovering Rune #3 Related quests: Up in the Clouds.
Icon of Locked Passage Hovering Rune #4 Related quests: Up in the Clouds.
Icon of Locked Passage Hovering Rune #5 Related quests: Up in the Clouds.
Icon of Locked Passage Hovering Rune #6 Related quests: Up in the Clouds.
Icon of Locked Passage Inconspicuous Contraption Related quests: Unscholarly Pursuits.
Icon of Locked Passage Lever
Icon of Locked Passage Lever It unlocks Door.
Icon of Locked Passage Pressure Plate #1
Icon of Locked Passage Pressure Plate #2
Icon of Locked Passage Pressure Plate #3
Icon of Locked Passage Pressure Plate #4
Icon of Locked Passage Pressure Plate (Library) Related quests: Unscholarly Pursuits.
Icon of Locked Passage Right Lever Related quests: Unscholarly Pursuits.
Icon of Locked Passage Switch (Library) Related quests: Unscholarly Pursuits.
Icon of Locked Passage Vrogir's Enclave Lever It opens Vrogir's Enclave Hidden Passage. You need enough strength or Ancient Key to be able to pull it.

Locked / Hidden Passages

Icon of Locked Passage Armaments of the One Door It's locked. It can be unlocked with Key of the One that can be found inside The Treasury of the One Chests.
Icon of Locked Passage Door It's locked.Related quests: Unscholarly Pursuits.
Icon of Locked Passage Door It's locked. You can use teleportation, jump, etc. then use the Lever to open it.
Icon of Locked Passage Door It's locked.
Icon of Locked Passage Door You have to use Lever to open it.
Icon of Locked Passage Door It's locked. You need to press four Pressure Plates to open it. you should put the Heavy Crates onto them.
Icon of Locked Passage Door It's locked. You can unlock it with the Key that you can find in the corpse of Black Ring Reaver.
Icon of Locked Passage Energy Barrier Related quests: The Academy.
Icon of Locked Passage Hidden Passage Pull the Lever to remove the wall.
Icon of Locked Passage Hidden Passage Use Dispel Illusion to remove it.
Icon of Locked Passage Hidden Passage to Black Ring Encampment You need Cowl of True Sight from Bishop Alexandar (lvl 16) or his head which you should put onto the Decrepit Altar.
Icon of Locked Passage Shrine to Amadia Pray to receive nice blessings (they work in Temple of Amadia only). You need Engraved Jewel to move it and uncover hidden door.
Icon of Locked Passage Storage Room Door It's locked. You can use Storage Room Key to unlock it.
Icon of Locked Passage Vrogir's Enclave Hidden Passage Use the Vrogir's Enclave Lever to open it.

Fights

Icon of Fight Scawl of the Black Ring He will appear when you get close to the Temple of Rhalic. You have to choose whether you are on his side or against him. He drops Black Mirror. Related quests: An Unlikely Patron, Invaders, The Sallow Man.
Icon of Fight Shriekers Four shriekers. Use the Purging Wand or Purging Wand to destroy them. Related quests: The Nameless Isle.
Icon of Fight The Great Guardian (lvl 17) The Great Guardian + 2 x Eternal Protector + 2 x Eternal Sentinel. The Great Guardian drops Blade of the Swornbreaker. Related quests: Proving Ground, The Key to Freedom.
Icon of Fight Windego (lvl 16)

Ornate Chests

Icon of Chest Broken Sarcophagus Random Divine quality item (?)
Icon of Chest Ornate Chest You should use teleportation skill and teleport the chest.
Icon of Chest Ornate Chest Divine quality amulet inside(always?). You can use Terrain Transmutation or Tornado spell to get rid of some lava and make a safe spot near the chest.
Icon of Chest Ornate Chest (lvl 17)
Icon of Chest Ornate Chest (lvl 17) Use teleportation to get this chest.
Icon of Chest Stone Desk Random Divine quality item inside(?)

Chests

Icon of Chest 2 x Reliquary
Icon of Chest Chest (lvl 17)
Icon of Chest Energy Chest
Icon of Chest Reliquary
Icon of Chest Reliquary Inside you should find Eternal Plate and Eternal Artefact.
Icon of Chest Reliquary
Icon of Chest Reliquary Eternal Artefact.
Icon of Chest Reliquary Phase Capacitor.
Icon of Chest Reliquary
Icon of Chest Reliquary You can use Terrain Transmutation or Tornado spell to get rid of some lava and make a safe spot near the reliquary.
Icon of Chest Reliquary
Icon of Chest Reliquary Eternal Artefact.
Icon of Chest Reliquary Eternal Plate.
Icon of Chest Reliquary
Icon of Chest Well-Worn Chest (lvl 16) It's hidden / buried.

Waypoints

Icon of Waypoint Shrine The Academy of The Seven
Icon of Waypoint Shrine The Beach Related quests: The Nameless Isle.
Icon of Waypoint Shrine The Impish Pocket Realm You will be teleported here after you use the Large Ruby.
Icon of Waypoint Shrine The Lady Vengeance Waypoint and a boat to the beach.
Icon of Waypoint Shrine The Lunar Gate
Icon of Waypoint Shrine The Temple of Amadia
Icon of Waypoint Shrine The Temple of Rhalic
Icon of Waypoint Shrine The Temple of Tir-Cendelius

Transitions

Icon of Transition Abandoned Service Tunnel (Entrance/Exit)
Icon of Transition Ancient Cavern (Entrance/Exit)
Icon of Transition Arena of the Ages
Icon of Transition Armoury (Entrance/Exit)
Icon of Transition Duna's Sanctum (Entrance/Exit)
Icon of Transition From Abandoned Service Tunnel Alternative entrance through Abandoned Service Tunnel.
Icon of Transition Murky Cave (Entrance/Exit)
Icon of Transition Portal You need to first activate all three hovering runes. Related quests: Up in the Clouds.
Icon of Transition Portal (Exit)
Icon of Transition Temple of Amadia (Entrance/Exit) Related quests: Up in the Clouds.
Icon of Transition The Cave (Entrance/Exit)
Icon of Transition The Council Academy Related quests: The Academy.
Icon of Transition To Abandoned Service Tunnel It's buried / hidden. You need to dig here.
Icon of Transition To Ancient Cavern
Icon of Transition To Arena of the Ages
Icon of Transition To Armoury
Icon of Transition To Cave
Icon of Transition To Duna's Sanctum
Icon of Transition To Murky Cave
Icon of Transition To Temple of Amadia
Icon of Transition To the Council Academy
Icon of Transition To the Elven Temple
Icon of Transition To the Heart of the Mother Tree
Icon of Transition To the Lady Vengeance Boat back to the Lady Vengeance.
Icon of Transition To Vrogir's Enclave
Icon of Transition Vrogir's Enclave (Entrance/Exit)

Source

Icon of Source Big Source Pool Infinite source.
Icon of Source Source

Where to find your first Phase Capacitor required to unlock the entrance to the Council Academy?

Each of the four automatons guarding Eternal Stormblade drops one Phase Capacitor. You will find them in Murky Cave. Here is the entrance To Murky Cave. The Sallow Man also has one Phase Capacitor.