Interactive map of Gizeh, the third location we visit in Indiana Jones and the Great Circle. The map features locations such as: Chapter Notes & Photos, Gizeh Stelae, Fieldwork Notes, Discoveries, Mysteries, Puzzle Solutions, Field Notes & Photos, Adventure Books, Medicine Bottles, Ancient Relics, Lost Artifacs of Africa, Keys, Disguises, etc.
Indy and Gina arrived to Gizeh on the same airship as Voss. Gizeh was crawling with Nazis searching for something, perhaps connected to the thirteen Great Circle stones that Voss stole from the Vatican. Before leaving the Vatican, Gina arranged to meet with a contact in Gizeh to help find her sister. Maybe this person knows more about what Voss and the Nazis are up to?
Markers on the map
Maps4
Signposts5
Disguises3
Adventure Quests2
Chapter Notes9
Chapter Photos23
Fieldwork3
Fieldwork Notes18
Fieldwork Photos7
Discoveries7
Field Notes34
Field Photos38
Gizeh Stelae10
Adventure Books24
Radio Frequencies4
Medicine Bottles25
Ancient Relics15
Lost Artifacts5
Mystery Quests6
Mystery Notes13
Mystery Photo1
Puzzles5
Key Items & Objects18
Switches25
Locked Container1
Keys5
Locked Passages40
Shops3
NPCs7
Ammunition Boxes21
Repair Kits39
Bandages69
Currency / Egyptian Pounds80
Bread52
Fruit49
Map Transitions8
Transitions70
Points of interest
Maps
Maps of the locations we visit. Some of them you have to find, and some, for the dungeons, etc. you get automatically when you reach a certain place.
Ancient Caves Map
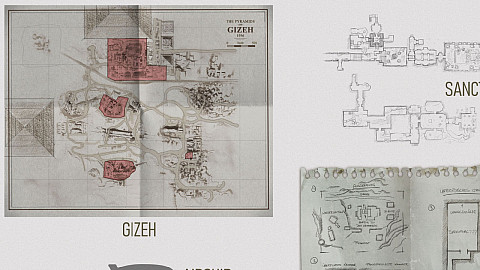
Gizeh MapOn the table in the Nawal's tent. Taking it is an objective of the "The Race is On" quest.
A detailed map of Gizeh and the Nazi excavations.
Signposts allow you to fast travel between them. In order to be able to select a specific signpost as a destination, you must first unlock it by reaching it on foot.
Gizeh Village
Great Sphinx
Khafre Excavation
Khentkawes Excavation
Workers' Area
Disguises
Disguises allow you to hide from enemies and enter restricted areas without being noticed.
Digsite OutfitOne of the possible locations. On Nawal's desk, if you follow the main storyline to help Nawal find the four steles and smuggle them by placing them in a box with a double bottom.
Digsite OutfitOne of the possible locations.
Wehrmacht Uniform
Adventure Quests
Adventures are the main story quests where your objective is to solve the mystery of the Great Circle.
The Race is OnPrevious adventure: The Stolen Cat Mummy.
Objectives:
Exit the Airship - The airship is about to land in Gizeh. There should be a service hatch in the back of the gondola.
-= continued in full description =-
Next adventure: The Idol of Ra.
The Idol of RaPrevious adventure: The Race is On.
Objectives:
Get to the Village Market - The Nazis are stealing stone stelae from Gizeh and shipping to Berlin. Nawal needs help smuggling them to a contact from the Cario Museum who in return will procure work passes to the Nazi Compound. There's a market in the village where they sell supplies that might come in handy.
Talk to Asmaa and buy the Lighter.
-= continued in full description =-
Next adventure: A Harsh Climb.
Chapter Notes
Chapter Notes, Gizeh. Chapter notes are documents or photos related to the adventure you must complete to uncover the mystery of the Great Circle. They contain all sorts of related interesting info. Collecting each of them is not mandatory but is worthwhile as it provides additional adventure points.
Affirmation LetterLetter. Related adventure: The Idol of Ra.
Genesis ChapterNote. (Clue). Related adventure: The Idol of Ra.
Meier's LetterLetter. Related adventure: The Idol of Ra.
Mural ObservationDocument. Related adventure: The Idol of Ra.
Second Stelae ListNote. You can find it after escaping the northern compound during the "The Idol of Ra" adventure. Related adventure: The Idol of Ra.
Stelae ListReceived from Nawal at the beginning of the "The Idol of Ra" adventure. Related adventure: The Idol of Ra.
Symbols RubbingSketch. (Clue). Related adventure: The Idol of Ra.
Three Eyed Gate CombinationsYou will receive this note after solving the Three Eyed Gate puzzle. Related adventure: The Idol of Ra.
Chapter Photos
Chapter Notes, Gizeh. Chapter notes are documents or photos related to the adventure you must complete to uncover the mystery of the Great Circle. They contain all sorts of related interesting info. Collecting each of them is not mandatory but is worthwhile as it provides additional adventure points.
Voss ArrivingYou can take this picture after examining all the five clues in Voss' office.
Related adventure: The Idol of Ra.
Fieldwork
Fieldwork, Gizeh. Fieldwork are local activities / side quests that are of greater importance and may or may not be related to the main adventure.
A Savage PredicamentHow to start: Talk to Professor Savage.
Reward: 525 Adventure Points + Construction Stele
Objectives:
Search the Detention Center - Professor Savage said that Sidney's likely held at the detention center in the Nazi Compound.
-= continued in full description =-
Sanctuary of the GuardiansHow to start: Talk to Gina once you complete the "The Race is On" adventure.
Reward: 400 Adventure Points
Objectives:
Explore the Sphinx Dig - Voss men are digging by the Sphinx, searching for the "Sanctuary of the Guardians". It seemed to be of particular importance to him.
-= continued in full description =-
Secret of the Queen MotherHow to start: Talk to Professor Omar.
Reward: 375 Adventure Points
Objectives:
Find the Queen Mother's Tomb - Omar showed an ostracan saying there is a secret in the tomb of Queen Mother Khentkawes. The Nazis have been excavating the tomb but it's on hold right now, presenting a great opportunity to try finding the secret before the Nazis do.
-= continued in full description =-
Fieldwork Notes
Fieldwork Notes. Notes and photographs that are related to fieldwork tasks.
Discoveries, Gizeh. Discoveries are activities that span over greater sections, some of them throughout the entire game. To complete one of these you will have to explore the world to find something that relates to the discovery.
A Remedy for All (Gizeh)How to start: Talk to Dr. Kafour.
Objectives:
Find Medicine Bottles in Gizeh x 25 - The local medical worker is in dire need of medicine and all recovered bottles should be brought there.
Summary: All the medicine bottles have been returned to the local medical workers.
A World of Knowledge (Gizeh)How to start: Buy the "Gizeh Books" from Asmaa for 350 Pounds.
Objectives:
Find Adventure Books in Gizeh x 27 - These have been discovered in Gizeh.
Summary: All the Adventure Books and Map Guides have been discovered.
Belongs in a MuseumHow to start: Progress the "The Idol of Ra" adventure through the northern Nazi Compound and approach the Nawal's Spy.
Reward: Ancient Relic
Objectives:
Talk to the Delivery Boy - Nawal's delivery boy is back from his delivery. Any remaining stone stelae in Gizeh should be taken to him, so he can transport them back to the Cairo Museum.
Find Stelae x 10 - Bring the remaining stelae to Nawal's delivery boy.
Deliver the Stelae - Bring the final stone stele to Nawal's delivery boy.
Summary: Found all the lost stelae in Gizeh and gave them back to the Cairo Museum.
Knuckle Duster DenHow to start: Try to enter the Knuckle Duster Den.
Reward: 300 Adventure Points
Objectives:
Find Disguise - Only Nazi uniforms are welcome at this refined establishment.
Enter Boxing Den - The boxing den is Nazi only. Should be possible to get in wearing a disguise.
Enter Ring - A Nazi off-duty boxing ring. They seem to run prize money bare-knuckle boxing matches. An opportunity to fight Nazis for some cash.
Defeat the Fighter - First Nazi fighter does not look much to the world.
Get Prize Money - First Nazi knocked down. Let's pick up the prize money the organizer got over at his table. (75 Pounds)
Enter Ring - Another Nazi fighter is waiting in the ring, eager to get knocked down.
Defeat the Fighter - This Nazi has more meat on his bones. Let's see if he can keep up.
Get Prize Money - Second Nazi down. Better collect the reward over at the organizer's table. (150 Pounds)
Enter Ring - The final fighter is waiting in the ring.
Defeat the Fighter - This final guy actually looks pretty intimidating.
Get Prize Money - All the fighters knocked down. The final reward is waiting on the organizer's table. (300 Pounds)
Summary: All Nazi boxers defeated. There's no more prize money to win here.
Lost Artifacts of AfricaHow to start: Find one of the lost artifacts located in Gizeh.
Objectives:
Find Lost Artifacts x 5 - Artifacts from different parts of Africa. They should be returned to the right museum.
Aduno KoroBa'al StatuetteIvory MaskJambiya DaggerNok Sculpture
Summary: Found all the lost artifacts in Gizeh. They'll be returned to their rightful home.
Riddles of the Ancients (Gizeh)Objectives:
Find Ancient Relics in Gizeh x 15
Summary: All the Ancient Relics have been added to the collection. Maybe they were once part of a greater mystery?
Wehrmacht TransmissionsHow to start: Find and read the first of the radio frequencies.
Reward: 150 Adventure Points
Objectives:
Find Radio Frequencies x 4 - Take the radio frequency to Gina. She might be able to use it for spying on the Nazis.
Give Radio Frequency to Gina - All the radio frequencies have been found. Return to Gina and talk to her.
Take Gina's Article
Summary: All the radio frequencies in Gizeh have been found and handed over to Gina.
Field Notes
Field Notes, Gizeh. Interesting notes and photographs gathered while out on the field. 58 such notes and photographs can be found in The Vatican.
Airship DocumentDocument. An alternative place where you can find this document if you did not collect it on board the airship.
Airship DocumentDocument.
Assignment LetterLetter.
Code LetterLetter.
Code Note
Code NoteMystery Note.
Disappearance ReportDocument. (Clue)
Dr. Kafour
DunesClimb to the roof of the temple and then photograph the dunes from its lower part at the back.
Engel's ReportDocument.
Excavation OrdersDocument.
Excavation PlansSketch.
Fattah RecipeRecipe.
Ful Medames RecipeRecipe.
Geomantic AnalysisJournal Page. On a small table in Nawal's tent.
Gun Approval DocumentDocument.
Hamam Mashi RecipeRecipe.
Horror Tales #1
Horror Tales #2Comic Book.
Klebér's LetterLetter.
Kozra LetterLetter.
Margaret PortraitSketch. On Nawal's desk. Spawns after completing the "The Race is On" adventure.
Marya's LetterLetter.
Meroë PageJournal Page.
Nawal ArticleNews Article.
Numeral Basics
Old Research JournalJournal Page.
Old Scholar's DiaryJournal Page.
Omega Book PageJournal Page.
Peru PostcardPostcard.
Scary Stories #1Comic Book.
Scary Stories #2Comic Book.
Thieves Article
Voss Article
Field Photos
Field Notes, Gizeh. Interesting notes and photographs gathered while out on the field. 58 such notes and photographs can be found in The Vatican.
Harvest SteleLock combination is: 0805. You can find it in the Code Letter.
Light Stele
Protector Stele
Ra Stele
Sebek Stele
Victory SteleInside the underground tomb accessed via the Underground Entrance. Use the Lighter to burn the hay covering the crawl space in the first chamber.
Adventure Books
Adventure Books allow you to learn new Abilities to tackle harder challenges. Adventure Books are divided into a few categories depending on which kind of Ability you can learn from it: Survival, Fitness, Packing, Brawling, and Combat. You can also collect Map Guides which are listed under the Exploration category. These will unlock important information about the locations that you visit and place markers on maps.
Block HeadCategory: Brawling
Description: Enemy melee weapon attacks can be efficiently blocked.
Adventure Points To Unlock: 400
Brawler IIICategory: Brawling
Description: Deal increased damage in armed and hand-to-hand melee combat.
Adventure Points To Unlock: 700
Bread BasketCategory: Packing
Description: Carry twice the amount of bread.
Adventure Points To Unlock: 400
Button Man ICategory: Combat
Description: One-handed firearms deal more damage.
Adventure Points To Unlock: 500
Climbing Ace IICategory: Fitness
Description: Drains less stamina and enables faster movement by using [L Shift] while ledge climbing.
Adventure Points To Unlock: 150
Cutman IIHere you can find the book if you didn't pick it up aboard an airship.
Category: Fitness
Description: Improved health bar regeneration efficiency.
Adventure Points To Unlock: 550
Cutman IICategory: Fitness
Description: Improved health bar regeneration efficiency.
Adventure Points To Unlock: 550
Gizeh ArtifactsYou can buy it for 350 Pounds from Asmaa.
Category: Exploration
Description: A guidebook with information on the possible locations of lost artifacts in Gizeh.
Gizeh BooksYou can buy it for 350 Pounds from Asmaa.
Category: Exploration
Description: A literature compendium of all the adventure books to be found in Gizeh.
Gizeh FrequenciesCategory: Exploration
Description: Secret military intelligence concerning the radio frequencies present in Gizeh.
Gizeh MedicineLock combination is: 0609.
Category: Exploration
Description: A guidebook with information on the medicine bottles located in Gizeh.
Gizeh MysteriesYou can buy it for 350 Pounds from Asmaa.
Category: Exploration
Description: A collection of curious mysteries that can be discovered in Gizeh.
Gizeh NotesYou can buy it for 700 Pounds from Asmaa.
Category: Exploration
Description: A handy guidebook to all of notes that can be gathered in Gizeh.
Gizeh RelicsCategory: Exploration
Description: An esoteric research journal concerning the locations of rumored ancient relics in Gizeh.
Hardboiled IIYou can buy it for 850 Pounds from the Shady Vendor (Gizeh).
Category: Survival
Description: Harden protection by merging two health bars into one.
Adventure Points To Unlock: 1000
Jumbo LassoCategory: Combat
Description: Heavyweight enemies can be whip-pulled into a grab.
Adventure Points To Unlock: 325
Patch UpCategory: Survival
Description: Improves the amount of health that is restored when applying bandages.
Adventure Points To Unlock: 550
Pep IICategory: Fitness
Description: Add a boost to stamina recovery speed.
Adventure Points To Unlock: 575
PitcherCategory: Combat
Description: Throw items farther and deal more damage.
Adventure Points To Unlock: 375
Sawbones IIYou can buy it for 550 Pounds from the Shady Vendor (Gizeh).
Category: Packing
Description: Bandage inventory capacity is increased by one.
Adventure Points To Unlock: 500
Slug Boy ICategory: Packing
Description: Increase handgun ammunition capacity by a half-dozen bullets.
Adventure Points To Unlock: 500
Slugger ICategory: Brawling
Description: Increases damage from charged-up attacks.
Adventure Points To Unlock: 450
Street Scrapper IICategory: Combat
Description: Deal increased damage with one and two handed melee weapons.
Adventure Points To Unlock: 750
True GritCategory: Survival
Description: Take less damage when down to the last bar of health.
Adventure Points To Unlock: 450
Radio Frequencies
Radio Frequencies that are needed to complete the "Wehrmacht Transmissions" discovery. These are small notes that can be found in areas occupied by enemy soldiers. Mostly they are located right next to radio sets.
Gizeh, Khafre ExcavationInside a locker standing in a large military tent. Related discovery: Wehrmacht Transmissions.
Gizeh, Meteorological StationIn the weather station building, on a desk with a radio. Related discovery: Wehrmacht Transmissions.
Gizeh, Nazi CompoundOn the second floor of the building, on a desk with radios standing against the north wall. Related discovery: Wehrmacht Transmissions.
Gizeh, Nazi Recreational AreaI a military tent, on the table with radios. Related discovery: Wehrmacht Transmissions.
Medicine Bottles
Medicine Bottles can be exchanged for Adventure Books that either raise your HP or stamina bar permanently.
Medicine BottleIn a small bedroom adjacent to Voss office.
Medicine Bottle
Medicine BottleIn the room behind the locked Wehrmacht Door.
Medicine Bottle
Medicine Bottle
Medicine Bottle
Medicine Bottle
Medicine Bottle
Medicine Bottle
Medicine Bottle
Medicine Bottle
Medicine Bottle
Medicine Bottle
Medicine Bottle
Medicine BottleOn the cargo bed of a truck standing next to the road.
Medicine Bottle
Medicine Bottle
Medicine Bottle
Medicine Bottle
Medicine BottleAt the very top of the elevator shaft. To get here, call the elevator to the top and hop on top of it as it goes up.
Ancient Relic (Belongs in a Museum)It's a reward for completing the "Belongs in a Museum" discovery.
Ancient Relic (Gizeh Tomb)
Ancient Relic (Haunted Tomb)It's inside the Haunted Tomb.
Ancient Relic (Khentkawes Excavation)
Ancient Relic (Nazi Compound #1)Safe combination: 40926. You can find the code on the Code Note.
Ancient Relic (Nazi Compound #2)
Ancient Relic (Sanctuary #1)
Ancient Relic (Sanctuary #2)
Ancient Relic (Sanctuary #3)
Ancient Relic (Seat of Eternity)
Ancient Relic (Secret Stash)In a locked crate at the back of the barracks, accessible from the outside through a window. Code 3262. The code can be discovered by combining clues from the Numeral Basics and from the Egyptian Numeral Code.
Nok SculptureIn the underground tomb accessed via the Crawl Hole.
Mystery Quests
Mysteries, Gizeh. Mysteries are shorter and sometimes quite challenging activities, and will give you adventure points when they have been completed, in addition to a variety of different smaller rewards.
A Thief's PromiseHow to start: Read the Desertion Report.
Find the Missing Nazi - A Nazi seems to have disappeared mysteriously near the Khentkawes digsite.
Summary: The missing Nazi turned out to be dead. He'd been betrayed by one of his comrades and immured inside an old tomb.
Bright FutureHow to start: Read the Pohl's Letter.
Reward: 225 Adventure Points
Search Bunk - One of the Nazis has been caught stealing equipment to sell on the black market. There could be more information at his bunk bed.
Find the Stolen Goods - One of the Nazis has been stealing equipment to sell on the black market. Maybe he has a stash of useful items somewhere?
Summary: Seems like the Nazi thief's associate wanted him dead. The stash of stolen goods turned out to be a trap - it was filled with dynamite that ignited when the box was opened.
Cloud AtlasHow to start: Read the Cloud Atlas Page or Cloud Status Logbook or try to open the chest.
Open Lockbox - There's a building in the middle of Gizeh where the Nazis are tracking the weather. There's also lockbox with a combination lock inside.
Solution:
13.10 - Cirrus - 0
09.10 - Stratus - 6
16.10 - Cirrus - 0
14.10 - Cumulonimbus - 9
So lock combination is: 0609.
Fortune's ReachHow to start: Read the Wanted Poster.
Reward: 225 Adventure Points
Track the Thieves - A couple of thieves are stealing artifacts from the excavation. They're likely still around. Take a photo of the Trail of Red Paint.
Follow the Red Footsteps - The thieves managed to step in paint. Should be easy enough to follow the tracks and see where they went. Follow it to the Underground Entrance.
Pick up the Graverobbing Plan.
Summary: The thieves were found dead in a collapsed excavation tunnel. Seems like they didn't know what they were doing.
Seat of EternityHow to start: Enter the tomb and read the Tomb Journal.
Reward: 225 Adventure Points
Open the Sarcophagus - There's a sarcophagus in the ruins just west of the village. Would be a miracle if it hasn't been plundered.
Solution:
Place the canopic jars in the following order from left to right:
Human
Falcon
Jackal
Baboon
Collect the Ancient Relic.
Summary: Placing the canopic jars on their proper places opened the tomb, revealing a strange artifact inside.
The HauntingHow to start: Read the Hauntings Report.
Reward: 225 Adventure Points
Investigate Tomb - There are rumors about a "haunted tomb" in Gizeh. Sounds like superstition, but there could be more to it.
Solution:
Take the Tomb Photograph and the Haunted Tomb Key.
Unlock the Haunted Tomb entrance.
Pick up the Spy's Note.
Summary: The "haunting\ was actually caused one of Nawal's spies. They played on the Nazis' superstitions in order to keep them away from a recently discovered artifact.
Statue of LightSolution:
Move the Mirror #B1 to light the Mirror #B2 located above the right side door.
The door won't open, so help Gina enter the room through the hole in the wall. Gina will provide a brass mirror.
Move the Mirror #B1 to light the Mirror #B3 located above the left side door.
Use the brass mirror provided by Gina to fix the Mirror #B4.
Move the Mirror #B1 to light the mirror Gina is holding.
The Resonance ChamberSolution:
Take photos of three tablets in the main room: "Leneph", "Hat sha-Athon", and "Vuha".
Get through the crawl hole and take photos of two more tablets: "Eo-shohd", and "Lezeem".
Pick up the Tablet Piece, use it to fix the "Al haht sheram" tablet, and take photo of it.
Approach the central statue and spread out six photos you took. Use them in the following order:
"Heed"
"The Lord's"
"Oath"
"Protect"
"The Secret"
"Of the name"
Once the puzzle is solved, you'll fall into an underground tunnel.
Three Eyed GateSolution:
Move the Mirror #C1 so the ray iluminates the symbol in the upper right corner of the door, which will open the door on the left side of the room.
Head through the door that opened and move the Mirror #C2 so that the ray passes through the gap and illuminates the Mirror #C3.
Move the Mirror #C3 so the ray iluminates the top left symbol on the door and move the Mirror #C1 so that ray illuminates the middle right symbol on the door, which will open the door on the right side of the room.
Head through the right door and grab the Brass Mirror. Use it to fix the Mirror #C4. It will illuminate the Mirror #C5.
Use three mirrors to unlock one by one the three symbols in the middle of the door. You will unlock each of them by illuminating such three symbols located on the sides which, when overlapped, form the symbol in the middle.
Key Items & Objects
Various other items that are useful during the adventure.
Detention Center Key(Clue).
Opens the attic of the Nazi detention and interrogation center.
dete
Discarded KeyA key to the locked building where a man is calling for help.
Haunted Tomb KeyA key to a tomb that the Nazis have locked down.
Related locked passage: Haunted Tomb.
Wehrmacht KeyThis key allows access to areas only available to soldiers of the Wehrmacht.
Locked Passages
Various locked or blocked passages. Some of them can be opened with the right key. Some can only be unlocked from a certain side. Others can be unblocked by, for example, using a large hammer or setting them on fire.
Breakable Wall
Breakable Wall
Breakable Wall
Breakable Wall
Breakable WallUse the hammer to destroy it after completing the Mural Puzzle.
Breakable Wall
Breakable Wall
Burnable Wall
Crawl HoleTo get inside you must buy a Lighter, which you use to burn the hay blocking the entrance.
Crawl Hole
Crawl HoleTo get inside you must buy a Lighter, which you use to burn the hay blocking the entrance.
Locked GateThe lever is in the secret room where the ancient relic is.
Locked Gate
Locked GateIt can be unlocked from the south side.
Locked GateIt can be unlocked from the east side.
Locked Gate
Locked GateIt can be unlocked from the east side.
Locked GateIt can be unlocked from the south side.
Locked Gate
Mirror Gate
Movable Wall
Right Locked Door
Watchtower Wehrmacht DoorThey can be opened from the inside with the Wehrmacht Key. You can enter the watchtower using the grappling point at the back of the tower.
Wehrmacht DoorKey required to open it: Wehrmacht Key.
Wehrmacht DoorKey required to open it: Wehrmacht Key.
Wehrmacht DoorKey required to open it: Wehrmacht Key.
Wehrmacht DoorKey required to open it: Wehrmacht Key.
Shops
Places where you can buy various items, such as adventure books or tools.
Female VillagerGive her a photo of the Goat. Reward: 15 Adventure Points.
GinaInside Nawal's tent.
Nawal
Nawal's Spy
Professor Omar
Professor Savage
Ammunition Boxes
Additional ammunition for the handgun. One box contains two bullets. This can be ammunition for Indy's revolver or the P08 pistol while wearing the Wehrmacht uniform.
Repair Kits
With a repair kit you can repair broken weapons in your satchel.
Bandages
Using bandages restores your health.
Currency / Egyptian Pounds
Places where you can find local currency.
Bread
Eating bread, such as cornetti, donuts, crackers and others boosts your total health temporarily.
Fruit
Eating fruit such as apples, oranges, lemons, figs and others gives you an additional stamina boost.
Map Transitions
Transitions between different sections of the map.