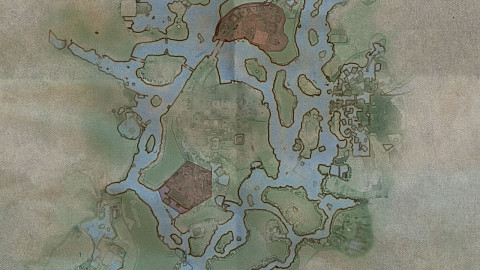
Interactive map of Sukhothai, another location we visit in Indiana Jones and the Great Circle. The map features locations such as ...
After a long journey from Shanghai, Indy and Gina arrived at a hotel close to Sukhothai, Siam. The place was full of Fascists who had been allowed into the country by a corrupt general. Instead of heading out into the jungle at night searching for the ruins of Sukhothai, Indy and Gina decided to get some well deserved rest.
Markers on the map
Maps7
Signposts8
Disguise1
Adventure Quests2
Chapter Notes10
Chapter Photos10
Fieldwork4
Fieldwork Notes18
Fieldwork Photos10
Discoveries7
Discovery Photos6
Cogwheels10
Field Notes23
Field Photos40
Adventure Books26
Radio Frequencies4
Medicine Bottles20
Ancient Relics24
Lost Artifacts5
Mystery Quests8
Mystery Notes15
Mystery Photos4
Puzzles12
Key Items & Objects26
Switches27
Keys2
Locked Passages22
Shops3
NPCs2
Ammunition Boxes21
Repair Kits38
Bandages41
Currency / Egyptian Pounds51
Bread55
Fruit74
Boat Docks13
Map Transitions10
Transitions65
Points of interest
Maps
Maps of the locations we visit. Some of them you have to find, and some, for the dungeons, etc. you get automatically when you reach a certain place.
Hidden Temple Map
Khmer Vault Map
Sukhothai MapAn alternative place where you can find this map if you don't already have one.
Sukhothai MapAn alternative place where you can find this map if you don't already have one.
Sukhothai MapThe first place where you can find this map right after starting the "The Blessed Pearl" adventure.
Map of the flooded ruins of ancient Sukhothai.
Village MapYou will receive this map automatically when you reach the village after escaping from the hotel.
Warrior Temple Map
Signposts
Signposts allow you to fast travel between them. In order to be able to select a specific signpost as a destination, you must first unlock it by reaching it on foot.
Secret Armory Entrance
Tongdang's Hut
Village
Wat Chana Songkhram
Wat Mahathat East
Wat Mahathat West
Wat Sa Si
Wat Si Sawai
Disguises
Disguises allow you to hide from enemies and enter restricted areas without being noticed.
Royal Army Uniform
Adventure Quests
Adventures are the main story quests where your objective is to solve the mystery of the Great Circle.
Trouble in ParadisePrevious adventure: Into the Fire.
Objectives:
Call Marcus - Sukhothai, one of the sites on the Great Circle. There must be a stone hidden somewhere in the ruins. Marcus Brody has access to all sorts of research back at the College that could prove helpful in finding it.
-= continued in full description =-
Next adventure: The Blessed Pearl.
The Blessed PearlPrevious adventure: Trouble in Paradise.
Objectives:
Join Gina - A new morning has arrived. Time to beat Voss to the Sukhothai stone. Sunan's story about the "Blessed Pearl" and his promise to help find it is a very good start. Gina is on the dock, talking to some of the rebels.
-= continued in full description =-
Next adventure: Atonements.
Chapter Notes
Chapter Notes, Sukhothai. Chapter notes are documents or photos related to the adventure you must complete to uncover the mystery of the Great Circle. They contain all sorts of related interesting info. Collecting each of them is not mandatory but is worthwhile as it provides additional adventure points.
Archaeologist's NotesJournal Page. Related adventure: The Blessed Pearl.
Chapter Notes, Sukhothai. Chapter notes are documents or photos related to the adventure you must complete to uncover the mystery of the Great Circle. They contain all sorts of related interesting info. Collecting each of them is not mandatory but is worthwhile as it provides additional adventure points.
Fieldwork, Sukhothai. Fieldwork are local activities / side quests that are of greater importance and may or may not be related to the main adventure.
A Study in FearHow to start: Explore the hidden pyramid, find the Nephilim Map and leave the area heading to Sunan.
Reward: 650 Adventure Points
Objectives:
Speak to Pailin - Might be worth stopping by Pailin before talking to Sunan. No one has better insight into the Fascist activity in the area than she does.
-= continued in full description =-
Lost in the PastHow to start: Progress the main adventure and speak to Sunan on the dock when possible.
Reward: 800 Adventure Points
Objectives:
Talk to Sunan - Sunan has another story to tell. Could be something useful to learn from it.
Find the Cave - Sunan told a story about a girl who met a demon in a cave. She helped the demon and got a golden fishing hook in return. If there is truth to the story, the cave should be located near Wat Sa Si.
-= continued in full description =-
The Kid Who VanishedHow to start: Visit Tongdang and then return to the boat.
Reward: 600 Adventure Points
Objectives:
Find the Treehouse - Sunan's nephew has been missing for a while. Maybe there's some clues to be found in the old treehouse.
-= continued in full description =-
Voss' Gold StashHow to start: Talk to Tongdang then leave his hut.
Reward: 50 Adventure Points
Objectives:
Steal Voss' Gold - Voss is bribing the local General with guns and gold to keep the excavations going. Which means there has to be gold in a stash somewhere in his base camp. Gold that can be used for buying a breathing device.
-= continued in full description =-
Fieldwork Notes
Fieldwork Notes. Notes and photographs that are related to fieldwork tasks.
"Gira'ahn-matu"This is a note you will collect during "a trip to the past". Related fieldwork: Lost in the Past.
Annika's ResearchJournal Page. Related fieldwork: A Study in Fear.
Discoveries, Sukhothai. Discoveries are activities that span over greater sections, some of them throughout the entire game. To complete one of these you will have to explore the world to find something that relates to the discovery.
A Remedy for All (Sukhothai)How to start: Talk to Nŏo.
Objectives:
Find Medicine Bottles in Sukhothai x 20 - The local medical worker is in dire need of medicine and all recovered bottles should be brought there.
A World of Knowledge (Sukhothai)How to start: Buy the Sukhothai Books from Tongdang.
Find Adventure Books in Sukhothai x 31 - Learn new abilities by collecting Adventure Books and taking a moment to study them.
Jungle Bruiser PitReward: 720 Adventure Points
Find a Disguise - They don't seem to welcome people without a uniform.
Khmer Cogwheel PuzzlesCogs Collected x 10 - Collect all the ancient Khmer wooden cogwheels.
Solve the Cogwheel Puzzle - There is a Khmer puzzle that can only be solved using the ancient wooden cogwheels.
Lost Artifacts of AsiaFind Lost Artifacts x 5 - Artifacts from different parts of Asia. They should be returned to the right museum.
Riddles of the Ancients (Sukhothai)Find Ancient Relics in Sukhothai x 24
Royal Army TransmissionsReward: 225 Adventure Points
Find Radio Frequencies x 4 - Take the radio frequency to Gina. Maybe she can use it for spying on the Fascists.
Give Radio Frequency to Gina - All the radio frequencies have been found. Return to Gina and talk to her.
Take Gina's Article
Summary: All the radio frequencies in Sukhothai have been found and handed over to Gina.
Discovery Photos
Hidden Platform Cogwheel Pillar
River Bank Cogwheel Pillar
Village Cogwheel Pillar
Wat Mahathat Cogwheel Pillar
Wat Si Sawai Cogwheel PillarDiscovery Photo.
Waterfall Ruins Cogwheel Pillar
Cogwheels
Cogwheel (Hidden Platform Puzzle)
Cogwheel (Hidden Pyramid #1)
Cogwheel (Hidden Pyramid #2)
Cogwheel (Hidden Pyramid #3)
Cogwheel (Village Puzzle)
Cogwheel (Wat Mahathat Puzzle #1)
Cogwheel (Wat Mahathat Puzzle #2)
Cogwheel (Wat Si Sawai Puzzle)
Cogwheel (Waterfall Ruins Puzzle #1)
Cogwheel (Waterfall Ruins Puzzle #2)
Field Notes
Field Notes, Sukhothai. Interesting notes and photographs gathered while out on the field. 58 such notes and photographs can be found in The Vatican.
Anti-Comintern ArticleNews Article.
Bergmann's LetterLetter.
Delivery Note
Flood ArticleNews Article. The first of the places where you can find this note. On a table on the ground floor of the hotel. Other location: Flood Article.
Flood ArticleNews Article. Other location: Flood Article.
Forgotten PageThe first of the places where you can find this note. Next to the bed in room #4 of the hotel. Journal Page. Other location: Forgotten Page.
Forgotten PageJournal Page. Other location: Forgotten Page.
Fried EggYou will get it when you talk to Sunan when he is fishing at the dock. The cat - Fried Egg - is somewhere near.
Monument ResearchJournal Page.
Pla Pao RecipeRecipe.
Rebel ArticleThe first of the places where you can find this note. On a table on the ground floor of the hotel. News Article. Other location: Rebel Article.
Rebel ArticleNews Article. Other location: Rebel Article.
Rebel FlyerNote. On a table with a red tablecloth, in a room on the lower floor.
Ruins ResearchJournal Page. On top of small ruins sticking out of the river.
Sukhothai ArticleThe first of the places where you can find this note. On the veranda of the house located on the right side of the hotel. News Article. Other location: Sukhothai Article.
SunanYou will receive it automatically after entering the boat while playing the "The Blessed Pearl" adventure.
Tales of Dread #4Comic Book.
Tales of Dread #5Comic Book.
Tales of Dread #6Comic Book.
Thot Man Pla Recipe
Tom Yum Goong RecipeRecipe.
Field Photos
Field Notes, Sukhothai. Interesting notes and photographs gathered while out on the field. 58 such notes and photographs can be found in The Vatican.
Capsized Barges
Coconut Graters
Cooking
Elephant Skeleton
Elephant Statue
Exploded Opening
Fascist Armory
Giant Mushroom
Jungle Bruisers
Khmer Water MillTake a picture of the mill wheel from the upper platform.
Mak-Yek
Naga
Old Ruins
Overgrown Statue
Prayer Grove
Pyramid Tower
Rice Farmers
River Buddha
Shiva
Stone Library
Storyteller
Sukhothai Pyramid
Thieving Monkeys
Tongdang
Tree House
Uncle Sunan
Village Doctor
Village Fishermen
Village Market
Village View
Villager Portrait
Voss' Camp
Voss' Camp Entrance
Wat Chana SongkhramTake a photo from the top of the watchtower.
Wat Mahathat
Wat Sa Si
Wat Si Sawai
Waterfall Tributary
Wreckage
Yeak Statue
Adventure Books
Adventure Books allow you to learn new Abilities to tackle harder challenges. Adventure Books are divided into a few categories depending on which kind of Ability you can learn from it: Survival, Fitness, Packing, Brawling, and Combat. You can also collect Map Guides which are listed under the Exploration category. These will unlock important information about the locations that you visit and place markers on maps.
Bear HandsCategory: Brawling
Description: Enables unarmed take-downs of enemies.
Adventure Points To Unlock: 1400
Fast HandsCategory: Combat
Description: Revolver reload speed is increased.
Adventure Points To Unlock: 650
Fast HandsThe first of the places where you can find this book. Right after arriving to Sukhothai, in a fascist tent pitched in front of the hotel.
Category: Combat
Description: Revolver reload speed is increased.
Adventure Points To Unlock: 650
HandymanCategory: Combat
Description: Increases the durability of melee weapons.
Adventure Points To Unlock: 800
Hardboiled IIIYou can buy it for 1200 Baht from the Shady Vendor (Sukhothai).
Category: Survival
Description: Harden protection by merging two health bars into one.
Adventure Points To Unlock: 2100
Iron Grip IICategory: Fitness
Description: Indy can clinch enemies for longer.
Adventure Points To Unlock: 475
Jumbo GripIt's in the safe. Lock combination: 2480. The code is on the photograph of the Painted Message. Related mystery: Path of Tigers.
Category: Brawling
Description: Grab heavyweight enemies in hand-to-hand combat.
Adventure Points To Unlock: 500
Jumbo ThrottleCategory: Combat
Description: Knock out unaware heavy-weight enemies with a whip pull.
Adventure Points To Unlock: 650
Kummetz GuideCategory: Exploration
Description: A guidebook to points of interest one can find while exploring the KMS Kummetz.
Lucky Hat IICategory: Survival
Description: The cooldown of Indy's Outfit's Fortitude is cut down by half, allowing the Lucky Hat ability to recover faster.
Adventure Points To Unlock: 500
Punch Out IICategory: Brawling
Description: Restore one bar of health when an enemy is knocked out.
Adventure Points To Unlock: 600
Sawbones IIIYou can buy it for 700 Baht from the Shady Vendor (Sukhothai).
Category: Packing
Description: Bandage inventory capacity is increased by one.
Adventure Points To Unlock: 950
Seeing RedCategory: Survival
Description: Deal more damage when down to the last bar of health.
Adventure Points To Unlock: 900
Shanghai GuideCategory: Exploration
Description: An informative guidebook to things of interest that can be discovered in Shanghai.
Slug Boy IICategory: Packing
Description: Increase handgun ammunition capacity by a half-dozen bullets.
Adventure Points To Unlock: 950
Slugger IICategory: Brawling
Description: Increases damage from charged-up attacks.
Adventure Points To Unlock: 900
Street Scrapper IIILock combination: 4134.
Category: Combat
Description: Deal increased damage with one and two handed melee weapons.
Adventure Points To Unlock: 1500
Sukhothai ArtifactsYou can buy it for 450 Baht from Tongdang one you buy the Rebreather.
Category: Exploration
Description: A handy guide to the possible locations of lost artifacts in Sukhothai.
Sukhothai BooksYou can buy it for 450 Baht from Tongdang.
Category: Exploration
Description: A literature compendium containing information on adventure books to be found in Sukhothai.
Sukhothai CogwheelsYou can buy it for 700 Baht from Tongdang one you buy the Rebreather.
Category: Exploration
Description: A guidebook with information regarding the sightings of Khmer cogwheels in Sukthothai.
Sukhothai FrequenciesCategory: Exploration
Description: Classified military document regarding the locations of encrypted radio frequencies in Sukhothai.
Sukhothai MedicineCategory: Exploration
Description: A guidebook with information on the whereabouts of medicine bottles in Sukhothai.
Sukhothai MysteriesYou can buy it for 450 Baht from Tongdang.
Category: Exploration
Description: A collection of information regarding possible mysteries to be discovered in Sukhothai.
Sukhothai NotesYou can buy it for 950 Baht from Tongdang one you buy the Rebreather.
Category: Exploration
Description: A guidebook detailing the various notes to be found in Sukhothai.
Sukhothai RelicsCategory: Exploration
Description: An old manuscript of esoteric knowledge regardig the ancient relics rumored to be found in Sukthothai.
Radio Frequencies
Radio Frequencies that are needed to complete the "Royal Army Transmissions" discovery. These are small notes that can be found in areas occupied by enemy soldiers. Mostly they are located right next to radio sets.
Sukhothai, Voss' CampIn the main building of Voss' Camp, on the desk with a radio. Related discovery: Royal Army Transmissions.
Sukhothai, Wat MahathatOn a table with radios standing under a canopy. Related discovery: Royal Army Transmissions.
Sukhothai, Wat Sa SiOn a table with radios standing under a tent. Related discovery: Royal Army Transmissions.
Sukhothai,Wat Chana SongkhramOn a small table inside the guard booth. Related discovery: Royal Army Transmissions.
Medicine Bottles
Medicine Bottles can be exchanged for Adventure Books that either raise your HP or stamina bar permanently.
Belt BuckleInside the ruins. You will get here after scorching the burnable wall and swimming through the flooded tunnel.
Bronze JueIt is located in a small ruin, which can be entered after burning the hay covering the grappling point. Use one of the tar jars located nearby to set the fire.
Ganesha StatueIn the ruins located under the main building in Voss' Camp. You can enter there, for example, through a crawl space located on the east side.
Jade HumanoidAt the lowest level, under the central platform.
Jōmon MaskOn the upper ledge. You can get here once you use one of the tar jars to burn the hay covering the grapping point.
Mystery Quests
Mysteries, Sukhothai. Mysteries are shorter and sometimes quite challenging activities, and will give you adventure points when they have been completed, in addition to a variety of different smaller rewards.
A Game of WitsHow to start: Read the Lorenzo's Challenge.
Reward: 250 Adventure Points
Solve the Mak-Yek Challenge - A note next to a board of Mak-yek pose a challenge to find the code to a safe. The code is hidden in the game. Better try to figure this one out.
F1 moves to F3, capturing E3 and G3
H1 moves to D1, capturing C1
B1 moves to B8, capturing A8, C8, D8, and E8
F8 moves to F6, capturing F5 and F4
Code = 3186
Child's PlayFind the Second Clue - The riddle said to follow banners to a shrine and a tree. That's where a second clue is.
Find the Third Clue - Second riddle said to look for the third clue under the tallest bridge in the village.
Find the Treasure - These clues apparently lead to a treasure hidden by the village dam.
Counting LettersHow to start:
Reward: 250 Adventure Points
Find the Footlocker Code - A German cipher machine with some code wheels, and a note with a challenge. Should be enough to figure out how to open the footlocker.
Elephant in the RoomHow to start: Take a photo of Buddhist Shrine.
Reward: 250 Adventure Points
Discover the Shrine's Secret - There's something more to this shrine. Might be worth taking a closer look to discover whatever secret it holds.
Monkey BusinessReward: 250
Follow the Monkey Trail - The monkeys are stealing from the Fascists. Perhaps they've taken something useful.
Enter the Equipment Room - The monkeys had stolen the key to the equipment room in the Fascist armory. Could be something useful in there.
Path of TigersHow to start: Examine the Rebels Photograph.
Reward: 250 Adventure Points + Jumbo Grip adventure book.
Objectives:
Find Location of the Photograph - A photograph next to the lockbox. Maybe it's a clue to the lock combination? Head to Wat Si Sawai and take a photo of the Painted Message.
-= continued in full description =-
The Serpent's ChestHow to start: Read the Voss' Letter.
Reward: 250 Adventure Points
Objectives:
Find the Ancient Keys x 3 - Voss has brought with him a curious snake-ornamented chest from the Gizeh. This chest can only be unlocked using three ancient keys hidden in three different locations around the world: the Vatican, Gizeh, and Shanghai.
Ancient Vatican KeyAncient Gizeh KeyAncient Shanghai KeyUnlock the Serpent's Chest and colelct the ancient relic.
Timely ArrivalReward: 250 Adventure Points
Find the Lockbox Code - A locked box with what seems like a Fascist shipment. Better search for clues and figure out the combination.
GIADA + Sabato = 59404
Puzzles and riddles that need to be solved to push the game storyline forward, gain access to new places, etc.
Hidden GateSolution:
Pick up two cogwheels from the central room: Cogwheel (Hidden Pyramid #1), and Cogwheel (Hidden Pyramid #2).
Crawl through the crawl space located near the Left Gear Train.
Climb the wall and pick up the Cogwheel (Hidden Pyramid #3) that you can find up there.
Use your whip and open the Plugged Pipe.The water will flow.
Place the cogwheels on the left or right gear train in the layout that is show on the picture below and pull the lever.
Do the same with the other gear train.
Hidden Platform Cogwheel PuzzleNumber of cogwheels: 7
Position the large and small cogwheels as shown in the picture below and then pull the lever. After completing the puzzle, don't forget to take the small cogwheels to use them in the next puzzle.
Khmer PipeworksSolution:
Turn the Handle (2) to make water flow.
Place Pipe Segment (5) (T-shaped) into Pipe Slot #C1 in such a way that the water flows to the left and to the right.
Place the Pipe Segment (6) (L-shaped) into Pipe Slot #C2 in such a way the water flows towards the door. It will open that door.
Get the Pipe Segment (7) (straight) and place it into the Pipe Slot #C2 (so you have to remove the Pipe Segment (6) from this slot) that the water flows into the left grate.
Place the Pipe Segment (6) into the Pipe Slot #C3 in such a way the the water flows to to central grate.
Place the Pipe Segment (4) into the Pipe Slot #C4 in such a way the the water flows to to right grate.
Nephilim Game
River Bank Cogwheel PuzzleNumber of cogwheels: 10
Position the large and small cogwheels as shown in the picture below and then pull the lever.
Sealed SarcophagusSolution:
Complete the Symbol Pedestal #3 - Use the Cross & Circle Key to line up all symbols.
Complete the Symbol Pedestal #4 - Use the Cross & Circle Key to lineup cross and diamond symbols then use the Circle Key to line up all symbols.
Complete the Symbol Pedestal #5 - A. Use the Cross & Diamond Key to line up diamond symbol with the line on the outer ring. B. Use the Cross & Circle Keykey to line up dimond symbol and cross symbol. C. Use the Circle Key to line up all symbols.
Complete the Symbol Pedestal #6
Story of the AncientsSolution:
Interact with the stone pillar in the center of the cave and complete the dream sequence.
After returning to the real world, rotate the stone blocks to match the screenshot below.
Collect the Golden Fishing Hook.
The Great GameSolution: Position other people as in the picture below and stand yourself in the place pointed by the arrow.
Village Cogwheel PuzzleNumber of cogwheels: 5
Position the large and small cogwheels as shown in the picture below and then pull the lever. After completing the puzzle, don't forget to take the small cogwheels to use them in the next puzzle.
Wat Mahathat Cogwheel PuzzleNumber of cogwheels: 5
Position the large and small cogwheels as shown in the picture below and then pull the lever. After completing the puzzle, don't forget to take the small cogwheels to use them in the next puzzle.
Wat Si Sawai CogwheelsNumber of cogwheels: 6
Position the large and small cogwheels as shown in the picture below and then pull the lever. After completing the puzzle, don't forget to take the small cogwheels to use them in the next puzzle.
Waterfall Ruins Cogwheel PuzzleNumber of cogwheels: 4
Position the large and small cogwheels as shown in the picture below and then pull the lever. After completing the puzzle, don't forget to take the small cogwheels to use them in the next puzzle.
Key Items & Objects
Various other items that are useful during the adventure.
Big Cogwheel
Big Cogwheel
Blessed PearlYou can reach this place after going all the way down in the northern shaft.
Circle Key
Cross & Circle Key
Cross & Diamond Key
Elephant Statuette #1
Elephant Statuette #2Inside a small alcove behind a burnable wall.
Elephant Statuette #3
Fish Crate
Game Piece x 2
Game Piece x 3
Golden Fishing Hook
Hammer
Pipe Segment (1)
Pipe Segment (2)
Pipe Segment (3)
Pipe Segment (4)
Pipe Segment (5)
Pipe Segment (6)
Pipe Segment (7)
Platform
Rebreather798 Baht
Tar Jars
Tar Jars
Torches
Switches
Various types of switches, levers, pressure plates and other items that can be switched, shifted, etc.
Handle
Handle
Handle
Handle (2)
Lever
LeverWhen you turn it the trapdoor will open and you will slide down the ramp to the trap room.
Lever
Lever
LeverHidden under some hay you can burn using the lighter.
LeverUse it to stop the cogwheels.
Pipe Slot #A1
Pipe Slot #B1
Pipe Slot #B2
Pipe Slot #C1
Pipe Slot #C2
Pipe Slot #C3
Pipe Slot #C4
Plugged Pipe
Plugged Pipe
Plugged Pipe
Symbol Pedestal #1Insert the Circle Key and pull it out when all three symbols on the pedestal line up.
Symbol Pedestal #2Use the Cross & Circle Key to line up diamond and cross symbols then pull it out. Then use the Circle Key to line up all three symbols.
Symbol Pedestal #4Use the Cross & Circle Key to lineup cross and diamond symbols then use the Circle Key to line up all symbols.
Symbol Pedestal #5Use the Cross & Diamond Key to line up diamond symbol with the line on the outer ring.
Use the Cross & Circle Keykey to line up dimond symbol and cross symbol.
Use the Circle Key to line up all symbols.
Symbol Pedestal #6
Weak WallDestroy it with one of the wooden poles that will fall to the ground when the ceiling begins to lower when you open the sarcophagus. When you do this the water will start flooding the room.
Keys
Keys you can use to open some locked doors, gates, etc.
Equipment Room KeyThis key opens the equipment room door in the Fascist armory.
Royal Army Key
Locked Passages
Various locked or blocked passages. Some of them can be opened with the right key. Some can only be unlocked from a certain side. Others can be unblocked by, for example, using a large hammer or setting them on fire.
Breakable Wall
Breakable Wall
Burnable Wall
Closed DoorTo open them, all you have to do is use force.
Closed DoorAran will open it from the inside at the end of the "The Kid Who Vanished" fieldwork.
Secret PassageYou can open it by rotating the handle on the right side of the passage during the "The Kid Who Vanished" quest. Gina will rotate the second handle.
Secret Passage
Secret Passage
Secret Passage
Secret Passage
Stone DoorIn a cave hidden behind a waterfall. To open it use the ancient relics you have to push out all the pins on the panel on the right.
Shops
Places where you can buy various items, such as adventure books or tools.
Fish VendorReturn the Fish Crate to her. Reward: 45 Adventure Points.
VillagerTake a photo of him and place the Villager Portrait on the table in front of him. Reward: 45 Adventure Points + 10 Baht.
Ammunition Boxes
Additional ammunition for the handgun. One box contains two bullets. This can be ammunition for Indy's revolver or the Model 1934 pistol while wearing the Royal Army uniform.
Repair Kits
With a repair kit you can repair broken weapons in your satchel.
Bandages
Using bandages restores your health.
Currency / Egyptian Pounds
Places where you can find local currency.
Bread
Eating bread, such as cornetti, donuts, crackers and others boosts your total health temporarily.
Fruit
Eating fruit such as apples, oranges, lemons, figs and others gives you an additional stamina boost.
Boat Docks
At the Boat Docks you can moor the boat you are using to travel around Sukhothai. Here you will also find radio transmitter that you can use to call the boat to you if it is located somewhere else.
Jungle Bruiser Pit
Khmer Vault
Secret Armory Entrance
Tongdang's Hut
Tree House
Village
Wat Chana Songkhram
Wat Mahathat East
Wat Mahathat West
Wat Sa Si #1
Wat Sa Si #2
Wat Si Sawai #1
Wat Si Sawai #2
Map Transitions
Transitions between different sections of the map.
Hidden Temple Entrance
Hidden Temple Entrance
Khmer Vault Entrance
Khmer Vault Entrance
Khmer Warrior Temple
To Sukhothai
To the Village
Underwater TunnelTo swim through it you need a Rebreather.