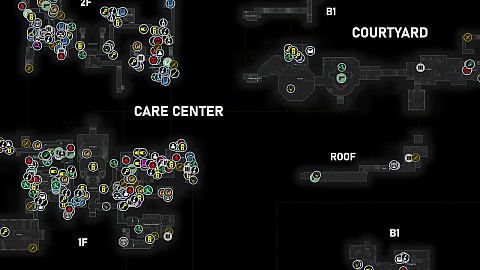
The interactive map of the Rhodes Hill area in Resident Evil Requiem provides a detailed overview of the Care Center complex and its surrounding locations. It displays all accessible floors, including upper wards, offices, restricted sections, and the basement levels. The map highlights key items, puzzles, locked doors, safe rooms, collectibles such as Mr. Raccoon statuettes, Files, and other important locations.
Markers on the map
Save Points8
Ink Ribbons22
Storage Boxes6
Maps5
Files41
Antique Coins22
Mr. Raccoon Memoriam10
Weapons15
Upgrades12
Safes3
Formidable Enemy Encounters6
Laser Microscopes2
Recipes4
Key Items29
Locked Passages44
Switchable Objects25
Lockpicks5
Simple Locks5
Med Injectors8
Herbs25
Ammo35
Throwables5
Warped Closets5
Empty Bottles7
Empty Injectors3
Rare Metal5
Scraps17
Infected Blood37
Breakable Objects28
Main Story Milestones14
Points of interest
Save Points
Typewriters, laptops, and computer consoles serve as the game's Save Points. When interacting with them, you can manually save your progress. They are usually located inside safe rooms or low-risk areas, allowing players to preserve progress before entering dangerous sections, solving major puzzles, or fighting bosses.
Chronic Care Center (Custodian's Office)
Chronic Care Center (Guard Office)
Chronic Care Center (Lead Researcher's Office)
Chronic Care Center (Processing)
Chronic Care Center (Room 201)
Chronic Care Center (Security Room)
Research Facility (Reception)
Water Treatment (Storage Bay)
Ink Ribbons
Ink Ribbons and Ink Ribbon Tins are essential components of the game's classic survival-horror save system (specifically for Grace's sections). Ink Ribbons are the only way to save your progress at Typewriters. Because each save consumes one Ink Ribbon, they are a strictly limited resource.
Storage Boxes
Item Boxes are essentially usable only by Grace Ashcroft. She can access these storage containers in safe areas to deposit items she cannot currently carry and retrieve them later from another item box, following the classic Resident Evil inventory system where all boxes are linked.
Item Box (Courtyard)
Item Box (Custodian's Office)
Item Box (Guard Office)
Item Box (Reception)
Item Box (Security Room)
Item Box (Storage Bay)
Maps
Maps are typically found hanging on walls, pinned to boards, placed on desks, or stored inside safes. After collecting one, unexplored sections of that specific area become visible on your in-game map, helping you track doors, locked rooms, and areas you may have missed.
Care Center Basement Floor Plan
East Wing Map
Raccoon Round Map (Rhodes Hill)You can find it in the Basement Safe. It's not a regular building layout map - rather, it's a Mr. Raccoon collectible map that marks the locations of all the Mr. Raccoon memorial statuettes within the Rhodes Hill area on your in-game map.
Research Facility Floor Guide
West Wing Map
Files
Files are collectible documents or logs found throughout the game's environments. In most cases, they are optional pieces of lore and information that you can collect up while exploring.
Progress NotesRhodes Hill File 1/41. On a small table next to a large armchair standing in the middle of room 203.
Note on Cardboard BoxRhodes Hill File 2/41. In the storage compartment in room 202. The light switch in the room does not work, so use your lighter.
Care Center PamphletRhodes Hill File 3/41. On the coffee table in the middle of the room.
Whiteboard ScrawlRhodes Hill File 4/41. Notes on the whiteboard hanging on the wall.
Folded NoteRhodes Hill File 5/41. In the pocket of a white lab coat hanging on a hook.
Chairman's NoteRhodes Hill File 6/41. A notebook with clues to the puzzle lying on the coffee table. You'll need a Pencil to reveal the hint.
Copy of an Email to a ManagerRhodes Hill File 7/41.
Note to the ChairmanRhodes Hill File 8/41. A piece of paper tossed into the trash can in the corner.
Blood Compound SynthesisRhodes Hill File 9/41.
Safe ReplacementsRhode Hill File 10/41.
Lead Researcher's MessageRhodes Hill File 11/41.
Lead Researcher's Picture 1Rhodes Hill File 12/41. A photograph lying on the desk.
Lead Researcher's Picture 2Rhodes Hill File 13/41.
Lead Researcher's Picture 3Rhodes Hill File 14/41. A framed photograph standing on the desk.
Examination Room Safe CodeRhodes Hill File 15/41. This note contains a clue on how to open the Examination Room Safe.
Patient Medical RecordsRhodes Hill File 16/41.
Spencer's Research IRhodes Hill File 17/41. You'll find this note in the notebook, which you can check after solving the puzzle.
Unlocking the Organ Transport BoxRhodes Hill File 18/41. You'll find this note in the notebook, which you can check after solving the puzzle. It contains a clue on how to open the Organ Transport Box and get the Artificial Lungs.
Victor's Journal EntryRhodes Hill File 19/41.
Construction NoticeRhodes Hill File 20/41. A sign hanging on the wall.
Bar & Lounge Safe CodeRhodes Hill File 21/41. This note contains a clue on how to open the Bar & Lounge Safe.
Background CheckRhodes Hill File 22/41.
Disposal Team ReportRhodes Hill File 23/41. A note you can find inside a cardboard box.
Double MutationRhodes Hill File 24/41.
Nurse's LogRhodes Hill File 25/41.
Satiety Suppression Medical RecordsRhodes Hill File 26/41.
Basement Safe CodeRhodes Hill File 27/41. This note contains a clue on how to open the Basement Safe.
Dishwasher's NoteRhodes Hill File 28/41. Inside the Warped Closet, which only Leon can open.
Special Directive for Raccoon CityRhodes Hill File 29/41. You will receive this information automatically during a cutscene once Leon reaches this location.
Report on Raccoon City SyndromeRhodes Hill File 30/41. You will receive this information automatically during a cutscene once Leon reaches this location.
Staff Member's Last WordsRhodes Hill File 31/41. A note lying on the ground next to a corpse in a dark tunnel.
Operation to Eliminate "The Girl"Rhodes Hill File 32/41.
Unlocking the CellsRhodes Hill File 33/41. Instructions hanging on the wall.
Technician's NoteRhodes Hill File 34/41.
Security Guard's ReportRhodes Hill File 35/41.
Visitor RecordRhodes Hill File 36/41.
Note Regarding Research ResultsRhodes Hill File 37/41.
Spencer's Research IIRhodes Hill File 38/41.
Subject 170 RecordRhodes Hill File 39/41.
Grace Ashcroft Blood Analysis ReportRhodes Hill File 40/41.
Roof Hatch ManualRhodes Hill File 41/41.
Antique Coins
Antique Coins are small collectible coins that serves as a currency for unlocking permanent upgrades. Antique Coins are specifically used to purchase four permanent upgrades for Grace Ashcroft. These upgrades can be bought in a special room called the Parlor.
Antique CoinYou will be able to take this coin and two others after opening the Bar & Lounge Safe.
Antique CoinYou will be able to take this coin and two others after opening the Bar & Lounge Safe.
Antique CoinYou will be able to take this coin and two others after opening the Bar & Lounge Safe.
Antique Coin
Antique CoinThe coin is lying on the piano keys.
Antique CoinThe coin is located on top of the metal locker. To reach it, you must climb onto the cart before moving it.
Antique CoinThe coin is lying on a simple, light-colored desk.
Antique CoinDropped by a singing zombie.
Antique CoinIt's lying on a dresser against the wall.
Antique Coin
Antique CoinYou will be able to take this coin and two others after opening the Examination Room Safe.
Antique CoinYou will be able to take this coin and two others after opening the Examination Room Safe.
Antique CoinYou will be able to take this coin and two others after opening the Examination Room Safe.
Antique CoinTo get this coin, you must break the small container sitting on the bar counter.
Antique CoinIt's lying on the bar counter.
Antique CoinYou'll find the coin sitting on the edge of the roulette table.
Antique CoinThe coin is lying on a half-round table.
Antique CoinThis is one of two coins you will find in a small, open safe.
Antique CoinTo collect this coin, you must break the small pitcher sitting on the dresser.
Antique CoinThe coin is lying on a small table near the stairs leading to the upper floor.
Antique CoinThis is one of two coins you will find in a small, open safe.
Antique CoinOn the desk, next to the computer keyboard.
Mr. Raccoon Memoriam
Mr. Raccoon Figurines are hidden collectible statues scattered throughout various locations in the game. They are small figurines modeled after Mr. Raccoon, a recurring mascot character in the Resident Evil series. These statues cannot be picked up. Instead, you must destroy them - usually by shooting or striking them - to register them as collected.
Mr. Raccoon (Care Center Courtyard)This figurine is sitting on a small desk placed against the wall.
Mr. Raccoon (Care Center Courtyard)You can spot this figurine through the window. It is sitting on a fence post.
Mr. Raccoon (Care Center)The figurine is sitting on top of the coffee maker.
Mr. Raccoon (Care Center)You can find this figurine while playing as Leon. It's inside a locked wardrobe that only he can open.
Mr. Raccoon (Care Center)You'll find the figurine resting on the counter at the reception desk.
Mr. Raccoon (Care Center)You can find it on a round table located by the staircase, right next to the grandfather clock.
Mr. Raccoon (Care Center)This one is tucked away behind the bed, right against the wall.
Mr. Raccoon (Care Center)The first figurine you'll come across. It is sitting on the edge of the mantelpiece.
Mr. Raccoon (Care Center)This figurine is sitting on the workbench.
Mr. Raccoon (Care Center)This figurine is sitting on top of an old CRT TV.
Weapons
Standard weapons and items that can be used as weapons.
B934
Classic 70Type: Rifle. Ammo Capacity: 6
Description: A standard bolt-action rifle. Can deliver serious firepower in skilled hands. The scope can be swapped out or removed.
Disposal TankYou can use this as a weapon to kill zombies while escaping from the research facility.
Disposal TankYou can use this as a weapon to kill zombies while escaping from the research facility.
Disposal TankYou can use this as a weapon to kill zombies while escaping from the research facility.
Disposal TankYou can use this as a weapon to kill zombies while escaping from the research facility.
Hemolytic InjectorA special drug that destroys infected blood cells. Prevents corpses from mutating and can be used to stealthily take out enemies.
Makeshift Knife
Makeshift Knife
Makeshift Knife
Makeshift Knife
Makeshift Knife
Makeshift Knife
MSBG 500Type: Shotgun. Ammo Capacity: 5
Description: A compact, pump-action shotgun. Offers excellent spread, but with limited capacity. Can be customized for an even wider blast.
S&S M232
Upgrades
Upgrades are permanent enhancements for Grace and Leon that expand inventory, boost health, increase damage/firepower, or provide utility.
CompensatorDescription: A custom part for the Aligator Snapper. Reduces muzzle rise. When titled, the barrel looks like an open mouth with bared fangs.
Connoisseur CharmA charm for any gun. Increases firepower.
Eye Spy CharmTo get it, you must kill Chunk while playing as Grace. Your best bet is to take him down while he's stuck in a doorway.
Description: A mysterious charm that works just by holding it. Increases likelihood you'll survive fatal damage.
FlashlightYou will find the flashlight on the infected man and collect it automatically during your first visit to this room.
Hip PouchA small pouch that adds two slots to your (Grace) inventory.
Hip PouchCost: 3 Antique Coins.
A small pouch that adds two slots to your (Grace) inventory.
Hip PouchA small pouch that adds two slots to your (Grace) inventory.
LighterOn the shelf in the dressing room of room 201. It will allow you to light up dark rooms during the early stages of the game.
Override ManualCost: 6 Antique Coins.
Increases the blood collector's capacity by 50.
StabilizerCost: 4 Antique Coins.
Improves gun handling and increases firepower.
Stakeout Takeout CharmA mysterious charm that works just by holding it. Increases knife power and durability.
SteroidsCost: 4 Antique Coins.
Increases max health.
Safes
Safes are locked containers that require a combination code to open. To open a safe, you must enter the correct combination by rotating the dial left or right to the required numbers before confirming the code. The combinations are usually learned by finding associated files, though once you know them you can open the safes without reading the clues.
Locations where you'll face formidable enemies. In most cases, you'll have to defeat them in combat, but some encounters will force you to sneak past or make a quick escape.
Blister Borne (Chapel)To kill Blister Borne you should focus on destroying the tumors covering its body.
ChefWhen you first encounter him, you won't have the gear to kill him, so you must bypass him. Later in the game, you'll find him near the doors to the Parlor. Once you kill him, he will drop the Pantry Key.
Chunk (Grace)He is optional so you don't have to kill him. After following you downstairs, he'll be patroling the corridors of the east wing. He drops Eye Spy Charm - Kill him before you get the Corrosive and visit the Lead Researcher's Office.
Chunk (Leon)
The GirlYou will first encounter this monster when you enter the nurses' station. If it starts chasing you, run toward well-lit rooms. This creature is the primary obstacle to obtaining the Screwdriver. When necessary, use the crawlspace under the table in the nurses' station to slip past her. Unbeatable for now. Keep your distance.
The GirlYou must avoid her and fend her off by shooting at her or using the spotlights until you restore power to the roof hatch controls. She will die once you open the roof hatch.
Laser Microscopes
Laser MicroscopeUsed to analyze collected blood specimens, thereby unlocking new crafting recipes.
Laser MicroscopeUsed to analyze collected blood specimens, thereby unlocking new crafting recipes.
Recipes
Blood Specimen (Converged)Recipes:
Med Injector (Green Herb + 60 Infected Blood / Mixed Herb (G+G) + 30 Infected Blood)
12.7x55mm Ammo x2 (Rare Metal + 80 Infected Blood)
Artificial LungsOne of the items you need to collect to get the ID Wristband (Level 2). To open the transporter:
Turn the dial to HAND
Move the switch to meet the middle line
Move switch 2 down
Move switch 5 down
Turn the dial to AUTO
Solution hint: Unlocking the Organ Transport Box
Blood CollectorWith it, you will be able to collect Infected Blood. Its initial capacity is 100 units, but it can be upgraded to 150 units after obtaining the Override Manual.
Description: An analysis device that collects blood which can be altered to craft other items.
Cherub KeyIn the drawer of the small table standing at the end of the hallway, by the window.
Unlocks: Cherub Relief Door.
CorrosiveThis substance is required to open the locker containing the Sun Quartz.
Double Helix ModelModel is inside the vine bottle. Rotate the label on the bottle until it looks complete, then pull the bottle apart to open it. You need it to fill in the Incomplete DNA and start the elevator.
East Wing KeycardYou'll find it in the severed hand of a dead scientist.
Unlocks: East Wing Door.
Forklift KeyYou can use it to activate Forklift or Forklift to create a path.
Fuse Box (Locked)You must use the Screwdriver to open the box. Once you take the fuse, you will need to run quickly toward the Fuse Box located near the gate.
Helicopter KeyRequired to start the helicopter located in the courtyard.
ID Wristband (Level 2)To get this wristband you need to collect the Artificial Lungs and Artificial Heart, put them inside the organless body then kill it.
Moon QuartzIt's first of the items you need to open the Courtyard Door.
To open the locker and take the quartz, you must enter the symbols in the correct order: Moon - Sun - Star - Moon. The hint can be found in the Chairman's Note.
Pantry KeyYou will obtain it after killing the Chef. Once you're able to do so, you'll likely encounter him patrolling hallway near the Parlor Door.
PencilIt will allow you to reveal and read the Chairman's Note, which contains the hint - combination to the locker holding the Moon Quartz.
Red JewelIt's inside the Unicorn Trinket Box. Examine the box and press the button on the back to open it. You need this item to unlock the Parlor Door.
ScrewdriverIt is located in the toolbox sitting on the top shelf. To reach it, move the cart standing nearby and climb onto it. You must act quickly, because "The Girl" attracted by the noise will chase you.
Unlocks: Fuse Box (Locked).
Severed HandYou can pick it up as Grace after exiting the basement elevator. You can then scan it under a microscope to reveal a hidden message.
Star QuartzGrace will receive this from Emily once you escape the basement and exit the elevator. This is the final crystal you need to open the Courtyard Door.
Sun QuartzUse the Corrosive to destroy the padlock then Star - Sun - Moon - Sun (You can figure out the code from the photographs in the room, two photographs each show two parts of the combination).
West Wing KeycardYou will collect it automatically during your first visit to this room.
Unlocks: West Wing Door.
Locked Passages are all locked doors, gates, barred areas, and other passages requiring keys, ID wristbands, fuses, tools, puzzles, or special actions (e.g., chainsaw for bolts) to open.
Attic DoorYou will only be able to open these doors after defeating Chunk (Leon).
CartYou must move this cart so that you can pass through here once the conveyor belt's direction is reversed.
Cell DoorThis door will open after you visit the area where the third joint plug is.
Cherub Relief DoorYou need the Cherub Key to unlock this door.
Control Room DoorThis door will unlock when you interact with the Computer Terminal.
Control Room DoorThese doors will unlock once you reach the Control Room via a detour and the self-destruct sequence for the research facility begins.
SpotlightTurn it on to fend off The Girl. It will turn off after a short while.
SpotlightTurn it on to fend off The Girl. It will turn off after a short while.
SpotlightTurn it on to fend off The Girl. It will turn off after a short while.
SwitchIt is used to change the direction of the conveyor belt.
SwitchIt is located on the lower level. Use it to drain the main tank, which will grant you access to a large amount of infected blood.
Lockpicks
LockpickOn the desk, next to the computer keyboard
LockpickOn a cabinet standing between the windows.
LockpickIn a metal storage locker.
LockpickIn the corner of the tunnel you can crawl into.
LockpickIt's on the floor in the water-filled part of the room, meaning you have to go through the entrance behind the Movable Crate.
Simple Locks
Simple Lock
Simple Lock
Simple Lock
Simple Lock
Simple Lock
Med Injectors
Med Injectors are quick-use healing items designed to restore the player's health instantly during gameplay.
Med Injector (Chemical Treatment)This injector is lying on a barrel.
Med Injector (Attic)It's behind the wall. You can only collect it after the boss destroys the wall while charging.
Med Injector (Chapel)Inside a metal container on a dresser covered with a shroud.
Med Injector (Collection & Testing)In a drawer of the worn-out metal desk.
Med Injector (Director's Office)Inside a small metal case on the desk.
Med Injector (Nurses' Station)It is lying on the floor next to the corpse.
Med Injector (Storage Bay)On a metal workbench, next to the typewriter.
Med Injector (Warped Chest)You can obtain this injector while playing as Leon, as only he is able to open the locker where it is stored.
Herbs
Herbs are healing items that restore your character's health when you take damage. They can be combined together to create stronger healing items.
Ammo
Ammunition is the bullets or shells that your guns use to shoot enemies. Ammo is an item you can collect or craft. Each weapon type requires its own specific ammo.
Throwables
Throwables include grenades and other items - such as bottles filled with corrosive liquid - that can be tossed at enemies to deal significant damage.
Hand Grenade
Hand Grenade
Hand Grenade (2)
Molotov Cocktail
Molotov Cocktail
Warped Closets
Warped Closets are special locked storage cabinets that Grace cannot open. Only Leon can break them with his melee weapon during his one-time section after Grace's descent.
Warped Closet (Filing Room)The closet is in a locked room that you must first unlock while playing as Grace.
Contains: Handgun Ammo (10), Med Injector.
Empty BottleYou can only pick up this bottle after you've collected the Lighter.
Empty Bottle
Empty BottleOn the floor. Appears only if you try to turn on the light before acquiring the Lighter.
Empty Bottle
Empty Bottle
Empty Bottle
Empty Injectors
Empty Injector
Empty Injector
Empty Injector
Rare Metal
Rare Metal is a high-grade crafting material found exclusively in locked containers protected with simple locks. You'll need a lockpick to access them, as this metal is essential for producing 12.7x55mm Ammo rounds for the Requiem handgun.
Rare Metal
Rare Metal
Rare Metal
Rare Metal
Rare Metal
Scraps
Scraps are the primary resource used for crafting ammunition for handguns, shotguns, rifles, and submachine guns, as well as for manufacturing grenades.
Infected Blood
Infected Blood (10)
Infected Blood (100)
Infected Blood (100)
Infected Blood (20)
Infected Blood (30)
Infected Blood (30)
Infected Blood (30)
Infected Blood (30)
Infected Blood (30)
Infected Blood (40)
Infected Blood (40)
Infected Blood (50)
Infected Blood (50)
Infected Blood (50)
Infected Blood (50)
Infected Blood (50)
Infected Blood (50)
Infected Blood (50)
Infected Blood (60)
Infected Blood (60)
Infected Blood (60)
Infected Blood (60)Available after approaching the Vent from the northern side.
Infected Blood (60)
Infected Blood (60)
Infected Blood (70)
Infected Blood (70)
Infected Blood (70)
Infected Blood (70)
Infected Blood (80)
Infected Blood (80)
Transfusion Bag (100)
Transfusion Bag (50)Kill the zombie carrying an IV pole.
Transfusion Bag (50)
Transfusion Bag (50)
Transfusion Bag (50)Kill the zombie carrying an IV pole.
Transfusion Bag (60)
Transfusion Bag (80)
Breakable Objects
Breakable Containers are destructible environmental objects that you can smash to obtain random loot. They typically appear as small fragile objects such as wooden crates, boxes, vases, or other easily breakable items. Once the container is broken, it usually drops a random item that the player can pick up.
Main Story Milestones
Rhodes Hill Starting Point (Grace - Part 1)This is where you begin your adventure in Rhodes Hill as Grace.
Rhodes Hill Starting Point (Leon - Part 1)This is where Leon begins his journey through the Care Center.
Rhodes Hill Ending Point (Leon - Part 1)When Leon reaches the gate just as Grace is trying to escape The Girl and helps her out, you will take control of Grace once again.
Rhodes Hill Starting Point (Grace - Part 2)
Rhodes Hill Ending Point (Grace - Part 2)After jumping into this hole, Grace will land in the basement, and you will regain control of Leon.