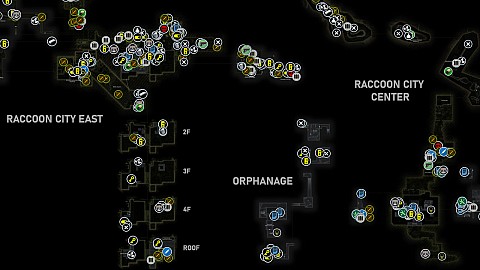
An interactive map of Raccoon City for Resident Evil Requiem, designed to help you navigate the ruins of this iconic Midwestern town. The map covers key locations across East Raccoon City, Raccoon City Center, and the Orphanage.
Markers on the map
Save Points4
Supply Boxes4
Files23
Mr. Raccoon Memoriam13
Weapons3
Upgrades7
Tracking Modules9
Formidable Enemy Encounters6
Key Items15
Locked Passages34
Locked Containers2
Switchable Objects13
Med Injectors8
Herbs18
Ammo30
Throwables8
Scraps7
Gunpowder7
Breakable Objects55
Random Loot Containers14
Hiding Places3
Plant 43 Seedlings9
Main Story Milestones7
Other4
Points of interest
Save Points
Typewriters, laptops, and computer consoles serve as the game's Save Points. When interacting with them, you can manually save your progress. They are usually located inside safe rooms or low-risk areas, allowing players to preserve progress before entering dangerous sections, solving major puzzles, or fighting bosses.
R.P.D. (Main Hall)
Raccoon City (Central Camp)
Raccoon City (Side Street)
Raccoon City (West Point)
Supply Boxes
Supply Boxes are special containers used by Leon S. Kennedy to manage equipment and resources. Instead of functioning as storage like traditional item boxes, Supply Boxes act more like a trading or resupply system where Leon can purchase weapons, ammunition, and other useful items, as well as sell weapons he is currently carrying to free up inventory space. If a weapon is sold, it is not permanently lost - Leon can buy it back later from the same system.
Files
Files are collectible documents or logs found throughout the game's environments. In most cases, they are optional pieces of lore and information that you can collect up while exploring.
Report on the Raccoon City IncidentRaccoon City File 1/18. Automatically received upon arrival in Raccoon City.
Raccoon Ciity Incident NewspaperRaccoon City File 2/18. A newspaper lying in the street.
Order for the Engineer CorpsRaccoon City File 3/18.
Battery Storage LocationsRaccoon City File 4/18.
Inventory ListRaccoon City File 5/18.
Engineer Corps NoteRaccoon City File 6/18.
R.P.D. Perimeter ReportRaccoon City File 7/18.
Top Secret OperationRaccoon City File 8/18.
Record of EventsRaccoon City File 9/18. A note pinned to the magnetic board.
Guide PamphletRaccoon City File 10/18. You will only be able to reach this location after completing the orphanage section.
Library CardRaccoon City File 11/18. The note will show up about 2 seconds after you open the drawer.
Barry's To Do ListRaccoon City File 12/18.
Scavenger Hunt - Clue 1Raccoon City File 13/18. Inside a jacket hanging on the wall.
Scavenger Hunt - Clue 2Raccoon City File 14/18. It's lying on a shelf inside the cabinet.
PhotographRaccoon City File 15/18. You won't be able to pick up and open the book until you have read the Library Card.
Toe TagRaccoon City File 16/18. Within a coffin inside the crypt.
Series 60 ResultsRaccoon City File 17/18.
New Researcher's NotebookRaccoon City File 18/18.
From Meryl to Mommy1998 Letters File 1/5. Deluxe Edition Only. On a red couch inside the building.
These notes must be collected in the correct order. Your reward for gathering them all is the R.P.D. Charm.
From Meryl to Mommy 21998 Letters File 2/5. Deluxe Edition Only.
These notes must be collected in the correct order. Your reward for gathering them all is the R.P.D. Charm.
From Meryl to Mommy 31998 Letters File 3/5. Deluxe Edition Only. On the dashboard of a wrecked car.
These notes must be collected in the correct order. Your reward for gathering them all is the R.P.D. Charm.
From Meryl to Mommy 41998 Letters File 4/5. Deluxe Edition Only. At the garage entrance, between the wall and the car wreck.
These notes must be collected in the correct order. Your reward for gathering them all is the R.P.D. Charm.
From Meryl to Mommy 51998 Letters File 5/5. Deluxe Edition Only. It's lying on the ground, behind the Gun Shop Kendo. Once you've read it, you can grab the charm.
These notes must be collected in the correct order. Your reward for gathering them all is the R.P.D. Charm.
Mr. Raccoon Memoriam
Mr. Raccoon Figurines are hidden collectible statues scattered throughout various locations in the game. They are small figurines modeled after Mr. Raccoon, a recurring mascot character in the Resident Evil series. These statues cannot be picked up. Instead, you must destroy them - usually by shooting or striking them - to register them as collected.
Mr. Raccoon (East Raccoon City)
Mr. Raccoon (East Raccoon City)
Mr. Raccoon (East Raccoon City)
Mr. Raccoon (East Raccoon City)
Mr. Raccoon (East Raccoon City)
Mr. Raccoon (East Raccoon City)
Mr. Raccoon (East Raccoon City)
Mr. Raccoon (East Raccoon City)
Mr. Raccoon (East Raccoon City)On top of a vehicle on the overpass. You can shoot it from the logistics warehouse's rooftop.
Mr. Raccoon (Raccoon City Center)
Mr. Raccoon (Raccoon City Center)
Mr. Raccoon (Raccoon City Center)
Mr. Raccoon (Raccoon City Center)
Weapons
Standard weapons and items that can be used as weapons.
GalType: Submachine Gun. Ammo Capacity: 50
Description: A submachine gun developed in the 1950s. Lacks accuracy but has a large ammo capacity, suitable for bursts of sustained fire.
Marksman 1AType: Rifle. Ammo Capacity: 10
Description: A semi-automatic marksman rifle. The damage per shot is limited, but it boats a high rate of fire and fast reload speeds.
W870 PoliceType: Shotgun. Ammo Capacity: 5
Description: A pump-action shotgun that boats an impressive spread. Requires a firm grip to keep its high power in check.
Upgrades
Upgrades are permanent enhancements for Grace and Leon that expand inventory, boost health, increase damage/firepower, or provide utility.
BSAA Emblem CharmA charm for sniper rifles. Increases firepower only when the scope is not equipped.
Power Shades CharmA charm for Requiem. Offers limitless bullet penetration and increases the firepower of the last bullet in the cylinder.
R.P.D. CharmDeluxe Edition Only. To collect this charm, you must read all the files from the "1998 Letters" category - the first one being the "From Meryl to Mommy."
A key chain Marvin gave to his daughter. Can be used as a charm for any gun. Increases firepower when near death.
S.T.A.R.S. Emblem CharmA charm for automatic guns. Increases firepower at the cost of more sway while aiming.
Silver Finish ScopeA custom part for the Classic 70. This scope boasts a high optical performance, making it ideal for hitting those long-range targets.
Tactical TrackerA device that records combat data. Credits earned from kills can be used at a supply box.
Tracking Modules
Tracking Modules are collectible items that store combat data and can be exchanged for credits at the supply boxes.
Tracking Module (Common) (2500)
Tracking Module (Common) (3000)
Tracking Module (Common) (3700)
Tracking Module (Common) (3700)
Tracking Module (Legendary) (8600)
Tracking Module (Rare) (4200)
Tracking Module (Rare) (4900)
Tracking Module (Rare) (5100)It drops from the Chainsaw Guy.
Tracking Module (Rare) (5100)
Formidable Enemy Encounters
Locations where you'll face formidable enemies. In most cases, you'll have to defeat them in combat, but some encounters will force you to sneak past or make a quick escape.
Blister Borne (Sewage Facility)It will attack you when you try to move the footbridge using the Valve Handwheel.
To kill Blister Borne you should focus on destroying the tumors covering its body.
Chainsaw GuyHe and other enemies will spawn once you pick up the Gas Can and head over to fill it with fuel.
Chainsaw Guy
Giant Spider
Plant 43Target the weak point (the mouth/bulb) / Dodge the tentacle slams (constant movement avoids most damage) / Trigger the finishing explosion.
Super Tyrant
Key Items
Battery #1One of the two batteries you need to collect to open the Locked Gate.
Battery #2One of the two batteries you need to collect to open the Locked Gate.
Broken Signal ReceiverThis is the second item you'll need to collect to make the detonator, which is used to unlock the Raccoon City Main Gate. You need the Repair Kit to fix it.
Locked Passages are all locked doors, gates, barred areas, and other passages requiring keys, ID wristbands, fuses, tools, puzzles, or special actions (e.g., chainsaw for bolts) to open.
Backyard GateThis gate can be opened from the south. You can get here through the sewage facility.
Basketball Court GateYou'll be able to open this gate after the fight with the Super Tyrant.
BSAA Container DoorTo open this container and access its contents, you must obtain the BSAA Container Key.
BSAA Container DoorTo open this container and access its contents, you must obtain the BSAA Container Key.
BSAA Container DoorTo open this container and access its contents, you must obtain the BSAA Container Key.
Med Injectors are quick-use healing items designed to restore the player's health instantly during gameplay.
Med Injector (Cedarbrook Apartments Roof)Inside a container found in the rooftop room.
Med Injector (East Raccoon City Street)Inside a case found within a large metal shipping container.
Med Injector (Gas Station)Next to the headless corpse.
Med Injector (Grimstone Building)In the hand of a dead soldier.
Med Injector (Parking Garage)On a bench in the garage.
Med Injector (Side Street)On the driver's seat of a battered delivery van.
Med Injector (Side Street)On a crate located near the save point.
Med Injector (The Applegate Hotel)In a metal case tucked beneath the counter.
Herbs
Herbs are healing items that restore your character's health when you take damage. They can be combined together to create stronger healing items.
Ammo
Ammunition is the bullets or shells that your guns use to shoot enemies. Ammo is an item you can collect or craft. Each weapon type requires its own specific ammo.
Throwables
Throwables include grenades and other items - such as bottles filled with corrosive liquid - that can be tossed at enemies to deal significant damage.
Hand Grenade
Hand Grenade
Hand Grenade
Hand Grenade
Hand Grenade
Hand Grenade
Hand Grenade x2
Stacked Hand Grenade
Scraps
Scraps are the primary resource used for crafting ammunition for handguns, shotguns, rifles, and submachine guns, as well as for manufacturing grenades.
Gunpowder
Gunpowder is a crafting material and comes in two variants - Small and Large. It is essential for producing ammo and grenades.
Breakable Objects
Breakable Containers are destructible environmental objects that you can smash to obtain random loot. They typically appear as small fragile objects such as wooden crates, boxes, vases, or other easily breakable items. Once the container is broken, it usually drops a random item that the player can pick up.
Random Loot Containers
Car TrunkRandom Loot x1.
Car TrunkRandom Loot x1.
Car TrunkRandom Loot x1. Gunpowder (Large)?
Car TrunkRandom Loot x1.
Military CrateRandom Loot x3.
Military CrateRandom Loot x3.
Military CrateRandom Loot x4.
Military CrateRandom Loot x3.
Military CrateRandom Loot x3.
Military CrateRandom Loot x3.
Military CrateRandom Loot x2.
Military CrateRandom Loot x4.
Military CrateRandom Loot x4.
Military CrateRandom Loot x2.
Hiding Places
Hiding spots your character can use to stay hidden from the children while navigating the orphanage.
Hiding Place (Bed)You can hide under the bed, where children are chasing you.
Hiding Place (Boxes)After taking the key, try to approach the trapdoor; you should hear a noise. Then quickly crouch down behind the boxes. Through the gap between the boxes, you can check when the children leave and whether it is safe.
Hiding Place (Table)Hide under the table and wait patiently for the children to open the locked door. Hide here too when the children standing in the hallway see you.
Plant 43 Seedlings
You must destroy Plant 43 Seedlings to unlock the "Not Today, Buds!" hidden achievement/trophy.
Main Story Milestones
ARK Entrance
Central Raccoon City Starting PointThis is where you start the game after arriving to central Raccoon City.
Orphanage Ending PointOnce you reach this location, you'll complete the orphanage section.
Orphanage Starting Point
Raccoon City Starting Point (Leon)
Ridgewood Station Drop PointThis is where you resume the game after defeating the Giant Spider.
To OrphanageOnce you arrive here, the orphanage section will begin.