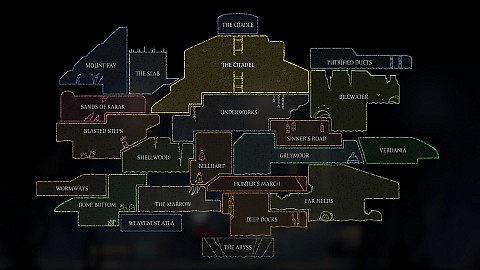
This interactive map of Pharloom in Hollow Knight: Silksong displays all major regions, pathways, and key points of interest, including benches, lost fleas, mask shards, tools, crests, abilities, silk spools, bosses, wishes, vendors & other NPCs, and much more.
Markers on the map
Area / Region Maps29
Abilities / Ancestral Arts11
Silk Skills6
Upgrades17
Bellway Stations12
Ventrica Stations7
Keys12
Mask Shards20
Spool Fragments18
Silk Hearts3
Craftmetal8
Crests6
Memory Lockets21
Tools61
Relics15
Psalm Cylinders6
Silkeaters10
Lost Fleas30
Boss Fights47
Ambush Rooms30
Void Masses47
Mementos8
Core Tasks19
Wishes48
Quest Items79
Vendors23
NPCs92
Benches81
Shell Shard Deposits88
Rosaries128
Lore43
Journal Entries246
Entrances52
One-way Blockers136
One-way Blockers145
One-way Blockers75
One-way Blockers66
Blocked Passages7
Switches36
Other10
Points of interest
Area / Region Maps
Maps are region-specific items that reveal the layout of individual areas in Pharloom. Most maps are sold by Shakra, the traveling cartographer, who appears in each new region and offers the local map in exchange for rosaries.
Weavenest Atla MapTo activate it, hit the two Power Cylinders located under the ceiling at the end of the corridor on the right.
Whispering Vaults MapUnlock cost: 70 Rosaries.
Whiteward MapUnlock cost: 70 Rosaries.
Wormways MapIt can be bought from Shakra (Wormways) for 70 Rosaries.
Abilities / Ancestral Arts
Abilities, also known as Ancestral Arts are Hornet's permanent upgrades that enhance movement, traversal, and exploration possibilities. As you acquire new ones, you'll unlock access to some previously unreachable areas.
Beastling Call (Needolin Upgrade)You will get it once you defeat the Bell Eater during the Beast in the Bells main task in Act 3. Teleports Hornet to the last activated Bellway station.
Ingame description: Mimic the song of the Bell Beast. Summon the Beastlings and return together to their mother.
Clawline (Grappling Hook)Throws Hornet's needle to latch onto a point and pull herself toward it.
Ingame description: Fling the needle as a harpoon and launch forcefully towards it.
Cling Greep (Wall Cling / Jump)Enables wall-clinging and wall-jumping.
Ingame description: Cling to sheer surfaces and leap to rapidly scale heights.
Drifter's Cloak (Glide)To get it you need to complete the Flexile Spines wish. Allows Hornet to glide gently through the air.
Ingame description: Flare the cloak to ride strong winds or glide gracefully.
Elegy of the Deep (Needolin Upgrade)You will get it when you talk to the Snail Shamans after returning from the Abyss (Act 3). Provides access to a few locations related to the main task.
Ingame description: Draw out memories of Pharloom's forgotten past.
Faydown Cloak (Double Jump)Given by a feathered beast encountered at the top of Mount Fay. Grants a second mid-air jump.
Ingame description: Fabled feather down, layered within the cloak. Leap again while airborne. Soar above foes. Reach new heights. Strike from above.
Needle Strike (Charge Attack)It's given to you by Pinstress, who can be found inside her floating house. A charged-up powerful needle thrust.
Ingame description: Charge power in the needle, then release as a deadly attack.
NeedolinMusical Instrument. You will get it after defeating Widow. A needle-based instrument that can open certain doors or interact with special NPCs.
Upgrades: Beastling Call (Needolin Upgrade) and Elegy of the Deep (Needolin Upgrade).
Ingame description: Play ancient melodies by stringing Silk along the needle.
Silk Soar (Super Jump)You will find it in the lower right part of the Abyss, which you explore in Act 3. It launches the Hornet vertically upward to a great height.
Ingame description: Fling the needle upwards and launch to tremendous heights.
Swift Step (Dash)It's the first abilty that you can find in the game. A quick dash for dodging or fast movement.
Ingame description: Sprint at blinding speed, beyond one's natural limits. Chase down prey and leap great distances.
Sylphsong (Silk Regeneration)Talk to Eva after you collect all Crests and unlock all of their slots via Memory Lockets. Allows you to regenerate your entire silk spool when you sit on a bench.
Silk Skills
Silk Skills are active combat abilities and there are six of them in total. Silk Skills must be manually triggered and consume Silk. They provide a range of powerful attacks, evasive maneuvers, and other effects to help you in combat.
Cross StitchTo earn this skill, defeat Phantom. A reactive defensive / offensive move.
Description: Deflective technique of a creature spun from thread. Bind Silk around the needle to deflect enemy attacks and instantly strike back.
Pale NailsAct 3. A homing multi-target skill.
Description: Technique taken from the primal source of Silk. Spin talons from thread that seek out enemies.
Rune RageTo earn this skill, defeat the First Sinner. Charge up and unleash rending runes of Silk upon enemies, dealing powerful area damage.
Description: Forgotten Weaver technique. Sew rending runes upon one's enemies.
SharpdartHigh-speed forward attack with piercing effect.
Description: Deadly Weaver technique. Pierce through enemies in a blur of blade and Silk.
SilkspearA straightforward ranged attack.
Description: Deadly Weaver technique. Throw the needle forward with force amplified by coiled Silk.
Thread StormAn area-of-effect attack.
Description: Deadly Weaver technique. Cast the needle in a whirl of Silk around oneself, lashing foes.
Upgrades
Crafting Kit (Blasted Steps, Grindle)You can buy it from Grindle for 700 Rosaries.
Crafting Kits are collectible upgrades that automatically increase the damage of your Tools when obtained.
Crafting Kit (Crawbug Clearing Wish)This is the reward for completing the Crawbug Clearing wish.
Crafting Kits are collectible upgrades that automatically increase the damage of your Tools when obtained.
Crafting Kit (Deep Docks, Forge Daughter)Can be bought from Forge Daughter for 180 Rosaries.
Crafting Kits are collectible upgrades that automatically increase the damage of your Tools when obtained.
Crafting Kit (Underworks, Twelfth Architect)You can buy it from Twelfth Architect for 450 Rosaries.
Crafting Kits are collectible upgrades that automatically increase the damage of your Tools when obtained.
CrawbellIt will be installed outside the Bellhome. It auto gathers Rosaries and Shell Shards over time.
Crest of Hunter Upgrade #1Talk to Eva and allow the Insight.
Description: Strike enemies repeatedly to build focus. Once focused, needle attacks will become deadlier.
Crest of Hunter Upgrade #2
FarsightIt can be assembled /repaired in your Bellhome. It shows quantities in menus, such as collected tools, collected desk entries, completed journal entries, etc.
Ingame description: Retracted Weaver surveillance instrument. Once assembled, the device will allow observation over vast distances.
QuillIt can be bought from Shakra (The Marrow) for 50 Rosaries. With this quill, you can add any new areas you discover to the maps that you own.
Tool Pouch (Blasted Steps, Grindle)If you didn't buy it from Mort, then you can buy it from Grindle for 220 Rosaries in Act 3.
Effect: Increases the capacity for Tools and Shell Shards that can be carried.
Tool Pouch (Bugs of Pharloom Wish)This is the reward for completing the Bugs of Pharloom wish.
Effect: Increases the capacity for Tools and Shell Shards that can be carried.
Tool Pouch (Far Fields, Mort)You can buy it from Mort for 220 Rosaries.
Effect: Increases the capacity for Tools and Shell Shards that can be carried.
Tool Pouch (Putrified Ducts, Flea Caravan)Reward from Mooshka after helping the Flea Caravan move to Fleatopia.
Effect: Increases the capacity for Tools and Shell Shards that can be carried.
Tool Pouch (The Marrow, Loddie)Reward for beating Loddie's first challenge. In Act 3, found on a table.
Effect: Increases the capacity for Tools and Shell Shards that can be carried.
Vesticrest #1Effect: +1 yellow tool slot on all Crests.
Desc: Equip additional Tools, independent of one's Crest.
Vesticrest #2Effect: +1 blue tool slot on all Crests.
Desc: Equip additional Tools, independent of one's Crest.
Bellway Stations
In Hollow Knight: Silksong, the primary Fast Travel system is the Pharloom Bellways, a network of stations identified by signposts bearing three right-pointing arrows. These stations allow players to travel instantly between previously discovered Bellway locations by riding the Bell Beast.
Bellway (Bellhart)Unlock cost: 60 Rosaries.
Bellway (Bilewater)Unlock cost: 80 Rosaries.
Bellway (Blasted Steps)Unlock cost: 60 Rosaries.
Bellway (Bone Bottom)It will be unlocked automatically when you unlock the Bellway (The Marrow) station.
Bellway (The Marrow)The first Bellway station you unlock after defeating the Bell Beast.
Bellway (The Slab)Unlock cost: 40 Rosaries.
Ventrica Stations
Ventrica Stations are a secondary Fast Travel network located within the Citadel region of Pharloom. They function separately from the Bellways and offer players additional traversal options within that area of the game.
Ventrica (Terminus)Available as soon as any other Ventrica station is unlocked.
Ventrica (Underworks)Unlock cost: 80 Rosaries.
Keys
Keys refer to four simple keys used to open certain locked doors and a few other specialized keys that allow players to pick locks and access new regions - for example, unique keys used in an area known as The Slab.
Architect's KeyThis key can be bought from Twelfth Architect for 110 Rosaries, but first you have to collect 25 Tools.
Key of HereticThe key will be dropped by the last of the defeated enemies in the room you jump into from above.
Key of Indolent
Simple Key (Mosslands, Pebb)This key can be bought from Pebb (Mosslands) for 500 rosaries.
Simple Key (Sands of Karak)
Simple Key (Sinner's Road)
Simple Key (Songclave, Jubilana)This key can be bought from Jubilana for 650 Rosaries. To be able to do this you have to complete The Wandering Merchant wish.
Mask Shards are collectible items that increase Hornet's maximum health, with four shards combining to form one additional health mask. Gathering all shards allows to reach a maximum of 10 health masks.
Mask Shard (Far Fields)Double jump (Faydown Cloak (Double Jump)) and hit the explosive orb. It will fall and clear the way to a mask shard.
Mask Shard (Far Fields)At the top of Skull Cave. To get there, you must first reach the bottom of the cave. You must also have the Clawline (Grappling Hook) ability.
Mask Shard (Fastest in Pharloom)This is a reward for winning the third race during the Fastest in Pharloom wish.
Mask Shard (Jubilana)You can buy it from Jubilana for 750 Rosaries. To be able to do this you have to complete The Wandering Merchant wish.
Mask Shard (Mosslands, Pebb)This mask shard can be bought from Pebb (Mosslands) for 300 rosaries.
Mask Shard (Mount Fay)Act 3. At the very top of the Brightvein. You need to use the Silk Soar (Super Jump) ability to reach the room it's in.
Mask Shard (Mount Fay)Inside a large hollow cylinder. To get to it, you need to obtain the Faydown Cloak (Double Jump).
Mask Shard (Savage Beastfly)It's a reward for completing the Savage Beastfly wish.
Mask Shard (Shellwood)To collect this mask shard, you must shatter the nearby wall that is blocking access to it.
Mask Shard (The Hidden Hunter)Act 3. It's a reward for completing the The Hidden Hunter wish.
Mask Shard (The Slab)
Mask Shard (Weavenest Atla)To get here, you must first acquire the Needolin ability.
Mask Shard (Whispering Vaults)To get there, you need to move the box located below. This will be possible if you use the secret passage located on the lower level.
Mask Shard (Wormways)To collect this mask shard, smash the nearby breakable wall and enter the secret room.
Spool Fragments
Spool Fragments are collectible upgrade items that increase Hornet's maximum Silk capacity, letting her store more of the resource used for abilities and healing through binding. Two fragments combine to form one full Spool, and each completed Spool permanently raises the amount of Silk Hornet can hold.
Spool Fragment (Balm for the Wounded)
Spool Fragment (Blasted Steps, Fleamaster Mooshka)
Spool Fragment (Cogwork Core)
Spool Fragment (Deep Docks)
Spool Fragment (Deep Docks)To get here, you have to switch the Lever.
Spool Fragment (Frey)You will be able to purchase it from Frey for 270 rosaries once you complete the My Missing Courier wish.
Spool Fragment (Grand Gate)
Spool Fragment (Greymoor)
Spool Fragment (Grindle)You can buy it from Grindle for 680 Rosaries.
Spool Fragment (High Halls)
Spool Fragment (Jubilana)You can buy it from Jubilana for 500 Rosaries. To be able to do this you have to complete The Wandering Merchant wish.
Silk Hearts provide a permanent, passive regeneration of Silk, the resource used for healing and abilities. Each Silk Heart you collect allows one notch of Silk to regenerate automatically over time after you have used it all.
Silk Heart (Bell Beast)Defeat the Bell Beast and complete a small platforming section.
Silk Heart (Lace)Defeat Lace (The Cradle) and complete a small platforming section.
Silk Heart (The Unravelled)Defeat The Unravelled and complete a small platforming section.
Craftmetal
Craftmetal is a rare upgrade material harvested from deposits. Its main purpose is to forge and purchase powerful new tools from the Forge Daughter, which enhance Hornet's stats, combat options, and traversal abilities.
Craftmetal (Blasted Steps)To get here go though the Hidden Passage.
Craftmetal (Deep Docks)This piece can be found in the chest.
Craftmetal (Mosslands, Pebb)It can be bought from Pebb (Mosslands) for 60 rosaries.
Craftmetal (Putrified Ducts)
Craftmetal (Songclave, Jubilana)It can be bought from Jubilana for 180 Rosaries.
Craftmetal (The Marrow)
Craftmetal (Underworks)
Craftmetal (Wisp Thicket)
Crests
Crests are a key collectible system in Hollow Knight: Silksong, functioning as modular loadouts that shape Hornet's combat and movement abilities. Each crest provides a distinct base moveset that modifies your needle attacks, silk techniques, and mobility options. Crests also determine how many and which types of Tools and Silk Skills can be equipped.
Crest of ArchitectEffect: Spin the needle as a screw, shredding foes. Spend Silk to rapidly craft new tools.
Slots:
Red x3
Blue x2
Yellow x2
Crest of BeastEffect: Tear foes with savage slashes. Bind to enter a wild fury and steal life from prey.
Slots:
Silk Skill
Red x2
Yellow x2
Crest of ReaperEffect: Attack with heavy, arcing slashes and reap additional Silk from enemies.
Slots:
Silk Skill
Red x2
Blue x2
Yellow x2
Crest of ShamanEffect: Cast the blade forward and strenghten Silk Skills with powerful runes.
Slots:
Silk Skill x3
Blue x2
Crest of WandererEffect: Cut swiftly and nimbly with short, precise strikes.
Slots:
Silk Skill
Red
Blue x2
Yellow x3
Crest of WitchTo get it complete the Infestation Operation wish.
Effect: Whip the needle in sweeping swings. Leech the life of foes through twisted roots.
Slots:
Silk Skill
Red x2
Blue x3
Memory Lockets
Memory Lockets are upgrade items used to unlock additional tool slots on Crests, allowing Hornet to equip more offensive, defensive, or exploration tools. Spending a locket permanently opens one of crest's locked circles, though the item is consumed in the process.
Memory Locket (Bellhart)
Memory Locket (Bellhart, Frey)This memory locket can be bought from Frey for 330 Rosaries.
Memory Locket (Bilewater)
Memory Locket (Bilewater)
Memory Locket (Blasted Steps)
Memory Locket (Blasted Steps, Grindle)If it was not purchased from Mort then in Act 3 it can be bought from Grindle.
Memory Locket (Deep Docks)
Memory Locket (Far Fields)
Memory Locket (Far Fields, Mort)It can be bought from Mort for 150 Rosaries. In Act 3 it is sold by Grindle instead.
Memory Locket (Grand Bellway)
Memory Locket (Greymoor)
Memory Locket (Greymoor, Halfway Home)On a ledge inside the Halfway Home. You need the Faydown Cloak (Double Jump) to get here.
Memory Locket (Hunter's March)This memory locket is inside a cage, so you must break it to obtain it.
Memory Locket (Underworks)To get here, go through the nearby secret area entrance, turn left, and go all the way down.
Memory Locket (Volatile Flintbeetles Wish)It's a reward for completing the Volatile Flintbeetles wish.
Memory Locket (Whispering Vaults)
Memory Locket (Wormways)
Tools
Tools are equippable items that grant a wide range of offensive, defensive, and utility abilities, allowing you to customize your playstyle to suit your preferences. Tools are equipped in crest slots, which determine both the number and color of tools you can use at once.
Straight PinRed Tool.
Desc: Light throwing tool, designed for rapid attacks.
Threefold PinRed Tool.
Desc: Flat, layered weapon, crafted to be thrown in a set.
Sting ShardRed Tool. It can be bought from Forge Daughter for 140 Rosaries and 1 Craftmetal.
Desc: Lethal trap formed of tightly bound blades. Once placed, the trap will pierce enemies that come into contact.
TacksRed Tool. It's a reward for completing the Roach Guts wish.
Desc: Short pins designed to be scattered along the ground. The sharp points will pierce any enemy who steps upon them.
LongpinRed Tool.
Desc: Weighted pin and haft, formed to pierce tough shells.
Curveclaw (Mottled Skarr)Red Tool. You can buy it from Mottled Skarr for 140 Rosaries. If vendor is dead the you can find it here.
Desc: Arched sharpbone used by hunters to take down flying prey.
Curveclaw (Hunter's March)Alternative location, if Mottled Skarr is dead.
Desc: Arched sharpbone used by hunters to take down flying prey.
CurvesickleRed Tool. Act 3. Throw the Curveclaw so that it hits each of the four targets in one throw. You may have to do this a few times, and then Skarr will show up. Give him the Curveclaw. After resting on the bench and returning to this spot, the Curvesickle will be lying on the ground.
Desc: Radial sharpbone used by skilled hunters to take down dangerous prey.
Throwing RingRed Tool. It's a reward for completing the Trail's End wish.
Desc: Hardened throwing weapon of the warrior Shakra. Blunt force weapon that rebounds between enemies and hard surfaces.
PimpilloRed Tool. You can build this tool here, but you will need Craftmetal x1 to do so.
Desc: Fabric pouch filled with volatile material. Explodes on impact with enemies or when ignited by its fuse.
ConchcutterRed Tool.
Desc: Spiral weapon fashioned from a hardened conchspire. Thrown at an angle, it can ricochet and catch prey off guard.
Silkshot (Forge Daughter)Red Tool. You can buy it from Forge Daughter for Rosaries x240 + Craftmetal x1 + Ruined Tool.
Desc: Ancient weapon of the Weavers, repaired and modified by Forge Daughter. Uses shell canisters and the wielder’s own Silk to fire.
Silkshot (Twelfth Architect)Red Tool. You can buy it from Twelfth Architect for Rosaries x130 + Craftmetal x1 + Ruined Tool.
Desc: Ancient weapon of the Weavers, repaired and modified by Twelfth Architect. Uses shell canisters and the wielder’s own Silk to fire.
Silkshot (Mount Fay)Red Tool. Here you can repair the Ruined Tool yourself. You will need Craftmetal x1 for this.
Desc: Ancient weapon of the Weavers, repaired to its original form. Uses shell canisters and the wielder’s own Silk to fire.
Delver's DrillRed Tool.
Effect: Rotary tool used for boring into bone and rock. Drives the wielder downwards, while spinning the drill with destructive force.
Cogwork WheelRed Tool. You can buy it from Twelfth Architect for 360 Rosaries and 1 Craftmetal.
Desc: Expanding circular blade powered by a cogwork motor. Propels forward, slicing through foes.
CogflyRed Tool. Red Tool. You can build this tool here, but you will need Craftmetal x1 to do so.
Desc: Winged cogwork companion that will seek nearby foes and attack.
Rosary CanonRed Tool. In a hidden room. To get it, strike the large lever a few times.
Desc: Repurposed mechanism from the base of a rosary stringing machine. Rosaries must be inserted to reload the cannon.
VoltvesselsRed Tool.
Desc: Convertible orbs containing electricity. The vessels can be thrown as a bola for an explosive discharge or staked as a spear to release a column of energy.
FlintslateRed Tool.
Desc: Sharpening slate made from cut and polished Flintgem. Temporarily super heats the needle’s blade, imbuing each slash with flame and increasing lethality.
Flea BrewRed Tool. Complete The Lost Fleas wish and talk to Grishkin.
Desc: Invigorating beverage prepared by the Flea Caravan. Temporarily increases the speed of movement and attacks.
Plasmium PhialRed Tool. It's a reward for completing the Alchemist's Assistant wish.
Desc: Spear-phial containing Plasmium. Injecting the liquid allows one to gain health beyond their natural limits.
Snare SetterRed Tool. The Snare Setter is used to complete the Silk and Soul wish by handing it to the Caretaker. After handing it to the Caretaker, it disappears from your inventory, and it is not possible to get it back.
Desc: Trap-setting tool of the Weavers. Lays a Silk rune that ignites when foes come into contact. Uses shell canisters and the wielder's own Silk.
Druid's EyeBlue Tool. This is the reward for completing the Berry Picking wish.
Effect: Amulet of protection formed from Mossberries. As the bearer takes damage, the amulet weeps a green elixir that will form into Silk.
Druid's EyesBlue Tool. This is the upgrade for Druid's Eye. To get it, deliver extra four Mossberries to the Moss Druid.
Desc: Powerful amulet of protection formed from many Mossberries. As the bearer takes damage, the amulet weeps a green elixir that will form into Silk.
Magma BellBlue Tool. It can be bought from Forge Daughter for 110 Rosaries and 1 Craftmetal.
Desc: Forged iron bell, crafted to ward against the intense heat of the Deep Docks. Reduces the damage taken from flame and magma.
Warding BellBlue Tool.
Desc: Holy bell inscribed with a hymn of protection. Shields the bearer as they bind their wounds.
Pollip PouchBlue Tool. It's a reward for completing the Rite of the Pollip wish.
Desc: Pouch containing a fast-acting venom drawn from a flower’s heart. Applies venom to equipped tools.
Fractured MaskBlue Tool. It can be bought from Mottled Skarr for 260 Rosaries. If Mottled Skarr is dead, it will be lying on the ground.
Desc: Old bug's skull carved for protection. Shields against critical damage but shatters on impact. If shattered, the mask will be repaired while resting at a bench.
MultibinderBlue Tool. You will be able to purchase it from Frey for 880 rosaries once you complete the My Missing Courier wish.
Desc: Elaborate, etched Weaver spindle, usable only by wielders of Silk. Extends the act of binding, but increases its healing effect.
WeavelightBlue Tool. It will fall from the ceiling after defeating Moss Mother x2.
Desc: Gleaming apparatus of Weaver make. Its core emits a faint glow. Increases the speed of Silk regeneration.
Sawtooth CircletBlue Tool. You can buy it from Twelfth Architect for 230 Rosaries and 1 Craftmetal.
Desc: Flexible belt of serrated metal teeth, able to affixed to the hem of a cloak. Flaring the cloak will spin the blades, damaging surrounding enemies.
Injector BandBlue Tool.
Desc: Brace of surgical pins from the Whiteward. Used to forcefully insert Silk deep inside a bug's shell. Increases the speed of binding.
Spool ExtenderBlue Tool. It can be bought from Jubilana for 720 Rosaries. To be able to do this you have to complete The Wandering Merchant wish.
Desc: Silk-storing tool of the Citadel, fashioned after an artefact of the Weavers. Allows the storing of additional Silk beyond one's natural abilities.
Reserve BindBlue Tool. It's a reward for defeating the Second Sentinel and completing the Final Audience wish.
Desc: Ornate artefact of the Citadel, able to hold a Bind's worth of Silk. Used when healing is needed and one's natural resources run low. The Reserve Bind will be restored when resting at a bench.
Claw MirrorBlue Tool. This is the reward for defeating Trobbio.
Desc: Theatrical tool of a vainglorious bug. When binding, emits a dazzling flash that damages surrounding enemies.
Claw Mirrors (Dark Mirror)Blue Tool. It's the reward form defeating Tormented Trobbio and completing the Pain, Anguish and Misery wish. It's an upgraded version of the Claw Mirror.
Desc: Twin theatrical tools of a vainglorious bug. When binding, emits a searing blast that damages surrounding enemies.
Memory CrystalBlue Tool.
Desc: Reflective stone with mnemonic properties. When taking damage, a memory of the bearer is formed of crystal. The memory will shatter into sharp spines if an enemy comes into contact.
Snitch PickBlue Tool. It can be bought from Grindle for 740 Rosaries.
Desc: Hooked tool for the forceful retrieval of loot from bugs and husks. Harpoon into foes to steal rosaries and shell shards, while causing additional damage.
Volt FilamentBlue Tool. You need to defeat the Voltvyrm to get this tool.
Desc: Charged organ from a defeated Voltvyrm. Can be coiled around thread, imbuing Silk Skills with electric charge.
Quick SlingBlue Tool.
Desc: Taut-drawing mechanism built from reed and bone, intended for mounting on the limb of a bug. Doubles the number of tools thrown.
Wreath of PurityBlue Tool.
Desc: Fragile band woven of reed and leaf, crafted to repel Muckmaggots. If broken, the wreath will be repaired while resting at a bench.
LongclawBlue Tool. It's a reward for completing the Broodfeast wish.
Desc: Talisman fashioned from the talon of a large predator. Increases the range of needle attacks.
Wispfire LanternBlue Tool. This is the reward for defeating the Father of the Flame.
Desc: Broken iron lantern containing smouldering wispfire. Wisps will spawn from the lantern and burn foes, at the cost of Silk.
Egg of FlealiaBlue Tool.
Desc: Icon of the mythical mother flea, passed down from caravans of old. A symbol of protection and kinship. Decreases the cost of Silk Skills while health is full.
Pin BadgeBlue Tool. This is the reward for completing the Fatal Resolve wish.
Desc: Emblem of the Order of the Pinstress, the old blademasters of Pharloom. Reduces charge time of Needle Strike.
CompassYellow Tool. It can be bought from Shakra (The Marrow) for 70 Rosaries.
Desc: Intricate tracking device, carved from shell. When equipped, the bearer’s location will be marked on their map.
Shard PendantYellow Tool.
Desc: Crude trinket worn by collectors and crafters. Allows one to collect more shell shards from defeated creatures.
Magnetite Brooch (Mosslands, Pebb)Yellow Tool. It can be bought from Pebb (Mosslands) for 120 rosaries. In Act 3, the tool can be bought from Grindle.
Desc: Holy stone inscribed with a prayer for rosaries. Any loose beads will be pulled toward the wearer.
Magnetite Brooch (Grindle)If you didn't buy it from Pebb (Mosslands), you can buy it from Grindle in Act 3 for 220 rosaries.
Desc: Holy stone inscribed with a prayer for rosaries. Any loose beads will be pulled toward the wearer.
Weighted Belt (Mort)Yellow Tool. It can be bought from Mort for 160 Rosaries.
Desc: Heavy band favoured by those with an unsteady step. The wearer will recoil less when striking foes and will not be flung as far when taking damage.
Weighted Belt (Far Fields)Yellow Tool. You can find it here in Act 3, if you didn't purchase it from Mort.
Desc: Heavy band favoured by those with an unsteady step. The wearer will recoil less when striking foes and will not be flung as far when taking damage.
Barbed BraceletYellow Tool.
Desc: Vicious bracelet worn by those who believe they have not been duly punished. Increases damage taken, but also increases damage dealt by the needle.
Dead Bug's PurseYellow Tool. It's replaced by the Shell Satchel in Steel Soul Mode.
Desc: Discarded purse of a fallen pilgrim. Allows the bearer to retain some rosaries upon defeat.
Desc (Shell Satchel): Quick access container formed from an old shell. Increases the quantity of crafted tools.
Magnetite Dice (Lumble The Lucky)Yellow Tool.
Desc: Playthings carved from magnetic material. Used in simple games and believed to bring luck to the bearer.
Magnetite Dice (Grindle)It can be bought from Grindle for 300 Rosaries in Act 3.
Desc: Playthings carved from magnetic material. Used in simple games and believed to bring luck to the bearer.
Ascendant's GripYellow Tool. You can buy it from Jubilana for 350 Rosaries. To be able to do this you have to complete The Wandering Merchant wish.
Desc: Gilded piton that allows one to hold in place while on a wall.
Spider StringsYellow Tool. You can buy it from Jubilana for 320 Rosaries. To be able to do this you have to complete The Wandering Merchant wish.
Desc: Sophisticated Weaver device. Resonates with music played to amplify and enhance a performance. Expands and strengthens the effects of the Needolin.
Silkspeed AnkletsTo get it you need the Swift Step (Dash) ability. Run quickly across the room to uncover it.
Desc: Experimental anklets of Weaver make. Draws upon the wearer's own Silk to increase sprinting speed.
Thief's MarkYellow Tool. You can buy it from Grindle for 350 Rosaries.
Desc: Symbol worn to identify oneself to fellow thieves. Gain extra rosaries from defeated enemies, but lose some rosaries on taking damage.
Relics
Relics are special collectible items scattered throughout the world of Pharloom. They are tradable items and you can bring them to Relic Seeker Scrounge to sell them in exchange for the in-game currency Rosaries.
Psalm Cylinders are collectible metallic cylinders etched with ancient sound-recordings. There are six of them scattered throughout the game world - including the special, quest related, Sacred Cylinder. You can deliver them to the Vaultkeeper Cardinius in the Whispering Vaults to advance a side quest, earning rosaries, and unlocking playable Melodies.
Psalm Cylinder (Blasted Steps, Grindle)You can buy it from Grindle for 240 Rosaries.
Psalm Cylinder (High Halls)
Psalm Cylinder (Underworks)
Psalm Cylinder (Whispering Vaults)
Psalm Cylinder (Whispering Vaults)
Sacred CylinderYou need this cylinder to complete the Vaultkeeper's Melody main task.
Silkeaters
Silkeaters are special consumable items. Consuming one remotely bursts your silk cocoon, instantly recovering all lost rosaries without the need to return to your death site.
Lost Fleas
Kratt
Lost Flea (Bellhart)
Lost Flea (Bilewater)
Lost Flea (Bilewater)
Lost Flea (Bilewater, Exhaust Organ)
Lost Flea (Blasted Steps)
Lost Flea (Choral Chambers)
Lost Flea (Choral Chambers)
Lost Flea (Deep Docks)
Lost Flea (Deep Docks)
Lost Flea (Deep Docks)
Lost Flea (Far Fields)
Lost Flea (Far Fields)
Lost Flea (Greymoor)
Lost Flea (Greymoor)
Lost Flea (Hunter's March)
Lost Flea (Memorium)
Lost Flea (Mount Fay)
Lost Flea (Sands of Karak)
Lost Flea (Shellwood)
Lost Flea (Sinner's Road)
Lost Flea (Songclave)
Lost Flea (The Marrow)
Lost Flea (The Slab)
Lost Flea (The Slab)
Lost Flea (Underworks)
Lost Flea (Underworks)
Lost Flea (Whispering Vaults)
Lost Flea (Wormways)
Vog
Boss Fights
Boss Fights are intense, multi-phase confrontations that test your agile combat prowess against massive, thematic foes in expansive arenas blending precise platforming, pattern memorization, and opportunistic aggression.
Bell BeastUse the Silkspear to set it free and then defeat it in combat.
Reward: Silk Heart.
Lost GarmondYou will encounter him here and will have to defeat him to complete the Hero's Call wish.
Lost Lace
Moorwing (1)He won't be here if you're traveling here with the caravan of fleas. In that case, you'll find him here. Drops: Beast Shard.
Moorwing (2)Alternative location if you didn't fight it here. Drops: Beast Shard.
Moss Mother (1)
Moss Mother (2)Here you can meet her again in Act 3.
Moss Mother x2
Nyleth
Palestag
Phantom
PinstressYou will encounter him here and will have to defeat him to complete the Fatal Resolve wish. Hit her several times to wake her up, then talk to her to start the fight.
Second SentinelYou will encounter him here and will have to defeat him to complete the Final Audience wish.
Shrine Guardian Seth
Sister Splinter
Skarrsinger Karmelita
Skull Tyrant (1)Hit the skull to start the fight. Objective of theThe Terrible Tyrant wish.
Skull Tyrant (2)There is a chance that after defeating the first Skull Tyrant another one will spawn here some time later, after resting at the bench located here.
Tormented TrobbioYou will encounter him here and will have to defeat him to complete the Pain, Anguish and Misery wish.
Trobbio
Voltvyrm
Watcher at the Edge
Widow
Ambush Rooms
Ambush Rooms (also called ambush sites or lockdown rooms) are special multi-enemy encounter areas where the doors temporarily lock, trapping Hornet inside to fight waves or groups of enemies that spawn in sets.
Void Masses
Void Mass is a dark, pulsating growth made of tangled husks and void-soaked silk that clings to walls or ceilings, corrupts surrounding enemies, and must be destroyed as part of the Dark Hearts quest in Act 3.
Mementos
Conjoined HeartYou can collect it after defeating the Clover Dancers.
Description: Enlivened heart of the Green Prince. Its beat is sharp and clear.
Craw MementoDescription: Iron emblem of the Court of Craws, absolving the bearer of all crimes past and future.
Grey MementoDefeat the Watcher at the Edge.
Description: Engraved cruststone, worn by sand and blanched by time. ...Watch...Remember...Till time... Life anew...
Guardian's MementoDescription: Aged medallion of the wanderer Seth. A gift given in respect of great skill.
Hero's MementoDefeat Lost Garmond and talk to him.
Description: Heirloom of a village lost to Pharloom’s Haunting.
Hunter's MementoComplete the Hunter's Journal by defeating all enemies and returning to Nuu.
Description: Seal symbol given in recognition of a true Hunter, stamped in sticky goo.
Sprintmaster MementoDescription: Gilded trophy awarded by Sprintmaster Swift to the fastest bug in Pharloom.
Surface MementoPlay the Needolin on the right side of the Nameless Town to make it drop from the ceiling.
Description: Worn ornament of the Nameless Town high above Pharloom.
Core Tasks
Hollow Knight: Silksong's main story is divided into three acts, focusing on Hornet's journey through the kingdom of Pharloom. The game world can be explored freely, but Main Tasks must be completed in order to progress through the story.
Starting LocationThis is where you start the game.
Next task: The Great Citadel.
The Great CitadelPrevious location: Starting Location.
To start it, reach Chapel Maid and speak with her.
Objectives:
1. Ascend through the lands of Pharloom and reach the Citadel at the kingdom's peak.
Next task: Grand Gate.
The Threadspun TownTo begin it, enter Bellhart for the first time.
Objectives:
1. Break the silken curse ensnaring the town of Bellhart. - Defeat Widow. To reach it, you must first acquire the Cling Grip ability.
Reward: It gives you an access to new ability - Needolin, and allows you to utilize the capabilities offered by Bellhart.
Grand GatePrevious task: The Great Citadel.
Objectives:
1. Awaken the old bells throughout the lands. - Activate five benches located in lower zones of Pharloom.
The five bells are:
The MarrowDeep Docks (Far Fields)
GreymoorBellhartShellwood
2. Return to the Grand Gate and open the way to the Citadel. - Once you have activated the five bells, return to the gate, play Needolin, and then defeat the Last Judge who will attack you.
Next task: Silent Halls.
Silent HallsThis is where Act 2 begins. The quest starts when you first step inside the Citadel.
Previous task: Grand Gate.
Objectives:
1. Venture inside the Citadel and confront the veiled bugs. - Talk to Lace and start the Pharloom's Crown.
Next task: Pharloom's Crown.
Pharloom's CrownTo start this quest, you must reach the Citadel and talk to Lace. Depending on how you reached the Citadel, whether through the Grand Gate or through Bilewater, you will meet Lace in a different location - Lace or Lace.
Previous task: Silent Halls
Objectives:
1. Scale the Citadel and confront the one who haunts the lands of Pharloom. - Reach and defeat the Cogwork Dancers.
2. Learn the Threefold Melody and open the path to the Citadel's crest. - Complete three sub-tasks.
Conductor's MelodyArchitect's MelodyVaultkeeper's Melody
3. Play the Threefold Melody before the statues at the Citadel's heart.
4. Rise above the Citadel and confront the one who haunts the lands of Pharloom. - Defeat Lace (The Cradle)
Conductor's MelodySubtask of: Pharloom's Crown.
Objectives:
1. Search the gilded heights of the Citadel for the melody of the Conductors. - Learn it from Conductor Ballador.
Desc: One part of the Threefold Melody, entrusted to the Conductors.
Architect's MelodySubtask of: Pharloom's Crown.
Objectives:
1. Search the mechanised core of the Citadel for the melody of the Architects. - solve the Music Pillars Puzzle.
Desc: One part of the Threefold Melody, entrusted to the industrious Architects.
Vaultkeeper's MelodySubtask of: Pharloom's Crown.
Objectives:
1. Search the cloistered wing of the Citadel for the melody of the Vaultkeepers. - Find the Sacred Cylinder
2. Find a means to play the Sacred Cylinder within the Whispering Vaults. - Talk to Vaultkeeper Cardinius and play the Sacred Cylinder.
Desc: One part of the Threefold Melody, entrusted to the secretive Vaultkeepers.
Pale MonarchPrevious task: Pharloom's Crown
Objectives:
1. Confront the one who haunts the lands of Pharloom.
Next task: Soul Snare.
Soul SnarePrevious task: Pale Monarch.
First, you must also complete the Silk and Soul wish, then talk to the Caretaker in Songclave.
Objectives:
1. Scale the Citadel and ensnare its monarch in a deadly trap. - Defeat the Grand Mother Silk and use the Needolin on her at the end of the fight.
Note: After the credits roll, load your save file to begin Act 3.
Next task: After the Fall.
After the FallThis is the first main task of Act 3.
Previous task: Soul Snare.
Objectives:
1. Discover the fate of Pharloom.
Next task: Awaiting the End.
Awaiting the EndPrevious task: After the Fall.
Objectives:
1. Confront the Caretaker and his family in the Ruined Chapel beside Bone Bottom. - Talk to the Snail Shamans.
Next task: The Dark Below.
The Dark BelowPrevious task: Awaiting the End.
Objectives:
1. Find aid in Deep Docks to access its diving bell and descend beneath Pharloom. - Talk to the Forge Daughter and Ballow (1).
2. Use the diving bell in Deep Docks to descend beneath Pharloom. - Get the Diving Bell Key and enter the Diving Bell.
3. Reach the source of the black threads within the Abyss.
Next task: Return to Pharloom.
Return to PharloomPrevious task: The Dark Below.
Objectives:
1. Escape the Abyss.
Next task: Spell Seeker.
Spell SeekerPrevious task: Return to Pharloom.
Objectives:
1. Return to the Snail Shamans in the Ruined Chapel beside Bone Bottom.
Next task: The Old Hearts.
Last DivePrevious task: Last Dive
Objectives:
1. Dive into the void and cut Pharloom free. - Return to the Abyss and defeat Lost Lace.
Beast in the BellsAvailabe in Act 3. To get it,attempt to summon the Bell Beast in the Grand Bellway or Bone Bottom.
Objectives:
1. Descend into the bellway and defeat the hostile creature within. - Defeat the Bell Eater.
Reward: Beastling Call (Needolin Upgrade) (ability)
Wishes
"Wishes" are the game's formal side-quest system - offered by NPCs or posted on special boards. They are optional quests but many of them tie into progression.
A Lifesaving BridgeHow to start: Complete the Bone Bottom Repairs wish, then check the Bone Bottom wishboard some time later.
Donate 300 Shell Shards.
Reward: A bridge built over the hole to the west.
A Vassal LostHow to start: Available in Steel Soul mode only. Talk to Steel Seer Zi.
Objectives:
1. Investigate the resting sites marked by Steel Seer Zi to uncover the location of her vassal x3.
2. Investigate the ritual site beside Bonegrave.
3. Return to Steel Seer Zi and inform her of Sula’s escape.
Reward: Growstone (Cold, steely stone with remarkable regrowth capacity. If shattered into shell shards, it will reform over time.)
Advanced AlchemyHow to start: Talk to Alchemist Zylotol in Act 3.
1. Collect Plasmified Blood from infected creatures in the Wormways x10. Plasmified Blood can be extracted with a fully charged stab from the Needle Phial tool.
2. Give the Plasmified Blood to the Alchemist at the top of the Wormways.
Reward: Plasmium Gland (An endless reserve of Plasmium when crafting Plasmium Phials.)
Alchemist's AssistantHow to start: Talk to Alchemist Zylotol.
1. Collect Plasmium from Plasmium buds in the lower Wormways x3. Plasmium can be extracted from buds using a fully charged stab from the Needle Phial tool.
PlasmiumPlasmiumPlasmium
2. Give the collected Plasmium to the Alchemist at the top of the Wormways.
Reward: Plasmium Phial (tool)
An Icon of HopeHow to start: Read the notice posted on the Bone Bottom's wishwall after starting Act 2 and completing A Lifesaving Bridge wish.
1. Donate 440 Shell Shard.
Reward: Hornet Statuette.
Balm for the WoundedSearch for traces of the pilgrim, Sherma, and track his location.
Bellhart's GloryDonate 400 Rosaries
Berry PickingHow to start: Talk to Moss Druid.
1. Collect Relics x3 from the moss-covered areas of Pharloom's lowlands.
2. Give the Mossberries to the Druid of Mosshome.
Reward: Druid's Eye (tool)
Bone Bottom RepairsHow to start: Read the notice posted on the Bone Bottom's wishwall.
1. Donate 200 Shell Shards.
BroodfeastHow to start: Talk to Huntress.
1. Use tools to acquire organs of various types so Huntress may feed her brood.
Seared Organ x15 - Flintslate, Pimpillo, Voltvessels, Wispfire Lantern
Shredded Organ x35 - Conchcutter, Sawtooth Circlet, Cogwork Wheel, Delver's Drill
Skewered Organ x10 - Longpin, Sting Shard
2. Return to Huntress with the organs.
Reward: Longclaw (tool).
Bugs of PharloomHow to start: Talk to Nuu (Greymoor).
1. Defeat the many creatures of Pharloom and fill out the Hunter's Journal x100.
2. Present the filled out Hunter's Journal to Nuu at the Halfway Home in Greymoor.
Reward: Tool Pouch (Increases the capacity for Tools and Shell Shards that can be carried.)
Building Up SongclaveHow to start: Check the Songclave wishboard.
1. Donate 300 rosaries to aid the growing Songclave.
Next wish: Strengthening Songclave.
Cloaks of the Choir1. Hunt cloaked choirbugs of the Citadel and collect Choir Cloaks from their bodies x15. - Drops from Choir Flyer, Choir Hornhead, Choir Pouncer, or Choir Elder.
2. Turn in the Choir Cloaks to Songclave's wishwall and collect the reward.
Reward: Heavy Rosary Necklace.
Crawbug Clearing1. Speak to Creige of the Halfway Home in Greymoor.
2. Hunt Crawbugs in Greymoor and collect their Ragpelt x25. - One or two crawbugs spawn on the roof of the Halfway Home. Leaving and re-entering the building respawns them, even without resting at a bench so you can farm them quickly there.
3. Give the Ragpelt to Creige of the Halfway Home in Greymoor.
Reward: Crafting Kit Expanded.
Dark Hearts1. Destroy Void Masses throughout Pharloom x12.
2. Return to Bellhart's wishwall to collect the reward.
Ecstasy of the End1. Speak to Fleamaster Mooshka of Fleatopia.
2. Achieve the high score in all Flea Games and become the Grand Champion.
Juggle
Dodge
Bounce
Fastest in PharloomRace Sprintmaster Swift to discover Pharloom's fastest bug.
Rewards:
1st Race: Rosary Necklace
...
...
Fatal Resolve1. Travel to Pinstress's home at the far edge of Blasted Steps and accept her challenge. - Pinstress Challenge.
2. Find Pinstress on the stormward side of Mount Fay and defeat her in battle.
Final Audience1. Track the Second Sentinel by their markers left near Songclave.
Fine Pins1. Hunt pin-wielding choirbugs of the Citadel and collect Fine Pins x10.
2. Turn in the Fine Pins to Songclave's wishwall and collect the reward.
Reward: Heavy Rosary Necklace.
Flexile SpinesHow to start: Talk to Seamstress.
1. Hunt Hokers in the Far Fields and collect Spine Cores x25.
2. Give the Spine Cores to the Seamstress waiting in Far Fields.
Reward: Drifter's Cloak (Glide) (ability)
Garb of the PilgrimsHow to start: Read the notice posted on the Bone Bottom's wishwall.
1. Hunt haunted pilgrims of Pharloom and collect Pilgrim Shawls from their bodies x12. - They are located in many places, but many of them are located in Mosshome, which is relatively close.
2. Turn in the Pilgrim Shawls to Bone Bottom's wishwall and collect the reward.
Reward: Rosary Necklace.
Great Taste of Pharloom1. Collect rare delicacies of Pharloom: Mossberry Stew, Vintage Nectar, Courier's Rasher, Crustnut, and Pickled Muckmaggot.
2. Deliver the rare delicacies to Mergwin in the dining chamber of the Citadel.
Reward: Pale Oil.
Hero's Call1. Seek out the distressed bug near the Blasted Steps Bellway.
Infestation Operation1. Acquire Steel Spines from Crull and Benjin in Sinner's Road so Yarnaby can remove the parasite.
2. Deliver the Steel Spines to Yarnaby in Greymoor so they can remove the parasite.
My Missing Brother1. Search for traces of the courier, Pill, and track his location.
My Missing CourierHow to start: Read the notice posted on the Bellhart's wishwall.
1. Search for traces of the courier, Tipp, and track his location. - Talk to Courier Tipp.
Reward: New items in Frey's stock.
Pain, Anguish and MiseryAct 3.
1. Return to the Citadel's Stage, beside the Whispering Vaults.
Pinmaster's OilHow to start: Defeat Widow, and then speak to Pinmaster Plinney in his home. You will get this wish after having your needle sharpened for the first time.
1. Retrieve Pale Oil from the Citadel.
2. Give Pale Oil to Plinney of Bellhart.
Reward: Shining Needle Upgrade.
Rite of the PollipHow to start: Talk to Greyroot.
1. Collect Pollip Hearts from the purple flowers of Shellwood x6.
2. Give the Pollip Hearts to Greyroot of Shellwood.
Reward: Pollip Pouch (tool).
Roach Guts1. Hunt the Muckroaches of Sinner's Road and collect Roach Guts from their bodies x10.
2. Deliver the Roach Guts to Crull and Benjin of Sinner's Road.
Savage Beastfly1. Track down the Savage Beastfly in the Far Fields and defeat it.
2. Turn in the Horn Fragment to Bellhart's wishwall and collect the reward.
Reward: Mask Fragment.
Silk and Soul1. Acquire the necessary components build a powerfull trap.
Maiden's Soul
Hermit's Soul
Seeker's SoulSnare Setter
2. Give the collected components to the Caretaker of Songclave.
Silver BellsHow to start: Read the notice posted on the Bellhart's wishwall.
1. Collect Silver Bells in the bellvein tunnels above and below Bellhart x8.
2. Turn in the silver Bells to Bellhart's wishwall and collect the reward.
Reward: Rosary Necklace.
Songclave Supplies1. Deliver supplies to the Caretaker in Songclave.
Reward: 410 Rosaries.
Strengthening SongclaveHow to start: Check the Songclave wishboard some time after you complete the Building Up Songclave wish.
1. Donate 500 Rosaries.
Survivor's Camp Supplies1. Deliver supplies to Flick at the Survivors' Camp.
Reward: 180 Rosaries.
The Hidden Hunter1. Track down one who stole Gilly's keepsake near the Bellshrine between Deep Docks and Far Fields.
2. Turn in the Grass Doll to Bellhart's wishwall and collect the reward.
The Lost Fleas1. Seek fleas across the lands of Pharloom and guide them to the Flea Caravan x5.
2. Return to Fleamaster Mooshka of the Flea Caravan, in the Marrow.
The Terrible TyrantHow to start: Read the notice posted on the Bone Bottom's wishwall.
1. Hunt a Skull Tyrant of the Marrow. - Kill the Skull Tyrant (1) and collect the Crown Fragment.
2. Turn in the Crown Fragment to Bone Bottom's wishwall and collect the reward.
Reward: Heavy Rosary Necklace.
The Wailing MotherHow to start: This wish should be available on the Songclave's wishwall after exploring the northern part of The Slab, and also completing some of the Songclave wishes.
1. Track down the wailing creature in the Slab and slay it. The creature can be tracked by its slime trail. - Broodmother, Broodmother's Eye
2. Turn in the Broodmother's Eye to Songclave's wishwall and collect the reward.
Reward: Heavy Rosary Necklace.
The Wandering MerchantHow to start: Check the Songclave wishboard.
1. Search for traces of the merchant, Jubilana, and track her location. - Find and talk to Jubilana.
Reward: Jubilana appears as a vendor in Songclave.
Trail's EndSearch for Shakra and her master in Bilewater.
Volatile FlintbeetlesHow to start: Read the notice posted on the Bone Bottom's wishwall.
1. Track down Flintbeetles in the Marrow and defeat them to collect Flintgems x3 - Collect: Flintgem, Flintgem, and Flintgem.
2. Turn in the Flintgems to Bone Bottom's wishwall and collect the reward.
Reward: Memory Locket (Volatile Flintbeetles Wish).
Quest Items
Miscellaneous items that must be obtained to start or complete wishes and tasks, as well as locations or objects related to wishes or tasks.
Cogheart PieceYou need this item to repair the Automaton. To obtain it, ring the bells in the correct order.
Solution (Bells numbered from left/top to right/bottom):
7 - 2 - 4 - 6
4 - 2 - 1 - 4 - 3
1 - 5 - 6 - 2 - 7 - 3
Cogheart PieceYou need this item to repair the Automaton. To obtain it, ring the bells in the correct order.
Solution (Bells numbered from left to right):
1 - 5 - 4 - 6
3 - 6 - 5 - 1 - 7
2 - 4 - 6 - 3 - 5 - 1
Cogheart PieceYou need this item to repair the Automaton. To obtain it, ring the bells in the correct order.
Solution (Bells numbered from left to right):
1 - 2 - 7 - 4
7 - 5 - 6 - 4 - 5
2 - 7 - 3 - 5 - 6 - 1
Encrusted Heart (Heart of Might)You need to get this heart to complete The Old Hearts main task.
FlintgemDropped by Flintbeetle, which only appears here after the Volatile Flintbeetles wish has been started.
FlintgemDropped by Flintbeetle, which only appears here after the Volatile Flintbeetles wish has been started.
FlintgemDropped by Flintbeetle, which only appears here after the Volatile Flintbeetles wish has been started.
FlintstoneInspect it to complete one of the entries in Materium.
Fountain (1)One of three fountains that must be unlocked to activate the Sacred Shrine.
Fountain (2)One of three fountains that must be unlocked to activate the Sacred Shrine.
Fountain (3)One of three fountains that must be unlocked to activate the Sacred Shrine.
Glowing Orb (Cocoon)One of the orbs needed to unlock the entrance to the Green Prince's Home. Hit the cocoon and then quickly collect the small orbs to finally collect the large glowing orb. If you don't manage to do it quickly enough, you can try again.
Glowing Orb (Flowers #1)In the hidden area. One of the orbs needed to unlock the entrance to the Green Prince's Home. Hit the flowers and then quickly collect the small orbs to finally collect the large glowing orb. If you don't manage to do it quickly enough, you can try again.
Glowing Orb (Flowers #2)One of the orbs needed to unlock the entrance to the Green Prince's Home. Hit the flowers and then quickly collect the small orbs to finally collect the large glowing orb. If you don't manage to do it quickly enough, you can try again.
Glowing Orb (Statue #1)One of the orbs needed to unlock the entrance to the Green Prince's Home. Hit the statue and then quickly collect the small orbs to finally collect the large glowing orb. If you don't manage to do it quickly enough, you can try again.
Glowing Orb (Statue #2)One of the orbs needed to unlock the entrance to the Green Prince's Home. Hit the statue and then quickly collect the small orbs to finally collect the large glowing orb. If you don't manage to do it quickly enough, you can try again.
Glowing Orb (Statue #3)One of the orbs needed to unlock the entrance to the Green Prince's Home. Hit the statue and then quickly collect the small orbs to finally collect the large glowing orb. If you don't manage to do it quickly enough, you can try again.
Glowing Orb (Statue #4)Inside hidden room. One of the orbs needed to unlock the entrance to the Green Prince's Home. Hit the statue and then quickly collect the small orbs to finally collect the large glowing orb. If you don't manage to do it quickly enough, you can try again.
Glowing Orb x5 (Sacred Shrine)To activate it, you must stand on three pressure plates and turn on three fountains: Fountain (1), Fountain (2), and Fountain (3).
Hermit's SoulOne of the items you need to collect to complete the Silk and Soul wish. To get it, talk to Bell Hermit once you started the wish.
Horn FragmentDrops from
Hunter's HeartYou need to get this heart to complete The Old Hearts main task.
MagnetiteInspect it to complete one of the entries in Materium.
Maiden's SoulOne of the items you need to collect to complete the Silk and Soul wish. To get it, talk to Chapel Maid once you started the wish.
MateriumIt's a "housing item" - a decorative / collectible item you can place in your Bellhome in Bellhart.
Mossberry (1)You need any three of them to complete the Berry Picking wish. After completing it, bring additional Mossberries to the Moss Druid for rosaries and an upgrade Druid's Eye > Druid's Eyes.
Mossberry (2)This one is a bit tricky. To pull it off, you need to bounce off the enemy's head by performing a downward attack.
You need any three of them to complete the Berry Picking wish. After completing it, bring additional Mossberries to the Moss Druid for rosaries and an upgrade Druid's Eye > Druid's Eyes.
Mossberry (3)You need any three of them to complete the Berry Picking wish. After completing it, bring additional Mossberries to the Moss Druid for rosaries and an upgrade Druid's Eye > Druid's Eyes.
Mossberry (4)Kill an enemy with a berry in its beak. The easiest way to do this is to use a Silkspear.
You need any three of them to complete the Berry Picking wish. After completing it, bring additional Mossberries to the Moss Druid for rosaries and an upgrade Druid's Eye > Druid's Eyes.
Mossberry (5)You need any three of them to complete the Berry Picking wish. After completing it, bring additional Mossberries to the Moss Druid for rosaries and an upgrade Druid's Eye > Druid's Eyes.
Mossberry (6)You need any three of them to complete the Berry Picking wish. After completing it, bring additional Mossberries to the Moss Druid for rosaries and an upgrade Druid's Eye > Druid's Eyes.
Mossberry (7)You need any three of them to complete the Berry Picking wish. After completing it, bring additional Mossberries to the Moss Druid for rosaries and an upgrade Druid's Eye > Druid's Eyes.
Mossberry StewYou will receive it from the druid when you talk to him during the Great Taste of Pharloom wish.
Seeker's SoulOne of the items you need to collect to complete the Silk and Soul.
Silver BellOne of the places where a silver bell may randomly pop up while doing the Silver Bells wish.
Silver BellOne of the places where a silver bell may randomly pop up while doing the Silver Bells wish.
Silver BellOne of the places where a silver bell may randomly pop up while doing the Silver Bells wish.
Silver BellOne of the places where a silver bell may randomly pop up while doing the Silver Bells wish.
Silver BellOne of the places where a silver bell may randomly pop up while doing the Silver Bells wish.
Silver BellOne of the places where a silver bell may randomly pop up while doing the Silver Bells wish.
Silver BellOne of the places where a silver bell may randomly pop up while doing the Silver Bells wish.
Silver BellOne of the places where a silver bell may randomly pop up while doing the Silver Bells wish.
Silver BellOne of the places where a silver bell may randomly pop up while doing the Silver Bells wish.
Silver BellOne of the places where a silver bell may randomly pop up while doing the Silver Bells wish.
Silver BellOne of the places where a silver bell may randomly pop up while doing the Silver Bells wish.
Silver BellOne of the places where a silver bell may randomly pop up while doing the Silver Bells wish.
Silver BellOne of the places where a silver bell may randomly pop up while doing the Silver Bells wish.
Steel Spines
Twisted Bud
Vintage NectarOne of the items you need to collect to complete the Great Taste of Pharloom wish. Use the Halfway Home Cellar to get here. Be prepared for a fight when you try to pick it up for the first time.
VoltridianInspect it to complete one of the entries in Materium.
Vendors
Vendors are key NPCs that players interact with to buy items. The main currency is Rosaries. These merchants are spread out across the map, and each one focuses on specific types of goods, like maps for navigation, tools for gameplay mechanics, or upgrades for Hornet's abilities. Some vendors only show up after completing certain quests or unlocking new areas. Others are mobile and change locations as the game progresses, or their stock updates based on your advancements.
Pinmaster PlinneyDefeat Widow to make him available. He "sells" weapon upgrades:
Sharpened Needle - Just speak to him.
Shining Needle - Complete the Pinmaster's Oil wish.
Hivesteel Needle - Complete the Great Taste of Pharloom wish + 450 Rosaries.
Pale Steel Needle - Complete the Ecstasy of the End wish + 680 Rosaries.
Relic Seeker ScroungeBuys the Relics:
Bone Scroll - 90 Rosaries
Weaver Effigy - 150 Rosaries
Choral Commandment - 180 Rosaries
Rune Harp - 210 Rosaries
Arcane Egg - 600 Rosaries
Gilly (1)Attack the bush near the statue to reveal her.
Gilly (2)Attack the bush near the bench to reveal her.
Green Prince
Green Prince
Green Prince (Sinner's Road)You will find him here locked in a cage. You need one of the [poi]2295|Simple Keys[/poi] to free him. Thanks to this and subsequent tasks related to him, you can gain access to Lost Verdania.
Green Prince (Verdania)Use the Elegy of the Deep ability next to him to get to the alternate version of the area (Lost Verdania).
Greyroot
Grindle
GrindleHe is behind a locked gate. Hit the gate to break it open.
Kratt (Greymoor)You have to save him first.
Note: Once you're inside, hit him when he's peeping at you through the hole in the top of the spa, and he'll let you use his spa for free.
Give him 10 Rosaries to enter the spa and gradually have your Silk restored.
Kratt (Putrified Ducts)
LaceShe appears here if you reached the Citadel through the Grand Gate. After talking to her, the Pharloom's Crown main task begins.
LaceShows up here if you enter the citadel for the first time via Bilewater > Exhaust Organ.
Little Pilgrim
Loam
Loddie
Loyal Mergwin
Lumble The Lucky
Mask Maker
Mister Mushroom (1)You will meet him during the Passing of the Age wish. Play Needolin to make him appear.
Mister Mushroom (2)You will meet him during the Passing of the Age wish. Play Needolin to make him appear.
Mister Mushroom (3)You will meet him during the Passing of the Age wish. Play Needolin to make him appear.
Mister Mushroom (4)You will meet him during the Passing of the Age wish. Play Needolin to make him appear.
Mister Mushroom (5)You will meet him during the Passing of the Age wish. Play Needolin to make him appear.
Mister Mushroom (6)You will meet him during the Passing of the Age wish. Play Needolin to make him appear.
Mister Mushroom (7)You will meet him during the Passing of the Age wish. Play Needolin to make him appear.
ShakraShe will be here during the Trail's End wish.
ShakraYou will encounter her here in Act 3.
Sherma
Sherma (1)
Sherma (2)
Sherma (Blasted Steps)
Sherma (Whiteward)
Snail Shamans
Sprintmaster Swift
Steel Seer Zi
Styx
Sula
Tall Pilgrim
Varga
Varga (Fleatopia)
Varga (Greymoor)
Vaultkeeper Cardinius
Vog (Fleatopia)
Vog (Grand Gate)
Weary Pilgrim
Yarnaby
Benches
Benches are checkpoints where Hornet can rest, fully restore health, refill equipped tools with Shell Shards, and swap tools or crests. They serve as spawn points after death or quitting, with some requiring rosary tolls to access.