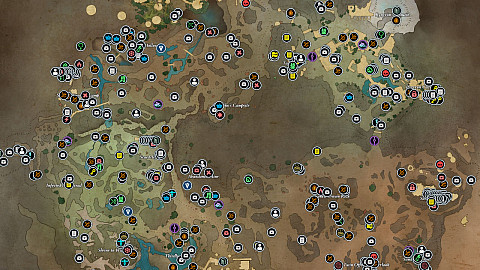
Interactive map of the Shatterscarp region and the city of Thirdborn, which we explore while playing Avowed.
Shatterscarp is a wild desert on the southern coast of the Living Lands and home to the city of Thirdborn. Settlers in the region are mostly emigrants from Rauatai, stubborn survivalists determined to eke out a living as a community.
Markers on the map
Treasure Maps3
Totem Parts7
Ancient Memory1
Godlike Abilities4
Amulets3
Trinkets5
Rings8
1H Melee Weapons3
2H Melee Weapons2
Pistol1
Wand1
Arquebus1
Bow1
Grimoire1
Shields2
Hands8
Feet6
Armor6
Adra17
Admeth's Wyrt70
Magran's Blessing3
Keys8
Documents19
Notes60
Blocked Passages26
Blocked Passages8
Blocked Passages13
Blocked Passages9
Blocked Passages6
Blocked Passages7
Blocked Passages12
Containers125
Locked Containers10
Main Quests3
Side Quests15
Quest Items17
Places of interest5
Companion1
Merchants9
NPCs25
Strangled Adra1
Boss Fights6
Fast Travel Beacons6
Party Camps4
Transitions11
Points of interest
Treasure Maps
Treasure Maps are unique documents that provide clues leading to the location of a hidden treasure.
Dead Man's MailCategory: Shatterscarp. In the corpses lying in the tent.
Related treasure: Necropants.
Robe of the Arcane CheaterCategory: Shatterscarp. Can be bought from Ihaka for 1,680 copper.
Related treasure: Robes of Surpassing Brilliance.
Seafarer's BootsCategory: Shatterscarp.
Related treasure: Wavebinder Boots.
Totem Parts
You can place Totems and their missing Fragments at the Totem Shrine in Party Camp. Each Totem is tied to a god from Eora's pantheon and grants powerful effects, but only one can be active at a time.
Agate EyeTotem Fragment - Wael.
Effect:
Enigmatic Shield: Activating a Level 15 or Level 20 ability grants +5% Damage Reduction for 10 seconds.
Amethyst EyeTotem Fragment - Wael.
Effect:
Magic in the Blood: Restoring Essence also restores a small amount of Health.
Emerald EyeTotem Fragment - Wael.
Effect:
Sight Beyond Eyes: +5% Critical Hit Chance
Eyes of the ObscuredTotem Base - Wael.
Used to: Activate passive bonuses when placed at party camp and restored with missing fragments.
Ruby EyeTotem Fragment - Wael.
Effect:
Disappearing Trick: Second Wind casts Shadowing Beyond.
Sapphire EyeTotem Fragment - Wael. You will find this piece at the bottom of the lake.
Effect:
Fickle Winds: Critical Hits deal high random accumulation.
Topaz EyeTotem Fragment - Wael.
Effect:
The Obscured's Vantage: +2 Intellect, +2 Perception
Ancient Memories
Ancient Memories appear as small, floating orbs of light and they are located in remote, named places. Discovering one grants one of the passive Godlike Abilities. Each region contains a single Ancient Memory to discover.
Godlike Abilities are unique, powerful skills tied to your character's status as a Godlike. They're split into active and passive ones. You start with one such ability by default, while others unlock through story progression, specific choices, or exploration.
Godlike's WillHow to get: You will get it after the conversation with Lödwyn and Ryngrim when you escape from Naku Kubel at the end of the "Shadows of the Past" main quest. You have to reject Sapadals's offer of power in Naku Kubel. It doesn't matter whether you side with Lödwyn or Ryngrim.
Related main quest: Shadows of the Past
Type: Passive
Effect: Gain a bonus Ability Point to spend in the Fighter, Ranger, or Wizard Ability Trees.
Remembrance of NimannaHow to get: Interact with the Ancient Memory (Shatterscarp).
Type: Passive
Effect: Increases your Maximum Stamina by 10%.
Scion of the Immortal LandHow to get: During the conversation with Inquisitor Lödwyn and Ryngrim, side with the Inquisitor and decide to destroy Naku Kubel.
Type: Active
Effect: Increases your damage and grants Health regeneration for 12 seconds.
Severed BranchHow to get: During the conversation with Inquisitor Lödwyn and Ryngrim, side with Ryngrim and let her sever the Adra.
Type: Active
Effect: Grants maximum Move Speed for 20 seconds.
Amulets
Amulets are a type of Accessories. They provide unique passive buffs or effects-like stat boosts, damage increases, or utility perks. They share a slot with trinkets and are limited to one equipped at a time.
Draconic CharmTo receive it, give the Lost Aedyran Scout the Strangely-Marked Xaurip Spear.
Effect:
Channel a Xaurip tribe's draconic deity to become Uninterruptable and breathe fire at your enemies
Umpara's PromiseEffect:
Negates all Physical Damage from Traps
Wahaki TuaEffect:
+10% Attack Damage with maces and spears
Trinkets
Trinkets are a type of Accessories. They provide unique passive buffs or effects-like stat boosts, damage increases, or utility perks. They share a slot with amulets and are limited to one equipped at a time.
Crystalline EggEffect:
Summons a trio of Crystal Eater Spiderlings to fight with you
Halma's FancyCan be bought from the Merchant in Thirdborn for 2,250 copper.
Effect:
+2 Perception
Heart of the LeviathanThis is a reward for completing the "Heart of Valor" quest. You must keep the heart or give it to Chiko.
Effects:
+20% Attack Damage
Slowly drains your Health
Poisoner's KitIt's a reward for completing the "The Wasteland Courier" side quest.
Effect:
Your weapons deal +5% bonus Poison Damage
Thirdborn Tira Nui BadgeIt's an optional reward for completing the "The Wasteland Courier" side quest.
Effect:
+2 Might
Rings
Rings are Accessories worn on the fingers that provide unique passive buffs, such as stat boosts, damage increases, or special effects. Only two rings can be worn at the same time.
Chitin BandYou will find it in the corpse of the wizard you kill here.
Effect:
-5% damage from Beasts
Cipher's Bestowed FocusEffect:
+5% Damage Reduction while your Health is below 30%
Ring of Elemental BalanceEffect:
+10% Fire, Frost, and Shock Accumulation
Ring of Prosperity's FortuneIt's a reward for completing the "One Last Drink" side quest.
Effect:
Critical Hit Chance increases with your total wealth
Sands' ShroudEffect:
10% chance to avoid ranged damage
Sigil of the ArcaneEffects:
+20% Ability Cast Speed
-20% Ability Essence Cost
Stormdancer RingThis is a reward for completing the "Heart of Valor" quest. You must give Chiko the heart and talk to her appropriately.
Effect:
+10% Shock Damage
The Ranga's ClarityEffects:
+1 Intellect
+1 Perception
1H Melee Weapons
One-handed Melee Weapons available in Avowed. These include daggers, swords, axes, maces and spears.
Star of UnbeingType: One-Handed, Mace
Stats:
161 Physical Damage
180 Stun
18 Stamina Cost
3% Critical Hit Chance
Effects:
Power Attacks deal high Poison Accumulation
A successful Special Attack casts Pull of Eora
Weight: 6
The Emperor's ReachType: One-Handed, Sword
Stats:
88 Physical Damage
70 Stun
11 Stamina Cost
3% Critical Hit Chance
Effects:
Killing an enemy gives you +10% Attack Damage and +10% Move Speed for 6 seconds
Special Attacks Stun nearby Kith. Cannot be chained
Weight: 6
Umpara's SpearIt's a reward for completing the "Heart of Valor" side quest. You have to return the heart to Keipo and / or make specific dialogue choices when talking to him.
Type: One-Handed, Spear
Stats:
88 Physical Damage
84 Stun
13 Stamina Cost
6% Critical Hit Chance
Effects:
Power Attacks launch a poison dart
+25% Critila Hit Damage
Weight: 5
2H Melee Weapons
Two-handed Melee Weapons available in Avowed. These include great swords, great axes and great hammers.
Hel's TongueType: Two-Handed, Great Sword
Stats:
149 Physical Damage
140 Stun
20 Stamina cost
3% Critical Hit Chance
Effects:
Power Attack kills restore 10% of your Maximum Essence
Hits deal +10% bonus Fire Damage against enemies above 50% Maximum Health
Hits deal +10% bonus Frost Damage against enemies below 50% Maximum Health
Weight: 8.5
Just PestleType: Two-Handed, Hammer
Stats:
259 Physical Damage
270 Stun
25 Stamina Cost
3% Critical hit Chance
Effects:
A Full Combo Attack gives you +20% Attack Speed and +10% Attack Damage for 12 seconds
+15% Stun
Weight: 10
Pistols
Pistols are a type of Ranged Weapons. Pistols require only one hand and shoot bullets perfectly straight at medium range, dealing moderately high damage and Stun. However, they have a slow rate of fire and their loud shots easily alert enemies.
Fair PlayCan be bought from Kampeki for 10,296 copper.
Type: One-Handed Ranged
Stats:
127 Physical Damage
140 Stun
20 Stamina Cost
3% Critical Hit Chance
Effects:
Killing an enemy restores 5% of your Maximium Health and 25% of your Maximum Stamina
Taunt and gain +100% Critical Hit Chance against enemies that Incapacitate one of your Companions
Weight: 4
Wands
Wands are a type of Ranged Weapons. Wands require only one hand and cast homing projectiles very quickly at Enemies up to medium range. However, they have low Block Efficiency, incurring a moderately high Stamina cost when Blocking.
Whisper of ExilesUnlocks with: Lockpick x5.
Type: One-Handed, Wand
Stats:
61 Physical Damage
56 Stun
12 Stamina Cost
6% Critical Hit Chance
Effects:
A Full Combo Attack deals low Frost Accumulation to nearby enemies
Hits deal +10% bonus Frost Damage
Weight: 2
Arquebuses
Arquebuses are a type of Ranged Weapons. Arquebuses require both hands and shoot bullets perfectly straight at long range, dealing very high damage and Stun. However, they have a very slow rate of fire and their loud shots easily alert enemies.
Izmalt's Meteoric ApparatusCan be bought from Kampeki for 12,355 copper.
Type: Arquebus
Stats:
226 Physical Damage
196 Stun
25 Stamina Cost
3% Critical Hit Chance
Effects:
Killing an enemy deals low Fire Accumulation to nearby enemies
Short-range Power Attacks deal high Stun and knock enemies back
Weight: 7.5
Bows
Bows are a type of Ranged Weapons. Bows require both hands and shoot arrows quietly at very long range, dealing moderately high damage. However, arrows will fall over time while moving through the air.
Storm-SwornType: Bow
Stats:
126 Physical Damage
140 Stun
12 Stamina Cost
9% Critical hit Chance
Effects:
Killing an enemy deals moderate Stun and Shock Accumulation to nearby enemies
Hits deal +10% bonus Shock Damage
Weight: 5
Grimoires
Grimoires are a type of Off-Hand Items. They enable a variety of Spells to be cast or unlocked in the Wizard Ability Tree.
Shields are a type of Off-Hand Items. Shields have very high Block Efficiency, meaning they can block with very low Stamina cost.
Nimanna's WardType: Shield
Stats:
77 Block Efficiency
20 Stability
300 Parry Efficiency
40 Elemental Resistance
Effects:
A successful Parry grants you Temporary Health
+5% Damage Reduction against Spirits
Weight: 6.5
The Desert's BountyType: Shield
Stats:
67 Block Efficiency
20 Stability
240 Parry Efficiency
33 Elemental Resistance
Effects:
+20% resistance to Fire Accumulation during the day
+20% resistance to Frost Accumulation at night
+30 Maximum Stamina
Weight: 8
Hands
Boots and shoes are a type of Clothing Items which can be placed in the hands slot. They don't provide base damage reduction or upgradeable tiers, focusing instead on passive bonuses like improved stats, movement, or utility effects.
Bracers of BloodlettingIt's a reward for completing all bounties in Shatterscarp.
Item Bonus:
+10% Parkour Speed
Effect:
Hits deal +5% bonus Bleed Damage
Magran's ForceItem Bonus:
-10% Stamina cost while Blocking
Effect:
+15% Fire Damage
Stormdancer GlovesThis is a reward for completing the "Heart of Valor" quest. You must give Chiko the heart and talk to her appropriately.
Item Bonus:
+10% Ability Cast Speed
Effect:
Power Attacks deal +5% bonus Shock Damage
Thirdborn GlovesCan be bought from Cinzia in Thirdborn for 3,750 copper.
Item Bonus:
+5% Power Attack Damage
Effect:
+2 Might
Wavebinder BracersCan be bought from the Merchant in Thirdborn for 3,750 copper.
Item Bonus:
-10% Ability Essence Cost
Effect:
+15% Reload Speed
Xaurip PawsTo get there, start south of here and swim through underwater tunnels.
Item Bonus:
+15% Stun
Effect:
Unarmed hits deal +10% bonus Fire Damage
Feet
Gloves and gauntlets are a type of Clothing Items which can be placed in the feet slot. They don't provide base damage reduction or upgradeable tiers, focusing instead on passive bonuses like improved stats, movement, or utility effects.
Sojourner BootsCan be bought from Cinzia in Thirdborn for 3,750 copper.
Item Bonus:
Increases your Heath restoration from all sources by 5%
Effect:
+40 Maximum Stamina
Stormdancer BootsThis is a reward for completing the "Heart of Valor" quest. You must give Chiko the heart and talk to her appropriately.
Item Bonus:
-10% incoming Fire, Frost, and Shock Damage
Effect:
+10% Shock Damage for 10 seconds after dodging
Thirdborn BootsCan be bought from the Merchant in Thirdborn for 3,750 copper.
Item Bonus:
+20 Maximum Health
Effects:
+30 Carry Capacity
+10% Move Speed
Wavebinder BootsRelated treasure map: Seafarer's Boots.
Item Bonus:
+15 Maximum Essence
Effect:
Experience smaller hit reactions
Armor
Armor Items are essential gear that players equip to their body slot to gain defensive benefits and unique buffs. Armor comes in three weight classes: Light, Medium, and Heavy, each affecting player character's stamina, essence, and stability against enemy attacks differently.
NecropantsUnlocks with: Lockpick x 3.
Related treasure map: Dead Man's Mail.
Type: Medium Armor
Stats:
15% Damage Reduction
39 Additional Damage Reduction
-25 Maximum Stamina
-35 Maximum Essence
Effects:
Summons a Spectre to fight with you
+30% resistance to Poison Accumulation
Weight: 10
Robes of Surpassing BrillianceRelated treasure map: Robe of the Arcane Cheater.
Type: Light Armor
Stats:
5% Damage Reduction
46 Additional Damage Reduction
-20 Maximum Stamina
-10 Maximum Essence
Effects:
+15% area of effect damage
+40 Maximum Essence
Weight: 4
Skald's BrigandineType: Heavy Armor
Stats:
25% Damage Reduction
40 Additional Damage Reduction
-45 Maximum Stamina
-45 Maximum Essence
Effects:
Regenerate Health if your Companions are downed
+20% Stamina regeneration rate
Weight: 22
Stormdancer's ScaleThis is a reward for completing the "Heart of Valor" quest. You must give Chiko the heart and talk to her appropriately.
Type: Medium Armor
Stats:
15% Damage Reduction
35 Additional Damage Reduction
-25 Maximum Stamina
-35 Maximum Essence
Effects:
5% chance to avoid ranged damage
+30% resistance to Shock Accumulation
Weight: 10
Thirdborn Brigandine JackType: Heavy Armor
Stats:
25% Damage Reduction
48 Additional Damage Reduction
-45 Maximum Stamina
-45 Maximum Essence
Effects:
Slowly regenerate Health while wet
+25 Carry Capacity
Weight: 22
Trickster's CuirassCan be bought from Cinzia in Thirdborn for 13,000 copper.
Type: Light Armor
Stats:
10% Damage Reduction
34 Additional Damage Reduction
-20 Maximum Stamina
-20 Maximum Essence
Effects:
+30% Move Speed while crouched
+40 Maximum Essence
Weight: 8
Adra
Adra crystals are used to upgrade unique weapons and armor. There are four types, each linked to a specific region and quality tier: Adra (Fine, Dawnshore), Awakened Adra (Exceptional, Emerald Stair), Corrupted Adra (Superb, Shatterscarp), and Adra Bán (Legendary, Galawain's Tusks+). Unlike common materials that improve gear within a tier, Adra upgrades unique gear between tiers.
Corrupted Adra x2 (Siamo)Superb Upgrade Material. Can be bought from Siamo for 5,625 copper each.
Corrupted Adra x2 (Wharaki)
Magran's Blessing
Magran's Blessing is a consumable item that temporarily increases Damage and Damage Reduction by 20% for 5 minutes.
Keys
Keys are used to open locked passageways. Sometimes they are only an alternative, as lock picks or a detour can also be used, but sometimes they are the only way to get somewhere.
Dirty Brown Key
LeverOn the upper floor, which can be accessed through the Freezable Grate. Deactivates traps in the tower.
Leversup-down-down-up.
Ornate Pargrun Key
Research House Key
Survivalist Chest KeyYou will receive it from the Survivalist if you tell him that Hylak is dead. This will be possible if you find the Hylak's Note.
Well Key
Winch
Documents
Documents are significant writings that you may find during your travels. The documents are divided into several sections, usually according to the region of their origin.
Aedyran Orders: Investigate Ruins in the Shark's TeethCategory: Shatterscarp
Aedyran Orders: Investigate Ruins in the Shark's TeethCategory: Shatterscarp
Aedyran Orders: Investigate Ruins in the Shark's TeethCategory: Shatterscarp
Ancient NoteCategory: Shatterscarp
Book of the HuntCategory: Lore
Bounty Hunter's NotesCategory: Shatterscarp
Filigreed BookUnder the wardrobe, on the top floor of the building.
Category: Lore
Fragments of the EyesCan be bought from Cinzia in Thirdborn for 500 copper.
Hylak's NoteCategory: Shatterscarp
Maxims of the Pargrunen IVCategory: Lore
Perilous Plants and Where to Pick ThemCategory: Shatterscarp
Precepts and Proverbs of AbydonCategory: Lore
Sun-Worn JournalCategory: Shatterscarp
The Dyrwood, Part 1: Early Colonial HistoryCategory: Lore
The Dyrwood, Part 2: The Broken Stone WarCategory: Lore
The Enigmatic God of ColdCategory: Lore
The Rise of the Cipher RangasCategories: Lore
The Soul Unbound, Chapter 17Category: Lore
Weathered JournalRelated side quest: Heart of Valor.
Category: Shatterscarp
Notes
Less important, various notes, documents, and the like, which can be found and read.
The Joy of Painting by the Grand Art Society of Vailia
The Tale Of The Village by the Archmage Ryngrim
Torn Parchment
WARNING
WARNING
Watchman's Log
Wicht Dreams
Woodcutter's Log
Blocked Passages
A locked or barred doors that can be opened with keys, lockpicks or from a certain side or walls and other obstacles that must be destroyed to get through.
Barred Door
Barred Door
Barred Door
Barred Door
Barred DoorYou can open it by exiting the Scaedclef Grotto through the back door.
Barred DoorThe door can be unlocked from the inside and the building can be accessed through the broken roof.
Weak WallBehind the wall, there is a switch for the fire traps.
Weak Wall
Weak Wall
Weak Wall
Weak Wall
Weak Wall
Weak Wall
ElevatorTo use the elevator, you must first restore the power supply. The generator is located next to the elevator at the top.
Lift
Shock Door (1)
Shock Door (3)
Shock Door (3)
Traps
Freezable Grate
Freezable Grate
Freezable Grate
Freezable Grate
Freezable Grate
Freezable Grate
Freezable Grate
Illusion
Illusion
Illusion
Illusion
Illusion
Illusion
Illusion Wall
Illusion Wall
Illusion Wall
Illusion Wall
Illusion Wall
Illusion Wall
Containers
Various containers containing different types of loot, e.g. materials, consumables, coins, equipment, etc.
Locked Containers
Locked ChestUnlocks with: Lockpick x3.
Locked ChestUnlocks with: Lockpick x3.
Locked ChestUnlocks with: Lockpick x1.
Locked ChestUnlocks with: Lockpick x3.
Locked ChestUnlocks with: Lockpick x1.
Locked ChestUnlocks with: Lockpick x3.
Locked ChestUnlocks with: Lockpick x1.
Locked LockboxUnlocks with: Lockpick x1.
Locked LockboxUnlocks with: Lockpick x1.
Locked LockboxUnlocks with: Lockpick x1.
Main Quests
Main Quests are essential for advancing the main story and involve significant events, major characters, access to new regions or companion, etc.
Face Your FearsPrevious main quest: A Path to the Garden.
Description: The archmage Ryngrim has arrived in Shatterscarp and created a magical barrier aound the ruins of Naku Kubel, for reasons known only to her. In order to gain access to the ruins, you'll need to speak with the archmage, who has taken up residence in the Shark's Teeth region of Shatterscarp.
Shadows of the PastPrevious main quest: Face Your Fears.
Description: Ryngrim gave Yatzli a grimoire that will dispell an arcane barrier the archmage conjured - one that blocks entry into Naku Kubel, an ancient Godless site in Shatterscarp. The path is now clear for you to enter the ruins, where Yatzli believes you will find clues to the location of the Garden - and perhaps the origins of the Dreamscourge.
Our Dreams Divide Us StillPrevious main quest: Shadows of the Past.
Description: After using the Ekidan device you found in Naku Kubel to decipher the location of the Garden, the time has come to enter Galawain's Tusks and find the path to Sapadal's prison.
Side Quests
Side quests are optional missions that players can complete alongside the main storyline. They provide extra rewards, such as experience points and unique items.
Bounty: Captain TagoHow to start: Read the wanted poster pinned to the board.
Reward: 1,200 copper.
Bounty: Koda and DarioHow to start: Read the wanted poster pinned to the board.
Reward: 1,200 copper.
Bounty: Kukae MakaHow to start: Read the wanted poster pinned to the board.
Reward: 1,200 copper.
Bounty: Moi PikiHow to start: Read the wanted poster pinned to the board.
Reward: 1,200 copper.
Bounty: Xaurip Chieftain GrithinHow to start: Read the wanted poster pinned to the board.
Reward: 1,200 copper.
Don't Look DownHow to start: Talk to Moapo.
Description: A local named Moapo told you about a pair of Dreamscourged hunters who reclaimed an old tower in the Shark'sTeeth. Meet them and deliver their supplies.
Fires in the MineHow to start: Talk to the Aedyran Soldier.
Description: Thirdborn and Aedyr are collaborating to reopen an abandoned sulfur mine in the Deadfall Highlands. Their efforts, however, have been stymied by a brood of spiders.
Related:
Seyon & KadaDarleSulfur Mines
Reward: 900 copper.
First Contact with the EnemyHow to start: You can start this quest by talking to Temerti, Private Nauki, or Sergeant Hasui.
Reward: 900 copper (Talk to Nauki about what Hasui said and give him the badges)
Heart of ValorHow to start: Talk to Chiko.
Description: Chiko asked you to meet their elderly uncle, Keipo, a Shatterscarp legend who slew a fearsome leviathan. Chiko believes Keipo has been feeling his age. Talking to a fellow adventurer could be just the thing he needs.
Rewards (Dependent on your choices): Umpara's Spear or Heart of the Leviathan + (optional) Stormdancer's Scale, Stormdancer Gloves, Stormdancer Boots, Stormdancer Ring, ....
Home Sweet HomeHow to start: Talk to Nameho.
Description: Nameho and Tamamu returned home to discover their parents had caught the Dreamscourge.
That Which RemainsDescription: Scaedclef, a small Aedyran settlement in the Ancient Lakebed, burned down. Investigate the remains. Find out what happened there.
The Wasteland CourierHow to start: Talk to Daiko.
Reward: Poisoner's Kit or Thirdborn Tira Nui Badge.
Totem of RevelationsHow to start: Buy the Fragments of the Eyes document from Cinzia or collect a piece of the Eyes of the Obscured totem.
Description: You obtained a document containing clues to the whereabouts of pieces of the Eyes of the Obscured, a powerful artifac and totem of Wael. The pieces can be found across Shatterscarp - the more pieces you gather and assemble, the more powerful the totem will become.
Quest Items
Quest Items are special items that players must collect, use or deliver as part of a main or side quest.
Companions are special NPCs that can join your party. Each companion has their own combat skills, unique personalities and story arcs and companion quests to discover and complete.
YatzliYou will meet her here when you have started the main quest "Face Your Fears".
Skills:
Essence Explosion - Yatzli invokes a strange arcane power that explodes upon hitting an enemy, releasing a burst of Essence and Explosive Damage.
Dispel Illusion - Order Yatzli to dispel a magical illusion and surrender its secrets.
Merchants
NPC merchants who sell weapons, armor, consumables and materials and also buy loot you don't need.
WharakiKill the dreamthralls in the and talk to Wharaki hiding between the rocks area then return here later.
She sells:
Weapons
Armor
Consumables (Lockpicks)
Materials (Corrupted Adra x2)
NPCs
Other NPCs you may encounter during the game. A properly led conversation with them will end peacefully, but when something goes wrong, for example, if you do not have the right stats, you need to be ready to go into battle.
SurvivalistIf you find the Hylak's Note, you will be able to tell him that Hylak is dead and you will receive the Survivalist Chest Key.
Tanusas
Tauwe
TemertiShe moves around the village and can be found here or near the big cannon near the docks.
Tira Nui Hajime
Ward of the Eye
Wounded Aedyran
Strangled Adra
Strangled Adra are large Adra crystals ensnared by vines and thorns. Interacting with these pillars allows players to cleanse them, yielding experience points and Adra material for upgrading gear.
Strangled Adra (Shatterscarp)
Boss Fights
Boss Fights are tough battles against powerful enemies with high health and unique abilities, requiring strategic play to overcome.
Captain Tago
Chieftain Grithin
Koda & DarioWith enough Might (10), you don't have to fight them, as you will be able to convince them to hand over the trophies to you.
Kukae MakaBlackwood Branch, Lockpick.
Moi Piki
Numena, Tanusas & Kutenrus
Fast Travel Beacons
You can fast travel directly to Fast Travel Beacons and Party Camps by interacting with their icons on the map. To be able to do this, you must first unlock them by reaching them on foot.
Ancient Lakebed South Beacon
Naku Kubel Beacon
Sand Sea Oasis Beacon
Shark's Mouth Beacon
Tago's Tower Beacon
Thirdborn Beacon
Party Camps
Party Camps are temporary hubs set by large Adra stones, which can be found throughout the Living Lands. Setting up camp will fully restore your health and essence. In the camp, you can chat with your companions, change their outfits, upgrade and enchant your equipment, cook, access the stash, and assemble god totems.
You can fast-travel to discovered camps. When leaving a camp, you can choose which two companions who have already joined you will accompany you, and decide whether to exit at the camp's location or return to the place you teleported from.
Deadfall Highlands Party Camp
Eagle's Reach Party Camp
Sharks Teeth Party Camp
Thirdborn Party Camp
Transitions
Transitions between maps and entrances to dungeons.