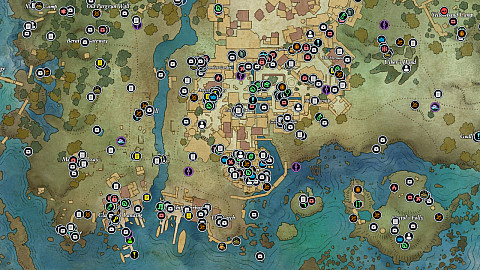
Interactive map of the Dawnshore region and the city of Paradis, which we explore while playing Avowed. This is the first major location we arrive to right after completing the prologue.
Dawnshore is a region on the southwestern coast of the Living Lands. The central city of Paradis is populated by scrappy settlers and new arrivals seeking fortune on the frontier. The abundance of goods and coin moving through Dawnshore has contributed to an equally abundant criminal underworld.
Markers on the map
Treasure Maps3
Totem Parts7
Ancient Memory1
Godlike Abilities3
Amulets4
Trinkets3
Rings11
1H Melee Weapons3
2H Melee Weapons2
Pistols2
Bow1
Grimoires2
Shields3
Hands6
Feet5
Armor6
Adra14
Paradisan Ladder40
Magran's Blessing15
Keys9
Documents60
Notes81
Blocked Passages20
Blocked Passages18
Blocked Passages19
Blocked Passages9
Blocked Passages5
Blocked Passages4
Containers140
Locked Containers22
Main Quests3
Side Quests16
Quest Items15
Places of Interest5
Companions2
Merchants15
NPCs22
Strangled Adra1
Boss Fights8
Fast Travel Beacons13
Party Camps4
Transitions9
Points of interest
Treasure Maps
Treasure Maps are unique documents that provide clues leading to the location of a hidden treasure.
Captain Henqua's SpoilsCategory: Paradis. In the skeleton lying on the platform, which you will pass by climbing to the top of the lighthouse.
Related treasure: Wind and Wave.
Intimidating Feline CodpieceCategory: Paradis. You can buy it from Lynna for 100 copper.
Related treasure: Stelgaer's Pride.
Woedica's InheritanceCategory: Paradis. Can be bought from Sanza for 100 copper.
Related treasure: Gloves of the Strangler.
Totem Parts
You can place Totems and their missing Fragments at the Totem Shrine in Party Camp. Each Totem is tied to a god from Eora's pantheon and grants powerful effects, but only one can be active at a time.
Broken Crown JewelTotem Fragment - Woedica. On the table in the back room of the Sanza's Emporium.
Effect:
Swift Orders: Reduces Companion ability cooldowns by 15%.
Golden FlamesTotem Fragment - Woedica. On the cliff edge near Castol's Folly camp.
Effect:
Flames of Resurrection: Second Wind casts Ring of Fire.
Golden Plaque of OathsTotem Fragment - Woedica. In a cave that can be reached through a flooded tunnel.
Effect:
The Queen's Burden: +2 Intellect, +2 Resolve.
Golden Plaque of PromisesTotem Fragment - Woedica. Inside the lighthouse. Accessible through a hole in the wall at the upper part of the lighthouse.
Effect:
Noblesse Oblige: Reviving a Companion grants rapid Health and Essence regeneration.
Golden Scale of JusticeTotem Fragment - Woedica. To get here for the first time, approach the place from the east, more or less from where the Grysca vendor is, jump onto the balcony where the Lockbox is, go inside, destroy the Cobweb and descend the ladder.
Effect:
Sympathy for the Damned: Critical Hits deal high Fire Accumulation.
Golden Scale of OrderTotem Fragment - Woedica. In a nest on the rocks. You can get there by passing the Pargrun Cache ruins.
Effect:
The Power of Command: Activating a Companion ability increases your damage for 5 seconds.
Scales of the OathbinderTotem Base - Woedica. On the altar at the Shrine to Woedica.
Used to: Activate passive bonuses when placed at party camp and restored with missing fragments.
Ancient Memories
Ancient Memories appear as small, floating orbs of light and they are located in remote, named places. Discovering one grants one of the passive Godlike Abilities. Each region contains a single Ancient Memory to discover.
Godlike Abilities are unique, powerful skills tied to your character's status as a Godlike. They're split into active and passive ones. You start with one such ability by default, while others unlock through story progression, specific choices, or exploration.
Dream TouchHow to get: Accept The Voice's offer of power in the Strangleroot.
Related main quest: Message from Afar
Type: Active
Cost: 30 Essence
Cooldown: 90 seconds
Effect: Heals and revives all nearby allies and deals damage over time to nearby Delemgan, Dreamthralls, and Vessels.
Godlike's WillHow to get: Reject The Voice's offer of power in the Strangleroot.
Related main quest: Message from Afar
Type: Passive
Effect: Gain a bonus Ability Point to spend in the Fighter, Ranger, or Wizard Ability Trees.
Remembrance of KishamalHow to get: Unlocked after finishing the "The Call of the Past" side quest / Interact with the Ancient Memory (Dawnshore).
Type: Passive
Effect: Increases your Maximum Health by 10%.
Amulets
Amulets are a type of Accessories. They provide unique passive buffs or effects-like stat boosts, damage increases, or utility perks. They share a slot with trinkets and are limited to one equipped at a time.
Enchanted SuolenetIt's an optional reward for completing the "Lost Suoles" side quest. Miteno will offer it to you when you give him suolenets for free.
Effect:
+20% Currency when looting coins
KithwarderBounty Master Aldrich will give it to you when you complete all the bounties in Dawnshore.
Effects:
-3% damage from Kith
+10% damage from other sources
Steel Garrote MedallionIn the Ruinous Cavern. In the upper part of the dungeon, before you jump into the hole.
Effect:
+1 Resolve
White Key CameoIn a chest located in the attic.
Effect:
Restore 50% of your Maximum Health when reviving a Companion.
Trinkets
Trinkets are a type of Accessories. They provide unique passive buffs or effects-like stat boosts, damage increases, or utility perks. They share a slot with amulets and are limited to one equipped at a time.
Night-Mistress' FavorIt's a reward for completing the "A Lady Never Tells" side quest.
Effect:
Slowly regenerate Essence while close to a Companion
Rathun FigurineYou can buy it from the Shantytown Merchant for 750 copper.
Effect:
+10% Fire Damage
The Fantastic AlembicIt's a reward for completing the "Precious Light" side quest.
Effect:
Drinking a potion clears all your Accumulations
Rings
Rings are Accessories worn on the fingers that provide unique passive buffs, such as stat boosts, damage increases, or special effects. Only two rings can be worn at the same time.
Arcanist's RingEffect:
+1 Intellect
Band of Transcendent SufferingUnderwater, at the bottom of the canal.
Effects:
+35% Melee Damage
-100% Damage Reduction
Bitter BondingYou can find it in the muck. You can give it to the Paradis Citizen for free or demand 100 copper.
Effect:
1% of your Attack Damage is restored as Health
Celestial LoopIt's an optional reward for completing the "Lost Suoles" side quest. You will get this if, when you handing over suolenets you first demand to be paid or you hand them over for free and when Miteno, as a token of gratitude, offers you his souolenet, you tell him to keep it.
Effect:
+15% resistance to Fire and Frost Accumulation
Delver's CautionIf you won't give healing potion to Caedmon.
Effects:
+1 Dexterity
+15% Parkour Speed
Delver's CautionIt's a reward for completing the "Dawntreader" side quest.
Effects:
+1 Dexterity
+15% Parkour Speed
Ondra's GraceThe chest is in a niche hidden behind the waterfall.
Effect:
Slowly regenerate Health while wet
Ring of Many StarsIt's a reward for completing all "Mapping" side quests for Sanza.
Effect:
Conjure magical homing projectiles that bounce between targets
Ring of Slow EssenceEffect:
Slowly regenerate Essence
Vindictive BandIt's a reward for completing the "Cabin Fever" side quest.
Effect:
Critical Hits deal Poison Damage.
Wayfarer's RingEffect:
+20% Health and Essence regeneration from Potions and Food
1H Melee Weapons
One-handed Melee Weapons available in Avowed. These include daggers, swords, axes, maces and spears.
Drawn in WinterIt will spawn after you examine the Ancient Memory (Dawnshore).
Type: One-Handed, Axe
Stats:
36 Physical Damage
14 Stun
15 Stamina Cost
6% Critical Hit Chance
Effects:
Power Attacks deal moderate Frost Accumulation to nearby enemies
Hits deal +10% bonus Frost Damage
Weight: 5
Last Light of DayDropped by Sargamis.
Type: One-Handed, Sword
Stats:
32 Physical Damage
10 Stun
11 Stamina Cost
3% Critical Hit Chance
Effects:
Killing an enemy restores 3% of your Maximum Health
Hits deal +10% bonus Fire Damage
Weight: 6
Sheathed in SummerDropped by Octav the Firebrand.
Type: One-Handed, Dagger
Stats:
20 Physical Damage
8 Stun
9 Stamina Cost
9% Critical Hit Chance
Effects:
A Full Combo Attack deals moderate Fire Accumulation
Hits deal +10% bonus Fire Damage
Weight: 3.5
2H Melee Weapons
Two-handed Melee Weapons available in Avowed. These include great swords, great axes and great hammers.
Seven StrivingsType: Two-Handed, Great Axe
Stats:
64 Physical Damage
22 Stun
22 Stamina Cost
6% Critical Hit Chance
Effects:
Killing an enemy gives you +15% Move Speed for 10 seconds
+5% Critical Hit Chance
Weight: 9
The Philosopher's RiddleType: Two-Handed, Great Sword
Stats:
54 Physical Damage
20 Stun
20 Stamina Cost
3% Critical Hit Chance
Effects:
A Full Combo Attack gives you +15% Attack Speed for 10 seconds
Hits deal +10% bonus Poison Damage
Weight: 8.5
Pistols
Pistols are a type of Ranged Weapons. Pistols require only one hand and shoot bullets perfectly straight at medium range, dealing moderately high damage and Stun. However, they have a slow rate of fire and their loud shots easily alert enemies.
Caeroc's PrideDropped by Tempestuous Luandi.
Type: Pistol
Stats:
46 Physical Damage
20 Stun
20 Stamina Cost
3% Critical Hit Chance
Effects:
Power Attacks deal high Shock Accumulation
Hits deal +10% bonus Shock Damage
Weight: 4
The DisappointerCan be bought from Kerdhed "Cutty" Colen for 360 copper.
Type: Pistol
Stats:
35 Physical Damage
20 Stun
20 Stamina Cost
Effects:
-10% Attack Damage
Hits deal +10% bonus Bleed Damage
Weight: 4
Bows
Bows are a type of Ranged Weapons. Bows require both hands and shoot arrows quietly at very long range, dealing moderately high damage. However, arrows will fall over time while moving through the air.
The Long TouchCan be bought from the Merchant for 432 copper.
Stats:
27 Physical Damage
14 Stun
12 Stamina Cost
9% Critical Hit Chance
Effects:
+10% Critical Hit Chance for Power Attacks while Fine Aiming
+5% Damage against enemies with full Health
Weight: 5
Grimoires
Grimoires are a type of Off-Hand Items. They enable a variety of Spells to be cast or unlocked in the Wizard Ability Tree.
Beothel's GrimoireCan be bought from Merylin for 450 copper.
Stats:
-28% Ability Cost
-15% Cooldown
Spells:
Corrosive Siphon (Lv.1)
Arcane Veil (Lv.1)
Parasitic Staff (Lv.1)
Blizzard (Lv.5)
Weight: 3
Shields
Shields are a type of Off-Hand Items. Shields have very high Block Efficiency, meaning they can block with very low Stamina cost.
Beetle's BulwarkType: Shield
Stats:
39 Block Efficiency
20 Stability
95 Parry Efficiency
13 Elemental Resistance
Effects:
While below 75% Maximum Health, a successful Parry summons a Beetle to fight with you
+20% Resistance to Fire Accumulation
Weight: 8
Wind and WaveIn a small cave whose entrance is underwater.
Related treasure map: Captain Henqua's Spoils.
Stats:
39 Block Efficiency
20 Stability
95 Parry Efficiency
13 Elemental Resistance
Effects:
+10% Move Speed
+20% resistance to Frost Accumulation
Weight: 7
Hands
Boots and shoes are a type of Clothing Items which can be placed in the hands slot. They don't provide base damage reduction or upgradeable tiers, focusing instead on passive bonuses like improved stats, movement, or utility effects.
Arcanist's GlovesItem Bonus:
+10% Parkour Speed
Effect:
+20 Maximum Essence
The Hands OccultItem Bonus:
+1% Critical Hit Chance
Effect:
+10% Shock Damage
Wayfarer's GlovesCan be bought from Lynna for 600 copper.
Item Bonus:
-10% Stamina cost while Blocking
Effect:
Power Attacks deal +5% bonus Fire Damage
Feet
Gloves and gauntlets are a type of Clothing Items which can be placed in the feet slot. They don't provide base damage reduction or upgradeable tiers, focusing instead on passive bonuses like improved stats, movement, or utility effects.
Arcanist's BootsIn the chest on top of the lighthouse.
Item Bonus:
Increases your Heath restoration from all sources by 5%
Effect:
+10% Move Speed
Blackwing BootsCan be bought from Kerdhed "Cutty" Colen for 1,500 copper.
Item Bonus:
+10% Dodge Distance
Effect:
+1 Dexterity
Boots of the BricklayerItem Bonus:
+10% Dodge Distance
Effect:
+15 Carry Capacity
Wayfarer's BootsIn the underground. To be able to open the door to the room where the chest is, you must first shoot through the hole in the red barrel standing on the other side, which will destroy the barrier blocking the door.
Item Bonus:
+10% resistance to Poison and Bleed Accumulation
Effect:
Slowly regenerate Health while walking
Armor
Armor Items are essential gear that players equip to their body slot to gain defensive benefits and unique buffs. Armor comes in three weight classes: Light, Medium, and Heavy, each affecting player character's stamina, essence, and stability against enemy attacks differently.
Arcanist's GambesonIn the chest that you will find in the building located within the Yellowband Camp.
Type: Light Armor
Stats:
8% Damage Reduction
8 Additional Damage Reduction
-15 Maximum Stamina
-20 Maximum Essence
Effects:
+15% area of effect damage
+20 Maximum Essence
Weight: 7.2
Blackwing ArmorYou will be able to collect it if you decide to kill Ygwulf.
Type: Light Armor
Stats:
10% Damage Reduction
14 Additional Damage Reduction
-20 Maximum Stamina
-20 Maximum Essence
Effects:
+30% Stealth Attack Damage
+25% Move Speed while crouched
Weight: 8
Many-Hued DoubletCan be bought from Merylin for 500 copper.
Type: Light Armor
Stats:
5% Damage Reduction
5 Additional Damage Reduction
-20 Maximum Stamina
-10 Maximum Essence
Effects:
-15% incoming Fire, Frost, and Shock Damage
Increases your Health restoration from all sources by 15%
Weight: 4
Steel Garrote PlateIn the Ruinous Cavern, in a cave where you fight Nacib.
Type: Heavy Armor
Stats:
30% Damage Reduction
7 Additional Damage Reduction
-50 Maximum Stamina
-50 Maximum Essence
Effects:
When taking damage greater than 25% of your Maximum Health, your attacker receives 50% of the damage
+1 Constitution
Weight: 25
Stelgaer's PrideRelated treasure map: Intimidating Feline Codpiece.
Type: Medium Armor
Stats:
18% Damage Reduction
9 Additional Damage Reduction
-35 Maximum Stamina
-30 Maximum Essence
Effects:
Cast Barbaric Shout when taking damage greater than 30% of your Maximum Health
+5% Stamina regeneration rate
Weight: 18
Wayfarer's ArmorYou can buy it from the Merchant for 500 copper.
Type: Heavy Armor
Stats:
30% Damage Reduction
7 Additional Damage Reduction
-50 Maximum Stamina
-50 Maximum Essence
Effects:
Slowly regenerate Health while below 20% Maximum Health
+10% Movement Speed
Weight: 30
Adra
Adra crystals are used to upgrade unique weapons and armor. There are four types, each linked to a specific region and quality tier: Adra (Fine, Dawnshore), Awakened Adra (Exceptional, Emerald Stair), Corrupted Adra (Superb, Shatterscarp), and Adra Bán (Legendary, Galawain's Tusks+). Unlike common materials that improve gear within a tier, Adra upgrades unique gear between tiers.
Adra (Castol's Folly)Fine Upgrade Material. In a chest standing on a platform.
Adra (Godless Executioner)Fine Upgrade Material. Dropped by the Godless Executioner.
Adra (Marynna)Fine Upgrade Material. Can be bought from Marynna for 625 copper.
Adra (Ralga)Fine Upgrade Material. Dropped by Ralga.
Adra (Runyd's House)Fine Upgrade Material. In a lockbox on the upper floor of the Runyd's House.
Adra (Strangled Adra)Fine Upgrade Material. You will receive it after cleansing the Strangled Adra (Dawnshore).
Adra (Thalla the Taskmaster)Fine Upgrade Material. Dropped by Thalla the Taskmaster.
Adra (The Strangleroot)Fine Upgrade Material. In a soldier's corpse. You can pick it up after the fight with the Dreamthrall Elder Brown Bear.
Adra (Yellowband Camp)Fine Upgrade Material. In the chest that you will find in the building located within the Yellowband Camp.
Adra (Ygwulf)Fine Upgrade Material. You will receive it if you and Ygwulf part on good terms.
Adra x2 (Gweneth)Fine Upgrade Material. Can be bought from Gweneth for 625 copper each.
Adra x2 (Merchant)Fine Upgrade Material. Can be bought from Merchant for 625 copper each.
Adra x2 (Sanza)Fine Upgrade Material. Can be bought from Sanza for 625 copper each.
Awakened Adra x2 (Sanza)It's a reward for completing the second "Mapping" side quest.
Paradisan Ladder
Paradisan Ladder is one of the Materials. It's used to upgrade weapons and armor parts.
Magran's Blessing
Magran's Blessing is a consumable item that temporarily increases Damage and Damage Reduction by 20% for 5 minutes.
Keys
Keys are used to open locked passageways. Sometimes they are only an alternative, as lock picks or a detour can also be used, but sometimes they are the only way to get somewhere.
Storeroom KeyOn the upper level of the tower. You can enter through the window.
Warehouse KeyYou can get this key by convincing Jago the Sea Wolf to let you into the warehouse or by simply killing him.
Ygwulf's Key
Documents
Documents are significant writings that you may find during your travels. The documents are divided into several sections, usually according to the region of their origin.
A History of the Living Lands I: OriginCategory: Lore.
Inside the Eothasian Temple, in a small cave accessible by heading through a low tunnel right past Caedmon.
A History of the Living Lands II: LacunaCategory: Lore.
A History of the Living Lands III: GlossolaliaCategory: Lore.
A History of the Living Lands IV: [REDACTED]Category: Lore.
A History of the Living Lands V: Synthesis (Work in Progress)Category: Lore.
A Very Good FarmerCategory: Lore.
Aedyran DialectsCategory: Lore.
Aedyre CustomsCategory: Lore.
Annals of the PargrunenCategory: Lore.
Assassin's NoteCategory: Paradis.
Book of Verses
Category: Dawnshore.
Inside the Eothasian Temple, in the room behind the shock activated gate.
Charred JournalCategory: Dawnshore.
Claviger's Journal, Final EntryCategory: Paradis.
Claviger's Journal, First EntryCategory: Paradis.
Claviger's Journal, Second EntryCategory: Paradis.
Claviger's Journal, Secret PageCategory: Paradis.
Claviger's Journal, Third EntryCategory: Paradis.
Crumbling Journal
Cryptic LetterCategory: Dawnshore.
Drops from Brentis & Pod.
Daily Affirmations of Focus and EfficiencyCategory: Dawnshore.
Dehengen's JournalCategory: Dawnshore.
Related side quest: Cabin Fever.
Gjeda's JournalRelated side quest: Dawntreader.
Category: Dawnshore.
Glanfathan CustomsCategory: Lore.
Letter from Ygwulf
Letter to KarlódhCategory: Dawnshore.
Inside the Eothasian Temple, in the backpack lying next to the skeleton on the edge.
Letter to the ClavigerCategory: Paradis
Maxims of the Pargrunen IICategory: Lore.
Maxims of the Pargrunen VICategory: Lore.
Missives of the Hand OccultCategory: Lore.
Nothing is Lost: The Search for UkaizoCategory: Lore.
On the Fire-Forged Path: The Travels of Gjaryc YltanCategory: Lore.
Procurement RequestCategory: Dawnshore.
Ritual to the Queen That WasCategory: Lore.
Scorched JournalCategory: Dawnshore.
St. Waidwen: Farmer Become GodCategory: Lore.
The Aedyr Empire, Part 1: OriginCategory: Lore.
The Aedyr Empire, Part 1: OriginCategory: Dawnshore.
The Aedyr Empire, Part 2: Expanding BordersCategory: Lore.
The Cartographer's Guild, Volume 1Category: Lore.
The Collected Annals of LlengrathCategory: Lore.
The Doughty Burglar: A Dyrwoodan Farce, Part 2Category: Lore.
The Dyrwood, Part 5: The Proliferation of AnimancyCategory: Lore.
The Great Western StagCategory: Lore.
The Life and Discoveries of PandgramCategory: Lore.
The Midwife's MemoirsCategory: Lore.
The Saint's War, Part 1: OverthrowCategory: Lore.
The Saint's War, Part 2: InvasionCategory: Lore.
The Sea and Her LoveCategory: Lore.
The Soul Unbound, Chapter 1Category: Lore.
Torn Pargrun Scroll, Part 1Category: Lore.
Torn Pargrun Scroll, Part 2Category: Lore.
True Stories from the Living LandsCategory: Lore.
Well-Worn BookCategory: Lore.
Ygwulf's Log ICategory: Paradis.
Ygwulf's Log IICategory: Paradis.
Ygwulf's Log IIICategory: Paradis.
Ygwulf's Log IVCategory: Paradis.
Notes
Less important, various notes, documents, and the like, which can be found and read.
A Prayer for the Lost Godlike
Aedyran Scouting Log
Ambassador Hylgard's Journal
Animancer's Journal
Artifact Observations
Artist's Journal
Audit of Confiscated Goods
Call to Arms
CAUTION
Clay Tablet
Consecration Prayer
Contrary Letter
Crumbling Gardener's Log
Disgruntled Neighbor's Note
Distance Record
Duty Log, Eastern Gatehouse
Epitaph
Evina's Travel Log
Faded Note
Field Notes
Finder's Letter
Foraging Notes
Fragile Diary
Friendly Warning
Geirmund's Journal
Hazing Note
Incomplete Lecture
Inquisitor's RequestRelated side quest: Dawntreader.
Invitation from the Claviger
Kauia's Journal
Late Payments
Legacy of the Tacan
Letter from Fior mes Ivèrno
Letter To Home
Letter to Inquisitor
Letter to Sargamis
Letter to the Oracle
Lighthouse Plaque
Literacy Lesson
Merchant's Journal
Merchant's Journal
Naasitaq Poetry: A Compilation
Nosy Observations
Note to a Fisherman
Note to the SurvivorIn the Ruinous Cavern. To get there, you have to swim underwater.
On Soul Twins: A Treatise
On the Binding of SoulsRelated side quest: Dawntreader.
On the Provenance and Ruination of Neketaka's 'Old City'
Orders from the Embassy
Orders from the Inquisitor
Priest's Journal
Purification of the Pilgrim
Recently Written Note
Reminder: Source Fresh Lumber
Runyd's Dream Journal
Sales Manifest
Salt-crusted Letter
Sargamis' Journal
Shipment Receipt
Skaenite Prayer
Statue Schematic
Stay Alert!
Steel Garrote Report
Strange Exchange
Suicide Note
Tayn's Diary
Test Your Mettle!
Test Your Mettle!
Test Your Mettle!
Test Your Mettle!
The Cartographer's Guild, Volume 2
The Most Unfortunate Tale of Favia and Bernat: A Vailian Tragedy
Transcript of a Sermon
Trapper's Log
Unsent Letter
Vagrant's Journal
WARNING
Waterlogged Book
Web-covered Journal
Worker's Note
Worn Book
Blocked Passages
A locked or barred doors that can be opened with keys, lockpicks or from a certain side or walls and other obstacles that must be destroyed to get through.
Barred DoorYou will get here through a tunnel, the entrance to which is located in a room with the Splinter of Eothas. You need to break a few vases.
Barred DoorYou can unblock the door from inside the building. You can enter the building through the window.
Barred DoorThey can be unlocked from the south side.
Barred DoorThe door can be unlocked from inside the building and you can get inside through a window on an upper floor.
Warehouse DoorUnlocks with: Warehouse Key or Lockpick x3.
Wooden Barrier
Wooden Barrier
Wooden Barrier
Wooden Barrier
Wooden Barrier
Wooden Barrier
Wooden Barrier
Wooden Barrier
Wooden Barrier
Wooden Barrier
Wooden Barrier
Wooden Barrier
Wooden Barrier
Wooden Barrier
Wooden Barrier
Wooden Barrier
Wooden Barrier
Wooden Barrier
Brambles
Brambles
Brambles
Brambles
BramblesDestroy them to uncover the right essence generator.
Brambles
Brambles
Brambles
BramblesDestroy it to uncover one of the traps needed to open the shock door.
Brambles
Cobweb
Cobweb
Cobweb
Cobweb
Cobweb
Cobweb
Cobweb
CobwebAfter it has been destroyed, you can jump down to a lower level.
Cobweb
Weak Wall
Weak Wall
Weak Wall
Weak Wall
Weak Wall
Weak Wall
Weak Wall
Weak WallDestroy it to uncover the essence generator.
Weak Wall
Shock Door (2)To open it destroy the brambles and then pull the lever.
Shock Door (2)To open it destroy the brambles to uncover one of the traps (so it can shoot) and destroy the weak wall to uncover the second essence generator then pull the lever.
Shock Gate (1)
Shock Gate (1)
Shock Gate (2)
Broken BridgeTo get to the other side, you have to freeze the water.
Freezable Grate
Freezable Grate
Freezable Grate
Containers
Various containers containing different types of loot, e.g. materials, consumables, coins, equipment, etc.
Main Quests are essential for advancing the main story and involve significant events, major characters, access to new regions or companion, etc.
Message from AfarYou will receive this quest automatically when you first arrive to Dawnshore.
Previous main quest: On Strange Shores.
Description: You sailed to the Living Lands in order to deliver an important missive from the emperor of Aedyr. First, make your way into the port city of Paradis, a rugged coastal settlement and home to the Aedyran embassy. Then find the ambassador and complete your task.
An Untimely EndYou will receive this quest automatically when you enter the City of Paradis at the end of the "Message from Afar" main quest.
Previous main quest: Message from Afar.
Description: Before you could deliver your missive from the emperor, a mysterious assailant attacked you in the streets of Paradis. You died... yet you live. With this new lease on life, the time has come to track down the assassin and unravel the mystery of your survival.
The Animancy MethodPrevious main quest: An Untimely End.
Description: Investigating the Dreamscourge has pointed you toward Fior mes Ivèrno, an intellectual haven of animancers. Ambassador Hylgard told you the governor would be a point of contact.
Side Quests
Side quests are optional missions that players can complete alongside the main storyline. They provide extra rewards, such as experience points and unique items.
A Lady Never TellsHow to start: Talk to the Concerned Courtesan.
Description: Giuliana, the proprietress of The Mermaid's Den, believes a local gang - the Sparrowhawks - have stolen her shipment. Since she lacks the authority to contend with them herself, she asked you to find it. She offered to compensate you handsomely for your trouble.
Reward: Night-Mistress' Favor + 300 copper or 700 copper.
Armor Fit for the WildsHow to start: You will receive this quest automatically when you come close to the watermill in Dawnshore.
Description: To survive in the Living Lands, you'll need to scavenge for supplies to upgrade your gear.
Bounty: NacibHow to start: Read the wanted poster pinned to the board.
Description: You've acquired a bounty notice for Nacib, located in her nest beneath Paradis. You must return proof of your kill to Aldrich in Paradis in order to claim your reward.
Related: Nacib.
Reward: 500 copper.
Bounty: Octav the FirebrandHow to start: Read the wanted poster pinned to the board.
Description: You’ve acquired a bounty notice for Octav the Firebrand, located at the Godless ruins northwest of Paradis. You must return proof of your kill to Aldrich in Paradis in order to claim your reward.
Related: Octav the Firebrand.
Reward: 500 copper.
Bounty: RalgaHow to start: Read the wanted poster pinned to the board.
Description: You've acquired a bounty notice for Ralga, located Mercenary Falls. You must return proof of your kill to Aldrich in Paradis in order to claim your reward.
Related: Ralga.
Reward: 500 copper.
Bounty: Tempestuous LuandiHow to start: Read the wanted poster pinned to the board.
Description: You've acquired a bounty notice for Tempestuous Luandi, located at the Ship Graveyard east of the Shantytown. You must return proof of your kill to Aldrich in Paradis in order to claim your reward.
Related: Tempestuous Luandi.
Reward: 500 copper.
Bounty: The YellowbandsHow to start: Read the wanted poster pinned to the board.
Description: You’ve acquired a bounty notice for the Yellowbands located east of Paradis in their camp. You must return proof of your kills to Aldrich in Paradis in order to claim your reward.
Related: The Yellowbands.
Reward: 500 copper.
Cabin FeverHow to start: Talk to Dehengen.
Description: A band of xaurips chased Dehengen, a local settler, out of her home. She asked you to drive them away so that she can return. Curiously, she expressed a desire to consult a Watcher about the problem, which suggests that she believes there may be a supernatural element to the problem.
Related: Dehengen's Cottage, Crude Wall Painting, Dehengen's Journal.
Reward: Vindictive Band (If you convince Dehengen to give her soul twin a chance.)
DawntreaderHow to start: Talk to Ofryc.
Description: An Aedyran expedition went missing while exploring a Temple of Eothas in northern Dawnshore. Ofryc, one of the expedition's scouts, asked you to discover what became of his team - particularly his brother, Caedmon.
Escape PlanHow to start: Talk to Remei Gardiola.
Description: A young couple with a checkered past wants to flee the Aedyran authorities in Paradis to live in Thirdborn. Remei, a friend of the couple, has asked you to procure the supplies they need to survive.
Forged of Star-StuffHow to start: find the first Fragment of Starmetal.
Description: You found a rare piece of starmetal. With the help of a talented smith, maybe it can be worked into something useful.
Lost SuolesHow to start: Talk to Miteno.
Description: Miteno, a former sailor, incurred Hylea's wrath in a terrible accident. Now birds have stolen his deceased crew's suolenets. He would very much like the sentimental treasures returned to him.
Mapping the Living Lands: DawnshoreHow to start: Talk to Sanza. You will receive the "Geirmund's Dispatch" document from him.
Description: Sanza, an excitable cartographer, wants to make a proper map of the Living Lands. He sent his assistant cartographers to each of its known regions, but none of them have returned. He asked you to search for them and bring their findings back.
Related: Geirmund's Map, Sanza.
Reward: 625 copper.
Precious LightHow to start: Talk to Sapiento de Falva.
Description: Sapiento de Falva, an animancer in Paradis, is researching a potion to fortify travelers against the plague afflicting the Living Lands and believes luminous adra may be the key ingredient. After a shipment he paid for failed to make it to shore, he asked you for help sourcing the luminous adra.
Related: Captain Trevik.
Reward: 500 copper (Bardatto) or The Fantastic Alembic + 300 copper (Sapiento.)
The Call of the PastHow to start: You will receive this quest at a certain stage of the game after one of the rests in the party camp.
Description: The voice in your head believes they have lost a fragment of their memory somewhere in Dawnshore. As strange as it seems, you may gain insight into their enigmatic nature if you find it.
Related: Ancient Memory (Dawnshore).
Totem of Rightful RulershipHow to start: Buy the Fragments of the Scales document from Sanza or collect a piece of the Scales of the Oathbinder totem.
Description: You obtained a document containing clues to the whereabouts of pieces of the Scales of the Oathbinder, a powerful artifact and a totem of Woedica. The pieces can be found across Dawnshore - the more pieces you gather and assemble, the more powerful the totem will become.
Quest Items
Quest Items are special items that players must collect, use or deliver as part of a main or side quest.
Geirmund's MapYou will find it on the ground, next to the body of the cartographer's assistant.
Related side quest: Mapping the Living Lands: Dawnshore.
Luminous Adra CrateYou will find it here if you decided to kill Captain Trevik. Otherwise, you will receive it from him.
Related side quest: Precious Light.
Writ of PassageYou will receive it from Stecg when you leave Dawnshore and have spared Ygwulf. It gives you safe passage into resistance areas.
Places of Interest
Crude Wall PaintingRelated side quest: Cabin Fever.
Lift
Narrow PassageIt's a way to the room where the lost expedition is.
Statue of EothasIf you shock all generators powering the statue, it will be destroyed and you will be attacked by Sargamis.
Related side quest: Dawntreader.
Companions are special NPCs that can join your party. Each companion has their own combat skills, unique personalities and story arcs and companion quests to discover and complete.
KaiHe will join you after a conversation with Captain Cynric.
Abilities:
Fire and Ire - Kai fires a powerful shot from his blunderbuss, dealing high Stun to a single enemy and Taunting them for 10 seconds.
Firestarter - Order Kai to burn away webs, brambles or other flammable obstacles.
MariusRecruiting him is part of the main quest "An Untimely End".
Abilities:
Binding Roots - Marius uses his wilderness lore to Root an enemy in place for 8 seconds.
Hunter's Sense - Order Marius to scan for enemies, loot, and plants in the Living Lands.
Merchants
NPC merchants who sell weapons, armor, consumables and materials and also buy loot you don't need.
Other NPCs you may encounter during the game. A properly led conversation with them will end peacefully, but when something goes wrong, for example, if you do not have the right stats, you need to be ready to go into battle.
Brentis & PodYou will be stopped by this couple the first time you try to cross the bridge after you visit the Strangleroot. Poda can be scared off, but Brentis will attack you.
Captain Evina BardattoDepending on how you conduct the conversation with her, your meeting could end peacefully or with a confrontation.
Related side quest: Precious Light.
StecgYou can meet him here when leaving Dawnshore, if you spared Ygwulf. He will give your a Writ of Passage.
YgwulfYou can kill him, or you can part with him peacefully.
Related main quest: An Untimely End.
Strangled Adra
Strangled Adra are large Adra crystals ensnared by vines and thorns. Interacting with these pillars allows players to cleanse them, yielding experience points and Adra material for upgrading gear.
Strangled Adra (Dawnshore)
Boss Fights
Boss Fights are tough battles against powerful enemies with high health and unique abilities, requiring strategic play to overcome.
Dreamthrall Elder Brown Bear
Godless ExecutionerHe will spawn soon after you pick up the Splinter of Eothas.
NacibYou will encounter it in the Ruinous Cavern.
Bounty Target. Related quest: Bounty: Nacib.
Drops:
Nacib's Leg (Trophy)
Thalla the TaskmasterYou will face him when visiting the apothecary during the quest "An Untimely End".
The YellowbandsBounty Targets. Related quest: Bounty: The Yellowbands.
Drop:
Yellow Armband x5 (Trophies)
Fast Travel Beacons
You can fast travel directly to Fast Travel Beacons and Party Camps by interacting with their icons on the map. To be able to do this, you must first unlock them by reaching them on foot.
Administration District Beacon
Claviger's Landing Beacon
Dehengen's Cottage
Eastern Paradis Gate Beacon
Emerald Stair Gatehouse Beacon
Gods' Gate Beacon
High Market Beacon
Northern Farms Beacon
Ondra's Reach Beacon
Paradis Main Gate Beacon
Strangleroot Beacon
Street of the Gods Beacon
Western Pargrun Wall Beacon
Party Camps
Party Camps are temporary hubs set by large Adra stones, which can be found throughout the Living Lands. Setting up camp will fully restore your health and essence. In the camp, you can chat with your companions, change their outfits, upgrade and enchant your equipment, cook, access the stash, and assemble god totems.
You can fast-travel to discovered camps. When leaving a camp, you can choose which two companions who have already joined you will accompany you, and decide whether to exit at the camp's location or return to the place you teleported from.
Ivona's Threshold Party Camp
Overgrown Expanse Party Camp
Southern Embrace Party Camp
The Rise Party Camp
Transitions
Transitions between maps and entrances to dungeons.