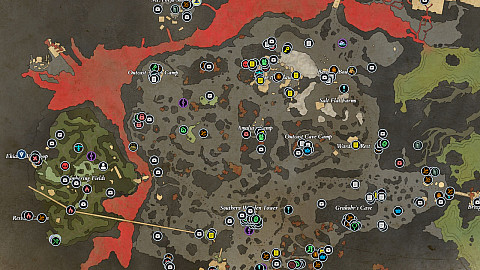
Interactive map of the Galawain's Tusks region and the Solace Keep, which we explore while playing Avowed.
Galawain's Tusks is a hostile, volcanic region deep in the Living Lands and home to Solace, a settlement of Pargrunen dwarves. The Wardens of Solace are fiercely isolationist. Few adventurers travel to Galawain's Tusks, and even fewer leave.
Markers on the map
Treasure Maps3
Totem Parts7
Ancient Memory1
Godlike Abilities3
Amulets2
Trinkets2
Rings8
1H Melee Weapons5
2H Melee Weapons2
Pistol1
Wand1
Arquebuses2
Bow1
Grimoire1
Shields3
Hands6
Feet6
Armor8
Adra18
Admeth's Wyrt45
Magran's Blessing4
Keys11
Documents40
Notes48
Blocked Passages16
Blocked Passages8
Blocked Passages11
Blocked Passages6
Blocked Passages3
Blocked Passages8
Containers118
Locked Containers23
Side Quests14
Quest Items11
Places of interest3
Merchants8
NPCs17
Strangled Adra1
Boss Fights10
Fast Travel Beacons9
Party Camps3
Transitions11
Points of interest
Treasure Maps
Treasure Maps are unique documents that provide clues leading to the location of a hidden treasure.
Ancient ArrowheadCategory: Galawain's Tusks. In a skeleton lying on the ground.
Related treasure:
My Loyal ShieldCategory: Galawain's Tusks. Can be bought from Stockkeeper Eberk for 5,220 copper.
Related treasure: Time's Tarnish (Shield).
The Blade that HungersCategory: Galawain's Tusks. Can be bought from Bulti for 4,032 copper.
Related treasure: Umbral Needle.
Totem Parts
You can place Totems and their missing Fragments at the Totem Shrine in Party Camp. Each Totem is tied to a god from Eora's pantheon and grants powerful effects, but only one can be active at a time.
Antler of the Persevering StagTotem Fragment - Galawain.
Effect:
Quarry to Slaughter: Increases your damage against prone enemies by 75%.
Antler of the Pursued StagTotem Fragment - Galawain.
Effect:
Bloodied Hands: Critical Hits deal high Bleed Accumulation.
Hunter's Arrows of SeekingTotem Fragment - Galawain.
Effect:
In Victory's Raiment: Killing an enemy gives you +4% Damage Reduction for 10 seconds
Hunter's Arrows of SlayingTotem Fragment - Galawain.
Effect:
The Changeling's Power: +2 Might, +2 Constitution.
Hunter's Arrows of SurvivingTotem Fragment - Galawain.
Effect:
On Victory's Heels: Killing an enemy gives you +20% Move Speed for 10 seconds
The Huntmaster's SpoilsTotem Base - Galawain.
Used to: Activate passive bonuses when placed at party camp and restored with missing fragments.
Wolf's Pelt TrophyTotem Fragment - Galawain.
Effect:
Hunting Howl: Second Wind casts Barbaric Shout.
Ancient Memories
Ancient Memories appear as small, floating orbs of light and they are located in remote, named places. Discovering one grants one of the passive Godlike Abilities. Each region contains a single Ancient Memory to discover.
Godlike Abilities are unique, powerful skills tied to your character's status as a Godlike. They're split into active and passive ones. You start with one such ability by default, while others unlock through story progression, specific choices, or exploration.
Godlike's WillHow to get: Reject Sapadal's offer of power at Mt. Forja in Galawain's Tusks. Related main quest: Our Dreams Divide Us Still.
Type: Passive
Effect: Gain a bonus Ability Point to spend in the Fighter, Ranger, or Wizard Ability Trees.
Remembrance of MaruHow to get: Interact with the Ancient Memory (Galawain's Tusks).
Type: Passive
Effect: Increases your Attack Damage by 10%.
Seeds of VengeanceHow to get: Accept Sapadal's offer of power at Mt. Forja in Galawain's Tusks.
Type: Active
Effect: Replaces Dream Touch. Heals and revives all nearby allies and deals damage over time to nearby Delemgan, Dreamthralls, and Vessels. Temporarily turns up to 3 nearby Kith corpses into allied Dreamthralls.
Amulets
Amulets are a type of Accessories. They provide unique passive buffs or effects-like stat boosts, damage increases, or utility perks. They share a slot with trinkets and are limited to one equipped at a time.
StoneheartIt's a reward for completing the "A Cure for Rage" side quest. You have to bring Grakohr the cure.
Effect:
Summons a Ruinous Blight to fight with you.
Trinkets
Trinkets are a type of Accessories. They provide unique passive buffs or effects-like stat boosts, damage increases, or utility perks. They share a slot with amulets and are limited to one equipped at a time.
Pearlescent Icosahedral HelstoneCan be bought from Gilyn for 3,000 copper.
Effect:
+4 Intellect
Rings are Accessories worn on the fingers that provide unique passive buffs, such as stat boosts, damage increases, or special effects. Only two rings can be worn at the same time.
Ashfall's LegacyIt's a reward for completing the "Wardens Warding" side quest.
Effect:
+10% Attack Damage and +20% Critical Hit Damage with pistols and arquebuses
Berserker RingEffect:
+4 Constitution
Dark RebirthEffect:
Reduces the cooldown for Second Wind by 15%
Disciple's RingIt's in a locked chest. Unlocks with: Lockpick x5.
Effect:
+60 Maximum Essence
Gourmand's DelightCan bebought from Chef Kumitru for 3,000 copper.
Effect:
Food restores 40% more Health and Essence
Ring of Greater OverseeingIt's in a locked chest. Unlocks with: Twisted Iron Key or Lockpick x5.
Effect:
+20% area of effect damage
Ring of Major DeflectionEffect:
+5% Damage Reduction
Warden's OathIt's a reward for completing all bounties in Galawain's Tusks.
Effect:
+20% Damage against Beasts and Wilders.
1H Melee Weapons
One-handed Melee Weapons available in Avowed. These include daggers, swords, axes, maces and spears.
BattletranceType: One-Handed, Mace
Stats:
173 Physical Damage
180 Stun
18 Stamina Cost
3% Critical Hit Chance
Effects:
Power Attacks give you +15% Attack Speed for 10 seconds and restore a small amount of Health to you and your Companions
+20% Ability Cast Speed
Weight: 6
Meteor BladeCan be crafted by Forgemaster Dela when you give him one piece of Starmetal.
Type: One-Handed Melee, Sword
Stats:
120 Physical Damage
100 Stun
11 Stamina Cost
3% Critical Hit Chance
Effects:
A Full Combo Attack gives the hit enemy -20% Damage for 15 seconds
Hits deal +10% bonus Frost Damage
Weight: 6
Ondra's OffenseUpgraded version of the Meteor Blade. Need another piece of Starmetal for the upgrade.
Type: One-Handed Melee, Sword
Stats:
141 Physical Damage
110 Stun
11 Stamina Cost
3% Critical Hit Chance
Effects:
A Full Combo Attack gives the hit enemy -20% Damage for 15 seconds
Hits deal +10% bonus Frost Damage
Weight: 6
Sheda Le SubiType: One-Handed, Axe
Stats:
135 Physical Damage
140 Stun
15 Stamina Cost
6% Critical Hit Chance
Effects:
A Full Combo Attack deals low Shock Accumulation to nearby enemies
Hits deal +10% bonus Shock Damage
Weight: 5
Umbral NeedleRelated treasure map: The Blade that Hungers.
Type: One-Handed, Dagger
Stats:
117 Physical Damage
104 Stun
9 Stamina Cost
9% Critical Hit Chance
Effects:
Restore 2% of the damage you deal as Health
+15% Damage against enemies with full Health
Weight: 3.5
2H Melee Weapons
Two-handed Melee Weapons available in Avowed. These include great swords, great axes and great hammers.
Forge's FriendIt could be buggy atm becouse to get here you have to perform a tricky jump (for example jump + charge) to get to the ledge soon after entering the mine.
Type: Two Handed Melee, Hammer
Stats:
333 Physical Damage
351 Stun
25 Stamina Cost
3% Critical Hit Chance
Effects:
Power Attacks deal high Fire Accumulation
Special Attacks summon a Greater Fire Bligh
Weight: 10
Pistols are a type of Ranged Weapons. Pistols require only one hand and shoot bullets perfectly straight at medium range, dealing moderately high damage and Stun. However, they have a slow rate of fire and their loud shots easily alert enemies.
Magic MistolType: Pistol
Stats:
207 Physical Damage
260 Stun
20 Stamina Cost
3% Critical Hit Chance
Effects:
Power Attacks deal very High Stun
Bullets seek and target enemies
Weight: 4
Wands
Wands are a type of Ranged Weapons. Wands require only one hand and cast homing projectiles very quickly at Enemies up to medium range. However, they have low Block Efficiency, incurring a moderately high Stamina cost when Blocking.
Cruel CommandCan be bought from Stockkeeper Eberk for 58,500 copper.
Stats:
99 Physical Damage
104 Stun
12 Stamina Cost
6% Critical Hit Chance
Effects:
Power Attacks deal +75% Stun to enemies with full Health
Hits deal +10% bonus Fire Damage
Weight: 2
Arquebuses
Arquebuses are a type of Ranged Weapons. Arquebuses require both hands and shoot bullets perfectly straight at long range, dealing very high damage and Stun. However, they have a very slow rate of fire and their loud shots easily alert enemies.
HeavenstrikeUpgraded version of the Moonstrike. Need another piece of Starmetal for the upgrade.
Type: Two-Handed Ranged, Arquebus
Stats:
406 Physical Damage
400 Stun
25 Stamina Cost
3% Critical Hit Chance
Effects:
Power Attacks deal moderate Frost Accumulation to nearby enemies
Hits deal +10% bonus Frost Damage
Weight: 7.5
MoonstrikeCan be crafted by Forgemaster Dela when you give him one piece of Starmetal.
Type: Two-Handed Ranged, Arquebus
Stats:
308 Physical Damage
280 Stun
25 Stamina Cost
3% Critical Hit Chance
Effects:
Power Attacks deal moderate Frost Accumulation to nearby enemies
Hits deal +10% bonus Frost Damage
Weight: 7.5
Bows
Bows are a type of Ranged Weapons. Bows require both hands and shoot arrows quietly at very long range, dealing moderately high damage. However, arrows will fall over time while moving through the air.
Ancient AlacrityType: Bow
Stats:
162 Physical Damage
182 Stun
12 Stamina Cost
9% Critical Hit Chance
Effects:
Slows the hit enemy by 15% for 5 seconds
Power Attacks give you +20% Move Speed for 5 seconds
Weight: 5
Grimoires
Grimoires are a type of Off-Hand Items. They enable a variety of Spells to be cast or unlocked in the Wizard Ability Tree.
Shields are a type of Off-Hand Items. Shields have very high Block Efficiency, meaning they can block with very low Stamina cost.
Bastion of SolaceGiven by Mihala at the end of the "Our Dreams Divide Us Still", if you have decided to save the Solace Keep.
Type: Shield
Stats:
91 Block Efficiency
20 Stability
380 Parry Efficiency
50 Elemental Resistance
Effects:
Blocking has a 25% chance to inflict Fire Damage on the attacking enemy
+75% Maximum Health
+50 Maximum Stamina
Weight: 6.5
Sun of Black HeavenType: Shield
Stats:
91 Block Efficiency
20 Stability
380 Parry Efficiency
Effects:
Blocking has a 10% chance to restore 20 Essence
+50 Maximum Essence
Weight: 6.5
Time's TarnishIn the underground, which can be accessed through a secret door.
Type: Shield
Stats:
91 Block Efficiency
20 Stability
380 Parry Efficiency
50 Elemental Resistance
Effects:
Blocking has a 20% chance to refill 20 Stamina
10% chance to avoid melee damage
Weight: 8
Hands
Boots and shoes are a type of Clothing Items which can be placed in the hands slot. They don't provide base damage reduction or upgradeable tiers, focusing instead on passive bonuses like improved stats, movement, or utility effects.
Berserker GlovesItem Bonus:
+10% Ability Cast Speed
Effect:
+15% Power Attack Damage with melee weapons
Death Knight GlovesDropped by Captain Aelfyr.
Item Bonus:
-10% Stamina cost while Blocking
Effect:
+15% Frost Damage
Gauntlets of DevotionCan be bought from Forgemaster Dela for 9,500 copper.
Item Bonus:
-10% Stamina Cost while Blocking
Hits deal +5% bonus Fire Damage
Gloves and gauntlets are a type of Clothing Items which can be placed in the feet slot. They don't provide base damage reduction or upgradeable tiers, focusing instead on passive bonuses like improved stats, movement, or utility effects.
Sentinel BootsItem Bonus:
+15 Maximum Stamina
Effect:
+60 Maximum Health
Shadowdancer's BootsItem Bonus:
Increases your Health restoration from all sources by 5%
Effect:
+40% Dodge Distance
Armor
Armor Items are essential gear that players equip to their body slot to gain defensive benefits and unique buffs. Armor comes in three weight classes: Light, Medium, and Heavy, each affecting player character's stamina, essence, and stability against enemy attacks differently.
Berserker ScaleUnlocks with: Outcast Chest Key.
Type: Medium Armor
Stats:
15% Damage Reduction
53 Additional Damage Reduction
-25 Maximum Stamina
-35 Maximum Essence
Effects:
+25% Damage and +50% Critical Damage while below 30% Maximum Health
+5% Critical hit Chance
Weight: 10
Faith and ConvictionCan be bought from Forgemaster Dela for 81,250 copper.
Type: Heavy Armor
Stats:
30% Damage Reduction
72 Additional Damage Reduction
-50 Maximum Stamina
-50 Maximum Essence
Effects:
Slowly regenerate Essence
You and your Companions receive +4% Damage Reduction
Helwalker's VestmentsType: Light Armor
Stats:
8% Damage Reduction
52 Additional Damage Reduction
-15 Maximum Stamina
-20 Maximum Essence
Effects:
+25% Melee Damage
-50% Damage Reduction
+50% Critical hit Damage with melee weapons
Weight: 7.2
Lava-Forged PlateType: Heavy Armor
Stats:
25% Damage Reduction
72 Additional Damage Reduction
-45 Maximum Stamina
-45 Maximum Essence
Effects:
Taking melee damage deals Fire Damage to nearby enemies
+45% resistance to Fire Accumulation
Weight: 22
Sentinel MailType: Medium Armor
Stats:
20% Damage Reduction
59 Additional Damage Reduction
-35 Maximum Stamina
-35 Maximum Essence
Effects:
-30% incoming Fire, Frost, and Shock Damage
10% chance to avoid ranged damage
Sky Mother's EmbraceType: Medium Armor
Stats:
20% Damage Reduction
71 Additional Damage Reduction
-35 Maximum Stamina
-35 Maximum Essence
Effects:
+3% Damage Reduction
+20% Move Speed
Weight: 15
Threads of the FaithfulCan be bought from Merchant Alonya for 81,250 copper.
Tyle: Light Armor
Stats:
10% Damage Reduction
70 Additional Damage Reduction
-20 Maximum Stamina
-20 Maximum Essence
Effects:
You and your Companions slowly regenerate up to 50% Maximum Health
You and your Companions deal +10% Damage
Weight: 6
Adra
Adra crystals are used to upgrade unique weapons and armor. There are four types, each linked to a specific region and quality tier: Adra (Fine, Dawnshore), Awakened Adra (Exceptional, Emerald Stair), Corrupted Adra (Superb, Shatterscarp), and Adra Bán (Legendary, Galawain's Tusks+). Unlike common materials that improve gear within a tier, Adra upgrades unique gear between tiers.
Adra Ban
Adra Ban
Adra Ban
Adra Ban
Adra Ban
Adra Ban (Congasar)
Adra Ban (Lava Tubes)
Adra Ban (Lava Tubes)
Adra Ban (Lava Tubes)Unlocks with: Lockpick x5.
Adra Ban (Mizuravul)
Adra Ban x2
Adra Ban x2
Adra Ban x2
Adra Ban x2 (Gilyn)
Corrupted Adra
Corrupted AdraSuperb Upgrade Material.
Corrupted AdraSuperb Upgrade Material.
Corrupted AdraSuperb Upgrade Material.
Magran's Blessing
Magran's Blessing is a consumable item that temporarily increases Damage and Damage Reduction by 20% for 5 minutes.
Keys
Keys are used to open locked passageways. Sometimes they are only an alternative, as lock picks or a detour can also be used, but sometimes they are the only way to get somewhere.
Aedyran Supply Cache Key
Ash Forest Outpost Jail KeyYou can get it from Liviu if you convince her to give it to you, or you will have to kill her.
Bent Farmhouse Key
Living Archives Courtyard Key
Outcast Chest Key
Petru's Key
Polished Key
Prison Tower Key
Razvan's Key
Storage Room Key
Twisted Iron Key
Documents
Documents are significant writings that you may find during your travels. The documents are divided into several sections, usually according to the region of their origin.
10 Years of DawnCategory: Lore
Bounty: Urvolnau
Charred Leather TomeCategory: Lore
Common Ailments Among the Denizens of Galawain's TusksCategory: Galawain's Tusks
Diary EntryIn a room on the upper floor.
Category: Galawain's Tusks
Diary of an AnimancerCategory: Galawain's Tusks
Excerpts from the Sermon of StruggleCategory: Lore
Rust-Stained Map of Galawain's TusksCategory: Galawain's Tusks
The Blacksmith Knights: A Short History of the Knights of the CrucibleCategory: Lore
The Soul Unbound, Chapter 20Category:
Water-stained NotebookCategory: Galawain's Tusks
Writings of Soreena ICategory: Lore
Writings of Soreena IICategory: Lore
Writings of Soreena IIICategory: Lore
Writings of Soreena IVCategory: Lore
Writings of Soreena VCategory: Lore
Notes
Less important, various notes, documents, and the like, which can be found and read.
A Child's Note of Warning
A collection of papers
A Letter Home
An Account of Stock
Beadle: A how-to
Bill of Goods Sold to Wardens
Bill of Goods Sold to Wardens
Bill of Goods Sold to Wardens
Bill of Goods Sold to Wardens
Broken Fragment of an Ekidan Tablet
Climber's Journal
Crumpled Letter
Delusional Report
Diary of a Merchant
Diary of an Animancer
Drafted Letter
Dreamthrall Notes on Captivity
Elder Grigore's Notes
Engraved Stone
Explorer's note
Faded Letter
Faded Worker Log
Forgemaster's Orders
Fragment of an Ekidan Tablet
Handwritten Notes
Help Wanted - Repair the Godless Aqueducts
Letter from Kostya to Lödwyn
Marynna's journal
Meditations on the Garden
Meditations on the Garden
Monk's Journal
Moulder Lung Observations - Final Entry
Mushroom Farm Manifest
Paper Scrap
Scrapped Plans
Singed Journal
Steel Garrote Journal
Tayn's Confession
Tear-Stained Note
The Establishment of Solace, Vol. 10
The Soreenian Proclamations
Torn Page from a Journal
Torn Pargrun Note
Two Records of Supplies
Unfinished PoetryIn a room on the upper floor.
Warden's Plea
Woedican Prayer
Xaurip Movements
Blocked Passages
A locked or barred doors that can be opened with keys, lockpicks or from a certain side or walls and other obstacles that must be destroyed to get through.
Barred DoorThe door can be opened from the inside and the first way to enter the building is through the hole in the roof.
Barred DoorThey can be unlocked from the courtyard.
Barred GateIt can be unlocked from the south side.
Various containers containing different types of loot, e.g. materials, consumables, coins, equipment, etc.
Locked Containers
Locked ChestUnlocks with: Lockpick x3.
Locked ChestUnlocks with: Lockpick x3.
Locked ChestUnlocks with: Polished Key or Lockpick x5.
Locked ChestUnlocks with: Lockpick x3.
Locked ChestUnlocks with: Lockpick x3.
Locked ChestUnlocks with: Lockpick x1.
Locked ChestIn a locked room on the upper floor.
Unlocks with: Lockpick x3.
Locked ChestUnlocks with: Lockpick x5.
Locked ChestUnlocks with: Lockpick x5.
Locked ChestUnlocks with: Mihala's Key.
Locked ChestUnlocks with: Lockpick x3.
Locked ChestUnlocks with: Lockpick x5.
Locked LockboxUnlocks with: Lockpick x3.
Locked LockboxUnlocks with: Lockpick x3.
Locked LockboxUnlocks with: Lockpick x1.
Locked LockboxUnlocks with: Lockpick x3.
Locked LockboxUnlocks with: Lockpick x3.
Locked LockboxUnlocks with: Lockpick x3.
Locked LockboxUnlocks with: Lockbox x1.
Locked LockboxUnlocks with: Lockpick x1.
Locked LockboxUnlocks with: Lockpick x5.
Locked LockboxUnlocks with: Lockpick x3.
Locked LockboxUnlocks with: Lockpick x1.
Side Quests
Side quests are optional missions that players can complete alongside the main storyline. They provide extra rewards, such as experience points and unique items.
A Cure for RageHow to start: Talk to Warden Lerae.
Description: An Aedyran caravan entered Galawain's Tusks bound for Solace Keep, but never reached its destination.
A Home for OutcastsHow to start: Talk to the Pargrun Outcast.
Description: A farm in Galawain's Tusks has been overrun with xaurips who fled from the North. A scout representing a group of Pargrunen outcasts asked you to clear out the farm so they can use it as a home.
Reward: 1,800 copper.
Boundaries of AntiquityHow to start: Talk to Chief Engineer Gabral.
Description: Gabral, Solace's Chief Engineer, sent an expedition to restore old Godless aqueducts to send water to the people of Solace. The expedition has gone missing. Find them.
Bounty: Beetle MatriarchHow to start: Read the wanted poster pinned to the board.
Reward: 1,800 copper.
Bounty: Congasar and CrustaHow to start: Read the wanted poster pinned to the board.
Reward: 1,800 copper.
Bounty: DestulHow to start: Read the wanted poster pinned to the board.
Reward: 1,800 copper.
Bounty: The SporekingHow to start: Read the wanted poster pinned to the board.
Reward: 1,800 copper.
Bounty: UrvolnauHow to start: Read the wanted poster pinned to the board.
Reward: 1,800 copper.
Chorus of the LostCompanion Quest - Marius.
How to get: You can start this quest by talking to Marius in the camp shortly after arriving in Galawain's Tusks, once you have visited the Bridge to the Garden.
Description: Marius has unresolved history from his childhood growing up in Galawain's Tusks. Visiting what remains of his old village might help resolve those issues.
HomecomingHow to start: Talk to Captain Geofri.
Description: Petru, the Warden Captain, has disappeared under suspicious circumstances.
Keep History Alive
Mapping the Living Lands: Galawain's Tusks
Totem of PerseveranceHow to start: Buy the Fragments of the Spoils document from Quartermaster Yorgu or collect a piece of the Huntmaster's Spoils totem.
Description: You obtained a document containing clues to the whereabouts of pieces of the Huntmaster's Spoils, a powerful artifact and a totem of Galawain. The pieces can be found across Galawain's Tusks - the more pieces you gather and assemble, the more powerful the totem will become.
Wardens WardingHow to start: Talk to Warden Radut.
Quest Items
Quest Items are special items that players must collect, use or deliver as part of a main or side quest.
Other NPCs you may encounter during the game. A properly led conversation with them will end peacefully, but when something goes wrong, for example, if you do not have the right stats, you need to be ready to go into battle.
Strangled Adra are large Adra crystals ensnared by vines and thorns. Interacting with these pillars allows players to cleanse them, yielding experience points and Adra material for upgrading gear.
Strangled Adra (Galawain's Tusks)
Boss Fights
Boss Fights are tough battles against powerful enemies with high health and unique abilities, requiring strategic play to overcome.
Borodin
Captain Aelfyr
Congasar & Crusta
Inquisitor Lödwyn
Mater Mare
Mizuravul
Revenant / Destul
Sibelius
The Sporeking
Urvolnau
Fast Travel Beacons
You can fast travel directly to Fast Travel Beacons and Party Camps by interacting with their icons on the map. To be able to do this, you must first unlock them by reaching them on foot.
Ash Forest Beacon
Lost Village Beacon
Path to Garden BeaconYou will be able to get here once you made the necessary progress in the main storyline of the game.
Primordial Depths North Beacon
Primordial Depths South Beacon
Quarry Beacon
Slumbering Fields Beacon
Twinedwood North Beacon
Twinedwood South Beacon
Party Camps
Party Camps are temporary hubs set by large Adra stones, which can be found throughout the Living Lands. Setting up camp will fully restore your health and essence. In the camp, you can chat with your companions, change their outfits, upgrade and enchant your equipment, cook, access the stash, and assemble god totems.
You can fast-travel to discovered camps. When leaving a camp, you can choose which two companions who have already joined you will accompany you, and decide whether to exit at the camp's location or return to the place you teleported from.
Primordial Depths Party Camp
Sallow Steppe Party Camp
Solace Keep Party Camp
Transitions
Transitions between maps and entrances to dungeons.