Welcome to guides4gamers.com

Neketaka, The Gullet, Pillars of Eternity II: Deadfire Map

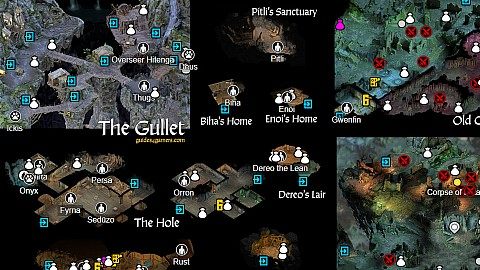
Map of The Gullet district in the city of Neketaka and its sub-zones such as The Hole, Delvers' Row, Undercroft, Old City, Old City Overlook, Old City Ruins, Biha's Home, Enoi's Home, Pitli's Sanctuary, Thelys' Home or Dereo's Lair.

Colloquially called the Gullet, the slums of Neketaka are home to both the Roparu caste of the city's Huana as well as myriad colorful and unsavory figures. Built in a great chasm at the heart of Neketaka, it is where much of the city's refuse, literal and figurative, comes to rest.

Neketaka, The Gullet

Neketaka, The Gullet - Map Markers Summary

Quest Items x2, Levers, Switches, etc. x4, Pets x4, NPCs x21, Locked / Secret Passages x7, Enemies x19, Enemies x7, Hidden Objects x10, Loot x97, Herb, etc. x1, Transitions x31, Transitions x2, Other x2

Quests that begin on this map

An alphabetical list of quests that begin on this map.

Legend / Points of interest

The following legend of Neketaka, The Gullet interactive game map defines the points of interest / markers displayed on the map. Each marker corresponds to a specific element to facilitate efficient navigation and interaction with the map.

Icon of Other Corpse of Botaro Related quests: All Aboard, The Lantern of Gaun.
Icon of Other Mosaic Related quests: The Cornett's Call.

Quest Items

Items needed to complete the quests.

Icon of Quest Item Cornett of Depths It's in the pool, you have to dive here. You can find here Cornett of Depths. When you find it, you will be attacked by 2 x Skeletal Warrior + Skeletal Sorcerer + 2 x Skeletal Brigand.Related quests: The Cornett's Call.
Icon of Quest Item Modwyr Talking sword. Take it to Yngfrith in Dunnage.

Levers, Switches, etc.

Levers, switches and other devices that activate secret doors, etc.

Icon of Locked / Secret Hand of Statue If you have Cornett of Waves then you can use it to open a nearby secret door.Related quests: The Cornett's Call.
Icon of Locked / Secret Lever (Hidden)
Icon of Locked / Secret Statue of a Woman Examine her arm. You need Cornett of Waves to use it. It will open a nearby door.
Icon of Locked / Secret Switch (Hidden)

Pets

Pets, unique friendly, non-combat creatures. They boost your team stats in a certain way and only one pet can be active at any given time.

Icon of Pet Algol Stray Dog. -20% Constitution afflicion duration. Party Members regain some health when they kill an enemy.
Icon of Pet Deus +1 Constitution. You party members regain some health when they kill an enemy.
Icon of Pet Ickis Forsaken Cat. + 3 all Defenses against Body Affliction / Mind Affliction attacks. Your party has bonus defense against Poison and Disease attacks.
Icon of Pet Onyx +1 Perception. Your party receives enhanced defenses against attacks that apply a disease.

NPCs

You can talk to them, sometimes you can buy something from them or sell them something. It may happen that as a result of a conversation or your actions, they will become aggressive towards you.

Icon of NPC Biha Related quests: All Aboard.
Icon of NPC Birta She can join your crew (450 copper).
Icon of NPC Captain Mad Morena Related quests: Food for Thought, Goods and Services.
Icon of NPC Dereo the Lean Related quests: The Cornett's Call, Trade Secrets.
Icon of NPC Enarat Trader: Armor (Fine and Exceptional), Consumables, Food and Drink, Other, IngredientsRelated quests: Trade Secrets.
Icon of NPC Enoi Related quests: Delver's Row, Food for Thought.
Icon of NPC Ernezzo Trader: Weapons: The Red Hand (exceptional arquebus), Armor: Garari Cuirass (legendary light armor), Consumables, Lockpicks, Ingredients.Related quests: Trade Secrets.
Icon of NPC Fyrna TraderRelated quests: Delver's Row.
Icon of NPC Gwenfin Related quests: The Cornett's Call.
Icon of NPC Imuani Trader: Weapons (Fine), Armor (Fine), Clothing: Rekvu's Fractured Casque (head, grants Immortal Will), The Undying Burden (waist).
Icon of NPC Lone Survivor
Icon of NPC Orron Related quests: All Aboard.
Icon of NPC Overseer Hitenga Related quests: All Aboard.
Icon of NPC Persa Related quests: A Sinking Feeling.
Icon of NPC Pitli Related quests: Food for Thought, Harsh Medicine.
Icon of NPC Rust
Icon of NPC Sedūzo Related quests: All Aboard, Delver's Row.
Icon of NPC Street Merchant Trader: Consumables, Ingredients.
Icon of NPC The Spindle Man Trader: Weapons (Spindle Man's Grimoire, Fine magic weapons), Armor (Fine Robe), Clothing (Sisyfo's Stone, Mortification Bindings, Rotward Amulet, Ring of Regeneration, Whitewitch Mask), Consumables.
Icon of NPC Thugs Thug + Bruiser + Brawler + Cutthroat. They will show up here after visiting The Hole. Pay them if you want to avoid the fight.
Icon of NPC Thugs To go further you need a permit from Dereo (The Cornett's Call quest). You can also kill them.

Locked / Secret Passages

Secret passages, locked doors, etc.

Icon of Locked / Secret Locked Door
Icon of Locked / Secret Locked Door Lock level 3.
Icon of Locked / Secret Locked Door Use hidden lever on the wall to open it.
Icon of Locked / Secret Locked Door
Icon of Locked / Secret Locked Door (Stealing) Lock level 8.
Icon of Locked / Secret Locked Gate (Stealing) Lock level 5.
Icon of Locked / Secret The Carving You need both Cornett of Waves and Cornett of Depths to open it.

Enemies

NPCs, monsters, etc. who will be aggressive towards you as soon as they see you.

Icon of Enemy Blights Greater Earth Blight + 2 x Earth Blight + Lesser Easth Blight + Flame Blight + Lesser Flame Blight.
Icon of Enemy Boars Giant Boar + 4 x Boar + 2 x Young Boar.
Icon of Enemy Breater Earth Blights 2 x Breater Earth Blight.
Icon of Enemy Cave Grubs 2 x Cave Grub + 2 x Cave Grubling.
Icon of Enemy Cave Grubs 2 x Cave Grub + 3 x Cave Grubling + 2 x Grub Burrow.
Icon of Enemy Giant Cave Grub
Icon of Enemy Guls Dragul + Gul.
Icon of Enemy Guls Dragul + 2 x Gul.
Icon of Enemy Mad Harvester Mad Harvester + 2 x Rabid Corpse-Eater.
Icon of Enemy Pestilent Rotghast
Icon of Enemy Rotghasts 2 x Pestilent Rotghast + Rotghast.
Icon of Enemy Shades Shade + 3 x Shadow + Skeletal Archer.
Icon of Enemy Skuldraks Skulldrak + Skulldrak Screecher + 2 x Grub Burrow.
Icon of Enemy Skulldrak
Icon of Enemy Skulldrak Skulldrak + 2 x Cave Bat.
Icon of Enemy Skulldraks Skuldrak Screecher + Cave Bat.
Icon of Enemy Wraith Wraith + Phantom + 2 x Shadows
Icon of Enemy Essence Battery
Icon of Enemy Sigil of Darkness
Icon of Enemy Sigil of Nightmares

Hidden Objects

Hidden interactive objects containing more or less valuable items that you can take.

Icon of Loot Book (Stealing)
Icon of Loot Bookcase (Stealing) Ring of Regeneration.
Icon of Loot Papers (Stealing)
Icon of Loot Rubble Fine Hatchet.
Icon of Loot Rubble
Icon of Loot Rubble
Icon of Loot Rubble
Icon of Loot Rubble
Icon of Loot Rubble Ring of Minor Protection.
Icon of Loot Wooden Post

Loot

Different interactive objects containing more or less valuable items that you can take

Icon of Loot Altar
Icon of Loot Armoire (Stealing)
Icon of Loot Barrel
Icon of Loot Barrel
Icon of Loot Barrel
Icon of Loot Barrel
Icon of Loot Barrel
Icon of Loot Barrel (Stealing)
Icon of Loot Basket (Stealing)
Icon of Loot Bookcase (Stealing)
Icon of Loot Box
Icon of Loot Cabinet
Icon of Loot Cabinet (Stealing)
Icon of Loot Chest
Icon of Loot Chest
Icon of Loot Chest
Icon of Loot Chest
Icon of Loot Chest (Stealing) Fine Leather Armor.
Icon of Loot Chest (Stealing)
Icon of Loot Closet
Icon of Loot Corpse
Icon of Loot Corpse
Icon of Loot Corpse
Icon of Loot Corpse
Icon of Loot Corpse
Icon of Loot Corpse
Icon of Loot Corpse
Icon of Loot Corpse
Icon of Loot Corpse
Icon of Loot Corpse
Icon of Loot Corpse
Icon of Loot Corpse
Icon of Loot Corpse
Icon of Loot Corpse Min's Fortune (exceptional one-handed sabre), Hastily Scrawled Note. After looting you will be attacked Guls, Rotghasts, Darguls and Reeking-Horror (drops Mewnan's Broad Belt, +2 Athletics).
Icon of Loot Corpse
Icon of Loot Corpse
Icon of Loot Crate
Icon of Loot Crate
Icon of Loot Crate
Icon of Loot Crate
Icon of Loot Crate
Icon of Loot Crate (Stealing)
Icon of Loot Garbage
Icon of Loot Locked Chest Lock level 3.
Icon of Loot Locked Chest Lock level 8.
Icon of Loot Locked Chest Lock level 10.
Icon of Loot Locked Chest Lock level 5.
Icon of Loot Locked Chest Lock level 6.
Icon of Loot Locked Chest (Stealing) Lock level 3.
Icon of Loot Locked Chest (Stealing) Lock level 4.
Icon of Loot Locked Chest (Stealing) Lock level 2. Fine Breastplate.
Icon of Loot Locked Chest (Stealing) Lock level 10. Whitewitch Mask (head).
Icon of Loot Locked Chest (Stealing) Lock level 5. Obsidian Lamp Figurine.
Icon of Loot Locked Chest (Stealing) Fine Rapier, Fine Scale Armor.
Icon of Loot Locked Chest (Trap) (Stealing) Lock level 9.
Icon of Loot Locked Chest (Trap) (Stealing) Lock level 8.
Icon of Loot Locked Sarcophagus (Trap) Lock level 7. Cadhu Scalth (exceptional large shield).
Icon of Loot Rubble
Icon of Loot Rubble
Icon of Loot Rubble
Icon of Loot Rubble
Icon of Loot Rubble
Icon of Loot Rubble
Icon of Loot Sarcophagus Wahai Pōraga (exceptional pollaxe).
Icon of Loot Table
Icon of Loot Table
Icon of Loot Table (Stealing)
Icon of Loot Urn
Icon of Loot Urn
Icon of Loot Urn
Icon of Loot Urn
Icon of Loot Urn
Icon of Loot Urn
Icon of Loot Urn
Icon of Loot Urn
Icon of Loot Urn
Icon of Loot Urn
Icon of Loot Urn (Stealing)
Icon of Loot Weapon Rack (Stealing) Fine Morning Star.
Icon of Loot Weapon Rack (Stealing)

Herbs, etc.

Icon of Loot Ink Harp

Transitions

Places, where you can go to other locations or other maps.

Icon of Transition Biha's Home
Icon of Transition Enoi's Home
Icon of Transition Pitli's Sanctuary
Icon of Transition The Hole
Icon of Transition The Narrows To Delvers' Row or Dereo's Lair. Delvers' Row: Right, Forward, Inspect the merchant stall, Go through the curtain behind the merchant stall, Deal with bandits.Related quests: Delver's Row.
Icon of Transition Thelys' Home
Icon of Transition To City Map Use it to unlock The Brass Citadel and The Sacred Stair.
Icon of Transition To City Map
Icon of Transition To Delver's Row
Icon of Transition To Dereo's Hideout / The Gullet To Dereo's Hideout: Explore the Narrows, Right, Left, Left.
Icon of Transition To Old City
Icon of Transition To Old City Overlook All Aboard quest will be added to your journal when you reach this place for the first time. You have to talk to Overseer Hitenga if you want to use it.Related quests: All Aboard.
Icon of Transition To Old City Overlook
Icon of Transition To Old City Ruins
Icon of Transition To Queen's Berth
Icon of Transition To The Gullet
Icon of Transition To The Gullet The elevator will stay here for a few hours and then it will not be available.
Icon of Transition To The Gullet
Icon of Transition To The Gullet (Balcony)
Icon of Transition To The Hole
Icon of Transition To The Hole - Upper Floor
Icon of Transition To The Narrows
Icon of Transition To Undercroft
Icon of Transition To Undercroft Related quests: Trade Secrets.
Icon of Transition Rope You can use it to get to the other side.