Map of Fort Deadlight and its sub-zones such as Deadlight Dungeon, Deadlight Court, Deadlight Donjon a.k.a. Command and Secret Dock. You must visit this place if you want to complete Blow the Man Down quest.
Fort Deadlight
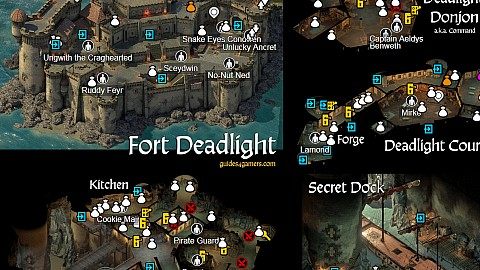
Markers on the map
- Quest Items3
- Levers, Switches, etc.5
- Key1
- Locked / Secret Passages13
- NPCs16
- Hidden Object1
- Loot67
- Enemies7
- Transitions25
- Transitions2
- Other5
Points of interest
Quest Items
Items needed to complete the quests.
Levers, Switches, etc.
Levers, switches and other devices that activate hidden doors, etc.
Keys
Keys that you can use to open closed doorways, chests, etc.
Locked / Secret Passages
Secret passages, locked doors, etc.
NPCs
You can talk to them, sometimes you can buy something from them or sell them something. It may happen that as a result of a conversation or your actions, they will become aggressive towards you.
Hidden Objects
Hidden interactive objects containing more or less valuable items that you can take.
Loot
Different interactive objects containing more or less valuable items that you can take.
Enemies
NPCs, monsters, etc. who will be aggressive towards you as soon as they see you.
Transitions
Places, where you can go to other locations or other maps.