Welcome to guides4gamers.com

Harbingers' Watch, Pillars of Eternity II: Deadfire Map

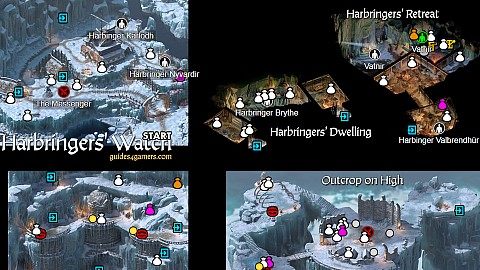
Map of Harbingers' Watch and its sub-zones such as Harbingers' Dwelling, Harbingers' Retreat, Outcrop on High, The Rimebound Temple, Temple of Decline, Rimebound Temple, The Shattered Passage, The Bridge Ablaze, The Endless Queries, The Drowned Kingdom, The Sunken Crown, Neriscyrlas' Lair or The White Void.

This location was added to the game in the first DLC called The Beast of Winter.

Harbingers' Watch

Harbingers' Watch - Map Markers Summary

Companion x1, Locked / Secret Passages x4, Levers, Switches, etc. x9, Pets x2, Quest Items x5, NPCs x27, Loot x68, Hidden Objects x17, Enemies x28, Enemies x3, Frozen Corpses x13, Transitions x45, Transitions x20, Traps x21, Other x12

Quests that begin on this map

An alphabetical list of quests that begin on this map.

Legend / Points of interest

The following legend of Harbingers' Watch interactive game map defines the points of interest / markers displayed on the map. Each marker corresponds to a specific element to facilitate efficient navigation and interaction with the map.

Icon of Other Beam of Light To be able to use it you need Waidwen's Sundial from Waidwen. Use it to activate the Panel.
Icon of Other Beam of Light To be able to use it you need Waidwen's Sundial from Waidwen. Use it to bring up the bridge to the nearby rock. When you do it, you will be attacked by 3 x Shambling Soul.
Icon of Other Beam of Light To be able to use it you need Waidwen's Sundial from Waidwen. Use it to create the brige which will allow you to reach a nearby chest.
Icon of Other Godhammer Bomb To uncover it you have to bring the Memory of Magranite Incantations to the Priest. You can try to pull out the soul without detonating the bomb.
Icon of Other Pool #1
Icon of Other Pool #2
Icon of Other Pool #3
Icon of Other Pool #4
Icon of Other Pool #5
Icon of Other Pool #6
Icon of Other Starting point
Icon of Other Sunken Temple Pool I'm not sure but I think that to remove water from here the water level in Pools #1 and #4 should be high.

Companions

List of NPCs you can invite to your team.

Icon of Companion Vatnir He will be here after you defeat The Messenger. He will give you Vatnir's Icepick required to climb .... You can convince him to join your team: Priest or Celebrant (Priest + Chanter) or Zealot (Priest + Rogue).Related quests: An Honored Guest, To Rise and Decline.

Locked / Secret Passages

Secret passages, locked doors, etc.

Icon of Locked / Secret Secret Door To open it you should use the Skull (Hidden).
Icon of Locked / Secret Secret Door You can use a nearby lever to open it. Pilgrim Ehrys will open it, if you let her convert into construct - The Last Pilgrimage quest.
Icon of Locked / Secret Tower Door You can unlock it with Evon Dewr Tower Key which drops from the Burning Soldier.

Levers, Switches, etc.

Levers, switches and other devices that activate hidden doors, etc.

Icon of Locked / Secret Brick (Hidden) It opens a nearby secret door.
Icon of Locked / Secret Panel To make it active you have to use Beam of Light. Use it to lower the water level and get access to the Chest.
Icon of Locked / Secret Panel With this panel you change the water level in the pool #5.
Icon of Locked / Secret Panel With this panel you change the water level in the pools #1 and #2.
Icon of Locked / Secret Panel With this panel you change the water level in the pool #6.
Icon of Locked / Secret Panel With this panel you change the water level in the pools #3 and #4.
Icon of Locked / Secret Panel With this panel you change the water level in the pool #4.
Icon of Locked / Secret Pedestal Use it to remove the water blocking access to the portal to The Drowned Kingdom.
Icon of Locked / Secret Skull (Hidden)

Pets

Pets, unique friendly, non-combat creatures. They boost your team stats in a certain way and only one pet can be active at any given time.

Icon of Pet Fjord +1 Constitution. Party deals additional Frost Damage with each melee attack.
Icon of Pet Frosty +1 Freeze Armor Rating. The party's Freeze attacks benefit from improved Accuracy. It's in the cheast sealed by ice. You can open it with Glacierbane / Prybar / Fire Ability / Might.

Quest Items

Items needed to complete the quests.

Icon of Quest Item Eye of Rymrgand The imp. Pay him 20.000 or give him the Stone Idol in exchange (10 bluff) or kill him and 3 x Rime Construct.
Icon of Quest Item Memory of Magranite Incantations Related quests: The Bridge Ablaze.
Icon of Quest Item Memory of Magranite Incantations It's in the barrel.Related quests: The Bridge Ablaze.
Icon of Quest Item Rime Construct Fluid Damaged Rime Construct. Investigate the leak. He will attack you.Related quests: Toasting the Dead.
Icon of Quest Item Stone Idol It's in the hidden chest (16+ perception).

NPCs

You can talk to them, sometimes you can buy something from them or sell them something. It may happen that as a result of a conversation or your actions, they will become aggressive towards you.

Icon of NPC Beast of Winter
Icon of NPC Frightened Aumaua After a short conversation, the Soul Collector will come and they will turn hostile.
Icon of NPC Glamfellen Soul You can get from her the Frostfall (superb, one-handed mace).
Icon of NPC Harbinger Brythe Related quests: The Higher-Ups, The Last Pilgrimage.
Icon of NPC Harbinger Karlódh Trader: Food and Drink.
Icon of NPC Harbinger Nyvardir Trader: Alcohol drinks. Complete his quest to receive Finality's Claim (ring, 25% Chance to Reflect against Acid / Disease / Frost / Wind attacks).Related quests: Toasting the Dead.
Icon of NPC Harbinger Valbrendhür Trader: Food and Drink, Other. Rooms, Recruit Adventurers, etc.
Icon of NPC King Wingauro o Watūri I Related quests: The Drowned Kingdom.
Icon of NPC Kuaru Spirit He can create the bridge for you which will allow you to reach the nearby portal.
Icon of NPC Neriscyrlas Related quests: Death's Depthless Dominion.
Icon of NPC Pilgrim Ehrys You need 8 Religion or 10 Insight then 15 Religion or 14 Diplomacy if you want to convince her to go back to the village.Related quests: The Last Pilgrimage.
Icon of NPC Priest Related quests: The Bridge Ablaze.
Icon of NPC Shackled Soul You will receive Betrayal. Bring her three motes of Conviction / Hostility / Regret.Related quests: The Endless Queries.
Icon of NPC Vatnir Related quests: An Honored Guest.
Icon of NPC Waidwen After you talk to him you will be teleported to the Moment After and you will receive Waidwen's Sundial.Related quests: The Bridge Ablaze.
Icon of NPC Wandering Soul Collect all four wandering souls to spawn Rynhaedr.Related quests: Death's Depthless Dominion.
Icon of NPC Wandering Soul Related quests: The Bridge Ablaze.
Icon of NPC Wandering Soul Related quests: The Drowned Kingdom.
Icon of NPC Wandering Soul It will be here if you detonated the Godhammer Bomb.Related quests: The Bridge Ablaze.
Icon of NPC Wandering Soul Related quests: The Bridge Ablaze.
Icon of NPC Wandering Soul Related quests: The Drowned Kingdom.
Icon of NPC Wandering Soul It will be here if the water level in Pool #4 is high (?).Related quests: The Drowned Kingdom.
Icon of NPC Wandering Soul Related quests: The Drowned Kingdom.

Loot

Different interactive objects containing more or less valuable items that you can take.

Icon of Loot Altar
Icon of Loot Barrel
Icon of Loot Barrel
Icon of Loot Barrel
Icon of Loot Barrel
Icon of Loot Barrel
Icon of Loot Barrel (Trap)
Icon of Loot Basket
Icon of Loot Basket
Icon of Loot Battle Axe Oathbreaker's End (superb two-handed battle axe).
Icon of Loot Belt Pouch
Icon of Loot Box
Icon of Loot Brazier
Icon of Loot Chest
Icon of Loot Chest
Icon of Loot Chest
Icon of Loot Chest To be able to reach it you have to use Panel.
Icon of Loot Chest
Icon of Loot Chest
Icon of Loot Chest
Icon of Loot Chest
Icon of Loot Chest
Icon of Loot Chest
Icon of Loot Chest
Icon of Loot Chest Corroded Vambraces (hands). To reach it you have to use the Beam of Light and create a bridge.
Icon of Loot Chest The Twin Eels (superb great sword).
Icon of Loot Chest (Trap) Footsteps of the Beast (feet, grants Beast of Winter). Sigil of Pain Wardstone.
Icon of Loot Corpse Brooch of Inevitable Winter (neck, -25% Freeze Damage taken, +25% Burn Damage taken.
Icon of Loot Corpse
Icon of Loot Corpse
Icon of Loot Corpse One Dozen Stood (legendary heavy armor).
Icon of Loot Corpse
Icon of Loot Crate
Icon of Loot Crate
Icon of Loot Crate
Icon of Loot Crate
Icon of Loot Crate
Icon of Loot Crate
Icon of Loot Crate
Icon of Loot Crate
Icon of Loot Crate
Icon of Loot Crate
Icon of Loot Crate
Icon of Loot Current's Rush Current's Rush (superb scepter).
Icon of Loot Frozen Corpse Examine the frozen corpse. Helm of the White Void and Guardian's Plate.
Icon of Loot Hidden Cache
Icon of Loot Locked Chest Lock level 10.
Icon of Loot Locked Chest (Trap) Lock level 12. Amulet of Greater Health.
Icon of Loot Rubble
Icon of Loot Rubble
Icon of Loot Rubble
Icon of Loot Rubble
Icon of Loot Sand
Icon of Loot Sarcophagus Wintertide Bulwark (large shield). When you take it, you will be attacked by Rime Construct and 2 x Frost Shade.
Icon of Loot Shelf
Icon of Loot Stone
Icon of Loot Stone
Icon of Loot Stone
Icon of Loot Stone
Icon of Loot Tent
Icon of Loot Urn
Icon of Loot Urn
Icon of Loot Urn
Icon of Loot Urn
Icon of Loot Urn
Icon of Loot Urn
Icon of Loot Urn
Icon of Loot Urn (Trap)

Hidden Objects

Hidden interactive objects containing more or less valuable items that you can take.

Icon of Loot Barrel
Icon of Loot Bed
Icon of Loot Belt Pouch Sigil of Death Wardstone.
Icon of Loot Container
Icon of Loot Corpse
Icon of Loot Hidden Cache
Icon of Loot Loose Stone
Icon of Loot Rubble
Icon of Loot Rubble
Icon of Loot Rubble
Icon of Loot Rubble
Icon of Loot Rubble
Icon of Loot Rubble
Icon of Loot Stone
Icon of Loot Tent
Icon of Loot Wood Panel

Enemies

NPCs, monsters, etc. who will be aggressive towards you as soon as they see you.

Icon of Enemy Bears Papa Snow Bear + 2 x Snow Bear.
Icon of Enemy Bears Mama Snow Bear + Snow Bear.
Icon of Enemy Burning Enemies Burning Soldier + Burning Cleric + Burning Archer.
Icon of Enemy Burning Soldier Burning Soldier + Burning Cleric + 2 x Burning Archer. The soldier will drop Evon Dewr Tower Key.
Icon of Enemy Drowned Enemies Drowned Watershaper + Drowned Berserker + Drowned Stormspeaker.
Icon of Enemy Elementals Greater Ice Blight + 2 x Frost Shade.
Icon of Enemy Neriscyrlas Neriscyrlas' Hope (neck, watcher only).
Icon of Enemy Pilgrim Pilgrim Savage + Bear Companion.
Icon of Enemy Pilgrims Champion Ascendant Grymgaer (drops Horns of the Aurochs) + Pilgrim Hierophant + Pilgrim Shadowdancer + 2 x Pilgrim Savage + Bear Companion.Related quests: The Higher-Ups.
Icon of Enemy Pilgrims Pilgrim Shadowdancer + Pilgrim Hierophant + Pilgrim Savage + Bear Companion.
Icon of Enemy Scourge Scourge + Warden of Decay. He will be here when you complete the The Bridge Ablaze quest.
Icon of Enemy Scourge
Icon of Enemy Scourge Scourge + 2 x Drowned Berserker + Drowned Watershaper + Drowned Stormspeaker.
Icon of Enemy Scourge Scourge + Warden of Decay.
Icon of Enemy Scourge
Icon of Enemy Shambling Soul It drops Kaihōa (grimoire/trinket, grants Lost in Time).
Icon of Enemy Shambling Souls 5 x Shambling Soul.
Icon of Enemy Shambling Souls 3 x Shambling Soul.
Icon of Enemy Shambling Souls 2 x Shambling Soul.
Icon of Enemy Shambling Souls 3 x Shambling Soul.
Icon of Enemy Shambling Souls 2 x Shambling Soul.
Icon of Enemy Soul Collector
Icon of Enemy Soul Collector Soul Collector + Warden of Decay.
Icon of Enemy Soul Collector Soul Collector + Drowned Berserker + Drowned Stormspeaker + Drowned Watershaper.
Icon of Enemy Soul Collector Soul Collector + 2 x Strangled Arcanist.
Icon of Enemy Soul Collector
Icon of Enemy Soul Collectors 2 x Soul Collector.
Icon of Enemy The Messenger It will be here after you talk to Vatnir.Related quests: An Honored Guest.
Icon of Enemy Sigil of Death
Icon of Enemy Sigil of Pain

Frozen Corpses

Icon of Other Frozen Corpse
Icon of Other Frozen Corpse Spirit.
Icon of Other Frozen Corpse
Icon of Other Frozen Corpses Soul vision here.Related quests: To Rise and Decline.
Icon of Other Frozen Corpses 3 x Frozen Corpse.
Icon of Other Frozen Corpses 2 x Frozen Corpse.
Icon of Other Frozen Corpses 3 x Frozen Corpse. Soul vision.Related quests: To Rise and Decline.
Icon of Other Frozen Corpses

Transitions

Places, where you can go to other locations or other maps.

Icon of Transition Beam of Light Noon: To the Moment Of. Dusk: To the Moment After.
Icon of Transition Beam of Light Dawn: To the Moment Before. Dusk: To the Moment After.
Icon of Transition Beam of Light Dawn: To the Moment Before. Noon: To the Moment Of.
Icon of Transition Beam of Light Dawn: To the Moment Before. Noon:To the Moment Of.
Icon of Transition Beam of Light Dawn: To the Moment Before. Noon: To the Moment Of.
Icon of Transition Harbringer's Dwelling
Icon of Transition Neriscyrlas' Lair The transition will become active when you collect all Wandering Souls and talk to Rynhaedr.Related quests: Death's Depthless Dominion.
Icon of Transition Portal to the Shattered Passage Vytmádh. Before you will be able to enter the portal you need to get Eye of Rymrgand. During the conversation with Rymrgand you have to agree to kill dragon for him then show him the relic, e.g. you can say: 1. "No.", 2. "What happened to the dragon?", 3. "What's the difference between the Vytmádh and the White Void?", 4. "Your breach will freeze the Deadfire if you don't close it.", 5. "Then I'll close the breach myself.", 6. With pleasure., 7. [Show Rymrgand the relic.] "You mean this?"Related quests: Death's Depthless Dominion, To Rise and Decline.
Icon of Transition Rimebound Temple - Eastern Cavern
Icon of Transition Rimebound Temple - West Cave
Icon of Transition Temple of Decline
Icon of Transition The Bridge Ablaze - The Moment Before The transition will become active when you collect all Wandering Souls and talk to Rynhaedr.Related quests: The Bridge Ablaze.
Icon of Transition The Drowned Kingdom The transition will become active when you collect all Wandering Souls and talk to Rynhaedr.Related quests: The Drowned Kingdom.
Icon of Transition The Endless Queries The transition will become active when you collect all Wandering Souls and talk to Rynhaedr.
Icon of Transition The Only Answers It will open after you bring three motes to Shackled Soul.
Icon of Transition The Sunken Crown
Icon of Transition To Harbringers' Watch
Icon of Transition To Outcrop on High The flat plane of ice. Use the icepicks received from Vatnir to climb here.
Icon of Transition To Outcrop on High
Icon of Transition To Rimebound Temple - Eastern Cavern
Icon of Transition To Temple of Decline
Icon of Transition To the Drowned Kingdom
Icon of Transition To the Rimebound Temple Swing closer to the object to get Glacierbane (superb one-handed war hammer).Related quests: The Last Pilgrimage.
Icon of Transition To the Rimebound Temple
Icon of Transition To the Shattered Passage
Icon of Transition Portal A1 To Portal A2.
Icon of Transition Portal A1 To Portal A2. When you use the portal for the first time, you will be witnessing the congregation and you will be able to get the Mote of Conviction / Hostility / Regret.
Icon of Transition Portal A2 To Portal A1.
Icon of Transition Portal A2 To Portal A1. It will be active after using portal A1.
Icon of Transition Portal B1 To Portal B2. When you use the portal for the first time, you will be witnessing the congregation and you will be able to get the Mote of Conviction / Hostility / Regret.
Icon of Transition Portal B2 To Portal B1. It will be active after using portal B1.
Icon of Transition Portal C1 To Portal C2. When you use the portal for the first time, you will be witnessing the congregation and you will be able to get the Mote of Conviction / Hostility / Regret.
Icon of Transition Portal C2 To Portal C1. It will be active after using portal C1.
Icon of Transition Portal G1 To Portal G2.
Icon of Transition Portal G2 To Portal G1.
Icon of Transition Portal H1 To Portal H2.
Icon of Transition Portal H2 To Portal H1.
Icon of Transition Portal J1 To Portal J2.
Icon of Transition Portal J2 To Portal J1.
Icon of Transition Portal K1 To Portal K2.
Icon of Transition Portal K2 To Portal K1.
Icon of Transition Portal Z1 To Portal Z2.
Icon of Transition Portal Z2 To Portal Z1.
Icon of Transition To Bridge
Icon of Transition To Docks You must first unlock the door from the other side.