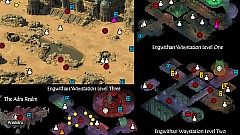
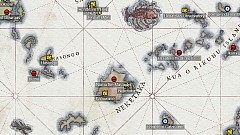
Welcome to guides4gamers.com

Pillars of Eternity II: Deadfire Interactive Maps

A collection of interactive maps for the game Pillars of Eternity II: Deadfire, created to assist players in exploring every corner of the game world. Each map contains essential information to help you achieve 100% completion, locate treasures, collectibles, quests, vendors, fast travel points, or other points of interest.

Index

The index below enables quick navigation to the desired map.

List of All Pillars of Eternity II: Deadfire Interactive Maps

World Map, Pillars of Eternity II: Deadfire Map

World Map - A general map of the entire Deadfire Archipelago. Major and minor locations, bounty targets, mapping the archipelago quests' locations and more.

Markers on the map: Major Locations x22, Major Locations x2, Bounty Targets x12, Mapping the Archipelago x12, Companions x2, Minor Locations x26, Other x1.

Vilario's Rest, Pillars of Eternity II: Deadfire Map

Vilario's Rest - Map of Vilario's Rest and the Sea Cave. This is the first location you visit in Pillars of Eternity 2: Deadfire after creating the character and completing the prologue.

Markers on the map: Companion x1, NPCs x5, Enemies x7, Loot x18, Herbs, etc. x10, Transitions x5, Transitions x3, Traps x2, Other x2.

Port Maje, Pillars of Eternity II: Deadfire Map

Port Maje - Map of Port Maje and its subzones such as: Port Maje Harbor, Gorecci Street, Sātahuzi, Rinco's Home, Governor Clario's Estate, The Kraken's Eye, Port Maje Jail, Chieftain's Lodge or Mokeha's Lodge.

Markers on the map: Companion x1, NPCs x18, Locked / Secret Passages x3, Hidden Objects x3, Loot x60, Herbs, etc. x8, Enemy x1, Transitions x25, Other x2.

Engwithan Digsite, Pillars of Eternity II: Deadfire Map

Engwithan Digsite - Map of Engwithan Digsite and its subzones such as: Arena Sub-level or Ruin Interior - Ancient Training Hall, Luminous Adra Pool or Foreman's Quarters.

Markers on the map: Quest Items x2, Pet x1, Companion x1, Locked / Secret Passages x2, Levers, Switches, etc. x4, Enemies x12, Hidden Object x1, Loot x28, Herbs, etc. x8, Transitions x12, Transition x1, Traps x7, Ashen Bodies x23, Other x1.

Neketaka, Queen's Berth, Pillars of Eternity II: Deadfire Map

Neketaka, Queen's Berth - Map of the Queen's Berth district in the city of Neketaka and its sub-zones such as Bardatto Estate, Luminous Adra Mill, Queen's Berth District Homes, Sanza's Map Emporium, The Wild Mare, Vailian Trading Company Headquarters or Valera Estate.

Markers on the map: Companions x2, Locked / Secret Passages x4, Levers, Switches, etc. x2, Key x1, Quest Items x5, NPCs x36, Pets x3, Hidden Objects x6, Loot x89, Enemy x1, Transitions x39, Other x2.

Neketaka, The Gullet, Pillars of Eternity II: Deadfire Map

Neketaka, The Gullet - Map of The Gullet district in the city of Neketaka and its sub-zones such as The Hole, Delvers' Row, Undercroft, Old City, Old City Overlook, Old City Ruins, Biha's Home, Enoi's Home, Pitli's Sanctuary, Thelys' Home or Dereo's Lair.

Markers on the map: Quest Items x2, Levers, Switches, etc. x4, Pets x4, NPCs x21, Locked / Secret Passages x7, Enemies x19, Enemies x7, Hidden Objects x10, Loot x97, Herb, etc. x1, Transitions x31, Transitions x2, Other x2.

Neketaka, Periki's Overlook, Pillars of Eternity II: Deadfire Map

Neketaka, Periki's Overlook - Map of the Periki's Overlook district in the city of Neketaka and its sub-zones such as Arkemyr's Manor, Watershapers Guild, Guild Ruins, Luminous Bathhouse, The Dark Cupboard, Marihi's Metalworks, Iolfr's Raiments or Cuitztli's Exotic Herbs.

Markers on the map: Quest Items x5, Locked / Secret Passages x3, Lever / Switch x1, Companion x1, Pet x1, NPCs x22, Hidden Objects x4, Loot x79, Herbs x18, Enemies x17, Enemies x4, Transitions x37, Transitions x4, Trap x1, Other x2.

Neketaka, Serpent's Crown, Pillars of Eternity II: Deadfire Map

Neketaka, Serpent's Crown - Map of the Serpent's Crown district in the city of Neketaka and its sub-zones such as Kahanga Palace, Takano's Estate, Muhhai's Estate or Lady Epero's Estate.

Markers on the map: Key x1, Quest Items x2, Companion x1, Hidden Object x1, Pets x2, NPCs x13, Loot x31, Enemy x1, Transitions x21.

Neketaka, The Sacred Stair, Pillars of Eternity II: Deadfire Map

Neketaka, The Sacred Stair - Map of The Sacred Stair district in the city of Neketaka and its sub-zones such as The Hanging Sepulchers, Spire of the Soul-Seers, Temple of Berath, Temple of Gaun, Forgotten Mausoleum or Realm of the Beast of Winter.

Markers on the map: Quest Items x3, Companion x1, Locked / Secret Passages x5, Levers, Switches, etc. x6, Pets x2, Hidden Objects x5, NPCs x14, Loot x55, Herbs x5, Enemies x11, Transitions x21, Transitions x2, Traps x12, Other x5.

Neketaka, The Brass Citadel, Pillars of Eternity II: Deadfire Map

Neketaka, The Brass Citadel - Map of The Brass Citadel district in the city of Neketaka and its sub-zones such as Imperial Command, Powderhouse, Gunsmithy, Officers' Lounge or Fleet Master's Office.

Markers on the map: NPCs x10, Loot x28, Transitions x24, Other x4.

Tikawara, Pillars of Eternity II: Deadfire Map

Tikawara - Map of Tikawara and Hōhina Ravine.

Markers on the map: Quest Items x2, Pet x1, NPCs x13, Enemies x3, Loot x19, Herbs x3, Transitions x12, Traps x3, Other x1.

Poko Kohara Ruins, Pillars of Eternity II: Deadfire Map

Poko Kohara Ruins - Map of Poko Kohara Ruins and its sub-zones such as Engwithan Waystation Level One, Two and Three or The Adra Realm. You must visit this place to complete The Storms of Poko Kohara side quest.

Markers on the map: Levers, Switches, etc. x2, Quest Items x2, NPC x1, Locked / Secret Passages x5, Hidden Objects x2, Loot x29, Enemies x17, Essence Batteries x8, Transitions x16, Traps x3, Other x8.

Fort Deadlight, Pillars of Eternity II: Deadfire Map

Fort Deadlight - Map of Fort Deadlight and its sub-zones such as Deadlight Dungeon, Deadlight Court, Deadlight Donjon a.k.a. Command and Secret Dock. You must visit this place if you want to complete Blow the Man Down quest.

Markers on the map: Quest Items x3, Levers, Switches, etc. x5, Key x1, Locked / Secret Passages x13, NPCs x16, Hidden Object x1, Loot x67, Enemies x7, Transitions x25, Transitions x2, Other x5.

Dunnage, Pillars of Eternity II: Deadfire Map

Dunnage - Map of Dunnage and its sub-zones such as Lifter's Refugee, Radiant Court, The King's Coffin, Balefire Beacon, Balefire Tower or The Treasure Trove.

Markers on the map: Quest Items x2, NPCs x22, Pets x2, Hidden Objects x2, Loot x26, Transitions x11, Other x1.

Hasongo, Pillars of Eternity II: Deadfire Map

Hasongo - Map of Hasongo and it's sub-zones such as the Lighthouse, Fleet Master's Office, Engineering Workshop, Dining Hall, Kitchen, Cannon Rampart or Storage Room. You must visit this place to complete A Distant Light main story quest.

Markers on the map: Quest Items x3, Locked / Secret Passage x1, NPCs x5, Pets x2, Enemies x12, Hidden Objects x2, Loot x25, Transitions x22, Transitions x3, Ashen Bodies x4, Other x4.

Crookspur, Pillars of Eternity II: Deadfire Map

Crookspur - Map of Crookspur and its sub-zones such us Sea Cave, Crookspur Dungeons or Crookspur Fort.

Markers on the map: Locked / Secret Passages x4, NPCs x6, Hidden Objects x5, Loot x35, Enemies x7, Transitions x12, Other x2.

Ori o Koīki, Pillars of Eternity II: Deadfire Map

Ori o Koīki - Map of Ori o Koīki and Ori o Koīki Sanctum. The most important NPC you will find on this map is Ruāsare, the Wahaki chieftain.

Markers on the map: Locked / Secret Passages x2, Levers, Switches, etc. x3, NPCs x4, Loot x20, Herbs x6, Transitions x5, Transitions x4, Other x3.

Sayuka, Pillars of Eternity II: Deadfire Map

Sayuka - Map of Sayuka and its sub-zones such as Cignath Mór, Bentbranch Bog, Huana Longhouse, Workshop or Fleet Master's Quarters.

Markers on the map: NPCs x8, Lever / Switch x1, Locked / Secret Passages x2, Pets x3, Enemies x9, Hidden Object x1, Loot x26, Herbs x29, Transitions x14, Other x7.

Motare o Kōzi, Pillars of Eternity II: Deadfire Map

Motare o Kōzi - Map of Motare o Kōzi. You must visit this place to complete The Last Sanctuary side quest.

Markers on the map: NPCs x2, Fragments of Soul x3, Pet x1, Quest Items x2, Hidden Objects x3, Loot x1, Enemies x6, Herbs x8, Transition x1, Other x3.

Bekarna's Observatory, Pillars of Eternity II: Deadfire Map

Bekarna's Observatory - Map of Bekarna's Observatory and The Orrery. You must visit this place to complete Bekarna's Observatory side quest.

Markers on the map: NPC x1, Hidden Objects x2, Loot x12, Quest Items x4, Enemies x3, Transitions x3, Other x2.

Ashen Maw, Pillars of Eternity II: Deadfire Map

Ashen Maw - Map of the Ashen Maw and its sub-zones such as The Sentinell Wall, The Ashen Bridge, The Jagged Keep, the Lair of the Ancient or the Foundations of the Ashen Maw. You must visit this place to complete He Waits in Fire main story quest.

Markers on the map: Locked / Secret Passages x4, Keys x2, Lever / Switch x1, NPCs x6, Quest Item x1, Pet x1, Loot x21, Enemies x4, Transitions x11, Ashen Corpses x14, Trap x1, Other x1.

Pāhowane, Pillars of Eternity II: Deadfire Map

Pāhowane - Map of Pāhowane and Pāhowane Underground. You must visit this place to complete Skipping Ahead side quest.

Markers on the map: Locked / Secret Passage x1, Lever / Switch x1, NPCs x2, Quest Item x1, Loot x9, Enemies x6, Transitions x3, Transitions x2, Other x1.

Splintered Reef, Pillars of Eternity II: Deadfire Map

Splintered Reef - Map of Splintered Reef and its sub-zones such us The Pickled Eel, Boathouse, Sea-Lashed Crypt, Crypt Interior and Glowing Outcrop. You have to visit this place if you want to do A Paradise of the Mind quest.

Markers on the map: Locked / Secret Passages x2, Levers, Switches, etc. x3, NPCs x4, Pets x2, Enemies x7, Loot x13, Herbs, etc. x5, Transitions x8, Traps x3, Other x1.

Oathbinder's Sanctum, Pillars of Eternity II: Deadfire Map

Oathbinder's Sanctum - Map of Oathbinder's Sanctum. You must visit this place to complete Lost Dues in Good Faith side quest.

Markers on the map: Quest Item x1, NPCs x3, Pet x1, Locked / Secret Passages x6, Levers, Switches, etc. x7, Hidden Objects x2, Loot x21, Enemies x5, Enemies x3, Transitions x9, Traps x5, Other x2.

Harbingers' Watch, Pillars of Eternity II: Deadfire Map

Harbingers' Watch - Map of Harbingers' Watch and its sub-zones such as Harbingers' Dwelling, Harbingers' Retreat, Outcrop on High, The Rimebound Temple, Temple of Decline, Rimebound Temple, The Shattered Passage, The Bridge Ablaze, The Endless Queries, The Drowned Kingdom, The Sunken Crown, Neriscyrlas' Lair or The White Void.

Markers on the map: Companion x1, Locked / Secret Passages x4, Levers, Switches, etc. x9, Pets x2, Quest Items x5, NPCs x27, Loot x68, Hidden Objects x17, Enemies x28, Enemies x3, Frozen Corpses x13, Transitions x45, Transitions x20, Traps x21, Other x12.