Engwithan Digsite - Map Markers Summary
Quest Items x2, Pet x1, Companion x1, Locked / Secret Passages x2, Levers, Switches, etc. x4, Enemies x12, Hidden Object x1, Loot x28, Herbs, etc. x8, Transitions x12, Transition x1, Traps x7, Ashen Bodies x23, Other x1
An alphabetical list of quests that begin on this map.
The following legend of Engwithan Digsite interactive game map defines the points of interest / markers displayed on the map. Each marker corresponds to a specific element to facilitate efficient navigation and interaction with the map.
 Cage
To open it, kill wurms and panthers and tell people in the cage that you've got rid of the creatures.Related quests: Stranded.
Cage
To open it, kill wurms and panthers and tell people in the cage that you've got rid of the creatures.Related quests: Stranded.
Items needed to complete the quests.
Pets, unique friendly, non-combat creatures. They boost your team stats in a certain way and only one pet can be active at any given time.
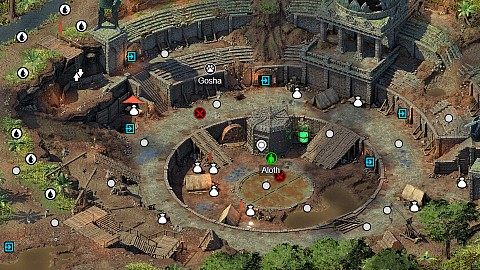
 Gosha
Deserted Cat. +1 Perception, enemy weapon attacks are less likely to crit against your party.
Gosha
Deserted Cat. +1 Perception, enemy weapon attacks are less likely to crit against your party.
List of NPCs you can invite to your team.
 Aloth
He's hiding in a cage. He can join your team.
Wizard or Battlemage (Wizard + Warrior) or Spellblade (Wizard + Rogue).
Aloth
He's hiding in a cage. He can join your team.
Wizard or Battlemage (Wizard + Warrior) or Spellblade (Wizard + Rogue).
Secret passages, locked doors, etc.
 Locked Door
To open it you have to light both braziers. To extinguish the fire in the room you must solve Trial of Flame puzzle.
Locked Door
To open it you have to light both braziers. To extinguish the fire in the room you must solve Trial of Flame puzzle.
Levers, switches and other devices that activate hidden doors, etc.
 Brazier
Brazier
Trial of Flame
Light both braziers (with torch / use flint and tinder / fire godlike) and press three correct pressure plates. In the top row press the two side plates, in the bottom row press the first plate on the left side.
NPCs, monsters, etc. who will be aggressive towards you as soon as they see you.
 Brine Imp
Brine Imps
4 x Brine Imp.
Brine Imps
2 x Brine Imp.
Cave Beetles
2 x Cave Beetle.
Essence Anomalies
2 x Essence Anomaly.
Rusted Copper Constructs
2 x Rusted Copper Construct + Wurm.
Skeletal Warrior
Skeletal Warrior
Will-O'-Wisp
Will-O'-Wisps
2 x Will-O'-Wisp + Sporeling.
Wurms
2 x Wurm.
Young Panthers
2 x Young Panther.
Hidden interactive objects containing more or less valuable items that you can take.
 Rubble
Different interactive objects containing more or less valuable items that you can take.
 Bag
Bag
Barrel
Barrel
Destroy it.
Barrels
3 x Barrel. Destroy them.
Barrels
3 x Barrel. Destroy them.
Barrels
2 x Barrel. Destroy them.
Chest
Gauntlets of Accuracy (hands, +3 Accuracy).
Chest
Gladiator Sword (one-handed sword).
Chest
Corpse
Amulet of Health (neck, +15 Max Health).
Crate
Crate
Crate
Crate
Crates
2 x Crate.
Crates
2 x Crate.
Desk
Desk
Desk
Desk
Locked Chest
Lock level 4. Fine Dagger.
Locked Chest
Lock level 2.
Potions
Rubble
Rubble
Urn
Urns
2 x Urn.
Weapon Rack
Different interactive objects containing ingredients that you can take.
 Rahi Pods
Rahi Pods
Ratiti Root
Ratiti Root
Ratiti Root
Ratiti Root
River Reed
River Reed
Places, where you can go to other locations or other maps.
 To Ancient Training Hall
To Ancient Training Hall
To Arena Sub-level
To Engwithan Digsite
To Engwithan Digsite
To Engwithan Digsite
To Engwithan Digsite
To Engwithan Digsite
To Foreman's Quarters
To Luminous Adra Pool
To World Map
To World Map
 Ladder
Inside most of the bodies you will find some money.
 Ashen Bodies
2 x Ashen Body.
Ashen Bodies
2 x Ashen Body.
Ashen Bodies
2 x Ashen Body.
Ashen Bodies
2 x Ashen Body.
Ashen Bodies
2 x Ashen Body.
Ashen Bodies
3 x Ashen Body.
Ashen Bodies
3 x Ashen Bodies.
Ashen Bodies
2 x Ashen Body.
Ashen Bodies
4 x Ashen Body.
Ashen Body
Ashen Body
Ashen Body
Ashen Body
Ashen Body
Ashen Body
Ashen Body
Ashen Body
Ashen Body
Ashen Body
Ashen Body
Ashen Body
Ashen Body
Ashen Body