Welcome to guides4gamers.com

White Orchard, Witcher 3: Wild Hunt Map

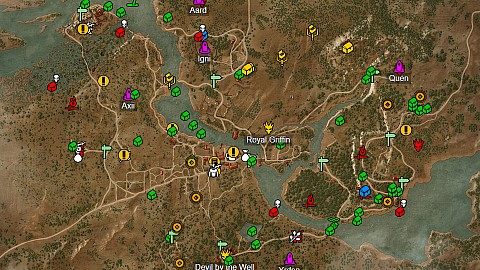
White Orchard is the first open world zone you can explore in The Witcher 3: Wild Hunt after finishing tutorial in Kaer Morhen. It takes aproximately a few hours to finish all quests available here.

This well-to-do village is famous for its fruit orchards, whose boughs burst out in white blossoms come spring, and also for the top-quality, furniture-grade lumber harvested from the Vulpine Woods.

White Orchard

White Orchard - Map Markers Summary

Places of Power x6, Witcher Gear x2, Quest Givers x7, Notice Board x1, Quest-related x7, Hidden Treasure Quests x3, Hidden Treasures x3, Treasures x36, Smuggler's Cache x1, Spoils of War x1, Special Monsters x2, Monster Nests x3, Guarded Treasures x5, Bandit Camps x6, Abandoned Sites x2, Signposts x10, Tavern x1, Merchants x2, Herbalists x2, Armorer x1, Blacksmith x1, Grindstones x3

Quests that take place on this map

An alphabetical list of quests that take place on this map.

Legend / Points of interest

The following legend of White Orchard interactive game map defines the points of interest / markers displayed on the map. Each marker corresponds to a specific element to facilitate efficient navigation and interaction with the map.

Places of Power

On your first visit to the place of power you will gain an additional ability point.

Icon of Place of Power Aard
Icon of Place of Power Axii There is one Wraith (6) nearby.
Icon of Place of Power Igni There is a Wraith (7) nearby.
Icon of Place of Power Quen
Icon of Place of Power Yrden There's a bear (6) nearby.

Witcher Gear

It is always some kind of box, chest or a corpse containing witcher gear diagrams required for scavenger hunt quests.

Icon of Witcher's Gear Viper School Gear (Silver Sword) Kolgrim's Remains. Diagram: Serpentine silver sword and Letter from witcher Kolgrim of the Viper School. Skeleton is in the crypt. Use your weapon or the aard sign to destroy the door to the crypt. Related quests: Scavenger Hunt: Viper School Gear (6).
Icon of Witcher's Gear Viper School Gear (Steel Sword) Diagram: Serpentine steel sword and the Interrogation report. Chest in the castle ruins. Related quests: Scavenger Hunt: Viper School Gear (6).

Quest Givers

Places where you can get new quests to play.

Icon of Quest Giver Aldert Geert A scholar who will introduce you to gwent, a trading card game. Related quests: Collect 'Em All.
Icon of Quest Giver Geralt & Vesemir This is where you begin your adventure after you finish the tutorial in Kaer Morhen.Related quests: Lilac and Gooseberries.
Icon of Quest Giver John Geermer Related quests: Precious Cargo.
Icon of Quest Giver Old Woman Related quests: A Frying Pan, Spick and Span.
Icon of Quest Giver Peter Saar Gwynleve The Nilfgaardian commander. Related quests: Lilac and Gooseberries, The Beast of White Orchard (3).
Icon of Quest Giver Tomira You can talk to her during The Beast of White Orchard quest. Related quests: Contract: Devil by the Well (2), On Death's Bed (2), The Beast of White Orchard (3).
Icon of Quest Giver Willis Related quests: Twisted Firestarter.

Notice Boards

Offers of work for the witchers are posted here. Return from time to time to notice boards you've already seen becouse new contracts might have been posted since your last visit.

Icon of Notice Board White Orchard Notice Board Related quests: Contract: Devil by the Well (2), Missing in Action.

Quest-related

Places, NPCs and other elements related in some way to the quests available in the game.

Icon of Quest-related Bastien and Rhosyn Related quests: Missing in Action.
Icon of Quest-related Destroyed Griffin Nest Related quests: The Beast of White Orchard (3).
Icon of Quest-related Dune Vildenvert Related quests: Missing in Action.
Icon of Quest-related Griffin Attack Site Related quests: The Beast of White Orchard (3).
Icon of Quest-related Mislav's House Related quests: The Beast of White Orchard (3).
Icon of Quest-related Odolan Related quests: Contract: Devil by the Well (2).
Icon of Quest-related The Battlefield Related quests: Missing in Action.

Hidden Treasure Quests

Here you can find clues about the location of the hidden treasures.

Icon of Hidden Treasure Deserter Gold (Quest) Take the Spy's notes from the small crate in the tent. Related quests: Deserter Gold (3).
Icon of Hidden Treasure Dirty Funds (Quest) Take the Scrawled notes from the chest in the tent. Related quests: Dirty Funds (2).
Icon of Hidden Treasure Temerian Valuables (Quest) Loot the Temerian lily key from the body lying on the shore then dive and use it to open locked chest on the bottom. Inside you will find the Blood-soaked military orders. Related quests: Temerian Valuables (4).

Hidden Treasures

Here you can find the hidden treasures.

Icon of Hidden Treasure Deserter Gold (Treasure) Chest is inside a small cellar. The entrance is located in the nearby house. Related quests: Deserter Gold (3).
Icon of Hidden Treasure Dirty Funds (Treasure) Related quests: Dirty Funds (2).
Icon of Hidden Treasure Temerian Valuables (Treasure) Chest is inside a small cellar, entrance is located in a nearby house. Related quests: Temerian Valuables (4).

Treasures

Places where there are usually chests containing some nice loot.

Icon of Treasure Chest
Icon of Treasure Chest Chest is behind the Nilfgaardian tent.
Icon of Treasure Chest Chest at the bottom of the waterfall.
Icon of Treasure Chest
Icon of Treasure Chest Chest next to the bridge.
Icon of Treasure Chest To enter the house, destroy the door with an aard sign.
Icon of Treasure Chest Chest on the wagon.
Icon of Treasure Chest Chest in the house.
Icon of Treasure Chest
Icon of Treasure Chest Chest under the bridge.
Icon of Treasure Chest
Icon of Treasure Chest Chest at the bottom of the lake.
Icon of Treasure Chests Two chests in the house.
Icon of Treasure Chests Three chests in the house.
Icon of Treasure Chests Two chests on the broken wagon.
Icon of Treasure Chests Two chests under the broken bridge.
Icon of Treasure Chests Three chests in the house.
Icon of Treasure Chests Two chests in the ruined house.
Icon of Treasure Corpse and Package
Icon of Treasure Corpses Two bodies in the ruins of a burned-out house.
Icon of Treasure Small Chest A small chest next to the body.

Smuggler's Caches

Icon of Smugglers' Cache Smugglers' Cache Six packs under the bridge.

Spoils of War

Icon of Spoils of War Spoils of War

Special Monsters

The special monsters you encounter on your way. These are mostly monsters that you have to kill to finish the witcher's contracts.

Icon of Special Monster Devil by the Well It's a wraith you have to kill to complete the Contract: Devil by the Well quest. Related quests: Contract: Devil by the Well (2).
Icon of Special Monster Royal Griffin Here you will start the fight against the griffin in The Beast of White Orchard quest. Related quests: The Beast of White Orchard (3).

Monster Nests

Every nest is guarded by the monsters of a specific type. Use bombs to destroy it. Do not forget to loot it after you destroy it.

Icon of Monster Nest Ghouls Ghouls (2).

Guarded Treasures

It is always some kind of box, chest or a dead body containing some goods and guarded by one or more monsters.

Icon of Guarded Treasure Guarded Treasure Two chests. Guarded by Warg (5) + 3 x Wolf (5).
Icon of Guarded Treasure Guarded Treasure It's in the crypt. Guarded by the Wraith (7).
Icon of Guarded Treasure Guarded Treasure
Icon of Guarded Treasure Guarded Treasure Guarded by 4 x Drowners (3,4).

Bandit Camps

Kill all the enemies in the area. There is always a treasure chest somewhere in the camp.

Icon of Bandit Camp Deserters A deserter leader (4) and a few deserters (1,2).
Icon of Bandit Camp Deserters A few deserters (1,2).
Icon of Bandit Camp Deserters A deserter leader (5) and a few deserters (1,2).
Icon of Bandit Camp Deserters A few deserters (1,2).

Abandoned Sites

A place abandoned due to monster or bandit attacks. Once the danger is eliminated, it will fill with life once more.

Icon of Abandoned Site Ghouls This place is occupied by the ghouls (2).
Icon of Abandoned Site Ghouls This place is occupied by the ghouls (4).

Signposts

Once discovered, signposts allow you to fast travel directly from one signpost to another. Walk up to the signpost and use it to open the world map and select the destination point.

Icon of Signpost Abandoned Village A few years ago, a group of armed men marched into this settlement. They butchered its inhabitants and burned down their homes. Not a soul has dwelt here since that black and bloody day.
Icon of Signpost Broken Bridge This bridge was destroyed by retreating Temerian troops during the Nilfgaardian attack. It was shoddily built to begin with. Good riddance.
Icon of Signpost Cackler Bridge Bridge named in honor of a woman who went mad from unfulfilled love. After her heart snapped, she spent all her days running up and down this bridge while laughing hysterically.
Icon of Signpost Crossroads The road splits here. One fork leads to Vizima, the other to Novigrad.
Icon of Signpost Ford Before the war, merchants and travelers would cross the river here. Now only Nilfgaardian soldiers traverse this path.
Icon of Signpost Mill Carts haul grain from all the surrounding villages to White Orchard's mill.
Icon of Signpost Nilfgaardian Garrison This strategic point guards White Orchard's main river crossing. Nilfgaardian troops have taken it over.
Icon of Signpost Ransacked Village A band of soldiers attacked this village early one morning. They slaughtered most of the villagers in their beds, and the lucky few who fled to the woods in time had nothing left to return to.
Icon of Signpost Sawmill White Orchard is famous not only for its premium fruit, but also for the top-quality, furniture-grade lumber harvested from the Vulpine Woods.
Icon of Signpost Woesong Bridge So named because of a girl who once would stand on the bridge and sing, waiting for her beloved's return.

Taverns

Here you can buy or sell various items.

Icon of Tavern White Orchard Tavern Gwent cards sold by Elsa, the innkeeper: Decoy, Catapult, Blue Stripes Commando, Crinfrid Reavers Dragon Hunter, Foltest - Lord Commander of the North.Related quests: Lilac and Gooseberries, The Beast of White Orchard (3), The Incident at White Orchard (2).

Merchants

Here you can buy or sell various items.

Icon of Shopkeeper Bram This is the merchant that you and Vesemir saved from the griffin. Gwent cards: Catapult, Blue Stripes Commando, Crinfrid Reavers Dragon Hunter, Foltest - Lord Commander of the North. Alchemy formula: Torn-out page: Griffin decoction Temerian gear: Armor, Boots, Trousers, Gauntlets, Horse Blinders, Saddle, Saddlebags
Icon of Shopkeeper Merchant

Herbalists

You can buy alchemical ingredients from herbalists.

Icon of Herbalist Herbalist
Icon of Herbalist Tomira

Armorers

Armorers craft armor. Armorers and blacksmiths can salvage crafting components from any unneeded items you've gathered.

Icon of Armorer Willis Armorer (Amateur)

Blacksmiths

Blacksmiths forge weapons. Armorers and blacksmiths can salvage crafting components from any unneeded items you've gathered.

Icon of Blacksmith Quartermaster Blacksmith (Amateur)

Grindstones

Sharpening your blade on a grindstone will cause it to deal more damage. This bonus will wear off after some time, but you can renew it by using a grindstone again.

Icon of Grindstone Grindstone