Chests Star Wars Jedi: Survivor Points of interest
Chests are one of the collectibles that count towards a zone's overall status. They are generally various types of containers that in the majority of cases contain cosmetic items, but sometimes they can also be stim canister, skill, etc.
Index
- Alignment Control Tower Chest 1/2
- Alignment Control Tower Chest 2/2
- Arid Flats Chest 1/4
- Arid Flats Chest 2/4
- Arid Flats Chest 3/4
- Arid Flats Chest 4/4
- Array Channel Chest 1/1
- Assembly Staging Chest 1/2
- Assembly Staging Chest 2/2
- Automated Forge Chest 1/3
- Automated Forge Chest 2/3
- Automated Forge Chest 3/3
- Basalt Rift Chest 1/5
- Basalt Rift Chest 2/5
- Basalt Rift Chest 3/5
- Basalt Rift Chest 4/5
- Basalt Rift Chest 5/5
- Bilemaw Den Chest 1/1
- Blustery Mesa Chest 1/1
- Buried Refuge Chest 1/1
- Bygone Settlement Chest 1/4
- Bygone Settlement Chest 2/4
- Bygone Settlement Chest 3/4
- Bygone Settlement Chest 4/4
- Central Command Chest 1/2
- Central Command Chest 2/2
- Chamber of Clarity Chest 1/1
- Chamber of Connection Chest 1/1
- Chamber of Detachment Chest 1/1
- Chamber of Duality Chest 1/1
- Chamber of Fortitude Chest 1/1
- Chamber of Reason Chest 1/1
- Corroded Silo Chest 1/3
- Corroded Silo Chest 2/3
- Corroded Silo Chest 3/3
- Crypt of Uhrma Chest 1/1
- Derelict Dam Chest 1/8
- Derelict Dam Chest 2/8
- Derelict Dam Chest 3/8
- Derelict Dam Chest 4/8
- Derelict Dam Chest 5/8
- Derelict Dam Chest 6/8
- Derelict Dam Chest 7/8
- Derelict Dam Chest 8/8
- Desert Passages Chest 1/2
- Desert Passages Chest 2/2
- Desert Ridge Chest 1/4
- Desert Ridge Chest 2/4
- Desert Ridge Chest 3/4
- Desert Ridge Chest 4/4
- Devastated Settlement Chest 1/3
- Devastated Settlement Chest 2/3
- Devastated Settlement Chest 3/3
- Flooded Bunker Chest 1/2
- Flooded Bunker Chest 2/2
- Fogged Expanse Chest 1/3
- Fogged Expanse Chest 2/3
- Fogged Expanse Chest 3/3
- Foothill Falls Chest 1/4
- Foothill Falls Chest 2/4
- Foothill Falls Chest 3/4
- Foothill Falls Chest 4/4
- Forest Array Chest 1/6
- Forest Array Chest 2/6
- Forest Array Chest 3/6
- Forest Array Chest 4/6
- Forest Array Chest 5/6
- Forest Array Chest 6/6
- Fort Kah'lin Chest x/3
- Fort Kah'lin Chest x/3
- Fort Kah'lin Chest x/3
- Forward Control Tower Chest 1/1
- Freight Handling Depot Chest 1/1
- Generator Underbelly Chest 1/1
- Gorge Crash Site Chest 1/2
- Gorge Crash Site Chest 2/2
- Halls of Ranvell Chest 1/2
- Halls of Ranvell Chest 2/2
- Hangar 2046-C Chest 1/1
- Hangar Bay Chest 1/1
- Hangar Bay Exterior Chest 1/1
- Harvest Ridge Chest 2/2
- Harvest Ridge Chest x/2
- Hunter's Quarry Chest 1/3
- Hunter's Quarry Chest 2/3
- Hunter's Quarry Chest 3/3
- Imperial Post 8L-055 Chest 1/2
- Imperial Post 8L-055 Chest 2/2
- Loading Gantry Chest 1/5
- Loading Gantry Chest 2/5
- Loading Gantry Chest 3/5
- Loading Gantry Chest 4/5
- Loading Gantry Chest 5/5
- Lucrehulk Core Chest 1/2
- Lucrehulk Core Chest 2/2
- Monastery Walls Chest 1/6
- Monastery Walls Chest 2/6
- Monastery Walls Chest 3/6
- Monastery Walls Chest 4/6
- Monastery Walls Chest 5/6
- Monastery Walls Chest 6/6
- Mountain Ascent Chest 1/6
- Mountain Ascent Chest 2/6
- Mountain Ascent Chest 3/6
- Mountain Ascent Chest 4/6
- Mountain Ascent Chest 5/6
- Mountain Ascent Chest 6/6
- Narkis Highlands Chest 1/2
- Narkis Highlands Chest 2/2
- Nekko Pools Chest 1/1
- Observatory Understructure Chest 1/2
- Observatory Understructure Chest 2/2
- Path of Conviction Chest 1/1
- Path of Persistence Chest 1/1
- Path of Restoration Chest 1/1
- Penitent Chambers Chest 1/2
- Penitent Chambers Chest 2/2
- Phon'Qi Caverns Chest 1/7
- Phon'Qi Caverns Chest 2/7
- Phon'Qi Caverns Chest 3/7
- Phon'Qi Caverns Chest 4/7
- Phon'Qi Caverns Chest 5/7
- Phon'Qi Caverns Chest 6/7
- Phon'Qi Caverns Chest 7/7
- Pyloon's Saloon Chest 1/2
- Pyloon's Saloon Chest 2/2
- Rambler's Reach Outpost Chest 1/10
- Rambler's Reach Outpost Chest 2/10
- Rambler's Reach Outpost Chest x/10
- Rambler's Reach Outpost Chest x/10
- Rambler's Reach Outpost Chest x/10
- Rambler's Reach Outpost Chest x/10
- Rambler's Reach Outpost Chest x/10
- Rambler's Reach Outpost Chest x/10
- Rambler's Reach Outpost Chest x/10
- Rambler's Reach Outpost Chest x/10
- Renovation Site 4733 Chest 1/2
- Renovation Site 4733 Chest 2/2
- Republic Research Laboratory Chest 1/3
- Republic Research Laboratory Chest 2/3
- Republic Research Laboratory Chest 3/3
- Rift Passage Chest 1/1
- Riverbed Watch Chest 1/1
- Rooftops Chest 1/2
- Rooftops Chest 2/2
- Sheltered Hollow Chest 1/1
- Smuggler's Tunnels Chest 1/1
- Sodden Grotto Chest 1/1
- Southern Reach Chest 1/3
- Southern Reach Chest 2/3
- Southern Reach Chest 3/3
- Swindler's Wash Chest 1/2
- Swindler's Wash Chest 2/2
- The Archive Chest 1/2
- The Archive Chest 2/2
- Timeworn Bridge Chest 1/1
- Trailhead Pantheon Chest 1/2
- Trailhead Pantheon Chest 2/2
- Undercity Meats Chest 1/1
- Untamed Downs Chest 1/6
- Untamed Downs Chest 2/6
- Untamed Downs Chest 3/6
- Untamed Downs Chest 4/6
- Untamed Downs Chest 5/6
- Untamed Downs Chest 6/6
- Veiled Hangar Chest 1/2
- Veiled Hangar Chest 2/2
- Viscid Bog Chest 1/3
- Viscid Bog Chest 2/3
- Viscid Bog Chest 3/3
- Water Treatment Works Chest 1/4
- Water Treatment Works Chest 2/4
- Water Treatment Works Chest 3/4
- Water Treatment Works Chest 4/4
- Wayfinder's Tomb Chest 1/2
- Wayfinder's Tomb Chest 2/2
- Whistling Drop Chest 1/2
- Whistling Drop Chest 2/2
- Winding Ravine Chest 1/3
- Winding Ravine Chest 2/3
- Winding Ravine Chest 3/3
- Yurt Barracks Chest 1/3
- Yurt Barracks Chest 2/3
- Yurt Barracks Chest 3/3
All known locations on the map Coruscant
 Freight Handling Depot Chest 1/1▶ show the map ◀
Weapon Materials - Coruscant Paint. You have to wall-run across one of the walls to get to this chest.

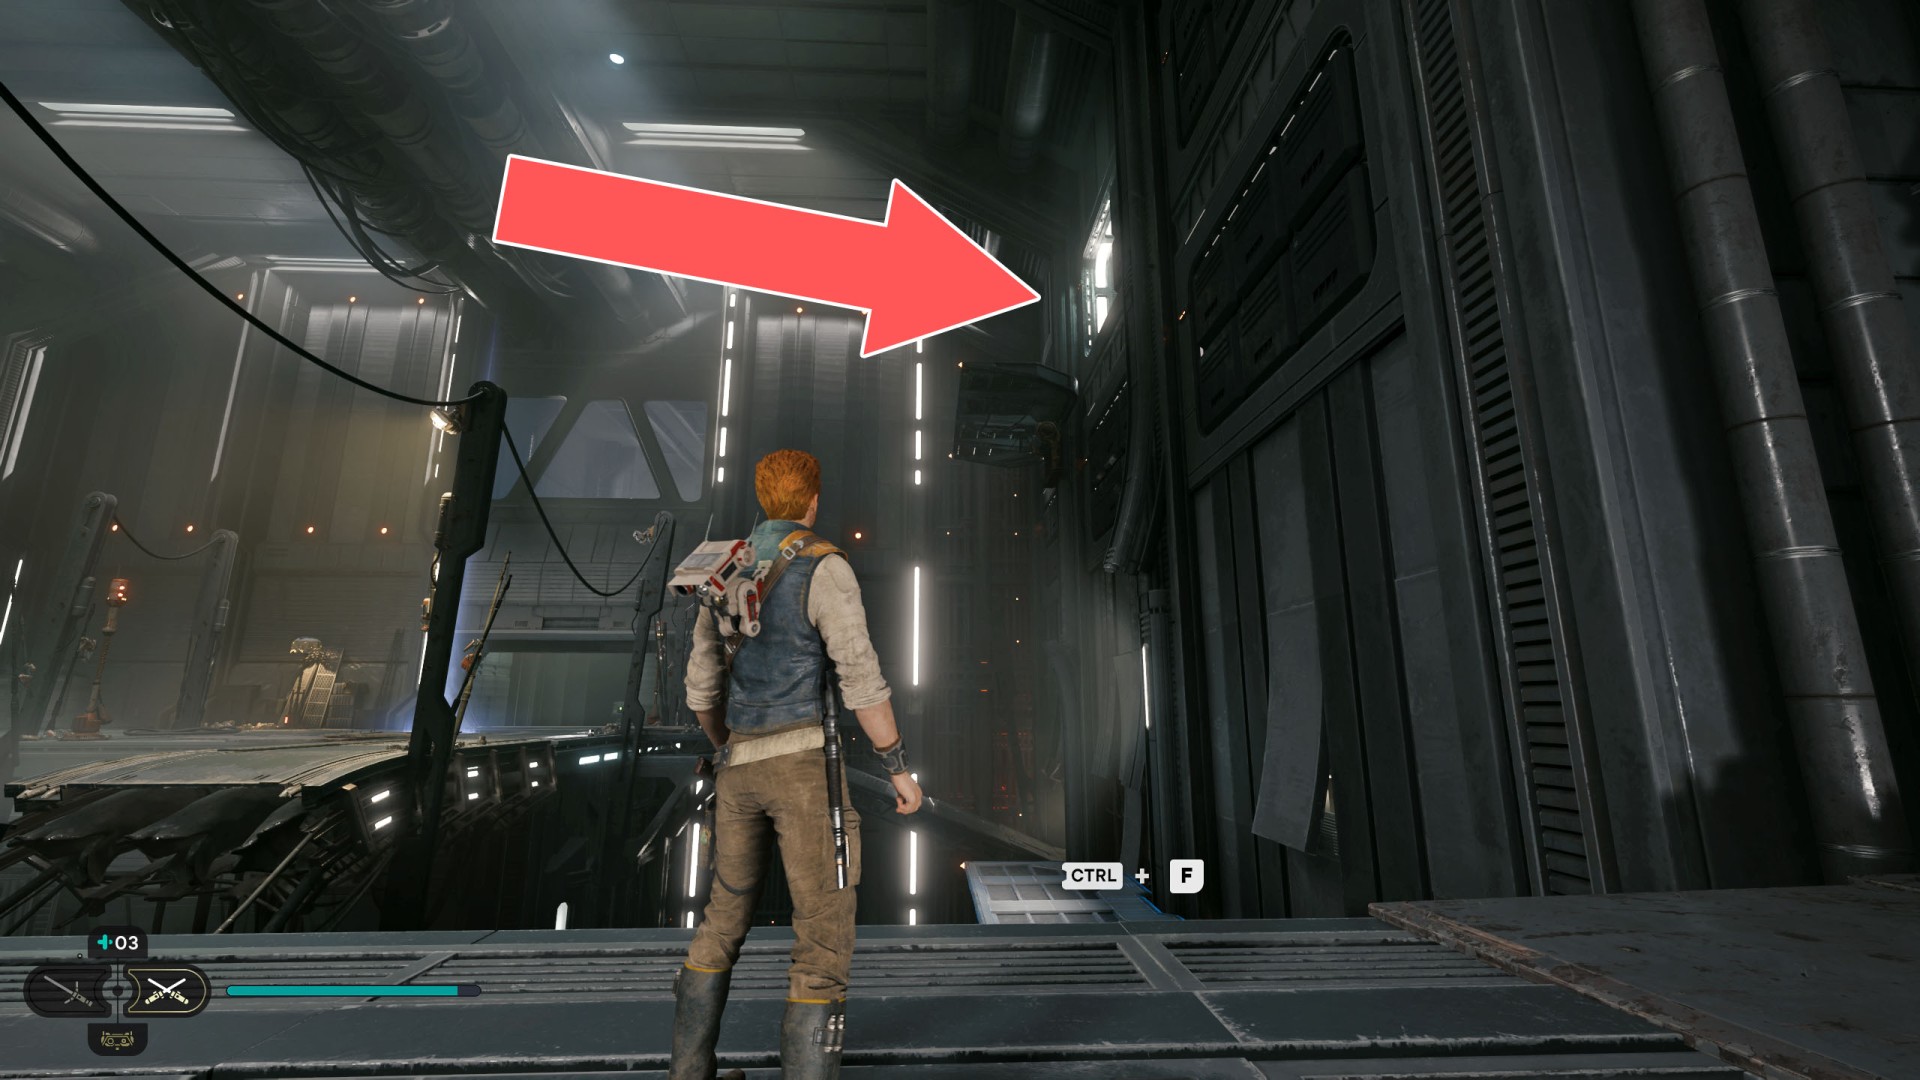
Hangar 2046-C Chest 1/1▶ show the map ◀
Despite the fact that it counts as a chest it is not a chest, but a terminal that BD-1 must hack. When you do this you will get a new ability - Slice: DT Sentry (Press [Key/Button] to slice and control damaged DT Sentry Droids). The door blocking access to it will only open when you get the "BD-1 Electro Darts", which will happen in one of the game's later story missions.

Renovation Site 4733 Chest 1/2▶ show the map ◀
BD-1 Materials - Coruscant Paint. This chest is located in a small locked room. To unlock the door order BD-1 to slice the terminal.

Renovation Site 4733 Chest 2/2▶ show the map ◀
Grip - Patience. To get here you have to wall-run across the two blue curved signs.


Rooftops Chest 1/2▶ show the map ◀
Emitter - Patience. You should notice it right after you reach the Rooftops location for the first time.

Rooftops Chest 2/2▶ show the map ◀
Switch - Patience. To get here, first order BD-1 to splice the terminal and thus open the door. Use the force push to close the hatch on the pipe and then do two double jumps to jump from platform to platform.


All known locations on the map Koboh


Alignment Control Tower Chest 2/2▶ show the map ◀
Map Upgrade: Ugrades. This terminal counts as chest. To be able to use this terminal you'll first need to complete (pick up essences) all seven Chambers found on Koboh. From the moment you do this, all the upgrades you have not yet collected will be marked on the maps.


Basalt Rift Chest 5/5▶ show the map ◀
Pommel - Diligence. It's inside a small cave at ther bottom level. Order BD-1 to slice this chest.


Bygone Settlement Chest 2/4▶ show the map ◀
Head - Geonosian. To get here you need to start by climbing up to the rocky ledge located in the middle of the settlement. From there, you will be able to jump onto a line. Ride the rope, run along the vertical walls, ride another rope and you will reach the platform where the chest is located.


In order to climb the rock ledge located in the central part of the settlement you must use Nekko. This will be possible from the side where the meditation point is located.

Bygone Settlement Chest 3/4▶ show the map ◀
Hair - Choppy Forward. Start on the platform where the Bygone Settlement Chest 2/4 is located. Use the rope to jump to the other side.


Chamber of Fortitude Chest 1/1▶ show the map ◀
BD-1 Materials - Two-Tone Metal. Order BD-1 to slice it.


Derelict Dam Chest 6/8▶ show the map ◀
Head - Scrapyard. Move the crate to allow you to jump on the wall you can run along.


Derelict Dam Chest 7/8▶ show the map ◀
Weapon Materials - Two-Tone Metal. It's a red chest. Requires: BD-1 Electro Darts. To unlock this chest, use the darts and shoot the elecrtic device located on the other side of the cave. Once you open the chest you will be attacked by Vashtan Wolfe.

Derelict Dam Chest 8/8▶ show the map ◀
Stim Canister. To reach this chest you must open the Big Metal Gate and defeat Gorocco Matriarch.


Foothill Falls Chest 3/4▶ show the map ◀
Stim Canister. Use the nekko you find in the cave to get to the platform above the building. The terminal you find there will allow you to call up a rolling mine. Throw the mine through the hole in the roof at the door blocking access to the chest.


Foothill Falls Chest 4/4▶ show the map ◀
Weapon Materials - Droid Paint. To get to the platform where the chest is you must have the Upgraded Ascension Cable. But you can also open it from a lower platform. All you need is to have the Lift and Slam ability.


Imperial Post 8L-055 Chest 1/2▶ show the map ◀
Weapon Materials - Textured Rubber. It's a red chest. Requires: BD-1 Electro Dart.


Lucrehulk Core Chest 2/2▶ show the map ◀
Pommel - Persistence. Requires: Lift and Slam. Lift it then slam it.

Mountain Ascent Chest 1/6▶ show the map ◀
Slice: Security Droid. It's a terminal. Order BD-1 to slice it.


Mountain Ascent Chest 3/6▶ show the map ◀
Beard - Mustache and Patch. Order BD-1 to slice this chest.


Pyloon's Saloon Chest 2/2▶ show the map ◀
Music Track - Eerin Siinaa. To get into this room you must find a way to open Moran Locker Door.

Rambler's Reach Outpost Chest 1/10▶ show the map ◀
Stim Canister. To enter the room where this chest is you must buy a Mysterious Keycode from Doma's Outpost Commodities shop, it will cost you 10 Priorite Shards.

Rambler's Reach Outpost Chest 2/10▶ show the map ◀
Shirt - Tactical. This chest is on the roof of the building.


Rambler's Reach Outpost Chest x/10▶ show the map ◀
BD-1 Materials - Rebel Paint. Requires: Lift and Slam.

Rambler's Reach Outpost Chest x/10▶ show the map ◀
Map Upgrade: Seed Pods.


Rambler's Reach Outpost Chest x/10▶ show the map ◀
Jacket - Duelist. Recruit T-1N8.
Rambler's Reach Outpost Chest x/10▶ show the map ◀
BD-1 Materials - Unique Metal. Requires: Nekko Mount, Lift and Slam.


Rift Passage Chest 1/1▶ show the map ◀
BD-1 Materials - Kashyyyk Paint. Requires: BD-1 Electro Dart.


Southern Reach Chest 3/3▶ show the map ◀
Blaster - Quickdraw. Requires: Lift and Slam, Koboh Grinder.


Untamed Downs Chest 5/6▶ show the map ◀
Jacket - Hunter. It's a red chest. Requires: BD-1 Electro Dart.

Untamed Downs Chest 6/6▶ show the map ◀
Grip - Arakyd Heavy. It's a red chest. Requires: BD-1 Electro Dart.


Winding Ravine Chest 1/3▶ show the map ◀
Weapon Materials - Warm Metal. To get to this chest you must run along the walls and turn to a side alley.


Winding Ravine Chest 2/3▶ show the map ◀
Beard - Goatee. To get here you must stack one crate on top of another and move them to the right place.


Winding Ravine Chest 3/3▶ show the map ◀
Lightsaber - Hunter. To get here you must first reach the Relter and fly down to this rock shelf.


Yurt Barracks Chest 3/3▶ show the map ◀
Body - Enforcer. It's a red chest. Requires: BD-1 Electro Dart.

All known locations on the map Jedha


Arid Flats Chest 3/4▶ show the map ◀
Jacket - Exile. Requires: Upgraded Ascension Cable (Grappling Hook). You can get here from the location of the Arid Flats Treasure 6/9.

Arid Flats Chest 4/4▶ show the map ◀
Emitter - Detachment. Requires: Upgraded Ascension Cable (Grappling Hook).


Buried Refuge Chest 1/1▶ show the map ◀
Photoreceptors - Kaminoan. This chest is at the bottom of an underwater tunnel.


Desert Passages Chest 1/2▶ show the map ◀
Pommel - Scrapyard. In order to unlock the door to the room where this chest is, BOTH balls that are in this room should be on the same side as this door. Use Force Pull / Push to rearrange them as long as it is needed.


Desert Ridge Chest 1/4▶ show the map ◀
Music Track - Revisit Waters. Do a wall-run to a small rock shelf and then double jump to the ledge where the chest stands.


Desert Ridge Chest 4/4▶ show the map ◀
Emitter - Temperance. To get here you need to climb to the top of the Path of Conviction, which means you need the upgraded version of the Ascension Cable to do so, then use the Relter and fly to the edge of the plateau where this chest is.


Halls of Ranvell Chest 1/2▶ show the map ◀
Hair - Undercut. At some point, while you're climbing, Merrin will take out some soldiers without your help. A few steps further, look up and you should notice an opportunity to bounce off the wall to jump onto the ledge above. There you will find this chest.


Halls of Ranvell Chest 2/2▶ show the map ◀
BD-1 Materials - Common Plastoid. This chest is in the room at the very top of the ruins.

Monastery Walls Chest 1/6▶ show the map ◀
Head - Nocular. On the middle level of the ruins. To get here you need to slide down the slope starting near the Monastery Walls Databank 1/3, grapple to the handle point on the wall, traverse the metal beam, and finally perform a wall-run.


Monastery Walls Chest 2/6▶ show the map ◀
Shirt - Wanderer. You will get here by the same route as to Monastery Walls Chest 1/6. The difference is that at a certain point, you have to jump over three stone pillars.

Monastery Walls Chest 3/6▶ show the map ◀
Audio Sensors - Nocular. This chest is located on the desert level, inside a building guarded by a few stormtroopers.

Monastery Walls Chest 4/6▶ show the map ◀
Photoreceptors - Nocular. In order to get to this chest you must jump over a few stone pillars.

Monastery Walls Chest 5/6▶ show the map ◀
Pants - Wanderer. To be able to get here you need to learn the "Dash" ability which will happen when you visit the Singing Ruins. It will allow you to make a long enough jump to the wall on the opposite side and climb higher.


Monastery Walls Chest 6/6▶ show the map ◀
Blaster - Skeleton Key. To be able to get here you need to learn the "Dash" ability which will happen when you visit the Singing Ruins. You can get here from the side of the platform where you find the Monastery Walls Treasure 6/7.


Path of Conviction Chest 1/1▶ show the map ◀
Weapon Materials - Wood. To get here you must have an upgraded version of the Ascension Cable (Grappling Hook). You will upgrade it during the second story visit to the Shattered Moon.


Path of Persistence Chest 1/1▶ show the map ◀
BD-1 - Industrial. To get to this chest you must have an upgraded version of the Ascension Cable (Grappling Hook). You will upgrade it during the second story visit to the Shattered Moon. Grapple to a flying hook point and then grapple to the hook point located on the rock.


Path of Restoration Chest 1/1▶ show the map ◀
Shirt - Wanderer. To be able to get here you need to learn the "Dash" ability which will happen when you visit the Singing Ruins.


Penitent Chambers Chest 2/2▶ show the map ◀
Body - Nocular. To get here start near the Penitent Chambers Shortcut #1 and climb up the wall. To get over the breach do a wall-run.


The Archive Chest 1/2▶ show the map ◀
Switch - Scrapyard. To be able to cross the green barrier and reach this chest you need to get Merrin's Charm which will happen when you visit the Buried Refuge.

The Archive Chest 2/2▶ show the map ◀
This chest is on the middle floor of the archives. You will get here by the same route as to the The Archive Treasure 2/5. Then you have to jump to the platform on the other side. It's a red chest so you need the "BD-1 Electro Darts" ability to unlock it.

An electric device you have to overload is behind the wall.

Timeworn Bridge Chest 1/1▶ show the map ◀
Switch - Temperance. To get here take the Timeworn Bridge Shortcut #3 and jump off the rope at the right moment.


Veiled Hangar Chest 1/2▶ show the map ◀
Lightsaber - Cere Junda. This chest will appear here after completing all missions of the main game storyline set on Jedah.

Veiled Hangar Chest 2/2▶ show the map ◀
Emitter - Scrapyard. You will be able to reach this chest after completing all the missions of the main game storyline taking place on Jedah.


Wayfinder's Tomb Chest 2/2▶ show the map ◀
Map Upgrade: Treasures. It's inside the tomb. This terminal counts as chest. Order BD-1 to hack it. From the moment you do this, all the treasures you have not yet collected will be marked on the maps.

Whistling Drop Chest 1/2▶ show the map ◀
Barrel - K3 Vindicator. This chest is hidden under a burning wrecked shuttle.

Whistling Drop Chest 2/2▶ show the map ◀
Grip - K3 Vindicator. To be able to cross the green barrier and reach this chest you need to get Merrin's Charm which will happen when you visit the Buried Refuge.

All known locations on the map Shattered Moon
Array Channel Chest 1/1▶ show the map ◀
Jacket - Duelist. This chest is on a small top platform. You will get there by running along two vertical walls. Choose the right moment to avoid being hit by the energy beam.


Assembly Staging Chest 1/2▶ show the map ◀
Stim Canister. To get here you must ride a zipline in the middle of which there is an electrical discharge. You have to jump over it at the right moment.


Automated Forge Chest 1/3▶ show the map ◀
Grip - Harmony. To get here you have to jump over two small platforms. Do it when they are not breathing fire or stick to their edges then you will avoid fire.

Automated Forge Chest 2/3▶ show the map ◀
Weapon Materials - Unique Metal. In order to reach this chest you need to come here from the side of two vertical walls that you will have to wall-run across.


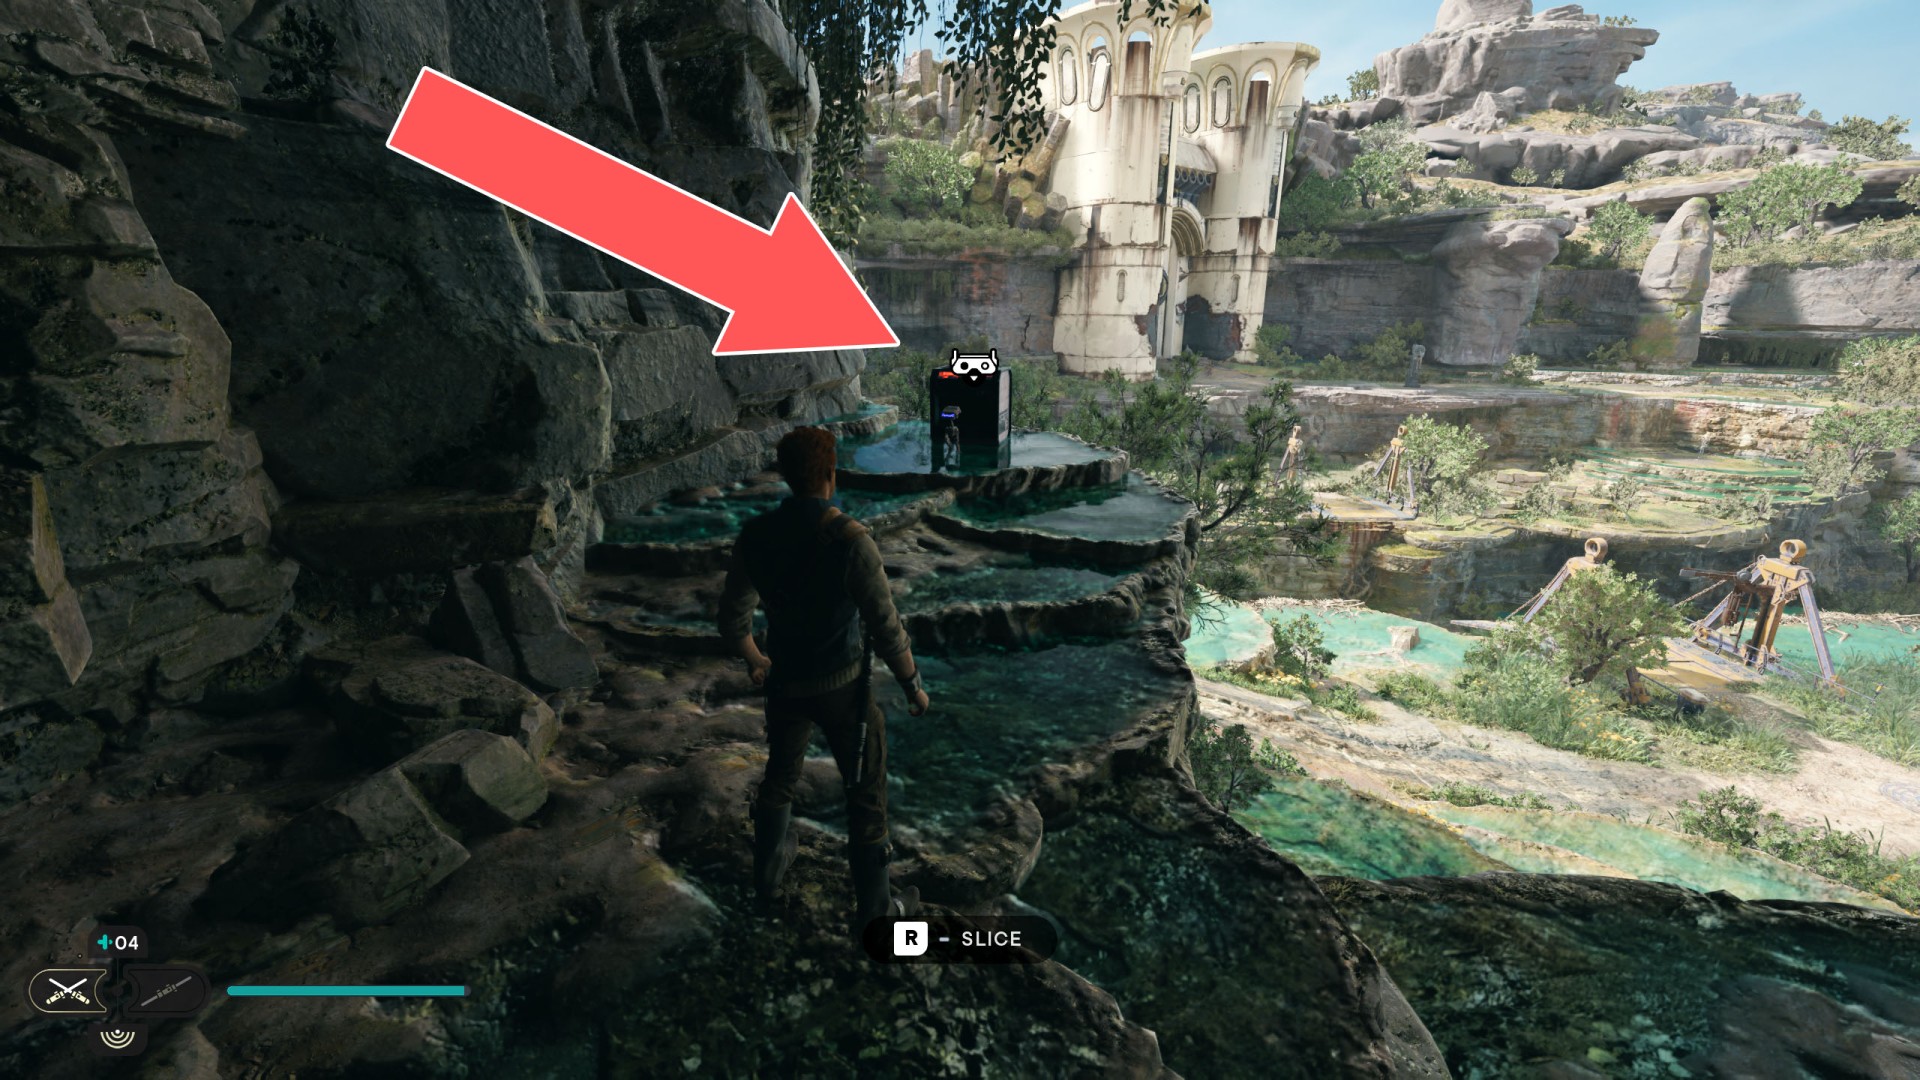
Republic Research Laboratory Chest 1/3▶ show the map ◀
Despite the fact that it counts as a chest it is not a chest, but a terminal that BD-1 must hack. When you do this you will get a new ability - Slice: Droideka (Press [Key/Button] to slice and control damaged Droidekas).

To be able to get here you must destroy the "vines" obstructing the round window on the upper floor. To do this, you should use the Koboh Grinder ability.


Republic Research Laboratory Chest 3/3▶ show the map ◀
Body - RSKF-44. It's a red chest so you need the "BD-1 Electro Darts" ability to open it.

All known locations on the map Nova Garon

Central Command Chest 2/2▶ show the map ◀
Map Upgrade: Databank. This terminal counts as chest. Order BD-1 to hack it. From the moment you do this, all the databanks you have not yet collected will be marked on the maps.

Hangar Bay Chest 1/1▶ show the map ◀
Shirt - Bomber. To get to the deck where the chest is, use the "BD-1 Electro Darts" ability to move the arm with the handle and use the handle point to jump onto the deck.


Hangar Bay Exterior Chest 1/1▶ show the map ◀
BD-1 Materials - Inquisitor Paint. From the place where the Hangar Bay Exterior Treasure 1/1 is located, jump up into the hallway that is above.

