An interactive map of the Island, the third of the locations we explore in Resident Evil 4 Remake. Chapters 13-16 are set on the isle grounds.
The Island
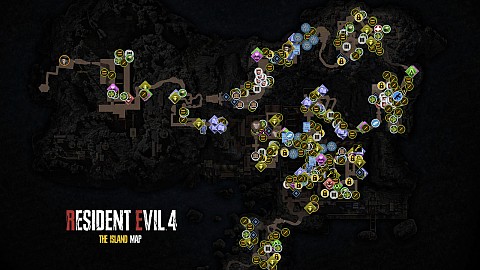
Markers on the map
- Clockwork Castellans4
- Boss Fights4
- Treasures24
- Files22
- Puzzles3
- Key Items4
- Requests4
- Request Objectives10
- Request Objectives4
- Typewriters10
- Merchants8
- First Aid Sprays4
- Herbs24
- Locked Passages18
- Weapons2
- Grenades3
- Ammo18
- Gunpowder9
- Crates81
- Barrels49
- Containers11
- Traps17
- Story Related4
- Story Related17
- Climbing Spots2
- Other9
Points of interest
Clockwork Castellans
Clockwork Castellans are small doll figurines hidden in various places in the game that need to be destroyed. Most of them are very difficult to spot but somewhat helpful in finding them is that when you are near the Clockwork Castellan, you will be able to hear its distinctive ticking-like sound...
Boss Fights
Locations where you will have to fight against more challenging opponents.
Treasures
Treasures, The Island. List of all the treasures that can be found on the Island (RE4 Remake) and which are needed to unlock the achievement / trophy "Raider" - Obtain all treasures on the island treasure map in a single playthrough.
Note: Treasures that drop from monsters do not count towards this achievement / trophy.
Files
A list of all the Files, The Island (notes, photos, etc.) you can access while exploring the island in Resident Evil 4 Remake.
Puzzles
Key Items
Requests
Notes from which you will learn about the Requests, what your task is and what the reward is for it. Reading them is not necessary to be able to fulfill a given request as long as you know what to do, but it makes it easier because it gives you clues, for example, markers will appear on the map.
Request Objectives
Request Objectives. All sorts of items and objects that you have to find and do something with, sometimes destroy, sometimes sell, in order to complete the requests available in the game.
Typewriters
The Typewriters can be used to save the game, as an additional place to store inventory items, and to customize the briefcase which provides various bonuses.
Merchants
Merchants at which you can buy new weapons, weapon parts, briefcase capacity upgrade, ingredients, recipes, etc. Their stock expands as you progress through the game. You can also sell found treasures at them.
Another function that merchants provide is upgrading the weapons you own. They will do this for the right amount of cash.
When you complete any of the Requests, you must return to any merchant in order to receive the reward for it in the form of an appropriate amount of Spinels. You can then exchange your Spinels for an item, such as a map showing where all the treasures are hidden or an exclusive weapon upgrade.
First Aid Sprays
First Aid Sprays are Health Items and can be used to fully heal your character.
Herbs
Herbs are Health Items. Green herbs can be used to partially heal your character. Green and other color herbs can be used to make mixed herbs. Mixed herbs containing yellow herbs permanently increase Leon's maximum life points.
Weapons
Grenades
Ammo
Gunpowder
Containers
Story Related
Climbing Spots
In these places there are some kind of openings in the wall, ladders, etc. located somewhere high up. In order to use them, there must be a companion with you. Then you will be able to lift the other person up and then she/he will climb higher and, for example, lower the ladder for you to use, or go through the opening to the other side and open a door or gate for you, which can only be unlocked from the other side.