Welcome to guides4gamers.com

Treasures, Red Dead Redemption 2 Points of interest

This collection includes every marker from the Treasures category of points of interest in Red Dead Redemption 2, all placed on interactive maps created specifically for the game.

A list of places where you can find treasure maps and corresponding treasures. Treasure maps show you where you can find the next map in the series or the final treasure.

In addition to the treasures you can reach using the treasure maps, there are also places you can simply visit and take away the gold bars that are there.

Index

The index below enables quick navigation to the desired marker / point of interest.

All known locations on the map - World Map

TreasureHigh Stakes Treasure Map #2

This map is located in a small rocky niche behind the waterfall. You can get the previous map leading to this place from random encounter, treasure hunter.

High Stakes Treasure Map #2

High Stakes Treasure Map #2

This map shows where the next map is hidden.

High Stakes Treasure Map #2

You can get the first treasure map (High Stakes Treasure Map #1) from the treasure hunter. The place where you can find this treasure hunter is random but it is relatively common to find him near the road between Wallace Station and Cumberland Falls. The guy will not want to give you the map on his own so you need to lasso him and tie him up or shoot him. Then you will be able to take the map.

Show the map

TreasureHigh Stakes Treasure Map #3

This map is hidden in a hole in the trunk of a fallen tree.

High Stakes Treasure Map #3

High Stakes Treasure Map #3

The map shows the final location where the treasure is hidden.

High Stakes Treasure Map #3

Show the map

TreasureHigh Stakes Treasure Stash

You will find 3 gold bars here. Follow path North East uphill from the fort. Pass through the gap between the two peaks & take the left path down. When you get to the rock carving, take the path above it. Be careful because it's easy to slide down here.

High Stakes Treasure Stash

Go straight ahead, jump down twice and walk under the overhang. Between the rocks you will find 3 gold bars.

High Stakes Treasure Stash

High Stakes Treasure Stash

Show the map

TreasureJack Hall Gang Map #2

Related missions: All That Glitters

This map can be found on the side of the Caliban's Seat mountain and it's hidden in the small wall crack. You can buy the previous map leading to this place (Jack Hall Gang Map #1) from Máximo Cristóbal Valdespino. For detailed information on how to get to this map check the description of the All That Glitters mission.

Jack Hall Gang Map #2

Show the map

TreasureJack Hall Gang Map #3

Related missions: All That Glitters

For detailed information on how to find this map check the description of the All That Glitters mission.

Jack Hall Gang Map #3

Show the map

TreasureJack Hall Gang Treasure

Related missions: All That Glitters

It contains two Gold Bars. Each one of them is worth $500. For detailed information on how to find this treasure check the description of the All That Glitters mission.

Jack Hall Gang Treasure

Show the map

TreasureLe Tresor des Morts Map #1

Le Tresor des Morts treasure is an extra treasure that's only available to those who pre-ordered the Special or Ultimate Editions of the game, as well as those who pre-ordered on PC.

Le Tresor des Morts Map #1

You discover a Map in an old jail cell that lies on the edge of a small settlement that was destroyed by fire.

Le Tresor des Morts Map #1

The map shows where the next clue to reach the treasure is hidden.

Le Tresor des Morts Map #1

Show the map

TreasureLe Tresor des Morts Riddle Note

This note is located in the underground passage under the docks in Saint Denis.

Le Tresor des Morts Riddle Note

Go to Saint Denis docks and head down the steps shown in the picture below.

Le Tresor des Morts Riddle Note

Drop into the water and follow the edge of the docks to a steel gate.

Le Tresor des Morts Riddle Note

Enter the underground passage.

Le Tresor des Morts Riddle Note

Find the note in the crack in the wall.

Le Tresor des Morts Riddle Note

This next clue is a rhyme, there's also a small sketch on the back of the note.

Where the floods rise up

But the dead stay dry

And the colored light falls

When the sun's in the sky.

There to your left you'll find our wealth

It's no good to us without our health.

Le Tresor des Morts Riddle Note

Show the map

TreasureLes Tresor des Morts Treasure

The treasure is hidden in the crypt at the cemetery in Saint Denis. Examine one of the plates in the crypt and you will find six Gold Bars inside.

Les Tresor des Morts Treasure

Les Tresor des Morts Treasure

Show the map

TreasureLockbox (Gold Bar)

The lockbox is lying under a desk in a burnt sheriff's office in Limpany. It contains one Gold Bar ($500) and Special Horse Stimulant Pamphlet. It's an easy way to get a lot of cash right after you reach the second chapter of the game.

Lockbox (Gold Bar)

Lockbox (Gold Bar)

Show the map

TreasureLockbox (Gold Bar)

It's in the ruins of the burnt-out mansion. Available when the Blood Feuds, Ancient and Modern mission is completed. It contains one Gold Bar.

Lockbox (Gold Bar)

Show the map

TreasureStatue Puzzle (Three Gold Bars)

You have to solve the puzzle. Press the buttons on the statues B - D - F - G and the secret storage will open in the statue in the middle. If you have pressed the wrong button, then you can push it out by pressing the button from the back of the statue.

Statue Puzzle (Three Gold Bars)

Statue Puzzle (Three Gold Bars)

There are three gold bars there.

Statue Puzzle (Three Gold Bars)

You can get to the cave where the statues are located through a small crack in the rocks.

Statue Puzzle (Three Gold Bars)

Note: These are statues that have 2, 3, 5 and 7 fingers (prime numbers). A statue without one hand corresponds to the number 7 because its other hand is on the ground.

Show the map

TreasureThe Poisonous Trail Map #1

You will find it in the lock box under the bed.

The Poisonous Trail Map #1

The map shows the place where the next clue leading to the treasure is located.

The Poisonous Trail Map #1

Show the map

TreasureThe Poisonous Trail Map #2

The Poisonous Trail Map #2

The Poisonous Trail Map #2

The Poisonous Trail Map #2

The map shows the place where the next clue leading to the treasure is located.

The Poisonous Trail Map #2

Show the map

TreasureThe Poisonous Trail Map #3

The Poisonous Trail Map #3

The Poisonous Trail Map #3

The map shows the place where the final treasure is located.

The Poisonous Trail Map #3

Show the map

TreasureThe Poisonous Trail Treasure

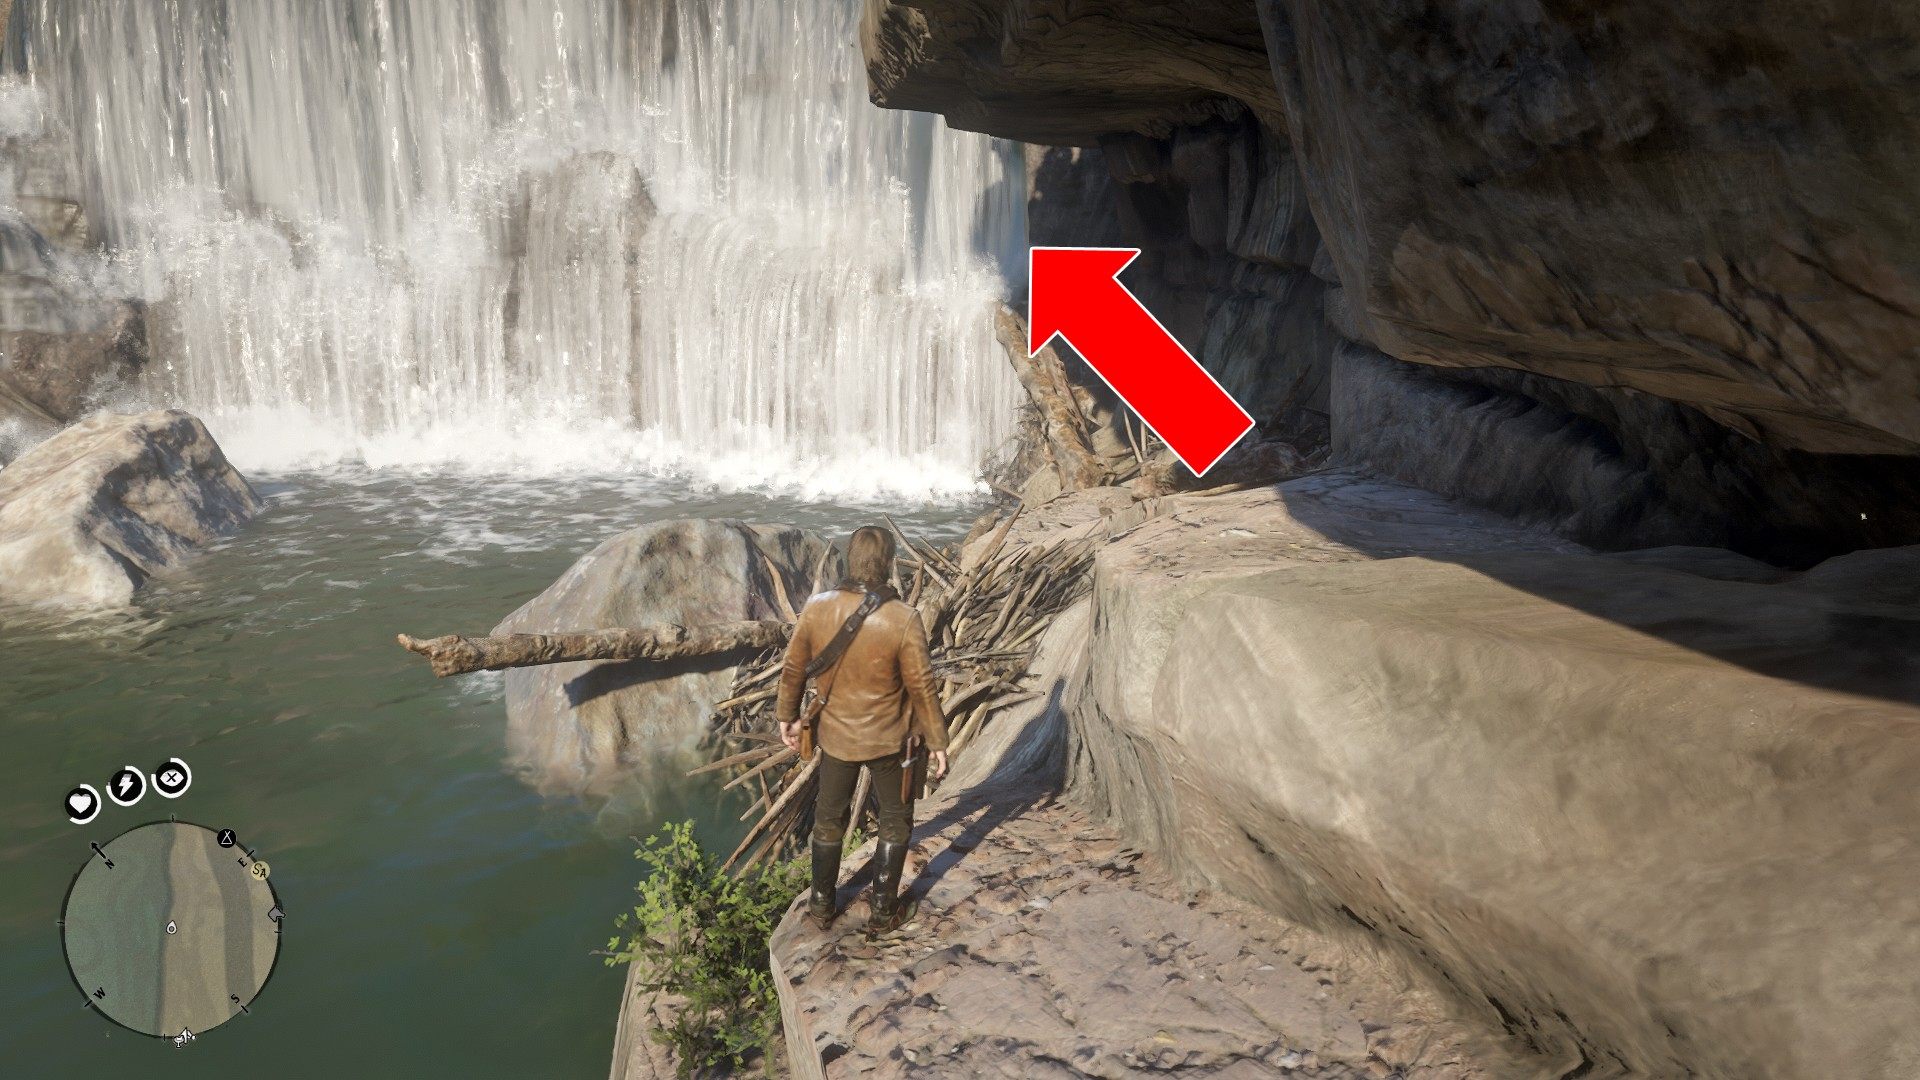
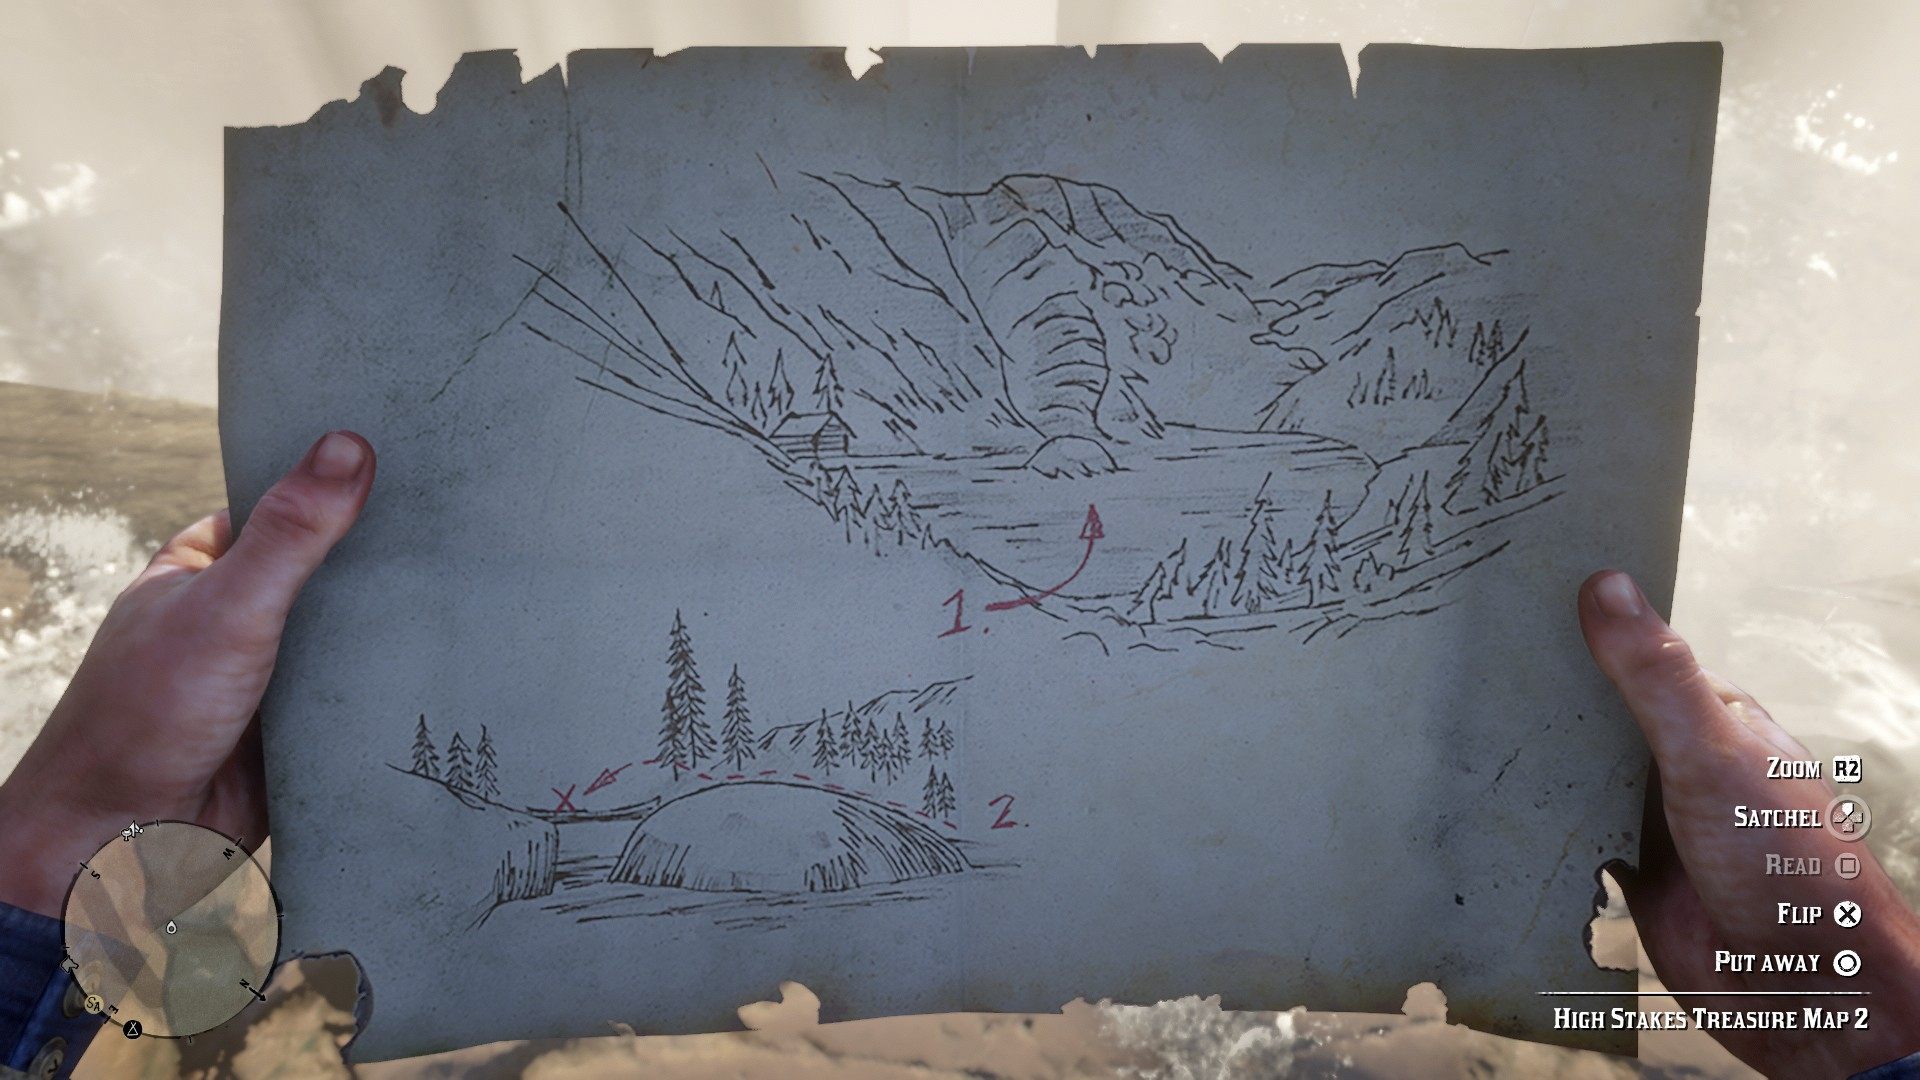
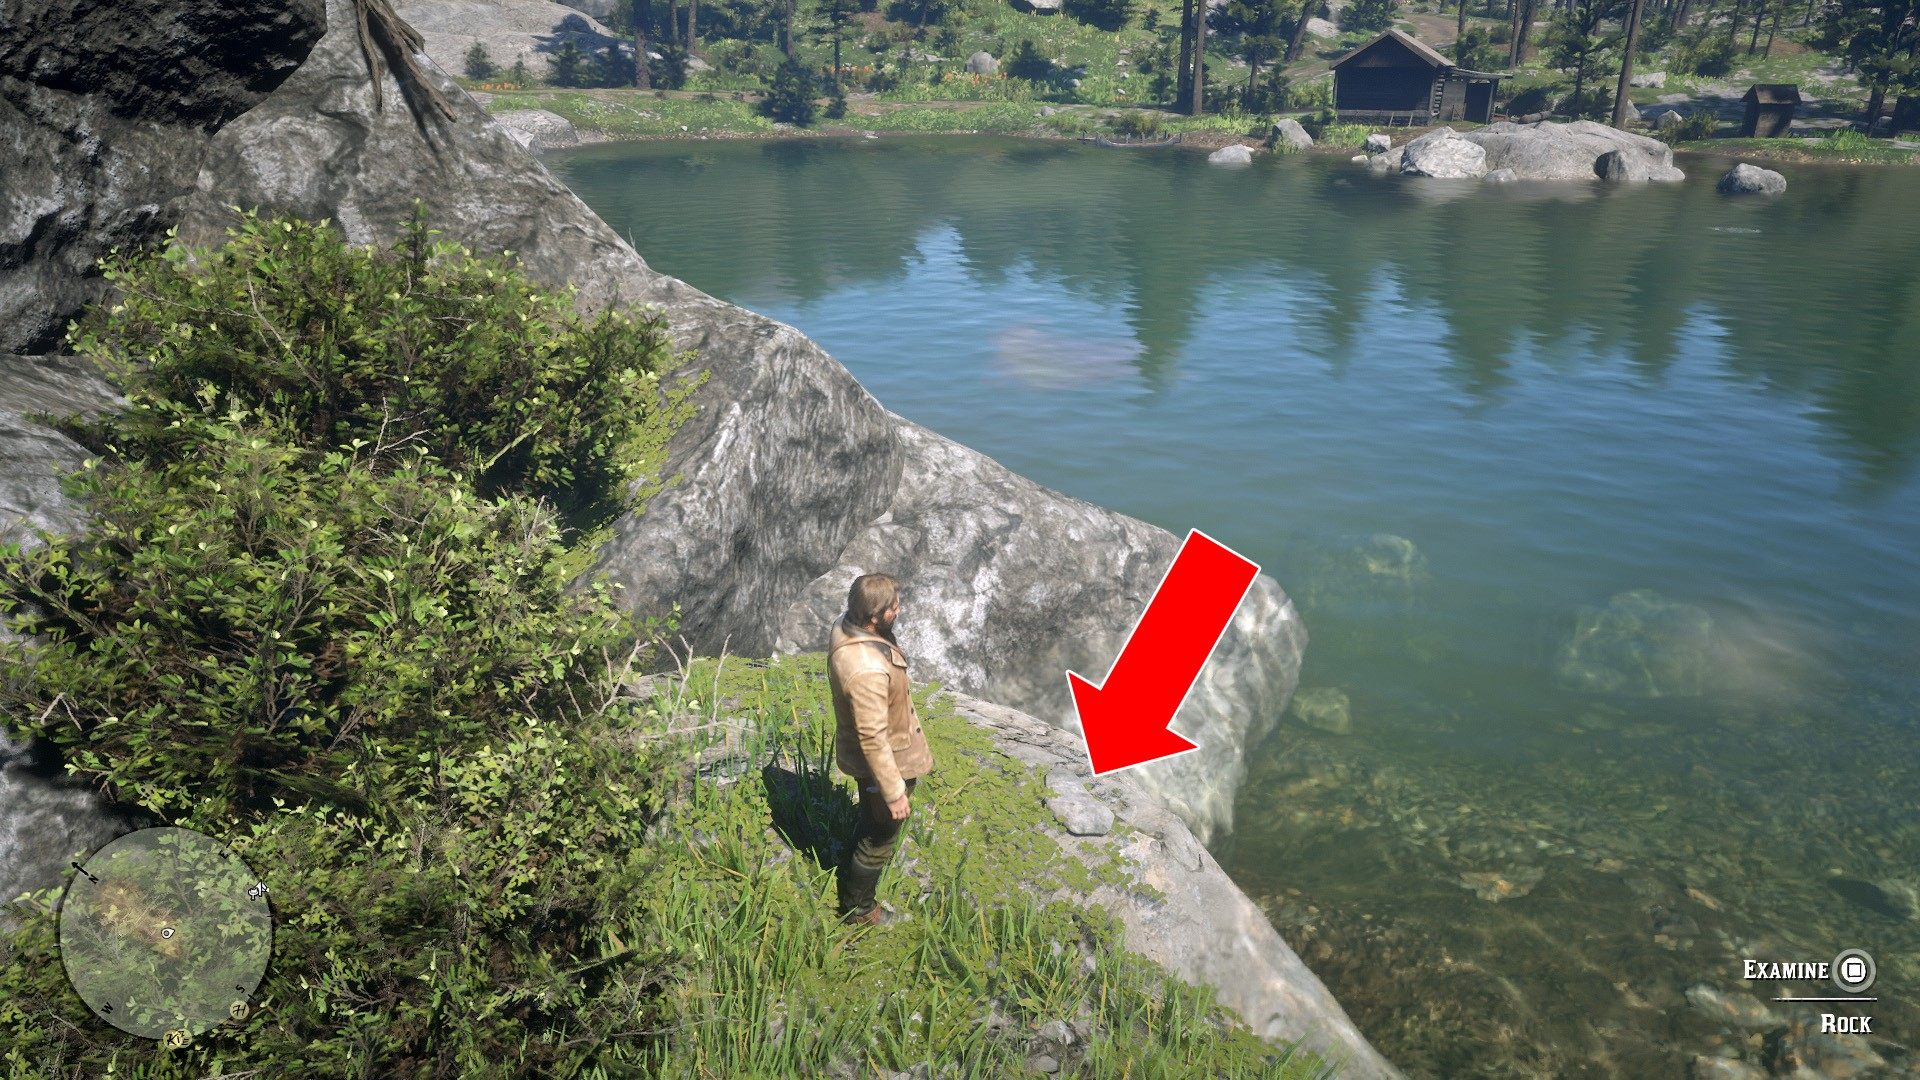
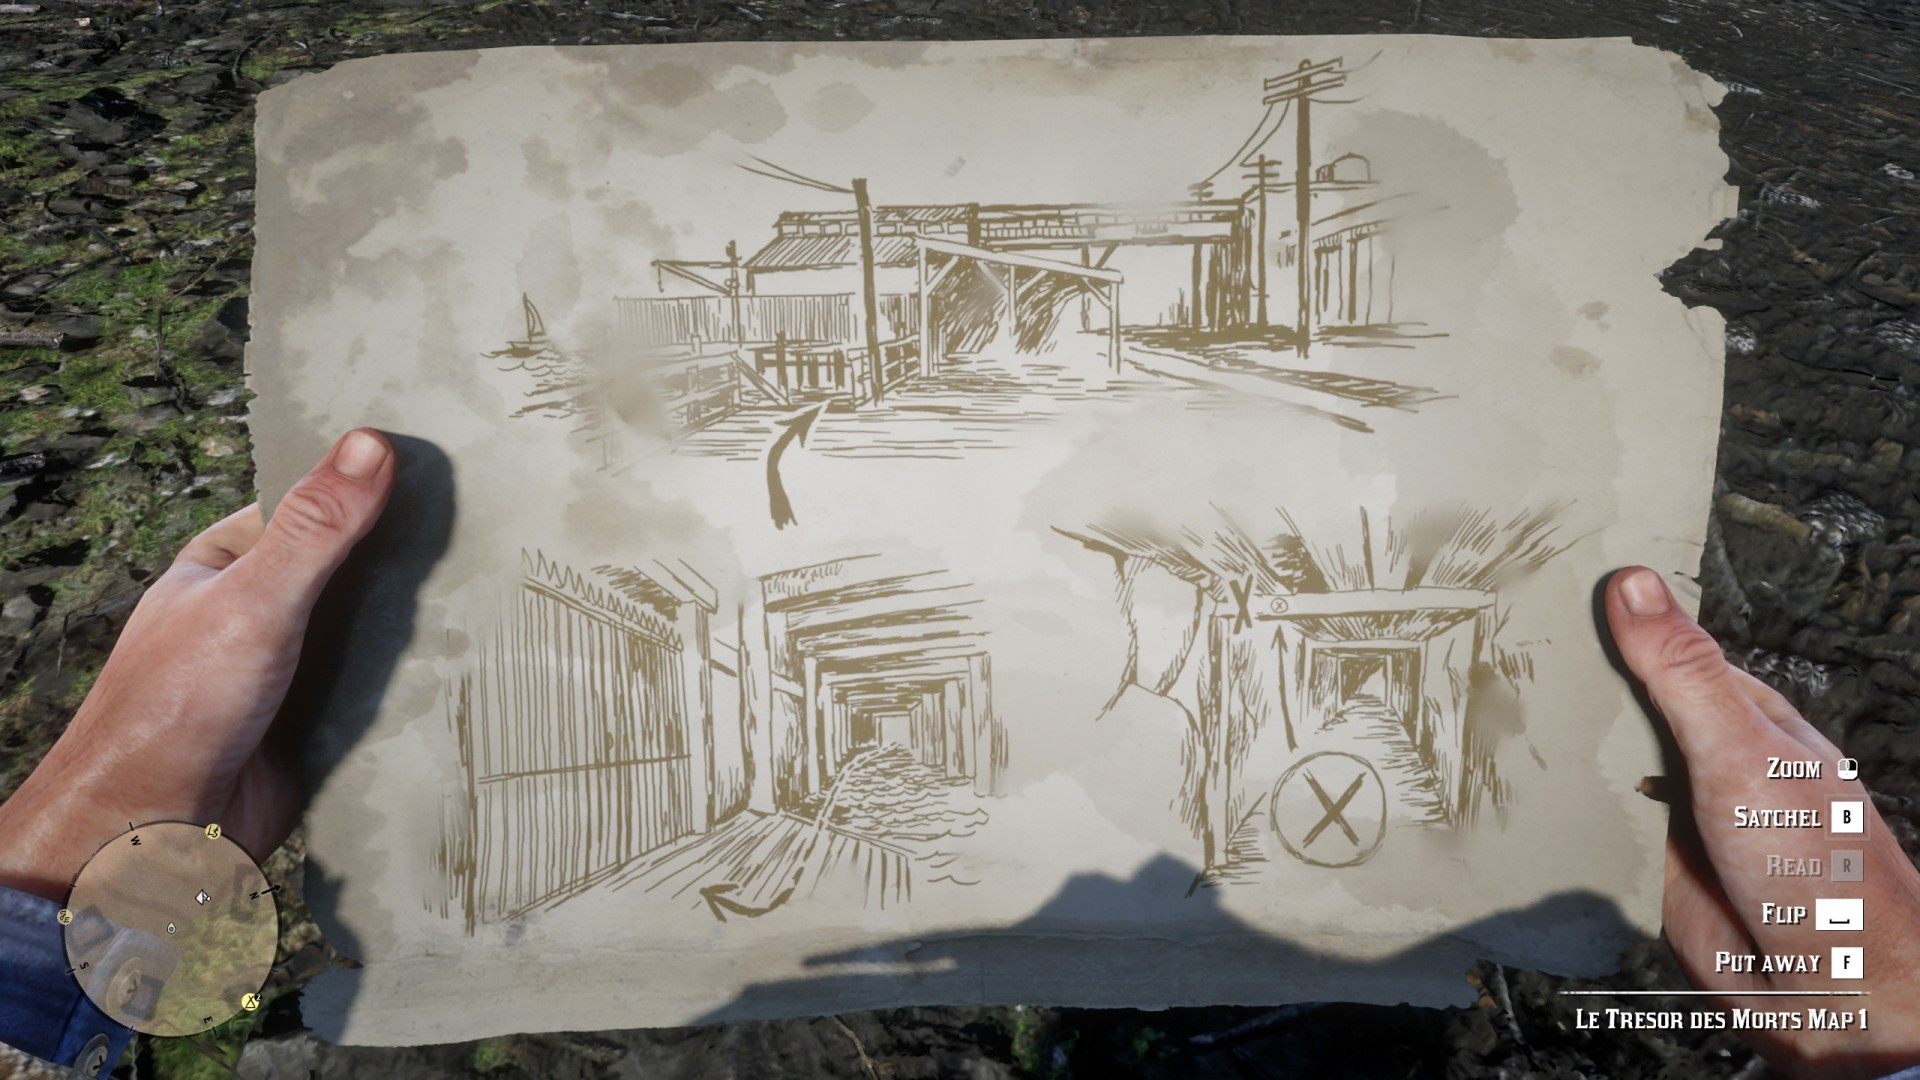
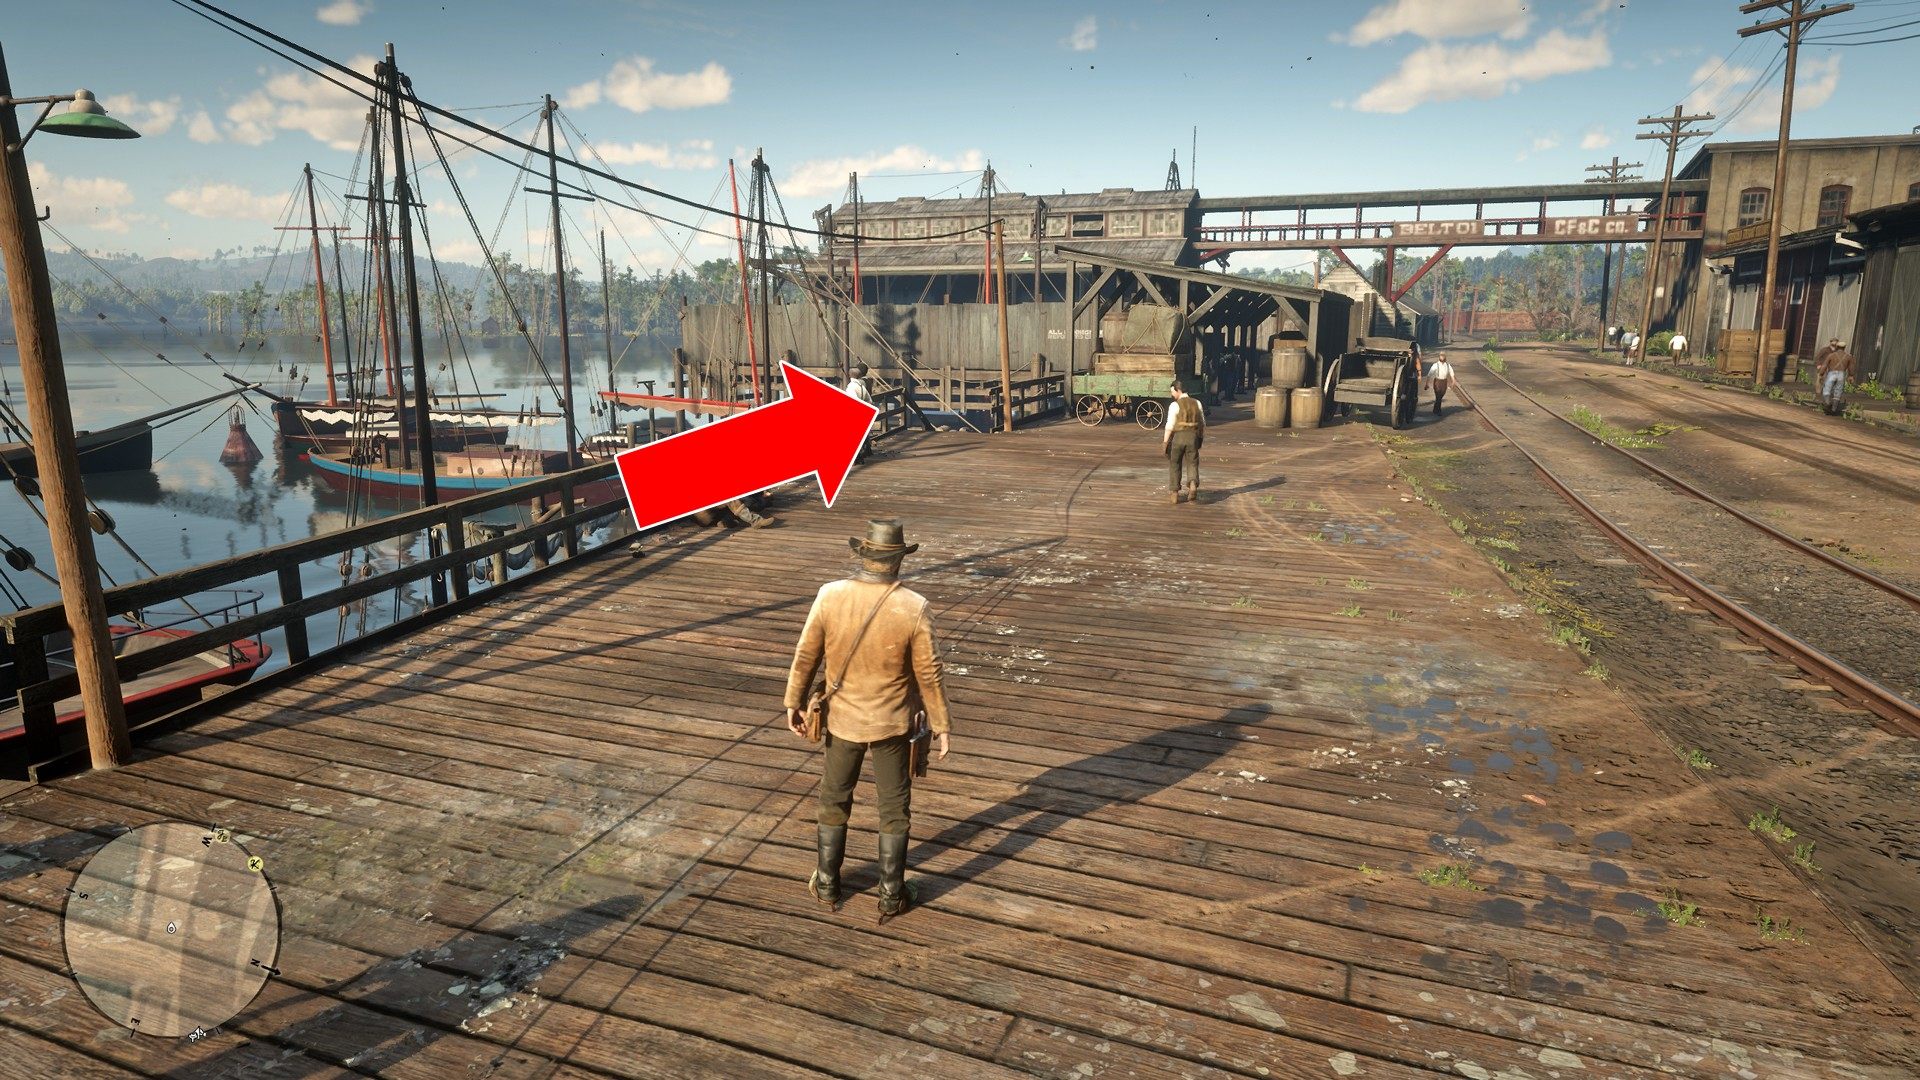
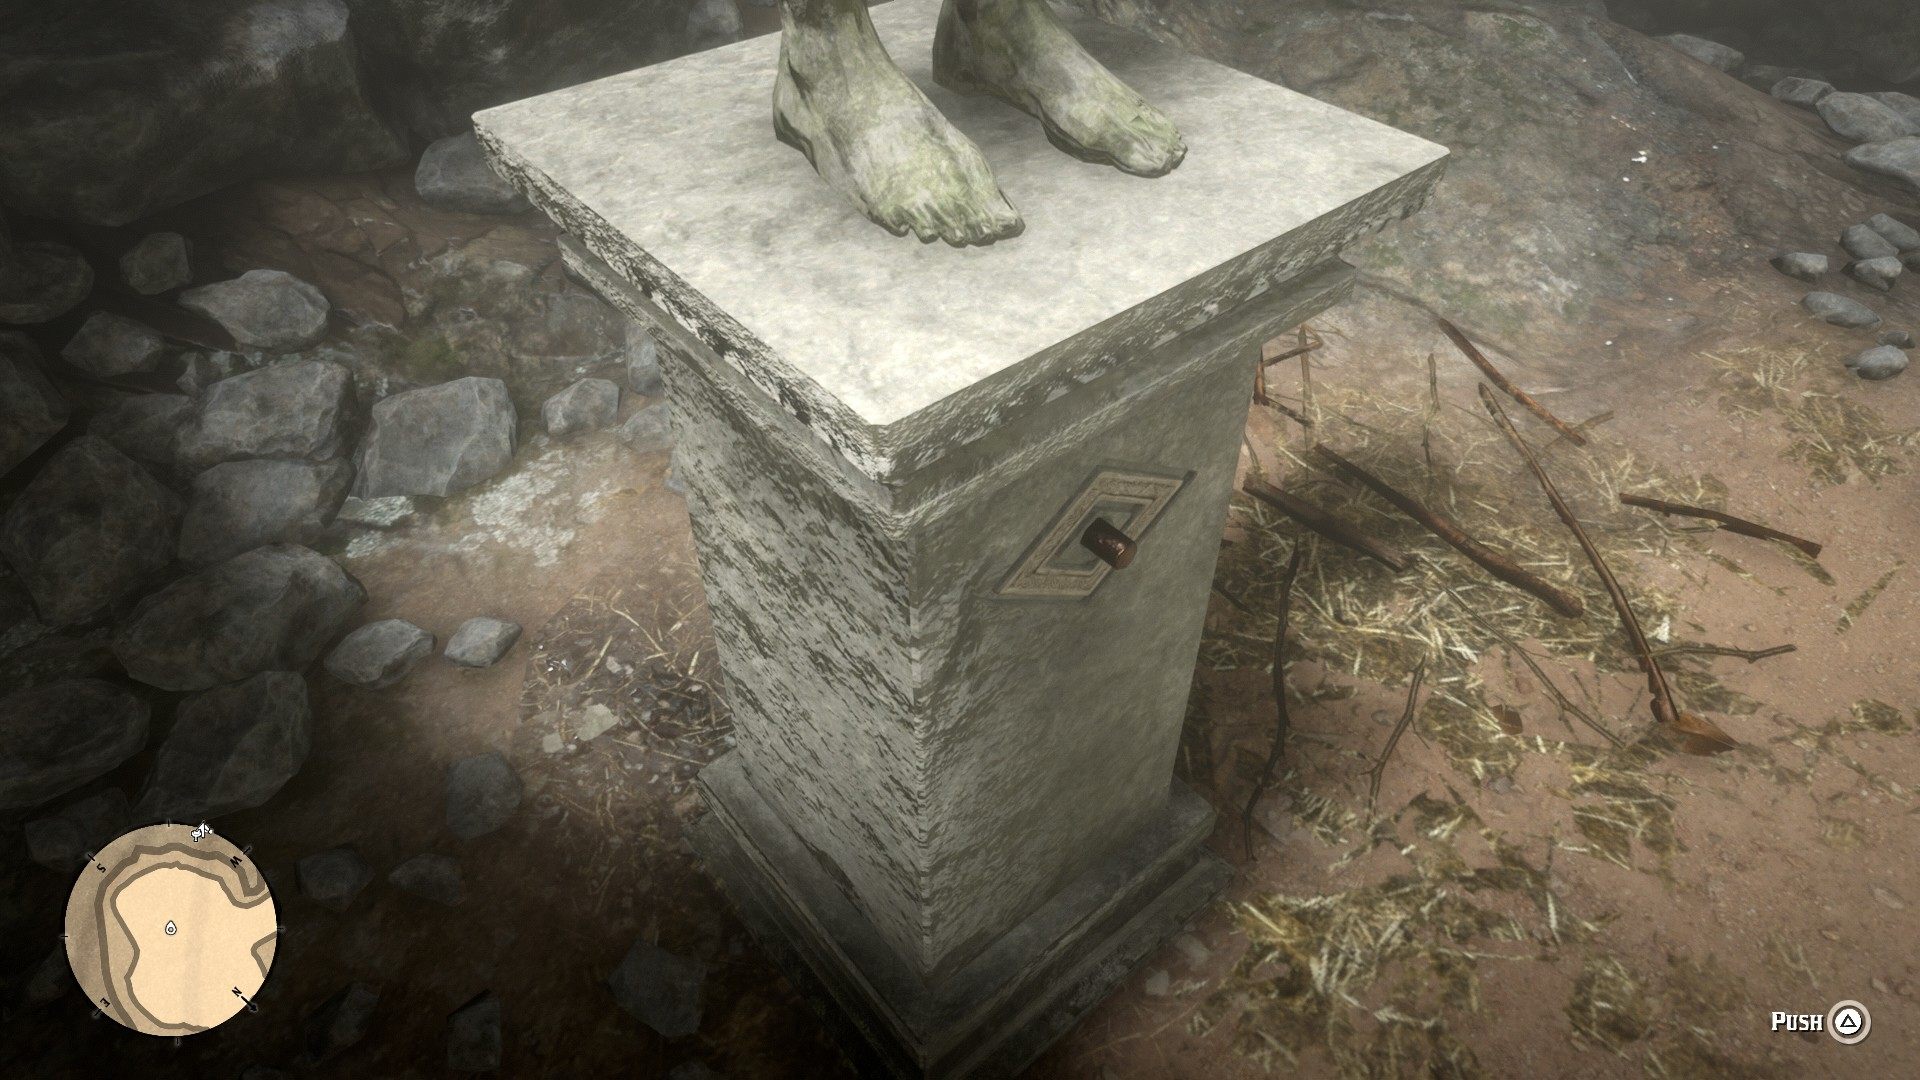
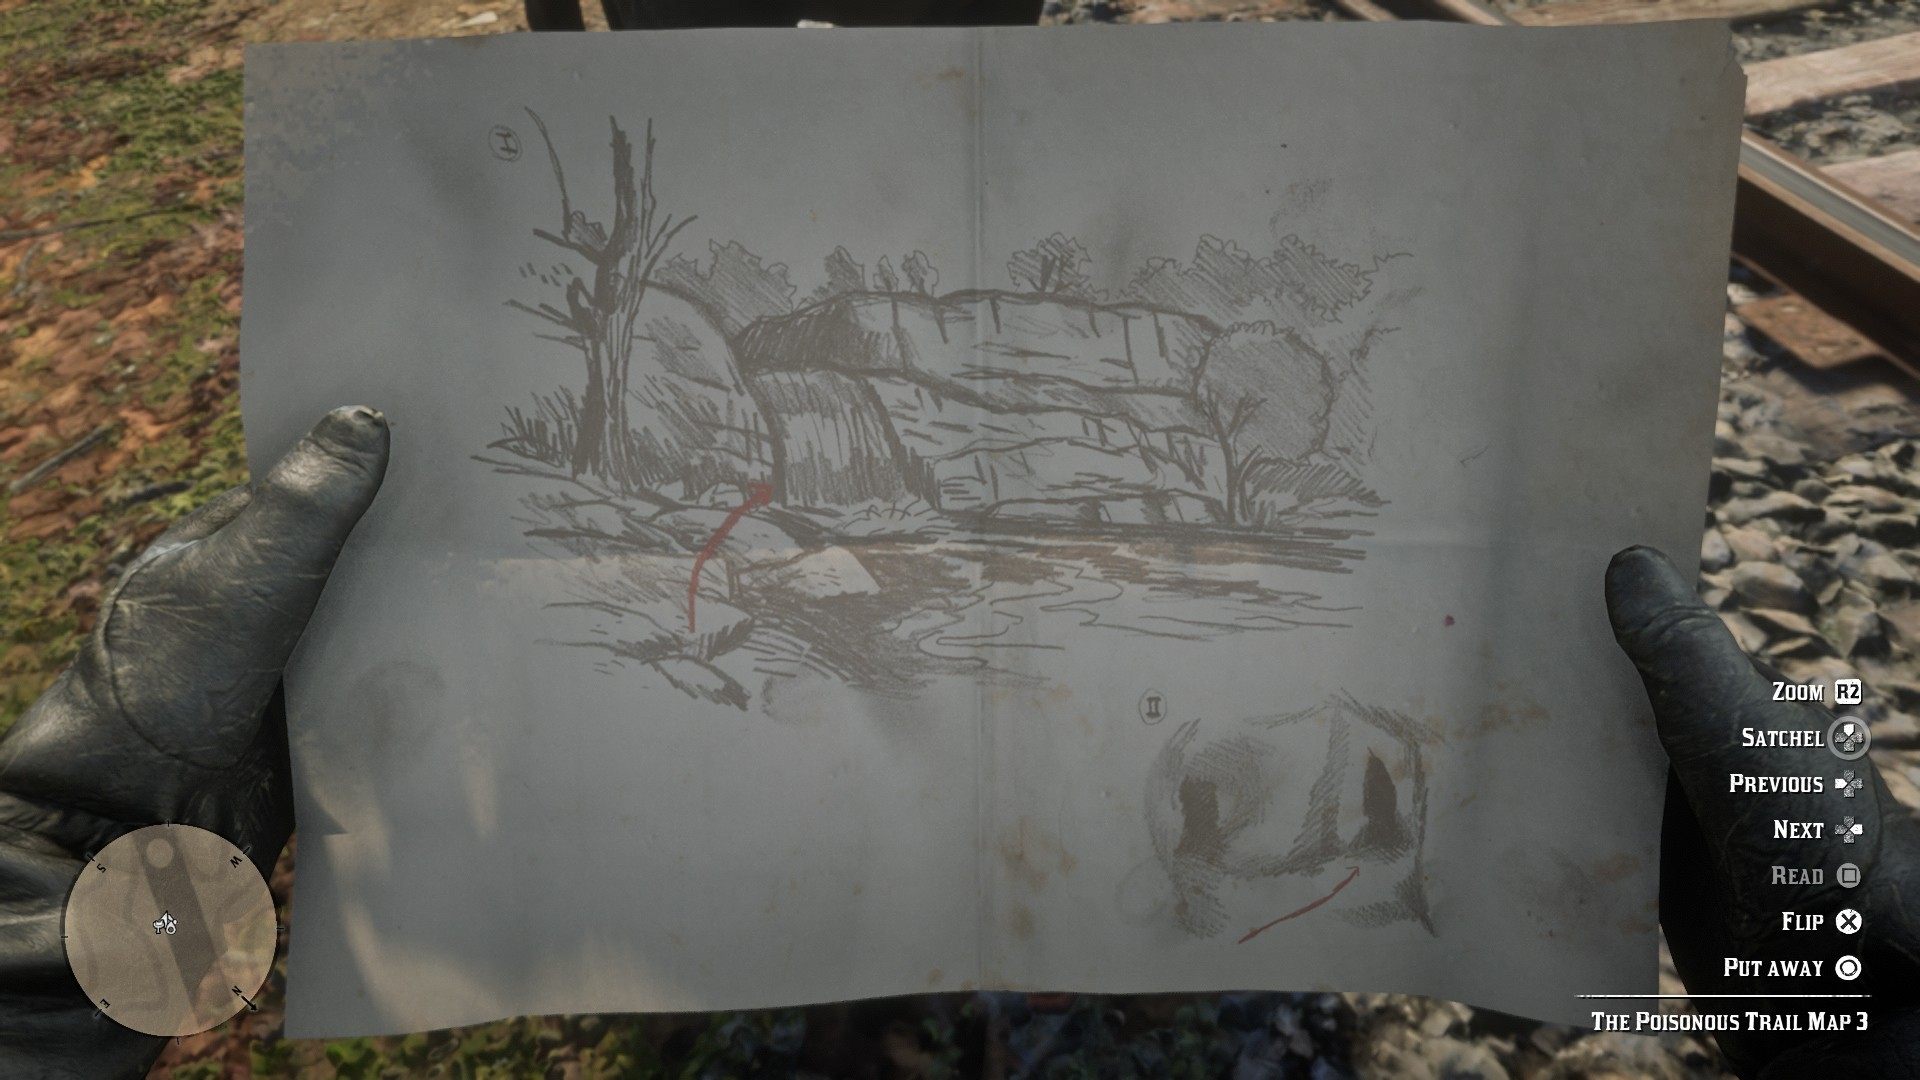
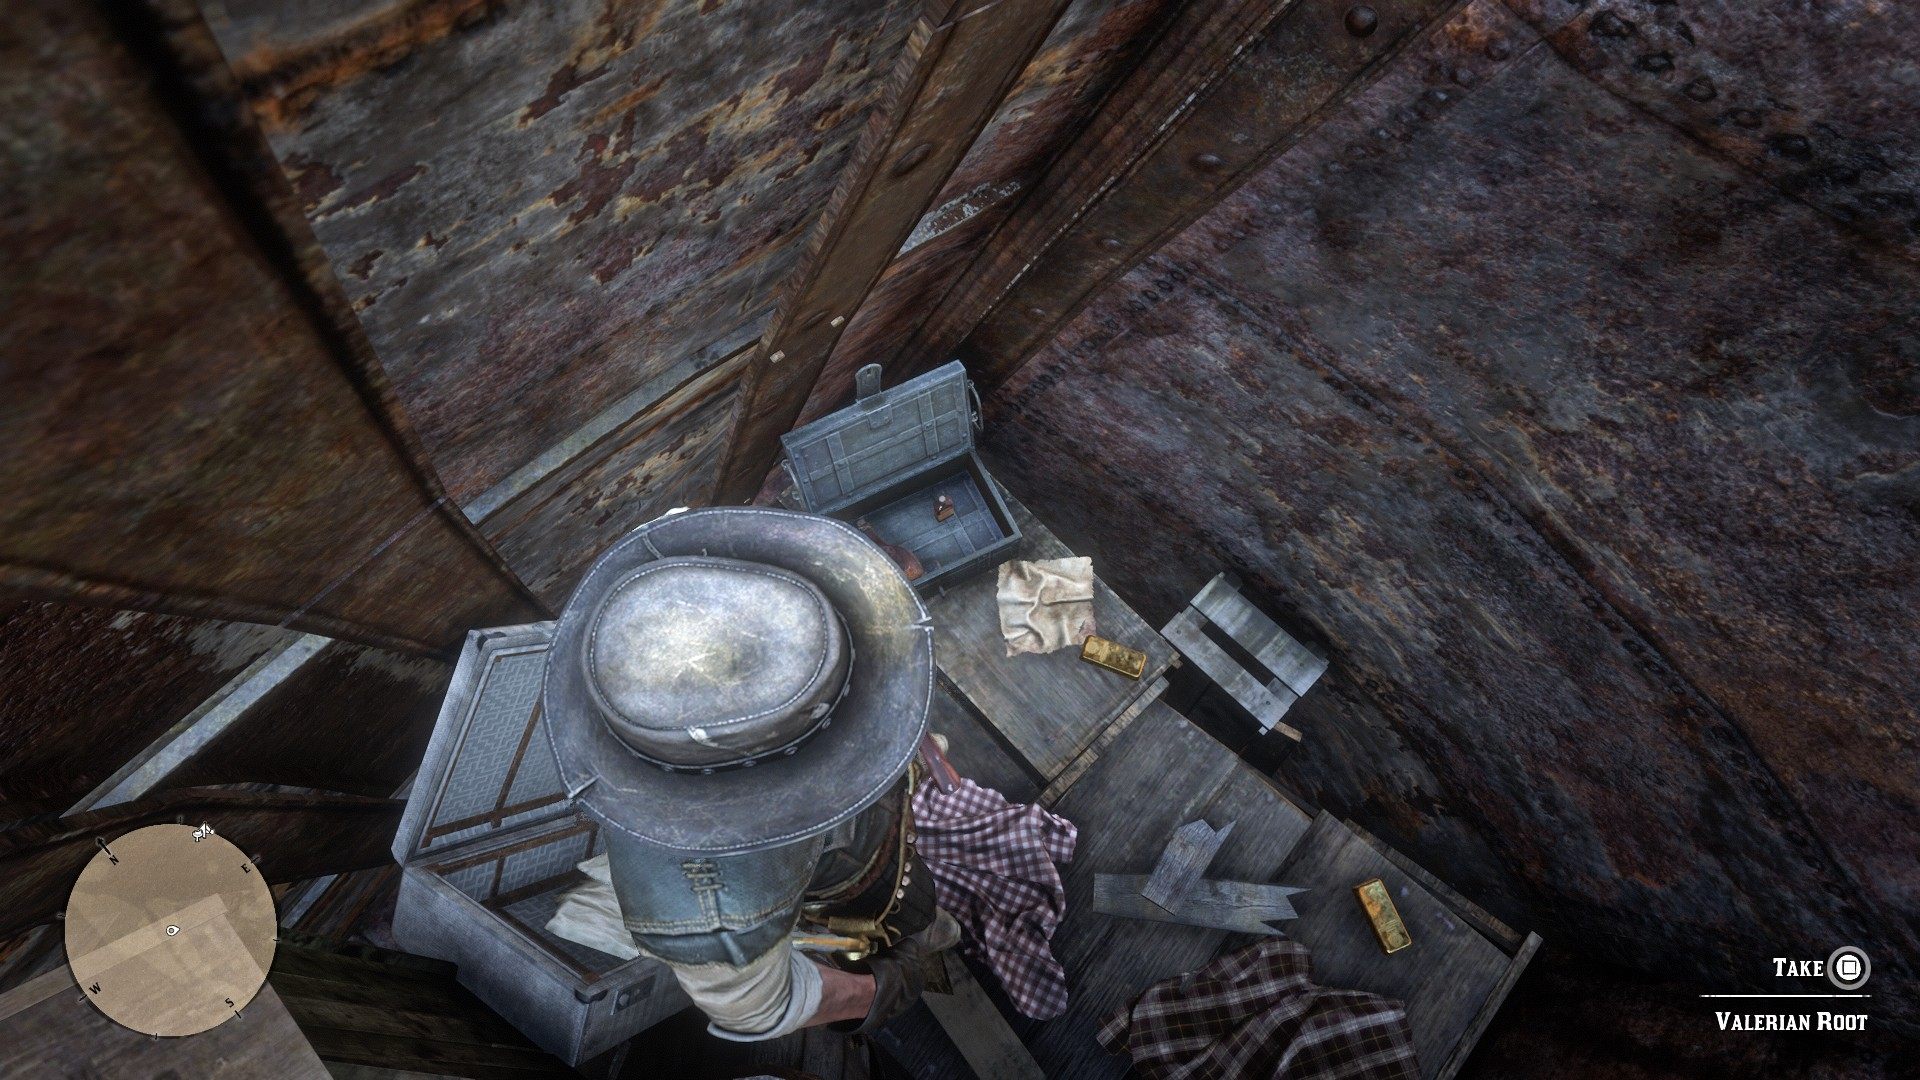
It contains four Gold Bars. Each one of them is worth $500. It's hidden in the cave behind the waterfall.

The Poisonous Trail Treasure

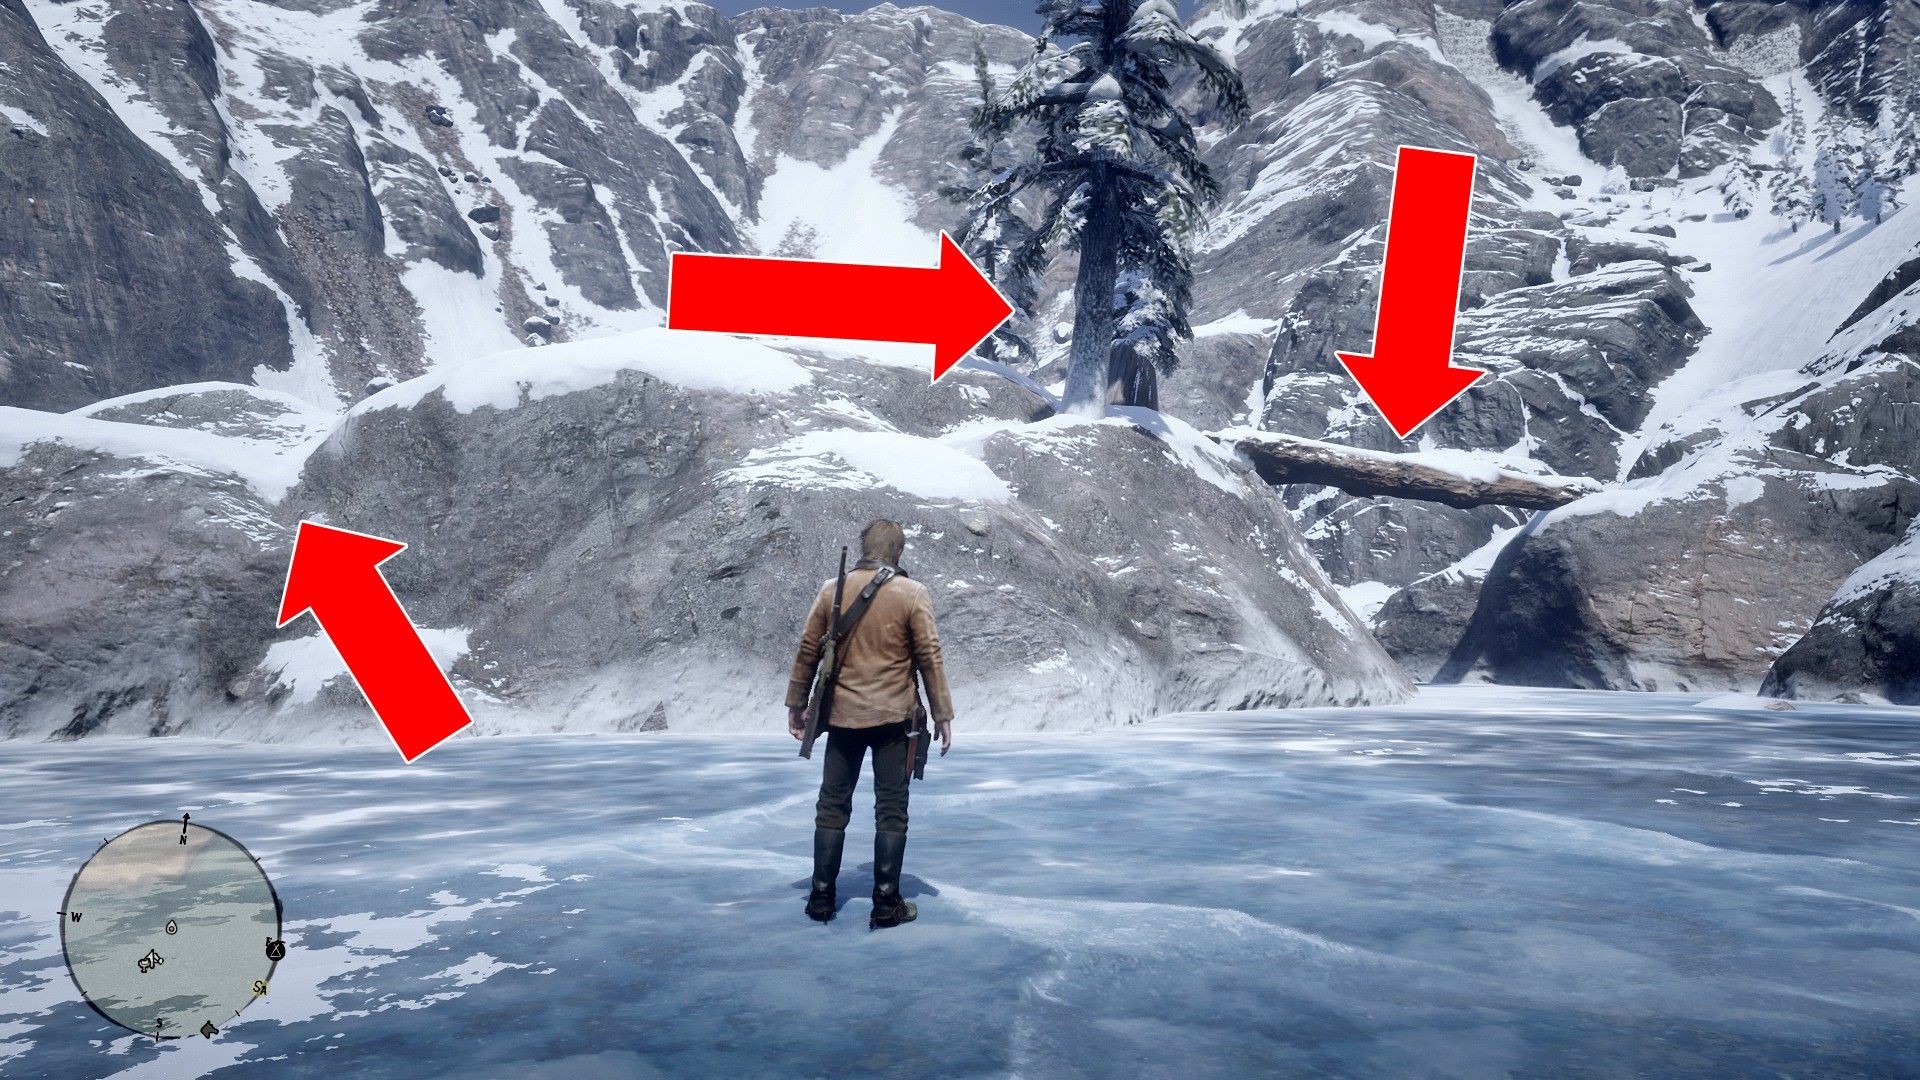
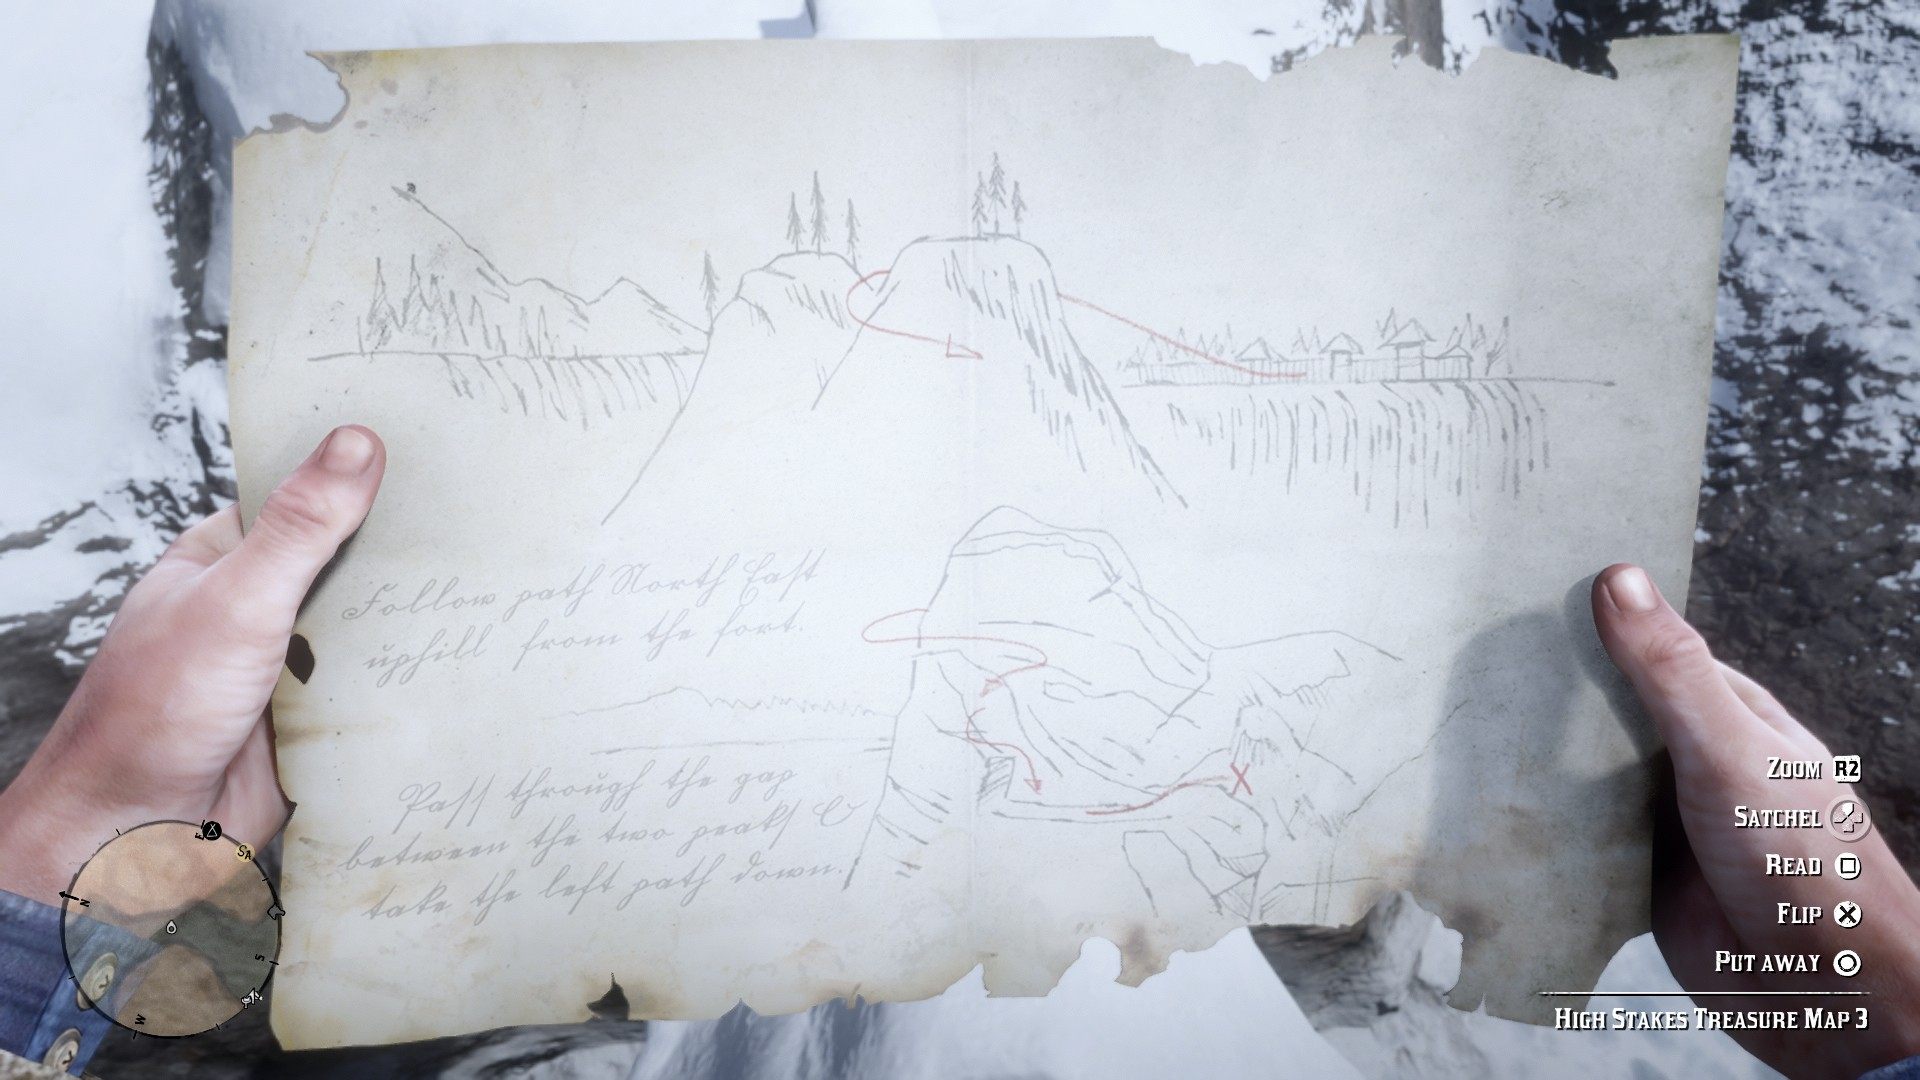
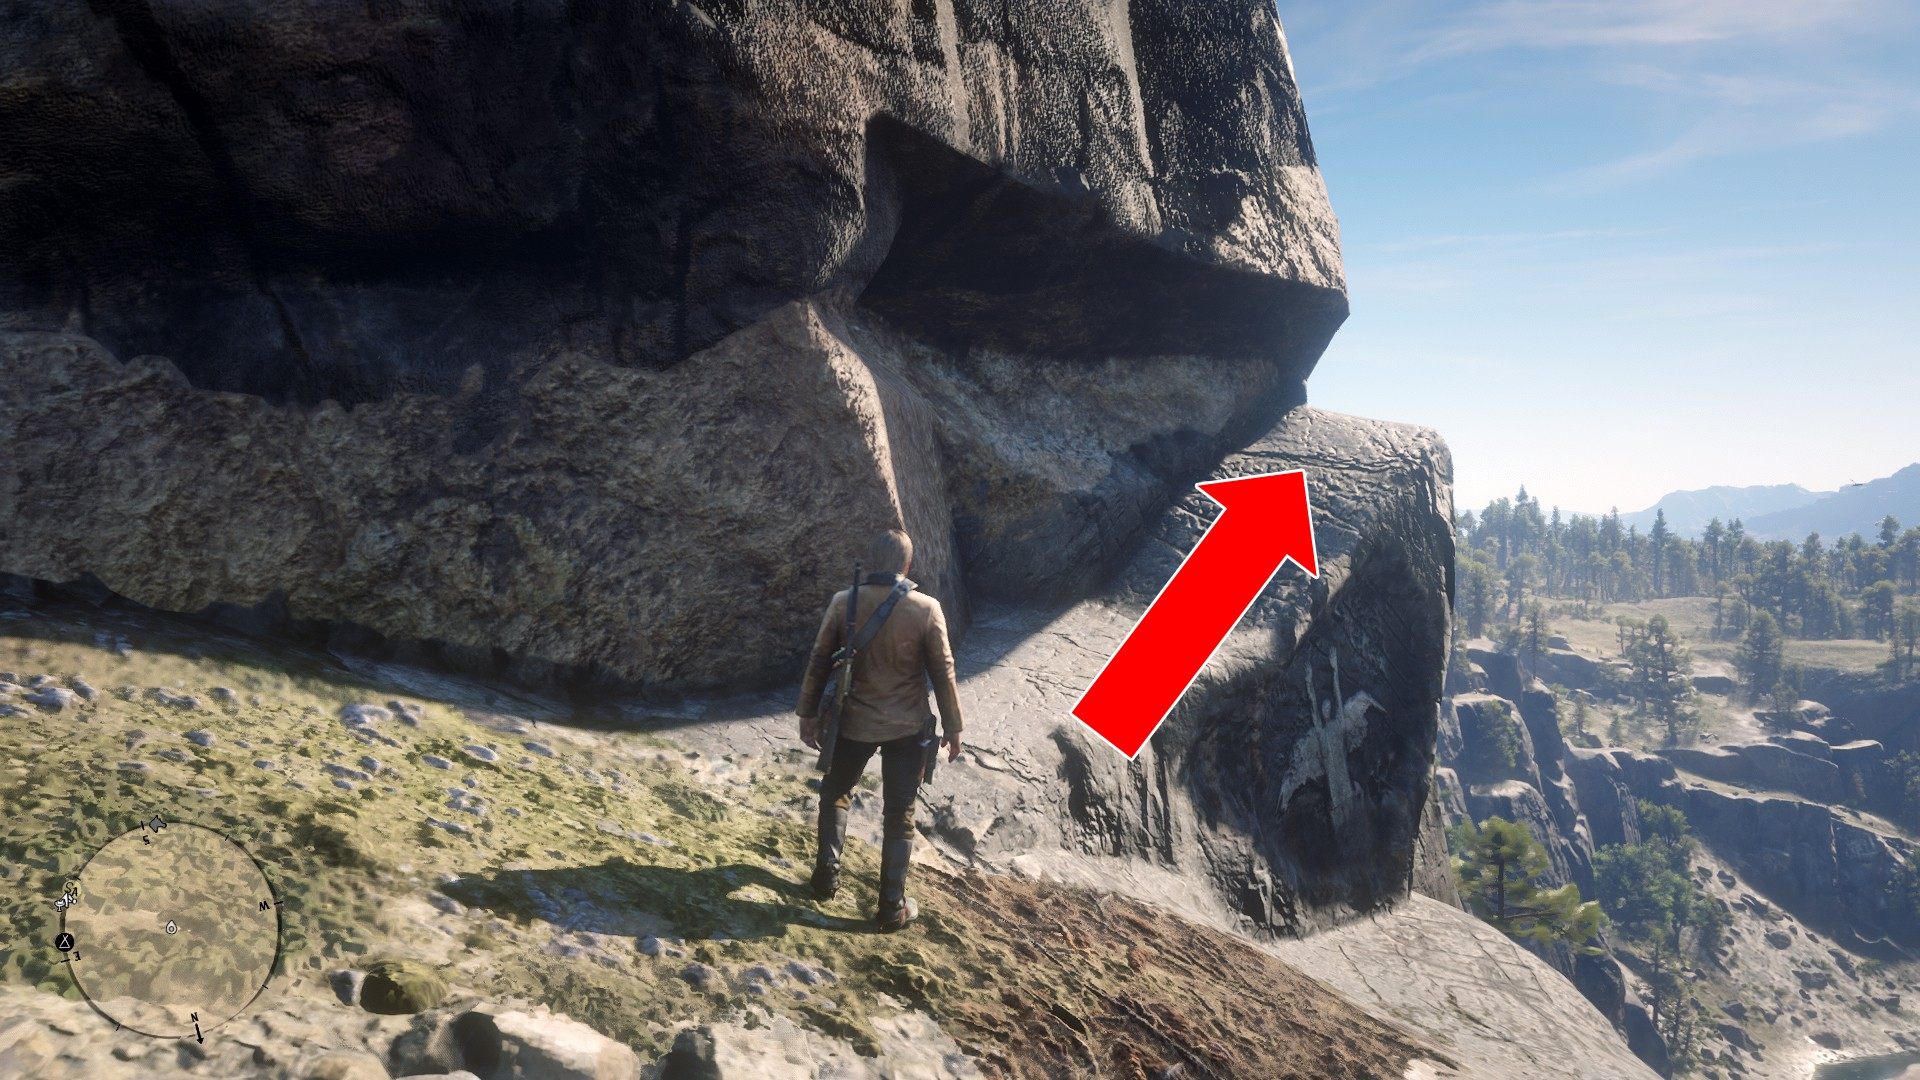
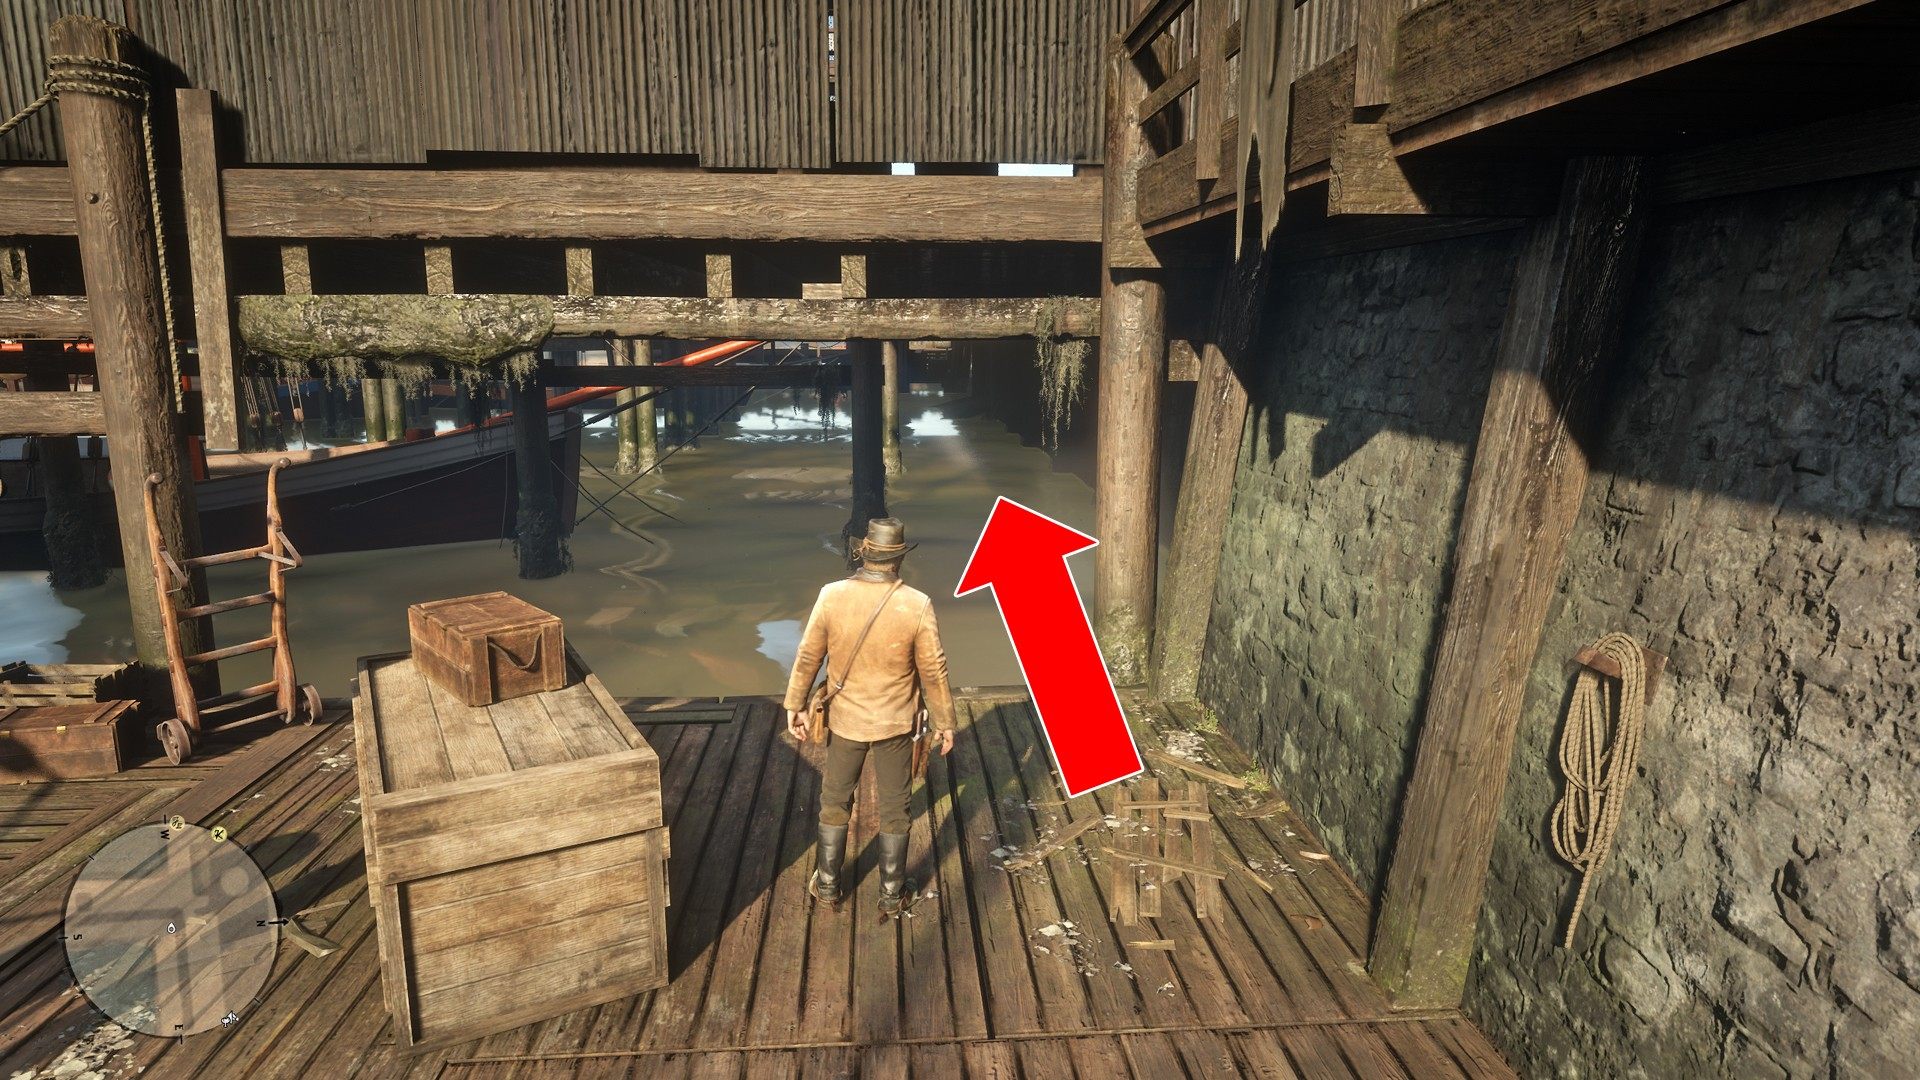
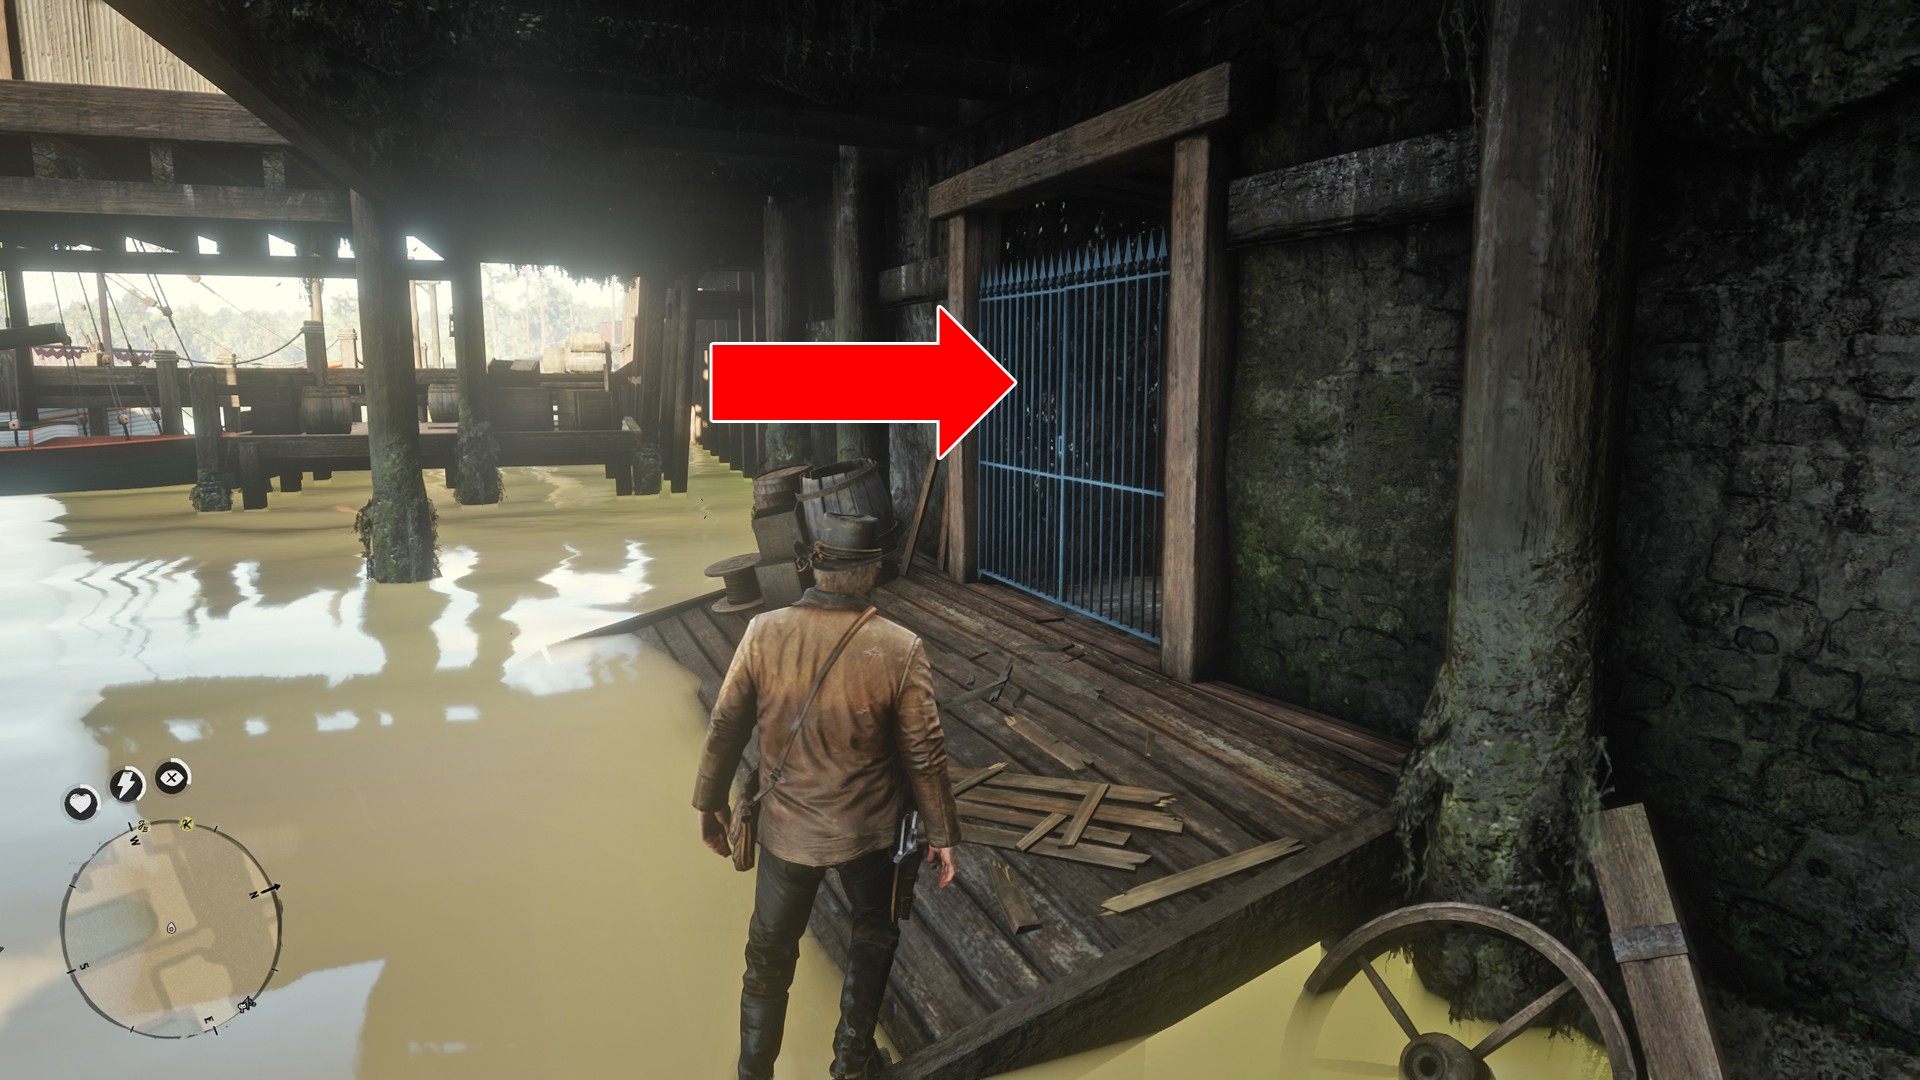
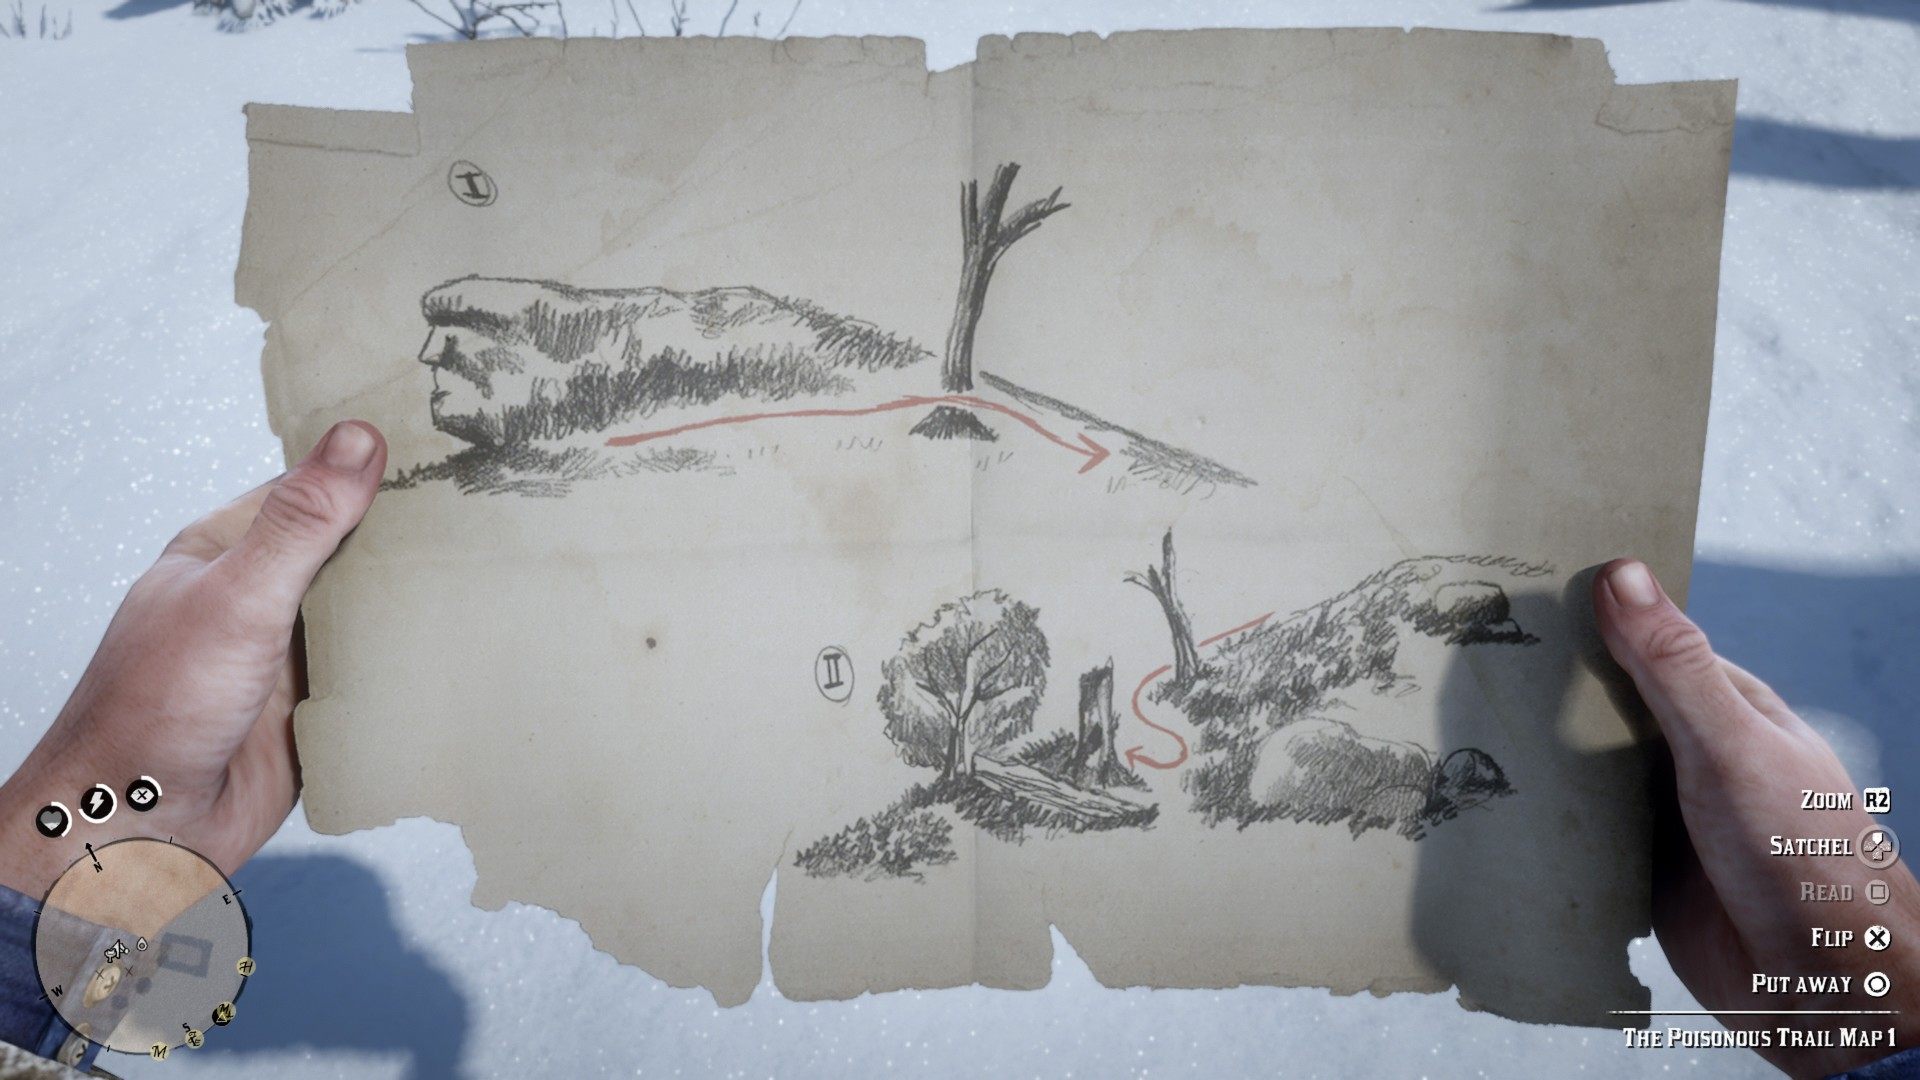
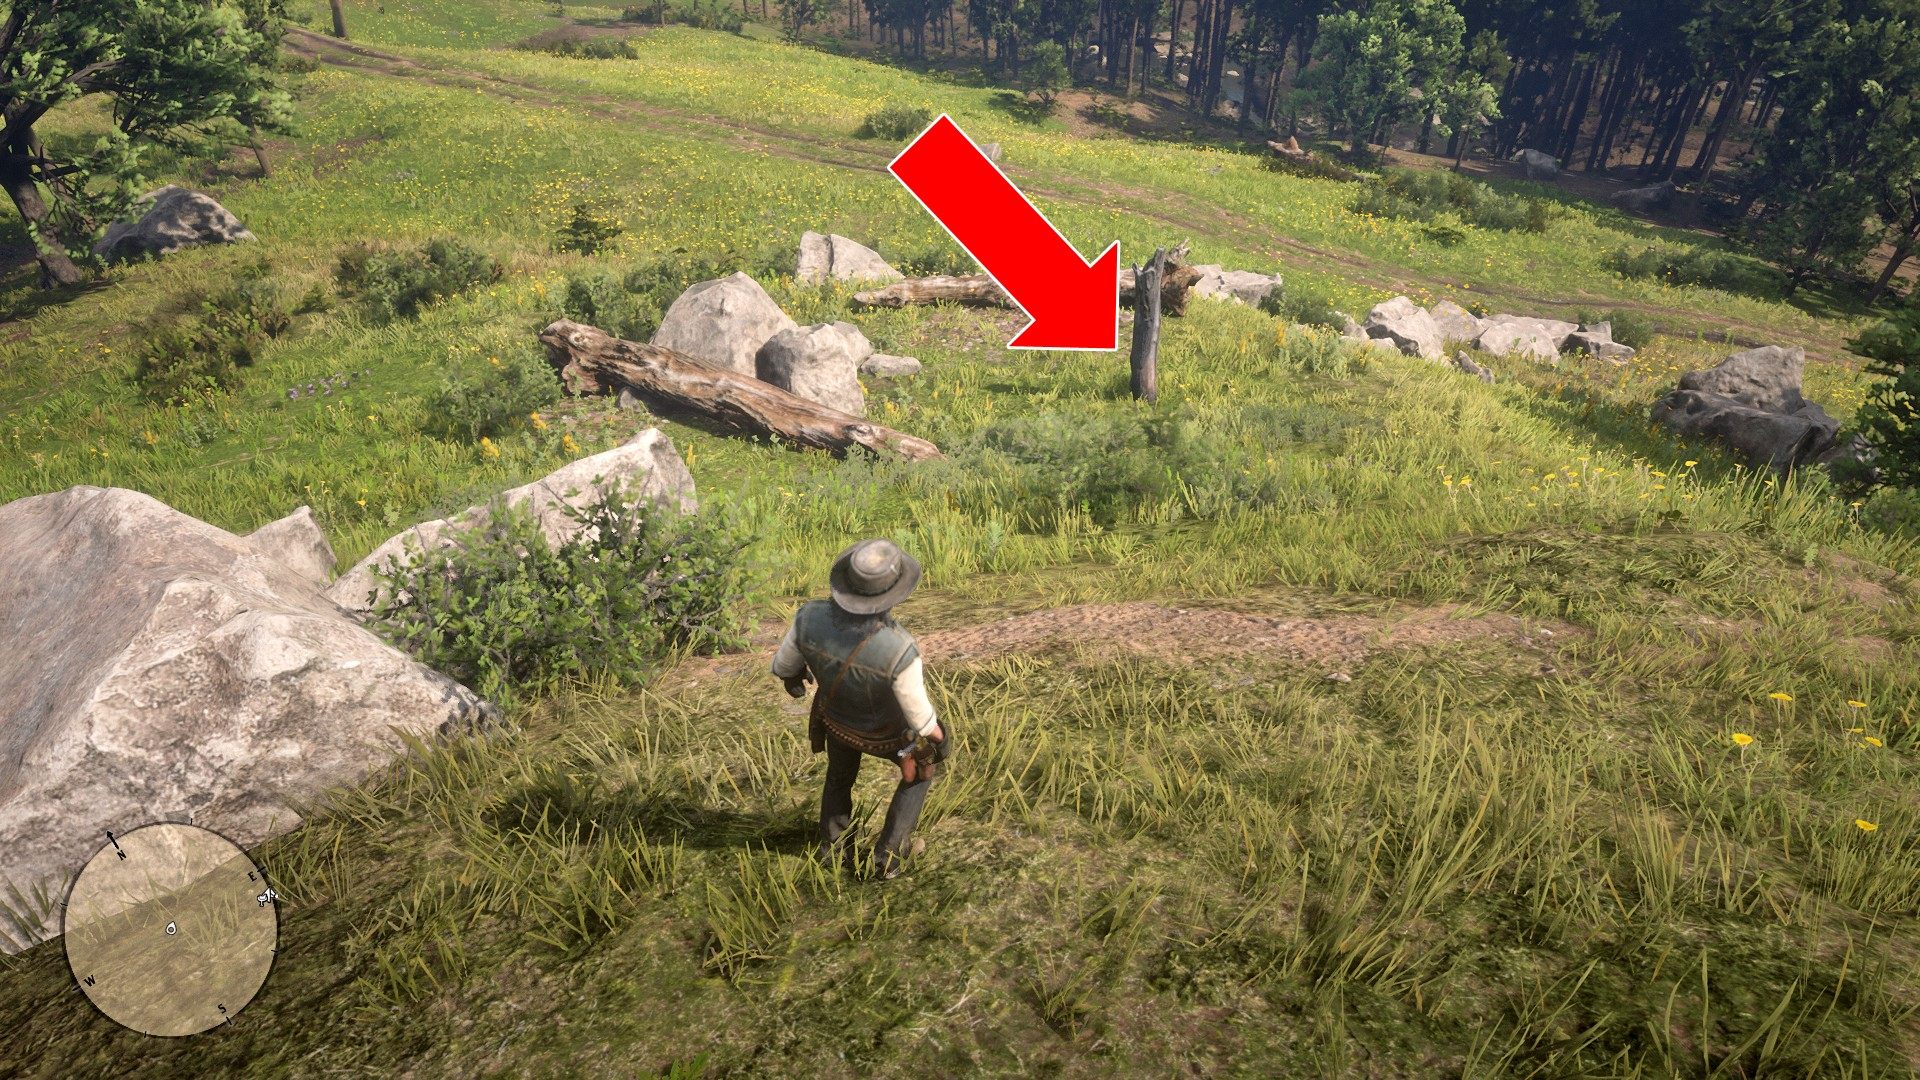
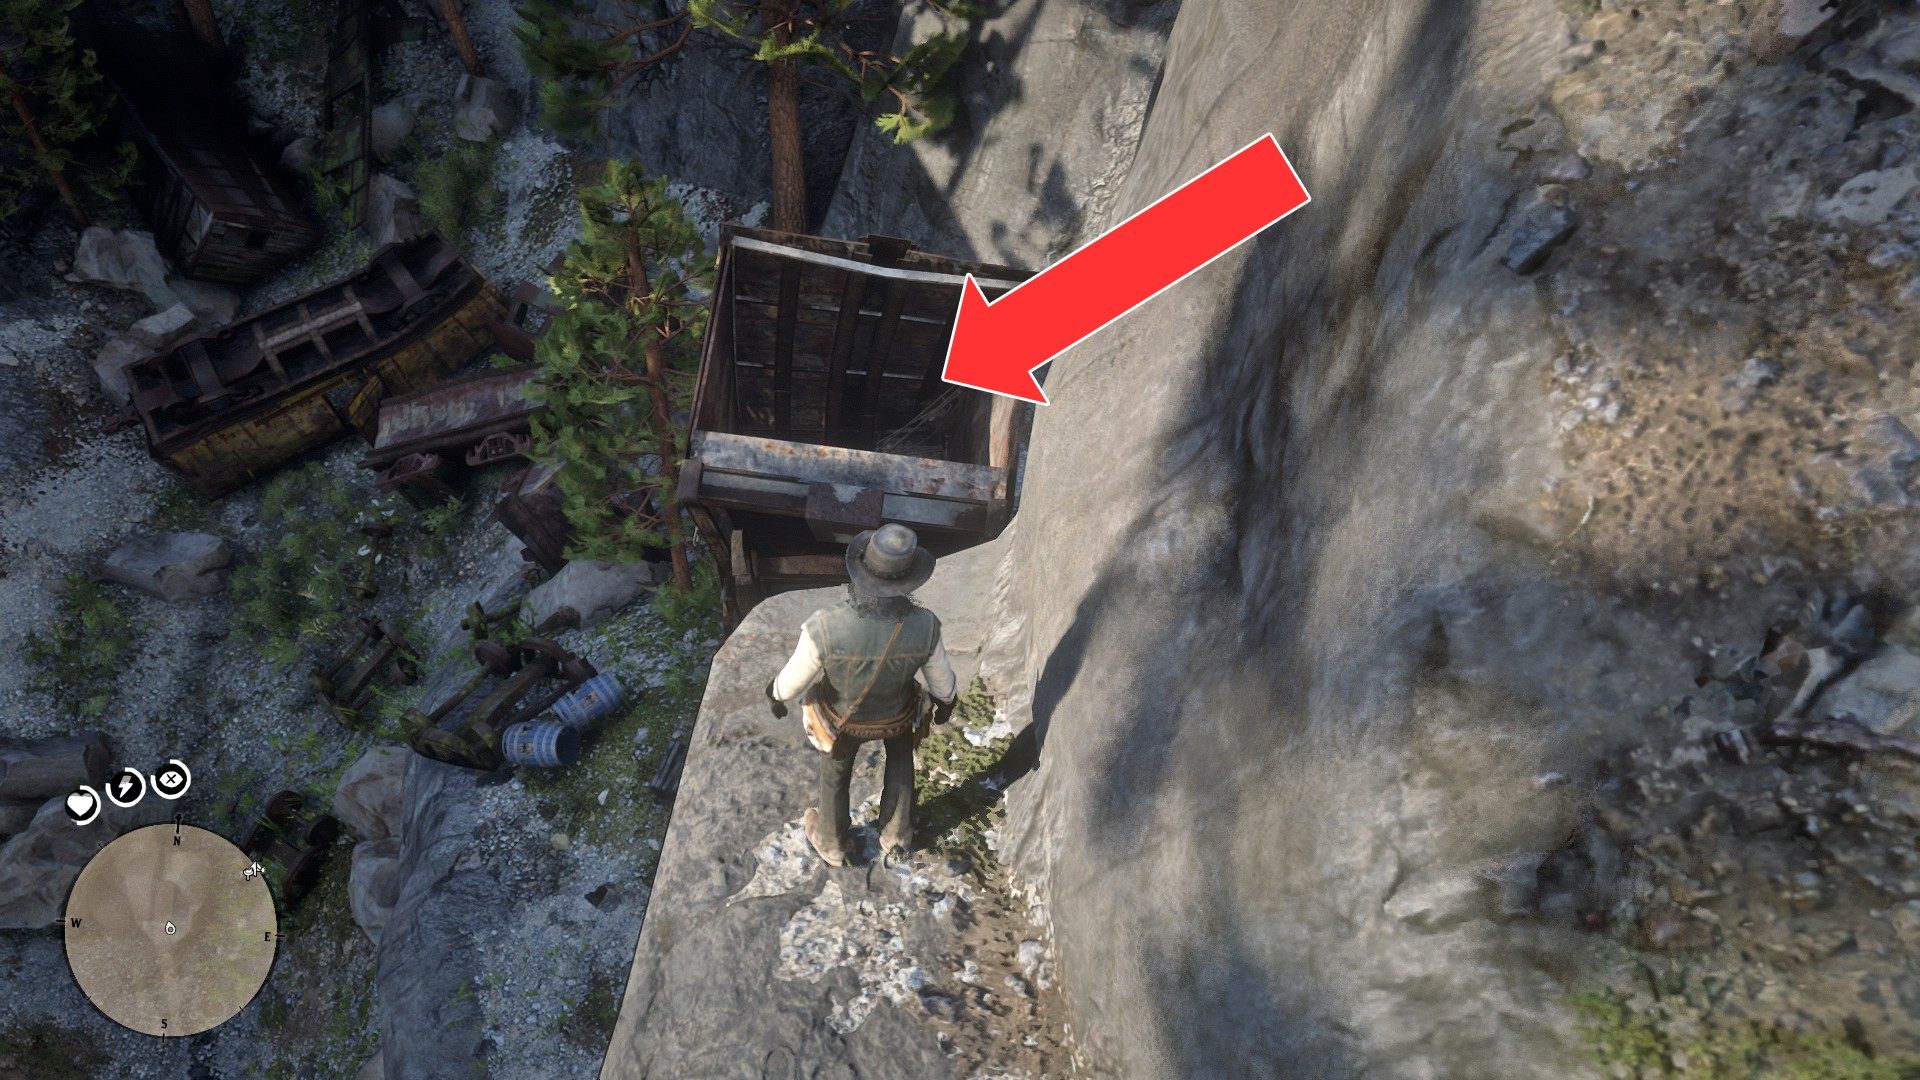
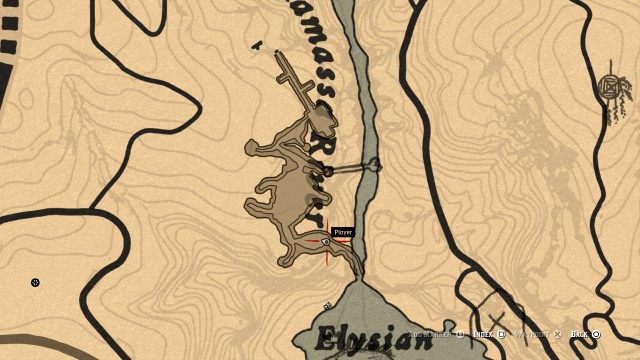
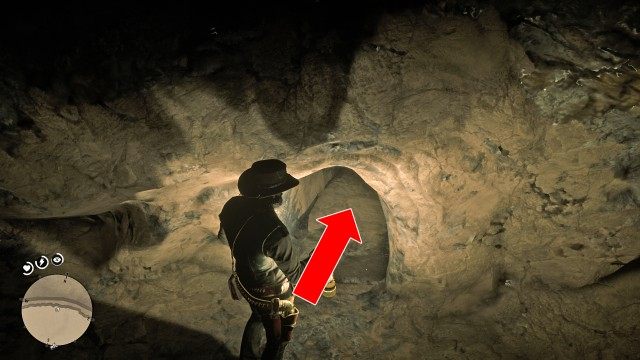
Enter the tunnel behind the waterfall and in the place marked on the map below, descend to the gap on the right side.

The Poisonous Trail Treasure

The Poisonous Trail Treasure

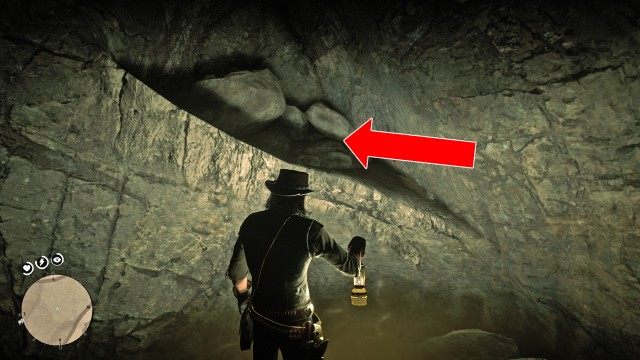
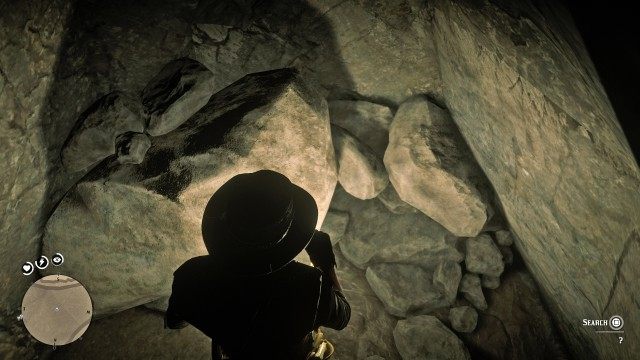
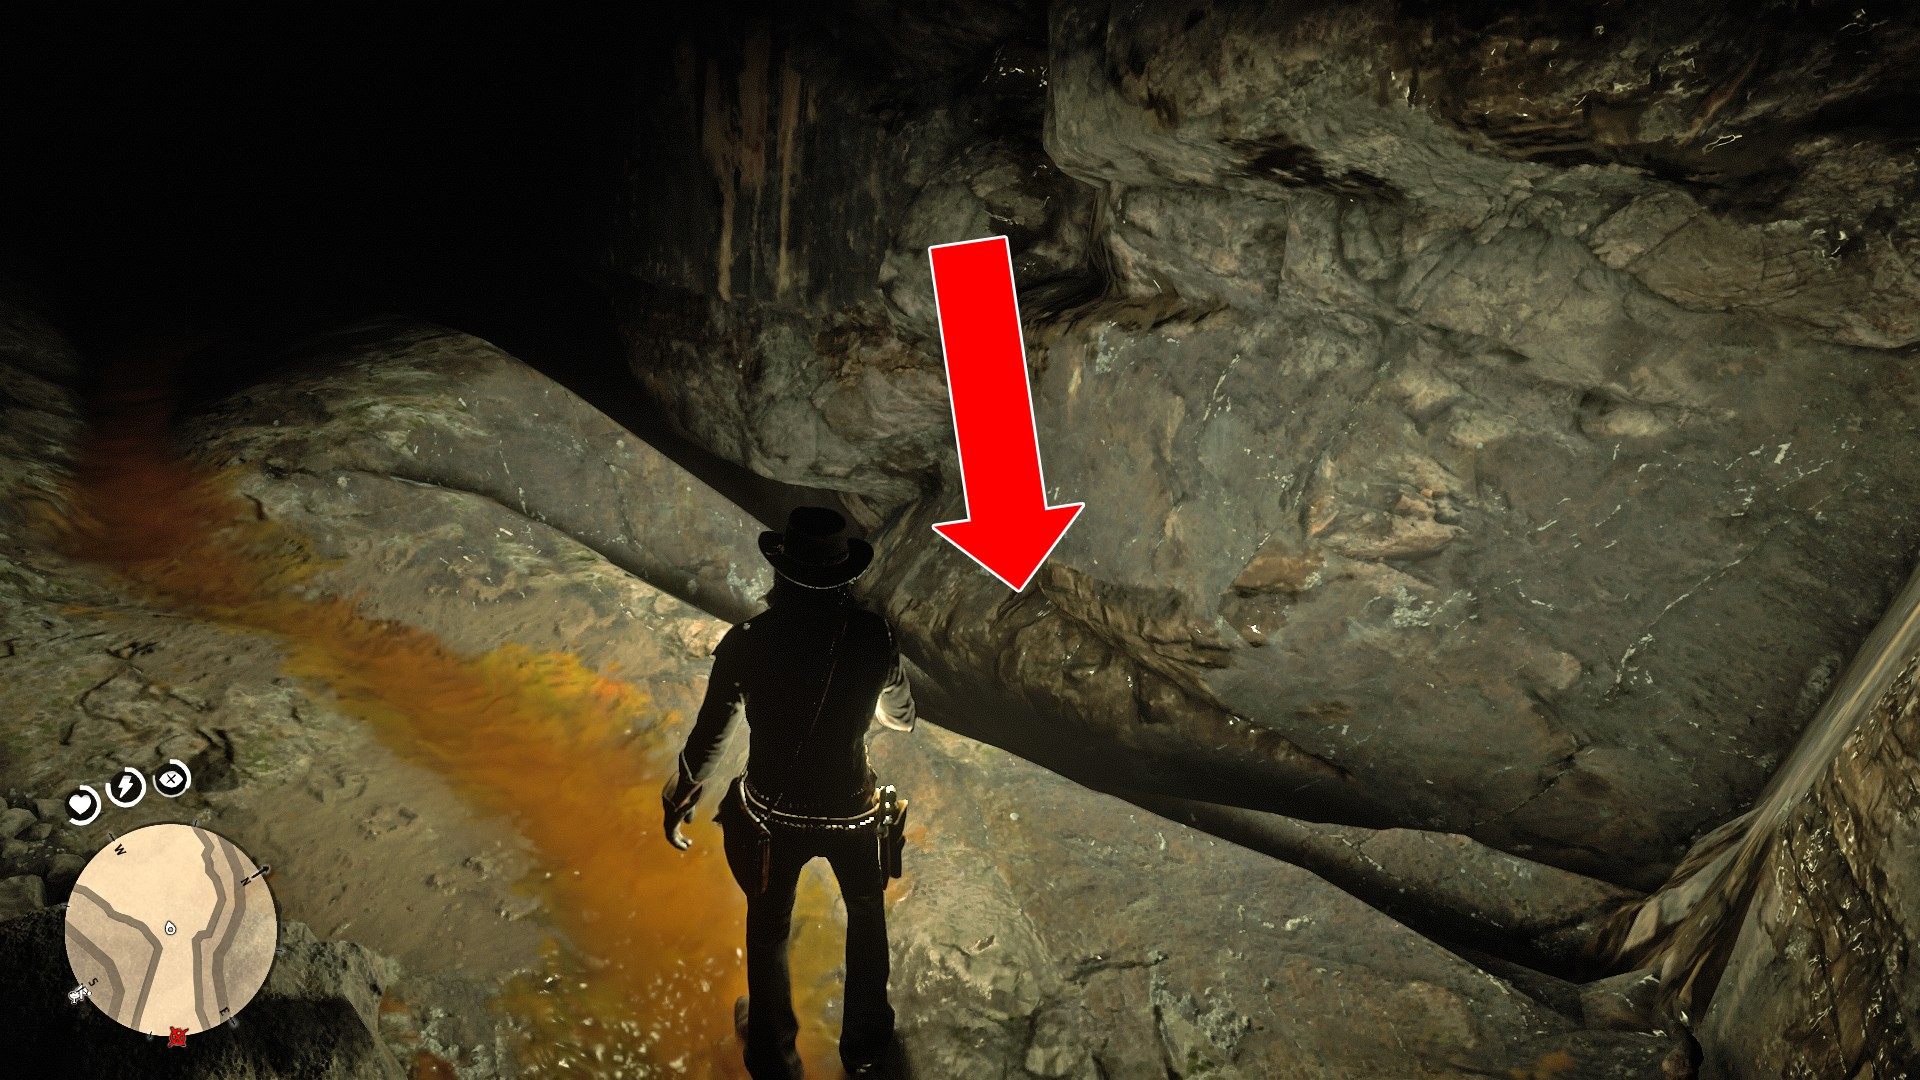
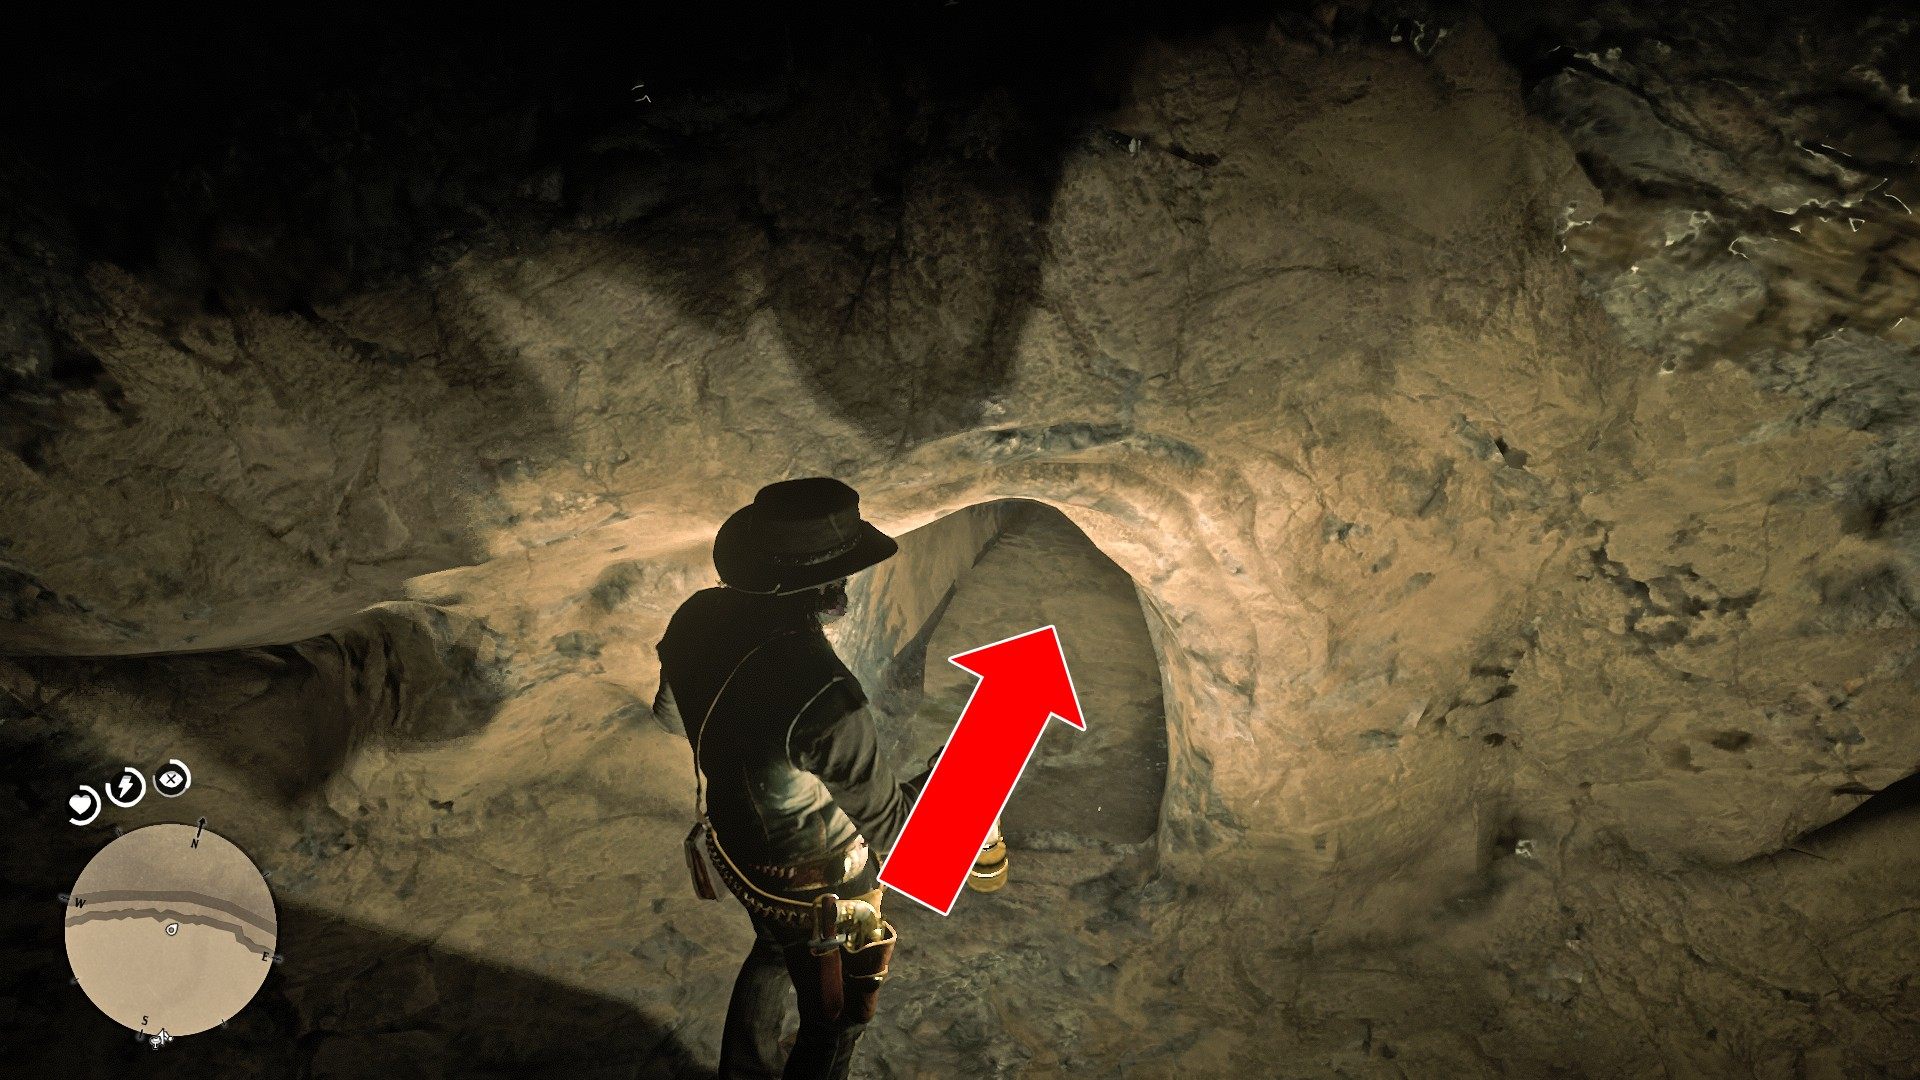
Go through a small tunnel.

The Poisonous Trail Treasure

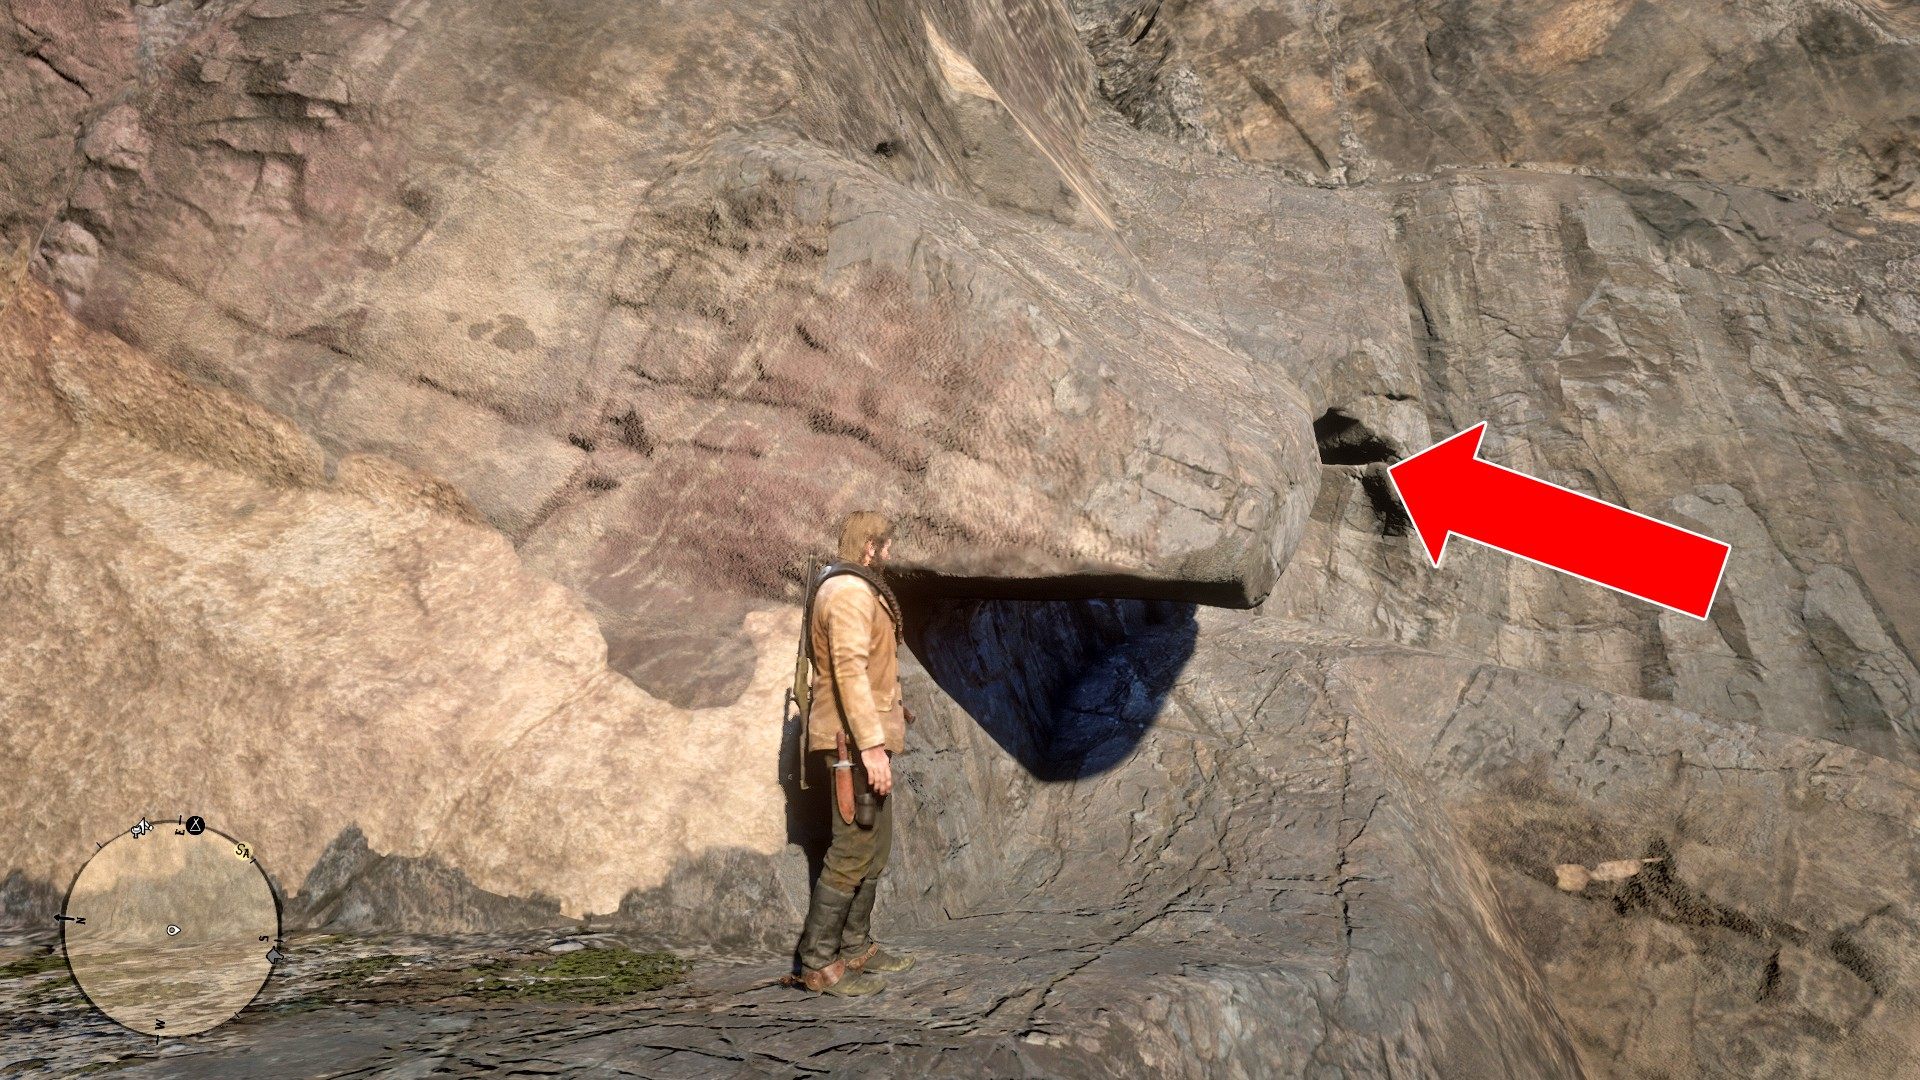
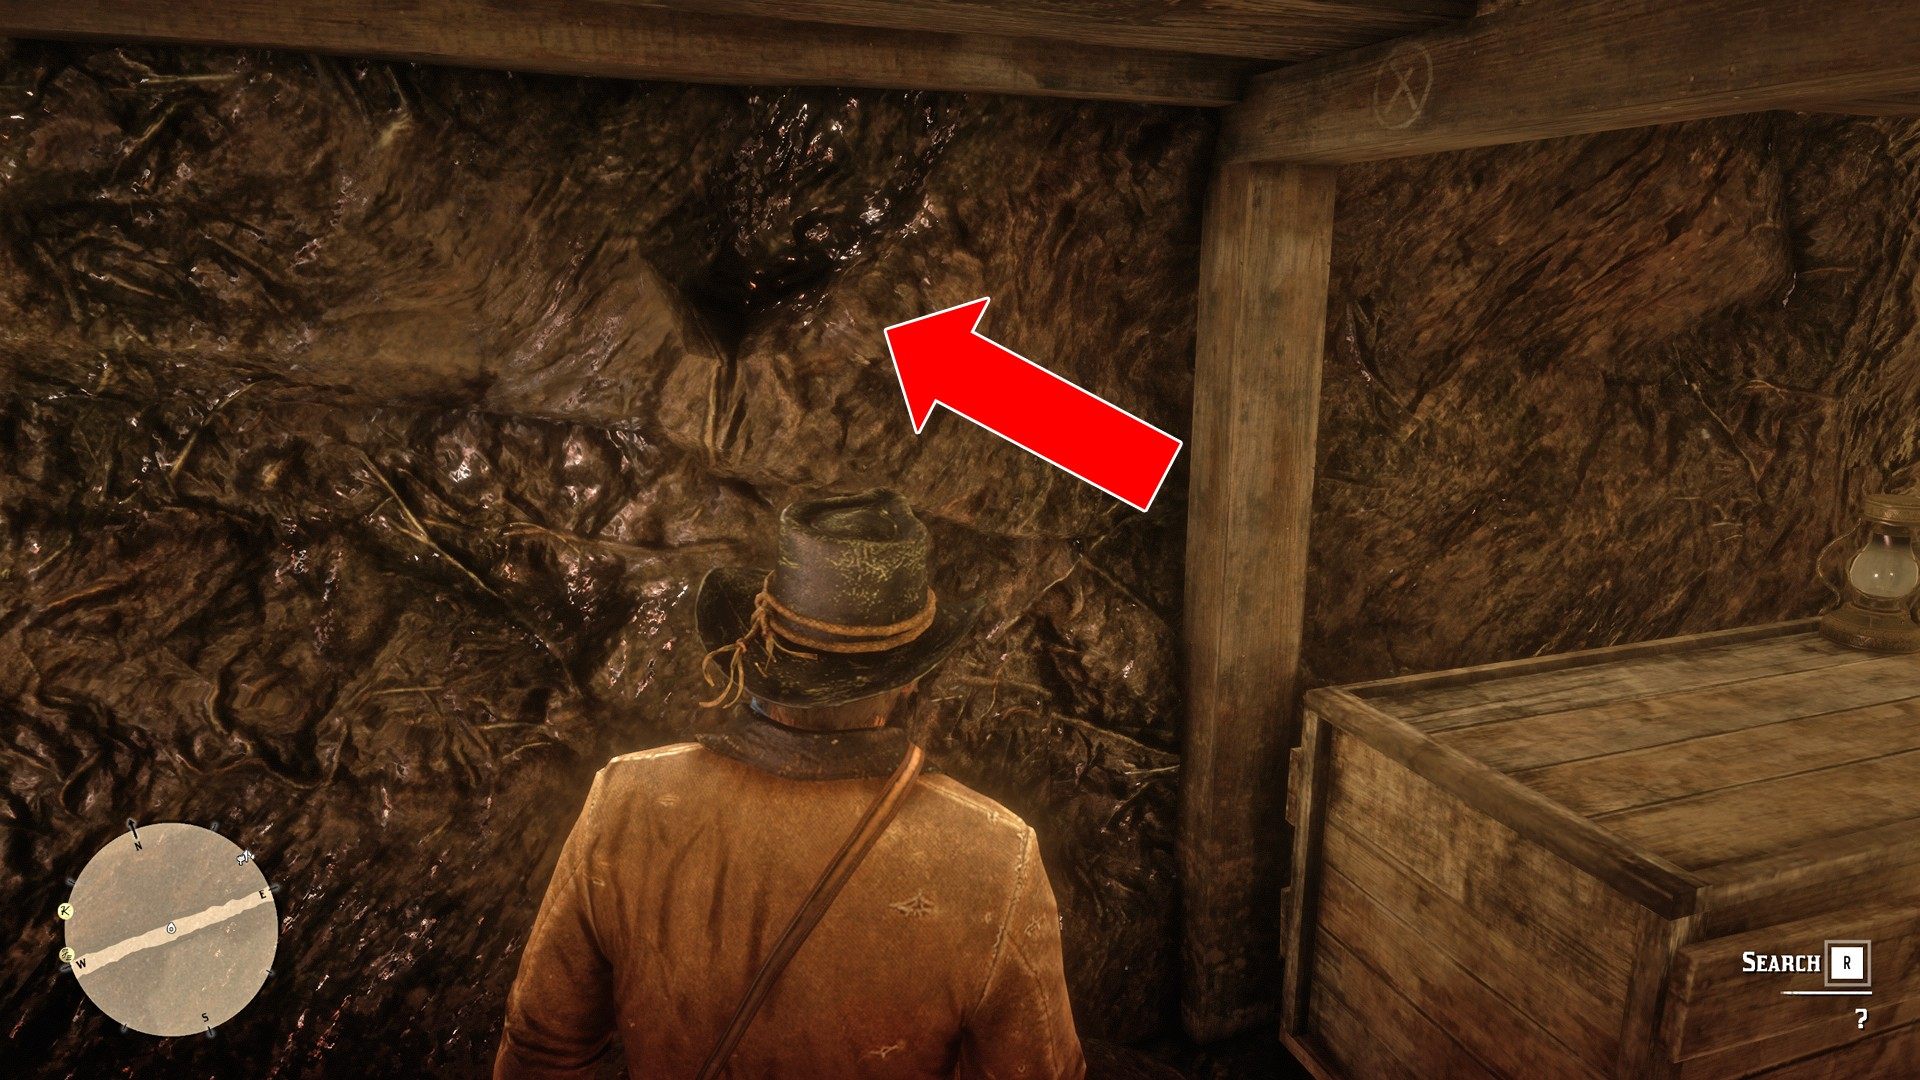
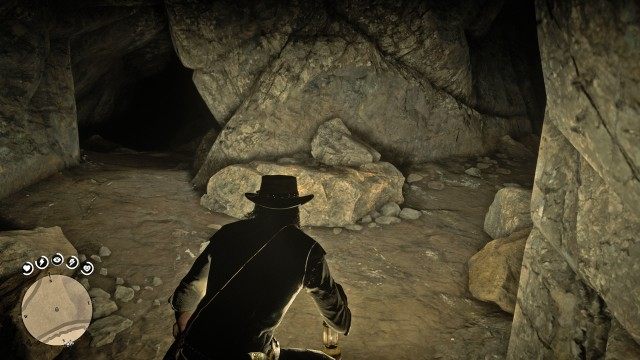
You'll get to the fork. The treasure map suggests the right path, but if you go left, you will also reach your destination (this way you will be going back).

The Poisonous Trail Treasure

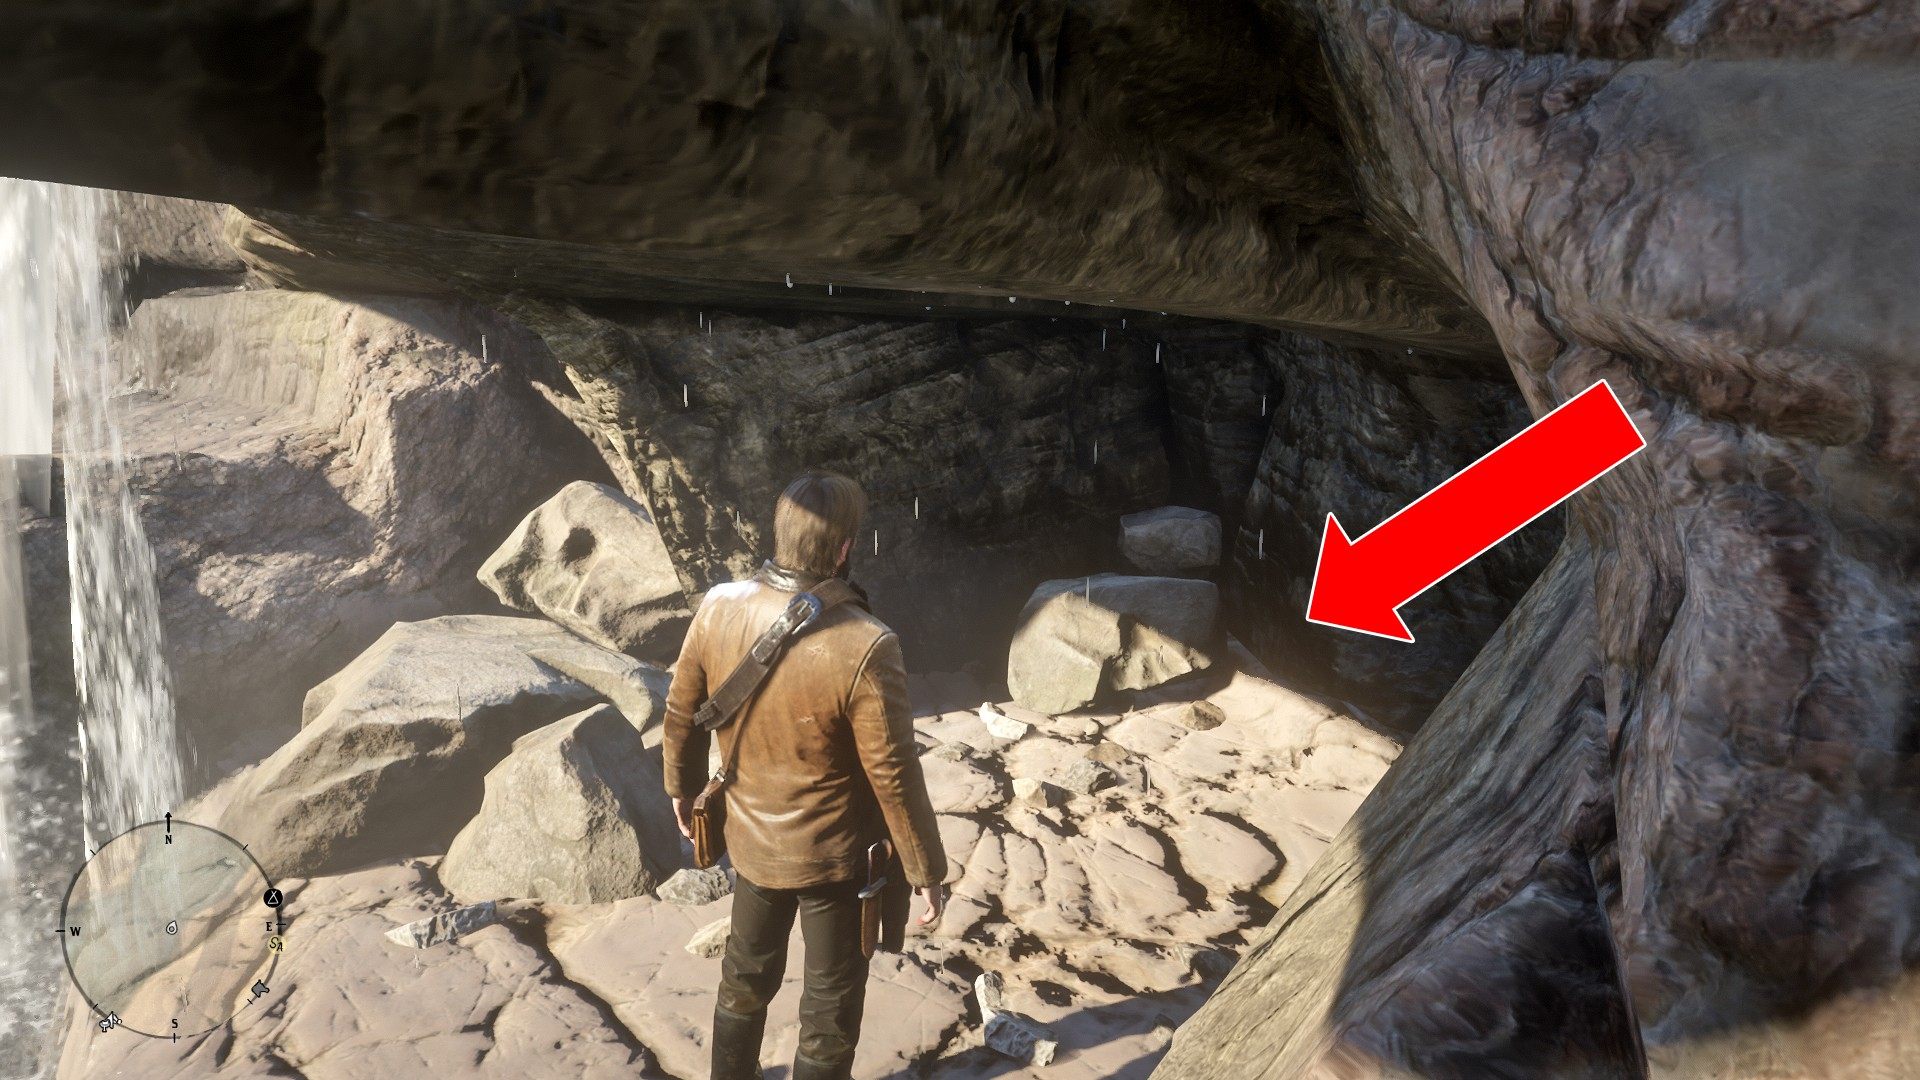
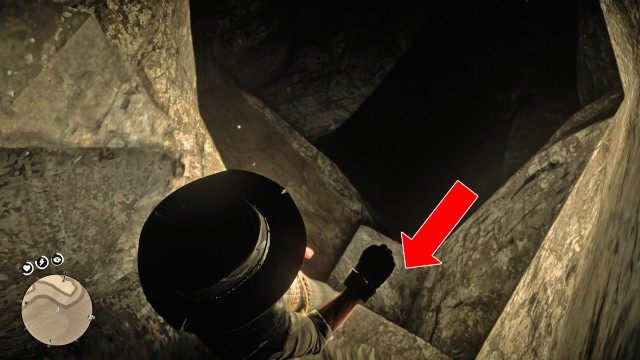
If you have chosen the right tunnel, you will reach the cave where you will have to jump to the ledge below. If you miss the ledge, you will fall to the bottom of the cave and die.

The Poisonous Trail Treasure

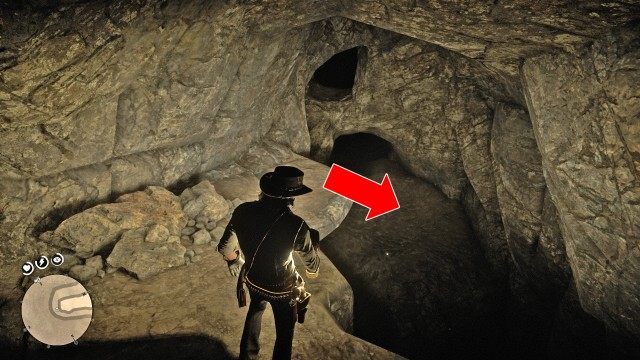
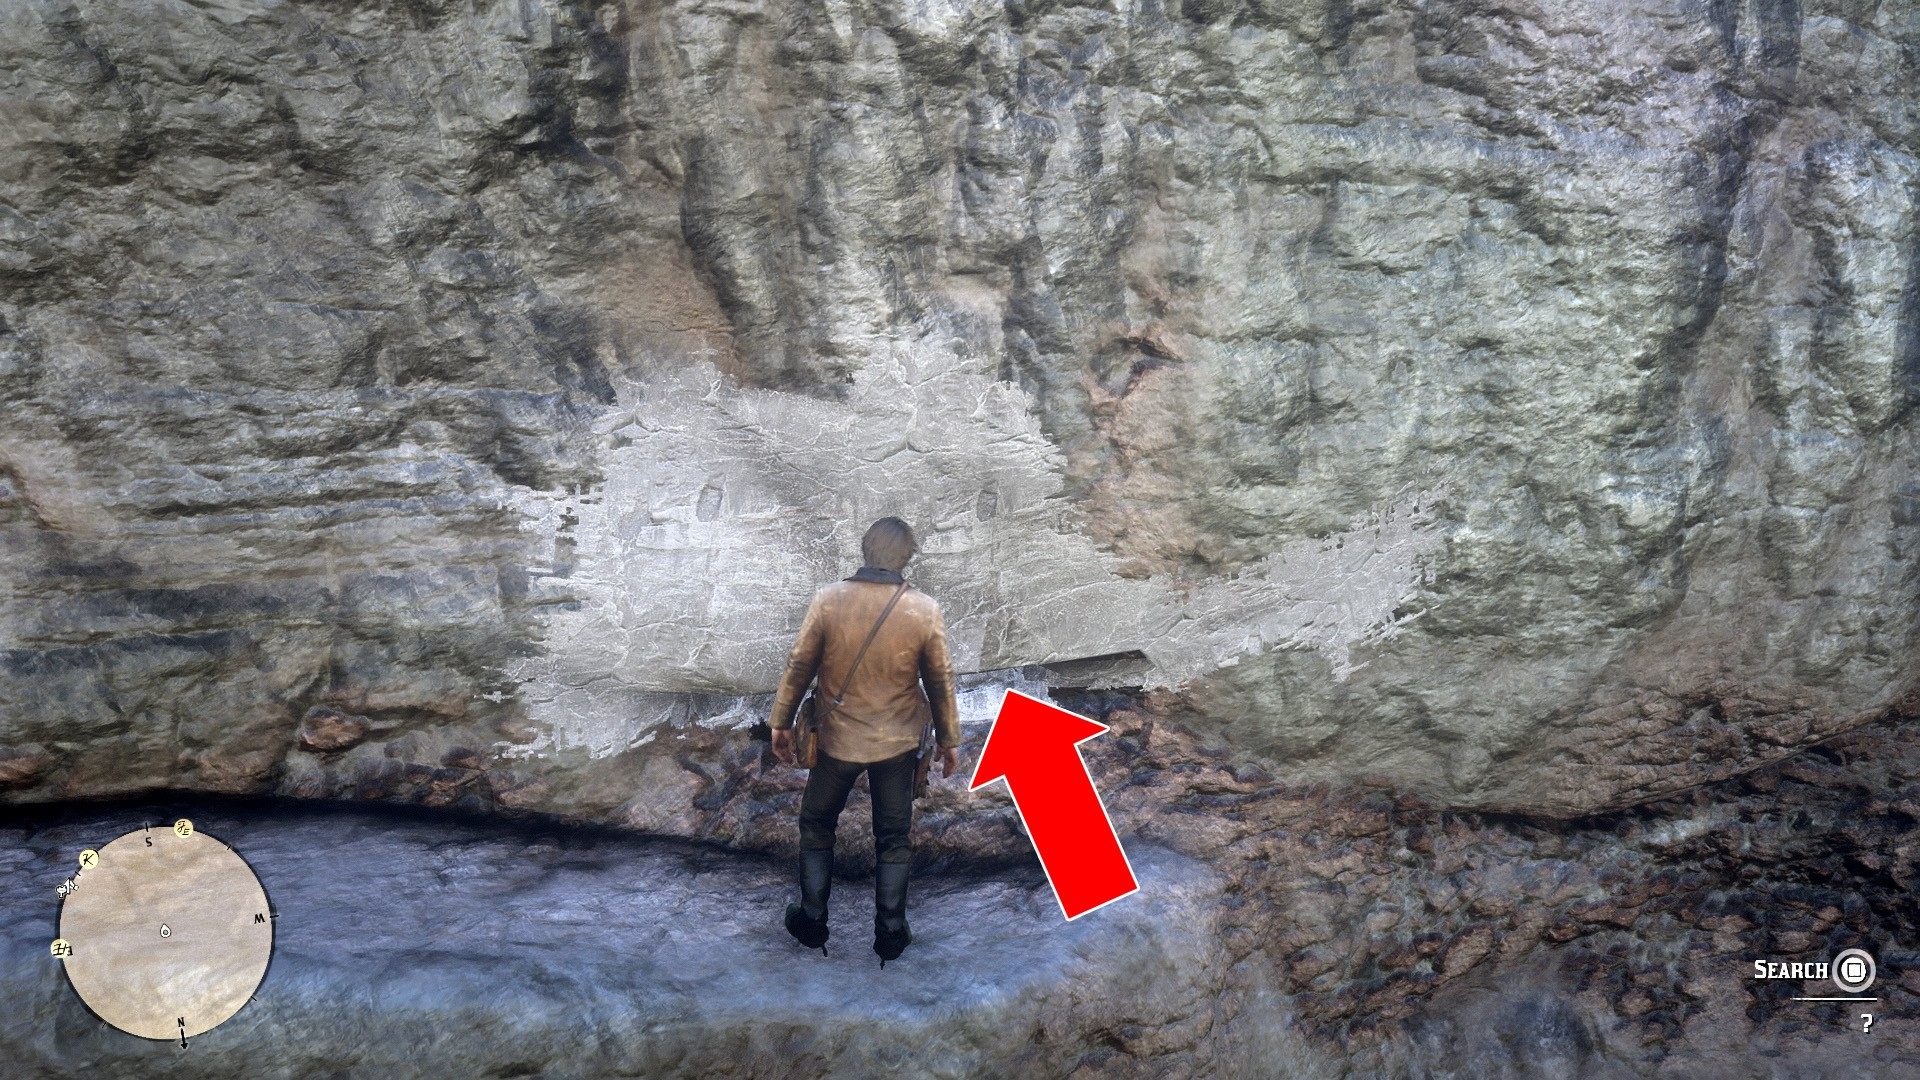
If you have chosen the left tunnel, when you reach the cave, go slowly to the edge of the tunnel and when you take a step forward, you should fall to a small rocky ledge below from which you can descend further.

The Poisonous Trail Treasure

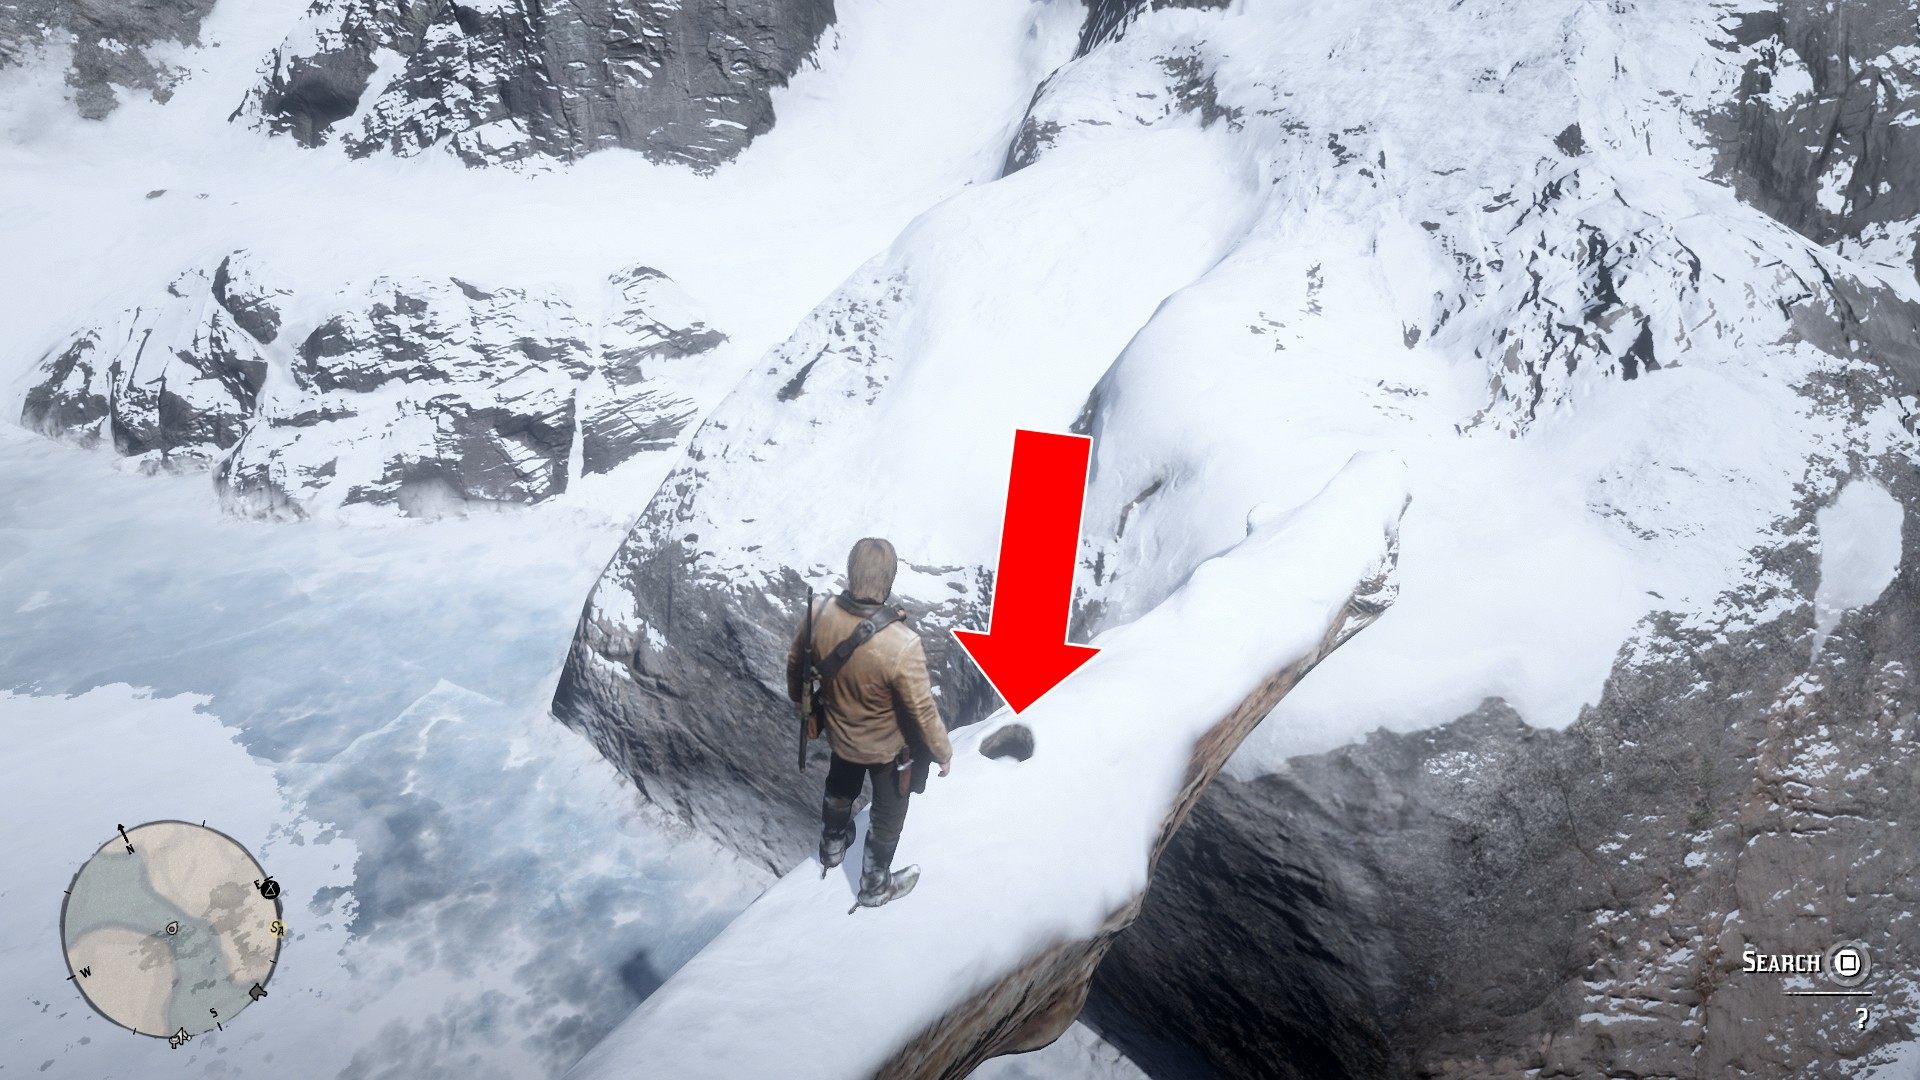
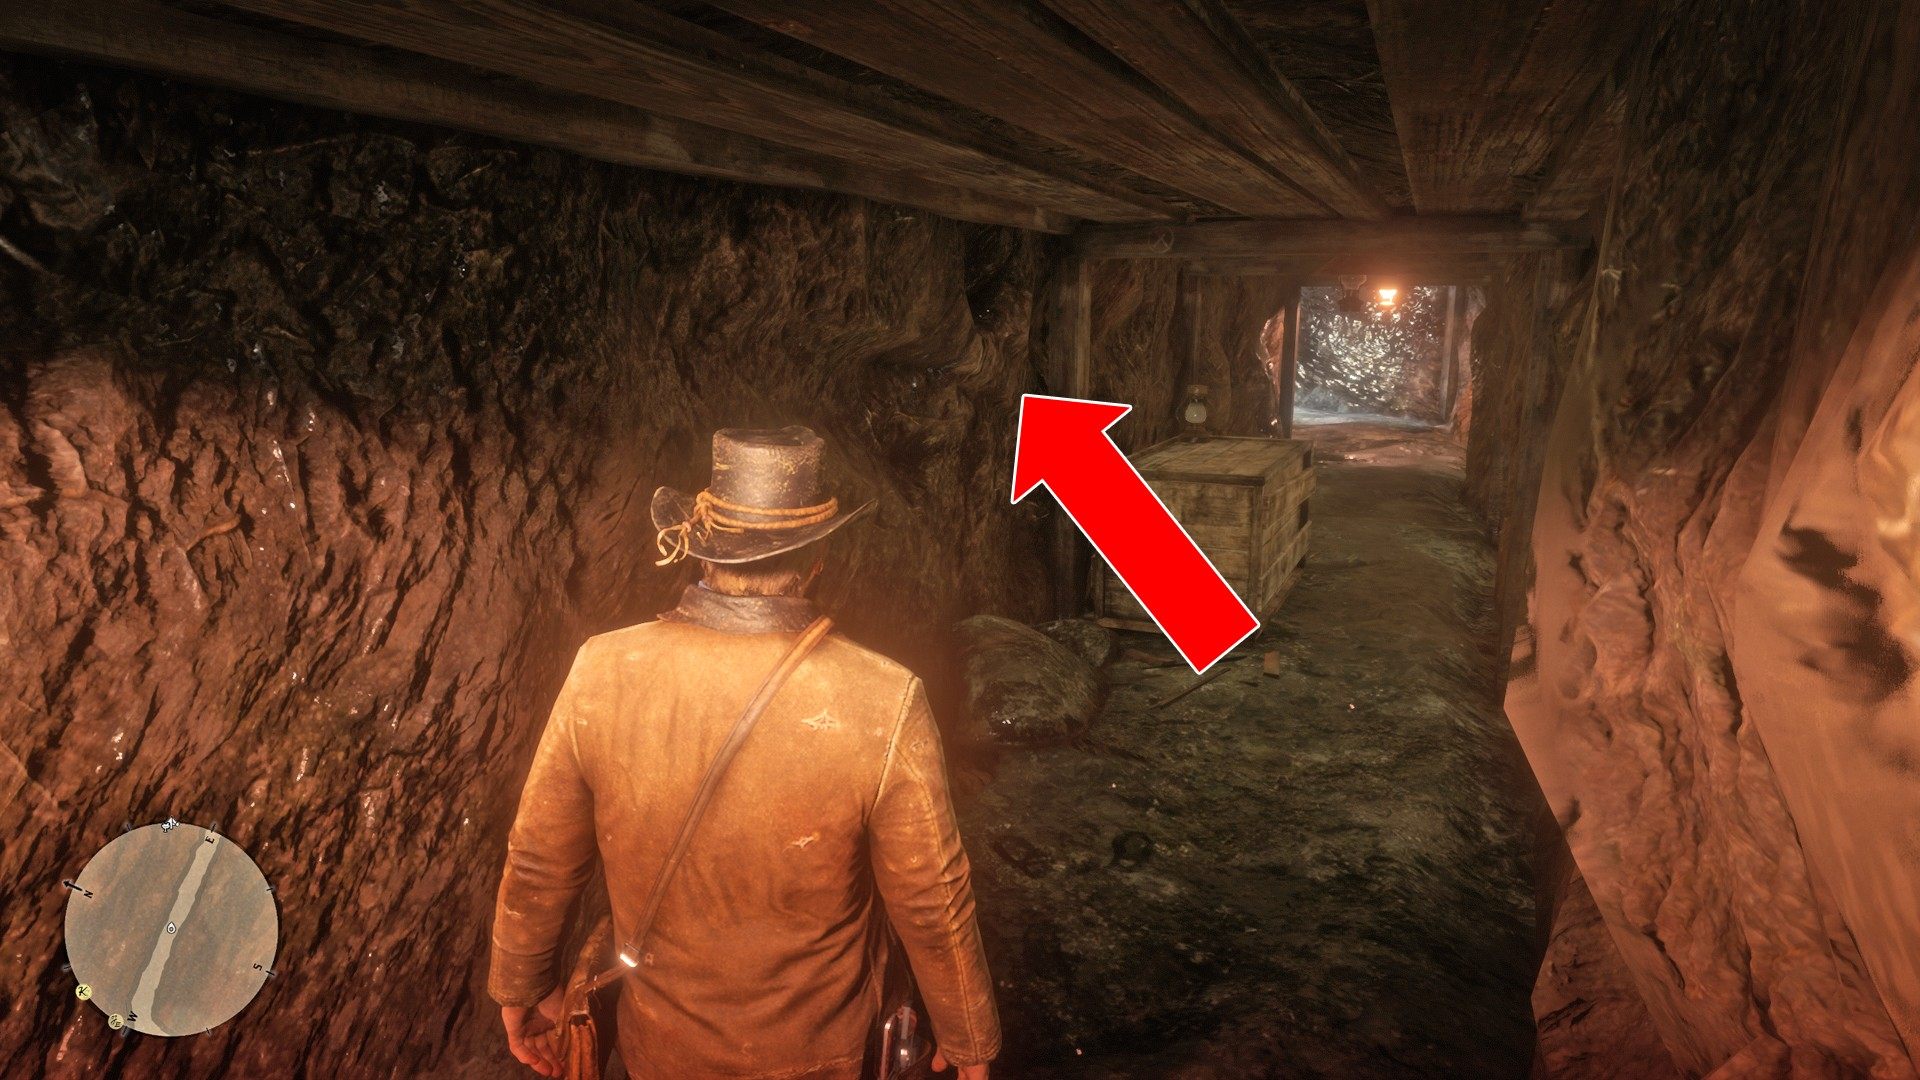
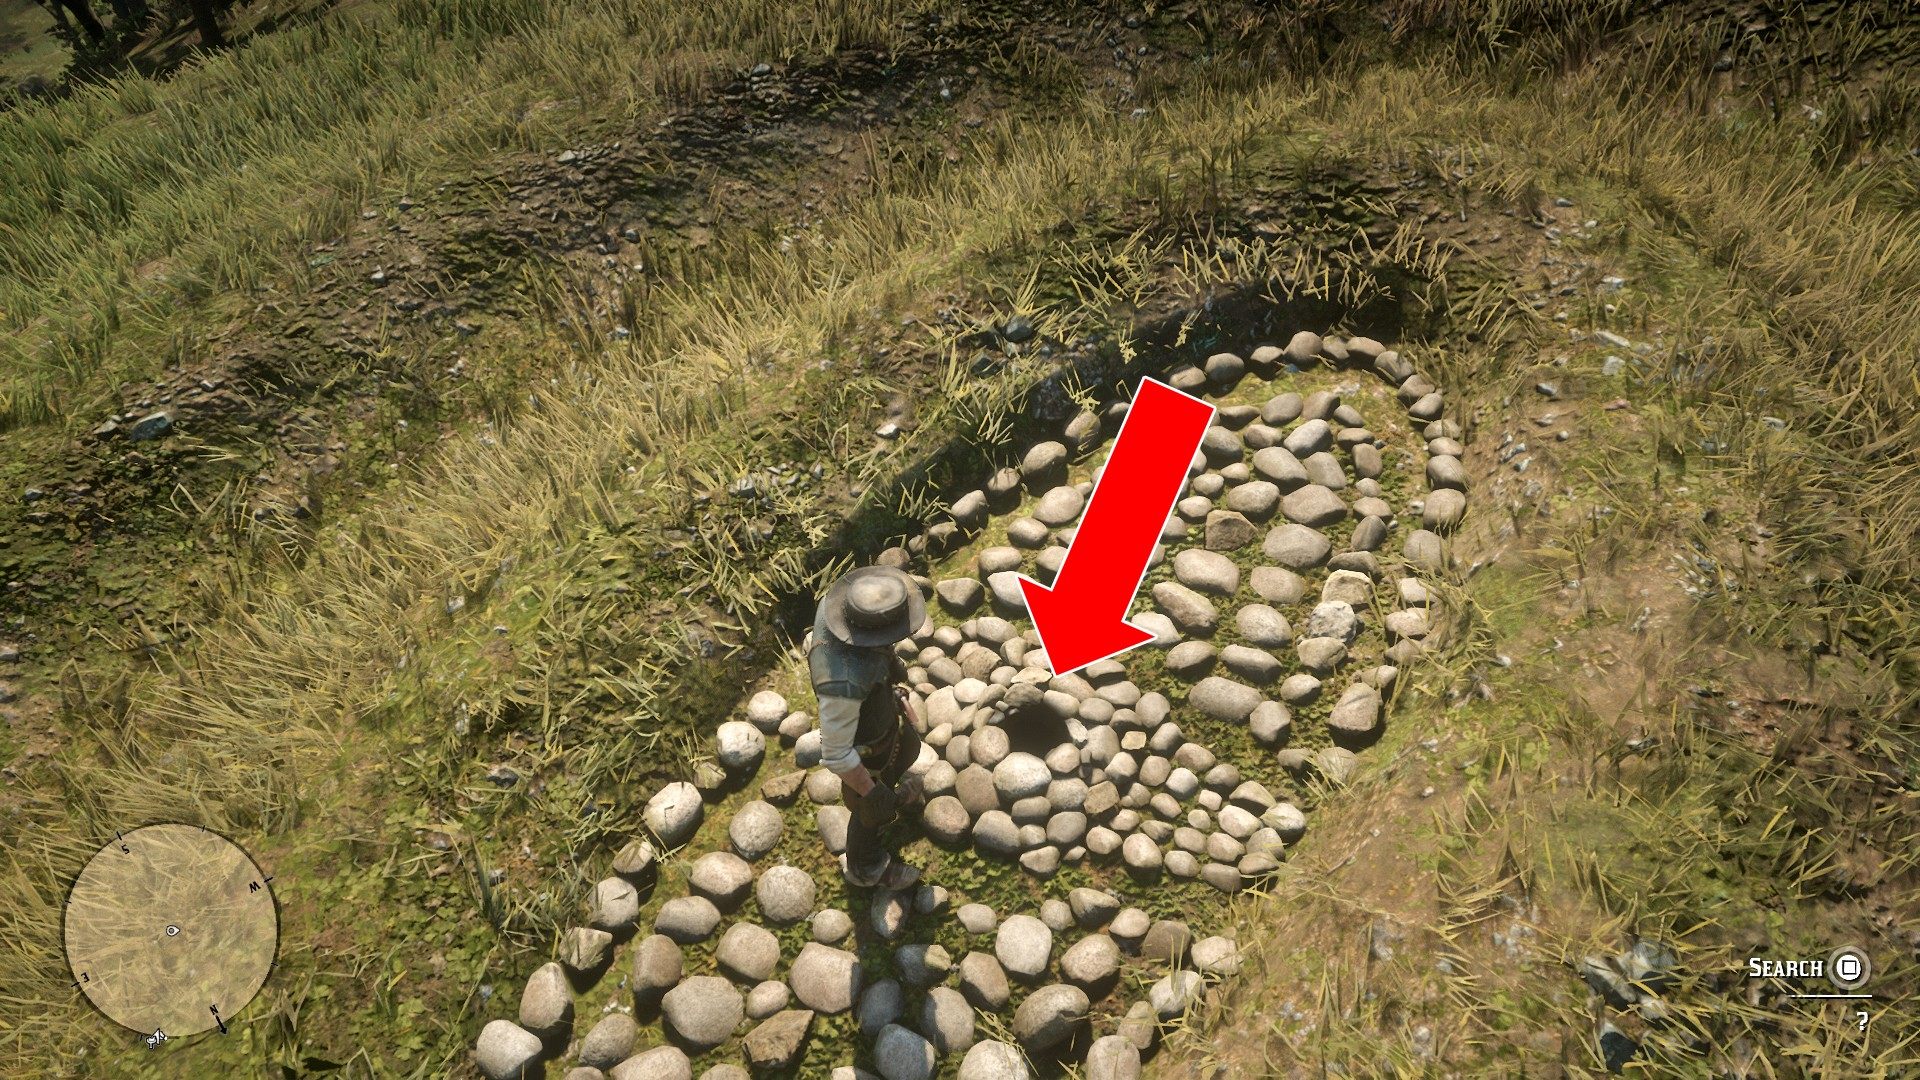
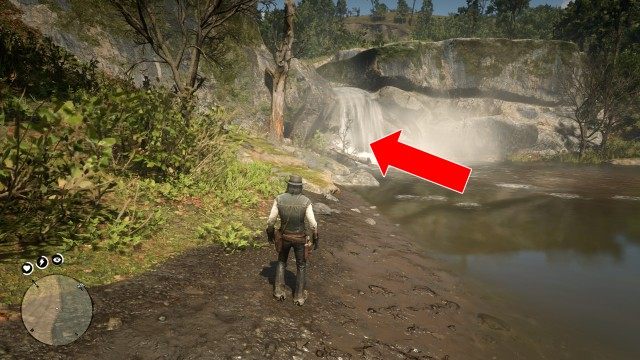
Slide down into the water. The treasure is hidden on the ledge above, between the rocks.

The Poisonous Trail Treasure

The Poisonous Trail Treasure

Show the map

TreasureTwo Gold Bars

The bars are inside a crashed railway car. It can be accessed from above.

Two Gold Bars

Two Gold Bars

Show the map