An interactive map of Hogwarts Castle, one of the places we explore while playing Hogwarts Legacy. This map features such locations as: Daedalian Keys, House Tokens, Field Guide Pages, Collection Chests, Demiguise Statues, Arithmancy Doors, Eye Chests, Legendary Chests, Floo Flames, etc.
Hogwarts Castle
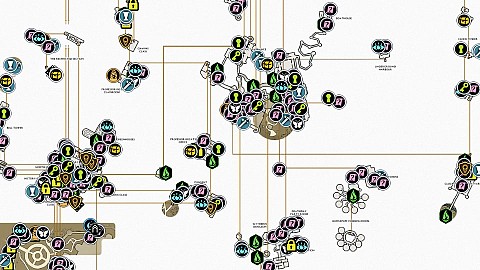
Markers on the map
- Hogwarts Secrets3
- Demiguise Moon Statues10
- Floo Flames36
- Arithmancy Doors12
- Wand Handles (Collection Chests)15
- Conjurations (Collection Chests)20
- Eye Chests15
- Legendary Chests12
- Daedalian Keys16
- House Cabinets / House Tokens16
- Astronomy Table1
- Field Guide Pages153
- Dungeons6
- Moths15
- Side Quests25
- Locks47
Points of interest
Hogwarts Secrets
Hogwarts Secrets are slightly more complex puzzles you may come across while exploring the castle. There are three of them in total. When you solve them you will get access to rooms with interesting loot. To be able to complete them you will first need to learn the appropriate spells, etc.
Demiguise Moon Statues
Demiguise Moons / Demiguise Statues become available after "The Caretaker's Lunar Lament" main quest and they can only be collected at night. Demiguise Moons are needed to learn the higher levels of Alohomora spell. This will allow you to open higher level locks.
Floo Flames
Unlocked Floo Flames act as fast travel points. To unlock a Floo Flame, simply walk near it.
Arithmancy Doors
The Arithmancy Doors are distinctive-looking doors that you will be able to open when you solve the puzzle assigned to them. As well as the door, you also need to locate two dials marked as "?" and "??" which in most cases should be somewhere very close to the door. In order to unlock the door, you must set the correct animal symbols on both dials. When they are the right symbols then the door will open when you try to do so.
Wand Handles (Collection Chests)
The Collection Chests containing the Wand Handles.
Conjurations (Collection Chests)
The Collection Chests containing the Conjuration Items.
Eye Chests
Eye Chests can be opened after learning the Disillusionment spell which turns you invisible. If you want, then you can also use the Invisibility Potion. Approach the chest without being seen by it to open it. Each eye chest will give you a total of 500 gold galleons.
Legendary Chests
Legendary Chests are large chests, with few exceptions mostly located in hard-to-reach places where you are sure to find a piece of legendary gear.
Daedalian Keys
Daedalian Keys & House Tokens. Daedalian Keys will appear only after starting the quest "The Daedalian Keys". These are small keys floating in the air. There are a total of 16 of them and all of them are located in Hogwarts Castle. When you approach one of them, it will start flying towards the corresponding House Cabinet, which should be somewhere nearby.
House Cabinets / House Tokens
Daedalian Keys & House Tokens. You can open these House Cabinets after finding the right Daedalian Key. Follow the key, interact with the cabinet and slap the key when it hovers over the lock. When you do so, the cabinet will open and you will receive a House Token that you can throw into the chest located in the common room of your house.
Astronomy Tables
A total of 15 Astronomy Tables are available in the game. You will be able to use them after completing the main quest "Astronomy Class". This will only be possible during the night. To solve this kind of puzzle you have to move the telescope until the blue outline of the constellation matches the bright stars on the sky.
Field Guide Pages
Dungeons
Moths
Moths play a "supporting role". They appear when their corresponding Lumos Frame has beed activated. Bring the moth back to the frame to acquire the Field Guide Page hidden in the frame.