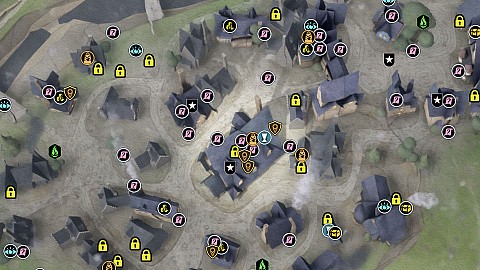
Hogsmeade - Map Markers Summary
Demiguise Moon Statues x9, Floo Flames x3, Conjurations (Collection Chests) x5, Eye Chests x15, Legendary Chests x5, Field Guide Pages x55, Moths x5, Side Quests x11, Dungeons x2, Infamous Foe x1, Vendors x9, Known Locations x7, Locks x23
The following legend of Hogsmeade interactive game map defines the points of interest / markers displayed on the map. Each marker corresponds to a specific element to facilitate efficient navigation and interaction with the map.
Demiguise Moons / Demiguise Statues become available after "The Caretaker's Lunar Lament" main quest and they can only be collected at night. Demiguise Moons are needed to learn the higher levels of Alohomora spell. This will allow you to open higher level locks.
Demiguise Moon Statue #1
It's inside the Tomes and Scrolls shop, in the side bedroom.
Demiguise Moon Statue #2
It's in the back room of the Hog's Head.
Demiguise Moon Statue #4
It's in a locked (Level 1 Lock) room on the top floor of The Three Broomsticks inn.
Demiguise Moon Statue #5
It's inside the locked (Level 1 Lock) house.
Demiguise Moon Statue #6
It's inside the locked (Level 1 Lock) house.
Demiguise Moon Statue #7
Upper floor of the locked (Level 1 Lock) house.
Demiguise Moon Statue #8
Upper floor of the locked (Level 2 Lock) house.
Demiguise Moon Statue #9
Upper floor of the locked (Level 2 Lock) house.
Unlocked Floo Flames act as fast travel points. To unlock a Floo Flame, simply walk near it.
North Hogsmeade
The northern side of Hogsmeade.
South Hogsmeade
The southern side of Hogsmeade.
West Hogsmeade
The western side of Hogsmeade.
Collection Chest (Conjuration)
It's inside the locked (Level 3 Lock) house.
Collection Chest (Conjuration)
It's in a locked (Level 1 Lock) room on the top floor of The Three Broomsticks inn.
Collection Chest (Conjuration)
It's located in a locked (Level 3 Lock) house, ground floor.
Collection Chest (Conjuration)
It's in the bedroom located on the second floor of the locked (Level 3 Lock) house.
Eye Chests can be opened after learning the Disillusionment spell which turns you invisible. If you want, then you can also use the Invisibility Potion. Approach the chest without being seen by it to open it. Each eye chest will give you a total of 500 gold galleons.
Legendary Chests are large chests, with few exceptions mostly located in hard-to-reach places where you are sure to find a piece of legendary gear.
Legendary Chest
This chest is in a locked (Level 2 Lock) part of this building.
Legendary Chest
This chest is located at the back of the building.
Legendary Chest
It's located in a locked (Level 3 Lock) house, second floor.
Field Guide Page
It flies in circles around the roof of the building. Use Accio to grab it.
Field Guide Page
It flies around here. Use Accio to grab it.
Field Guide Page
It's flying around here. Use Accio to grab it.
Field Guide Page
It flies around the bridge. Use Accio to grab it.
Field Guide Page
It's flying in circles above the water. Use Accio to grab it.
Field Guide Page
It flies close to a nearby building and slightly north of it.
Field Guide Page
It's flying around here. Use Accio to grab it.
Field Guide Page
It's circling around the roofof the house. Use Accio to grab it.
Field Guide Page
It's flying aroud here. Use Accio to grab it.
Field Guide Page
It's flying around. Use Accio to grab it.
Field Guide Page
It flies in a narrow alley between buildings. Use Accio to grab it.
Field Guide Page
It's flying underneath the stone bridge. Use Accio to grab it.
Field Guide Page
It flies around the Steepley and Sons shop. Use Accio to grab it.
Field Guide Page
It's fying along the alleyway. Use Accio to grab it.
Field Guide Page
It's flying aroud here. Use Accio to grab it.
Field Guide Page
It's flying around the upper floor of the upper level of the Tomes and Scrolls shop. You have to intearcat with the book (switch) on the first floor to extend the enchanted staircase. Use Accio to grab it.
Field Guide Page
It flies along the building. Use Accio to grab it.
Field Guide Page
It's flying aroud here. Use Accio to grab it.
Field Guide Page
It's flying aroud here. Use Accio to grab it.
Field Guide Page (Abandoned Shop)
It's next to the entrance to the building. Use Revelio to reveal it.
Field Guide Page (Brood and Peck)
It's inside the Brood and Peck shop. Use Revelio to reveal it.
Field Guide Page (Butterbeer Barrels)
It's by the large barrels you'll find by The Three Broomsticks inn. Use Revelio to reveal it.
Field Guide Page (Ceridwen's Precarious Cauldrons)
It's in front of the pile of cauldrons. Use Revelio to reveal it.
Field Guide Page (Dungbomb)
It's inside the Zonko's Joke Shop, upper floor. Use Revelio to reveal it.
Field Guide Page (Enchanted Staircase)
It's inside the Tomes and Scrolls shop. Use Revelio to reveal it.
Field Guide Page (Exploding Bonbons)
It's inside the Honeydukes shop. Use Revelio to reveal it.
Field Guide Page (Fizzing Whizzbees)
It's inside the Honeydukes shop. Use Revelio to reveal it.
Field Guide Page (Frog Spawn Soap)
It's inside the Zonko's Joke Shop. Use Revelio to reveal it.
Field Guide Page (Gladrags Mannequin)
It's inside the Gladrags Wizardwear shop, in frot of the mannequin. Use Revelio to reveal it.
Field Guide Page (Gladrags Wizardwear)
It's next to the entrance to the Gladrags Wizardwear shop. Use Revelio to reveal it.
Field Guide Page (Hengist of Woodcroft)
It's in front of the statue. Use Revelio to reveal it.
Field Guide Page (Hog's Head Docks)
At the dock, above the wooden boxes. Use Revelio to reaveal it.
Field Guide Page (Hogsmeade Community Garden)
It's near the stone steps in the small garden. Use Revelio to reveal it.
Field Guide Page (Hogsmeade)
It's next to the bridge. Use Revelio to reveal it.
Field Guide Page (Honeydukes)
It's next to the entrance to the Honeydukes shop. Use Revelio to reveal it.
Field Guide Page (J. Pippin's Potions)
It's inside the J. Pippin's Potions shop. Use Revelio to reveal it.
Field Guide Page (Magical Mail)
It's in the post office building. Use Revelio to reveal it.
Field Guide Page (Moth Frame #1)
Use Lumos to activate the frame and then guide the Moth (Hogsmeade #1) to it. Once you do it, the page will pop up.
Field Guide Page (Moth Frame #3)
It's inside the abandoned building. Use Lumos to activate the frame and then guide the Moth (Hogsmeade #3) to it. Once you do it, the page will pop up.
Field Guide Page (Moth Frame #4)
This frame is outdoors, at the back of the building. Use Lumos to activate the frame and then guide the Moth (Hogsmeade #4) to it. Once you do it, the page will pop up.
Field Guide Page (Moth Frame #5)
This frame is outdoors, at the back of the building. Use Lumos to activate the frame and then guide the Moth (Hogsmeade #5) to it. Once you do it, the page will pop up.
Field Guide Page (Mounted Hog's Head)
It's inside the Hog's Head inn. Use Revelio to reveal it.
Field Guide Page (Ollivanders Wand Shop)
It's next to the entrance to the Ollivanders shop. Use Revelio to reveal it.
Field Guide Page (Scrivenshaft Cats)
It's inside the Scrivenshaft's Quill shop. Use Revelio to reveal it.
Field Guide Page (Sneakoscope)
It's inside the Gladrags Wizardwear, by the table with the sneakoscope (it looks like a telescope) lying on it.
Field Guide Page (Spintwitches Sporting Needs)
It's inside the Gladrags Wizardwear shop, in frot of the mannequin. Use Revelio to reveal it.
Field Guide Page (Tea Shop Decor)
It's inside the Steepley and Sons shop. Use Revelio to reveal it.
Field Guide Page (The Dogweed and Deathcap Tree)
It's inside the Dogweed and Deathcap shop, by the tree. Use Revelio to reveal it.
Field Guide Page (The Magic Neep Cart)
It's next to the shopkeeper. Use Revelio to reveal it.
Field Guide Page (The Three Broomsticks)
It's inside the Three Broomsticks inn, in front of the fireplace. Use Revelio to reveal it.
Field Guide Page (Three Broomsticks Private Room)
It's in a locked (Level 1 Lock) room on the top floor of The Three Broomsticks inn. Use Revelio to reveal it.
Field Guide Page (Water Well)
It's next to the water well. Use Revelio to reveal it.
Field Guide Page (Zonko's Joke Shop)
It's next to the entrance to the Zonko's Joke Shop. Use Revelio to reveal it.
Moths play a "supporting role". They appear when their corresponding Lumos Frame has beed activated. Bring the moth back to the frame to acquire the Field Guide Page hidden in the frame.
A Demanding Delivery
It unlocks when you complete the "Flying Class" main quests. Talk to Parry Pippin. Rewards: Appearance (Potioneer's Cap), 300 Gold.
A Friend In Deed
It unlocks when you complete the "Beasts Class", "The Helm of Urtkot", and "The Caretaker's Lunar Lament" main quests. Talk to Sirona Ryan. Reward: Conjutration Spellcraft (Keg Shelf).
Flight Test / Sweeping the Competition / The Sky Is the Limit
After completing the main quest "Flying Class" you will be able to buy a broom from Albie Weekes. Do this to receive his first quest.
Follow the Butterflies
It unlocks when you complete the "Flying Class" main quests. Talk to Clementine Willardsey. Rewards: Conjuration Spellcraft (Flower Box).
Spot Removal
It unlocks when you complete the "The High Keep" main quest. Talk to Sacharissa Tugwood. Rewards: Appearances (Bubotuber Harvesting Attire), 300 Gold.
Take the Biscuit
Talk to Garnuff.
Tangled Web
It's a follow-up of the "Absconder Encounter" quest. Talk to Crispin Dunne. Reward: Conjuration Spellcraft (Sinister Oddities Shelf).
The Unique Unicorn
This quest unlock some time after you finish the "Niamh Fitzgerald's Trial" main quest. You may also need to complete the "Phoenix Rising" quest first. Talk to Betty Bugbrooke. Reward: Conjuration Spellcraft (Wooden Maiden).
Venomous Revenge
It unlocks when you complete the "Beasts Class", "The Helm of Urtkot", and "The Caretaker's Lunar Lament" main quests. Talk to Ackley Barnes. Reward: Appearance (Dragonhide Herbologist Gloves), 300 gold.
Ashwinder Hideout
You can visit this place during the "A Basis for Blackmail" relationship quest (Natsai Onai).
1 x Collection Chests
The Tomb of the Villager
This dungeon is available only during the night.
Various Vendors from whom you can purchase the recipes, ingredients, clothing items you need, etc.
Brood and Peck
A beast supply shop stocked with the latest and greatest in beast byproducts.
Dogweed and Deathcap
A plant shop for all sorts magical flora and seeds.
Sells:
1 x Chinese Chomping Cabbage Seed (600)
1 x Mandrake Seed (800)
1 x Venomous Tentacula Seed (1,050)
2 x Fertiliser (300)
2 x Chinese Chomping Cabbage (300)
2 x Mandrake (500)
2 x Venomous Tentacula (600)
Gladrags Wizardwear
A clothing shop for both the elegant and eccentric wizard. It has two additional locations in London and Paris.
J. Pippin's Potions
An apothecary that carries a wide selection of potions and potions ingredients.
Sells:
1 x Focus Potion Recipe (1,200)
1 x Thunderbrew Recipe (1,200)
1 x Invisibility Potion Recipe (800)
1 x Maxima Potion Recipe (500)
5 x Ashwinder Eggs (150)
5 x Dugbog Tongue (100)
5 x Horklump Juice (50)
5 x Lacewing Flies (100)
5 x Leaping Toadstool Caps (150)
5 x Leech Juice (150)
5 x Spider Fang (50)
5 x Stench of the Dead (100)
5 x Troll Bogeys (100)
5 x Mongrel Fur (50)
2 x Focus Potion (500)
2 x Thunderbrew (1,000)
2 x Edurus Potion (300)
2 x Invisibility Potion (500)
2 x Maxima Potion (300)
3 x Wiggenweld Potion (100)
Madam Snelling's Tress Emporium
A hairdressing salon run by Calliope Snelling that offers the latest hairstyles.
Ollivanders
A branch of the renowned wand shop owned and operated by the Ollivander wandmaking family since 382 B.C.
Spintwitches Sporting Needs
A sporting goods shop that sells a variety of brooms.
The Magic Neep
Hogsmeade's supplier of fresh produce, seeds and fertiliser.
Sells:
1 x Fluxweed Seed (350)
1 x Knotgrass Seed (350)
1 x Mallowsweet Seed (200)
1 x Shrivelfig Seed (450)
2 x Fertiliser (300)
2 x Dittany Leaves (100)
2 x Fluxweed Stem (150)
2 x Knotgrass Sprig (150)
2 x Mallowsweet Leaves (100)
2 x Shrivelfig Fruit (150)
Tomes and Scrolls
A specialty bookshop with wares that fulfil the promise of its name.
Sells:
Beast Feeder spellcraft (1,200)
Beast Toybox spellcraft (500)
Chopping Station spellcraft (1,500)
Dung Composter spellcraft (1,000)
Hopping Pot spellcraft (3,000)
Material Refiner spellcraft (1,500)
Potting Table with a Large Pot spellcraft (1,000)
Potting Table with Two Large Pots spellcraft (3,000)
Potting Table with a Medium Pot spellcraft (750)
Potting Table with Two Medium Pots spellcraft (1,500)
Potting Table with Three Medium Pots spellcraft (3,000)
Potting Table with Three Small Pots spellcraft (400)
Potting Table with Five Small Pots spellcraft (2,500)
Medium Potions Station spellcraft (1,000)
T-Shaped Potions Station spellcraft (2,000)
Breeding Pen spellcraft (1,000)
Famous places that can be visited in Hogsmeade.
Hog's Head
A pub and inn known for its unsavoury patrons and general uncleanliness.
Hogsmeade Square
The central square in Hogsmeade.
Honeydukes
A sweet shop stocked with a variety of wizarding confections, but is known best for its fudge. It is, naturally, very popular with Hogwarts students.
Steepley and Sons
Hogsmeade's local tea shop. It offers a wide selection of fine teas and confections.
The Old Fool
An abandoned old building in Hogsmeade.
The Three Broomsticks
The Three Broomsticks Inn is the most esteemed pub in Hogsmeade, where conversation and Butterbeer flow freely.
Zonko's Joke Shop
A joke and trick shop with a selection of pranking delights that include Biting Teacups, Inflatable Tongues and Dungbombs.