An interactive map of The Black Trench, a sprawling sewer and underground cave system - essentially a dark, labyrinthine expanse beneath the settlement of Sacrament and Orban Glades. It becomes accessible during the "Of Rats and Raiders" questline.
The Black Trench
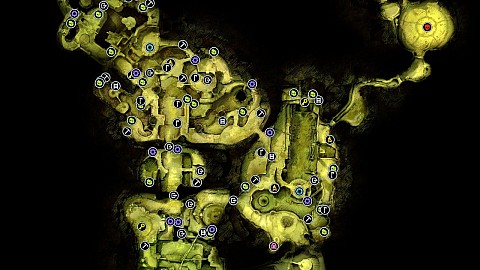
Markers on the map
- Cerim Whispers3
- Fire Pits4
- Treasure Chests26
- Keys3
- Passages11
- Mechanisms12
- Sub-Zones3
- Boss Fight1
- Trees8
- Ore Deposits11
- Ladders, Elevators, Creepers, etc.9
Points of interest
Cerim Whispers
Cerim Whispers in No Rest for the Wicked are special locations that play two important roles in the game. First, they serve as places where the game's progress is saved and as places where the player's character is respawned when it dies. Secondly, they serve as places used for fast travel.
Fire Pits
Fire Pits in No Rest for the Wicked are special locations where you can cook meals using obtained ingredients. Every meal has different effects. Most will recover Health, but some can give you temporary status effects.
Treasure Chests
Places where you can find treasure chests containing resources or pieces of gear. The contents of the chests is random to a large extent, also whether or not a chest will occur in a particular place, maybe its type, seems to be somewhat random.
Keys
Keys and similar items used to open various locked doors or passages, activate some mechanisms, etc. Some of them you will be able to find only by following certain quests.
Passages
Various passageways, for example, closed doors or gates where you have to find a way to open them. Sometimes you will have to find the right key, sometimes they can only be unlocked from one of the sides. In some cases, all you have to do is use a weapon and destroy them.
Mechanisms
Various mechanisms, for example, levers or turning wheels which you have to use to open some gate, move a platform over which you can jump further, etc.
Boss Fights
Significant, named bosses that you have to fight against at some stage of the game.
Trees
Places where the Trees grow. Trees can be cut down as long as the character is equipped with a woodcutter's axe. They are the source of various types of wood.
Ore Deposits
Places where Ore Deposits can be found in No Rest for the Wicked. They can be mined, as long as the character is equipped with a pickaxe. They are the source of different types of ores.
Ladders, Elevators, Creepers, etc.
Ladders, creepers and other such objects on which the player can climb to a higher or lower level, sometimes also horizontally. Some of the ladders are raised, so in this case you will need to lower them first. To do this, you need to find a way to approach them at the top and then kick them down.