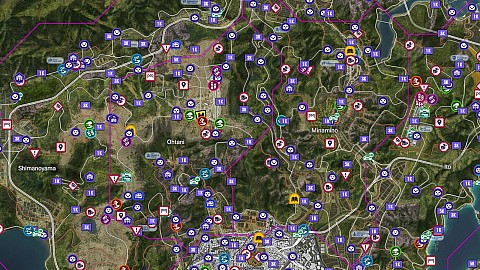
Forza Horizon 6 Map. An interactive map of a fictional part of Japan that is the open world setting of Forza Horizon 6. It shows the locations of collectibles and various activities such as Fast Travel Boards, XP Boards, Barn Finds, Landmarks, Expeditions, Player Houses, Trailblazers, Danger Signs, Speed Zones, Speed Traps, Drift Zones and more.
The map below shows Japan during the spring season. While the map's appearance changes slightly in other seasons, the road layout, event locations, and other key elements remain the same.
Markers on the map
Treasure Chests7
Photo Subjects28
Treasure Cars9
Barn Finds15
Player Houses8
Festival Sites2
Wristband Events7
Stories9
Car Meets4
Job1
Road Racing Events22
Dirt Racing Events21
Cross Country Racing Events19
Touge Battles5
Street Racing Events15
Drag Racing Events3
Time Attacks4
Drag Meets3
Speed Traps30
Speed Zones30
Danger Signs20
Drift Zones20
Trailblazers11
Trailblazers (Finish Gate)11
Aftermarket Cars32
XP Board (5K)25
XP Board (3K)75
XP Boards (1K)100
Regional Mascots200
Landmarks74
Regions10
Other1
Points of interest
Treasure Chests
Treasure Chests are hidden, smashable boxes scattered across the game world that serve as the objective for weekly Treasure Hunts. Because these events are tied to the live-service seasonal calendar, each Treasure Chest is only available for a limited time before disappearing at the end of the weekly update.
Horizon Decades (Spring)Treasure chest that could be found during spring in the second season of Forza Horizon 6 - "Horizon Decades".
Reward: 100,000 CR, 3 Festival Points.
Horizon Decades (Summer)Treasure chest that could be found during summer in the second season of Forza Horizon 6 - "Horizon Decades".
Reward: 100,000 CR, 3 Festival Points.
Horizon Decades (Winter)Treasure chest that could be found during winter in the second season of Forza Horizon 6 - "Horizon Decades".
Reward: 100,000 CR, 3 Festival Points.
Italian Exotics (Summer)Treasure chest that can be found during summer in the third season of Forza Horizon 6 - "Italian Exotics".
Reward: 100,000 CR, 3 Festival Points.
Welcome to Japan (Autumn)Treasure chest that could be found during autumn in the first season of Forza Horizon 6 - "Welcome to Japan".
Reward: 100,000 CR, 3 Festival Points.
Welcome to Japan (Spring)Treasure chest that could be found during spring in the first season of Forza Horizon 6 - "Welcome to Japan".
Reward: 100,000 CR, 3 Festival Points.
To get here, start by heading to the upper level of the neighboring building.
Welcome to Japan (Summer)Treasure chest that could be found during summer in the first season of Forza Horizon 6 - "Welcome to Japan".
Reward: 100,000 CR, 3 Festival Points.
Photo Subjects
Photo Subjects are the various types of landmarks, such as murals, that you need to photograph to complete certain Discovery Japan challenges.
Chaser Zero
Daikoku Monument
Dragon 76 Mural
Hirosaki Castle
HZN-VI Rocket
Kazuhisa Uragami Mural
Kenji Iwasaki Mural
Kinkaku-ji
Kitayama Big Daisugi
KiteSeason: Summer
KiteSeason: Summer
Koinobori Fish FlagsSeason: Spring
Lady Aiko Mural
Naoshi Mural
Okuyama Taiki Mural
Peace Torii
Ruriko-ji Temple
Shirakawa Island Farmhouse
Sky LantersSeason: Autumn, Time of Day: Night
Sotoyama Ski Resort
Statue of Hachikō
Tanabata StreamersSeason: Summer
Tatsuro Kiuchi Mural
Temple of Nachi Falls
Tokyo Tower
Wakana Yamazaki Mural
Water LanternsSeason: Summer
Water Lanterns
Treasure Cars
Treasure Cars are rare, abandoned vehicles scattered throughout Japan's diverse landscapes. These cars are not housed in barns. Instead, they are left in the open world, often in scenic or secluded locations like industrial districts, docks, or overgrown rural areas.
1969 Dodge Charger R/T
1974 Lancia Stratos HF Stradale
1981 BMW M1
1985 Mazda RX-7 GLS-SE
1985 Nissan Safari Turbo
1987 Porsche 959
1991 Nissan Figaro
1995 Mistubishi Lancer Evolution III GSR
2005 Ford GT
Barn Finds
Barn Finds are hidden abandoned cars scattered across the open-world map of Japan. As you progress through the game, you unlock "Barn Find Rumors" that mark a search zone on your map. Inside each hidden barn is a rare or classic car that gets restored and added to your garage.
1962 Lincoln ContinentalTo unlock this barn find, you must earn 8,000 Discover Japan points to obtain the Pink Stamp.
1969 Toyota 2000GTTo unlock this barn find, you must earn 2,500 Discover Japan points to obtain the Green Stamp.
1971 Nissan Skyline 2000GT-RTo unlock this barn find, you must earn 5,000 Discover Japan points to obtain the Blue Stamp.
1982 Porsche 911 Turbo 3.3To unlock this barn find, you must earn 8,000 Discover Japan points to obtain the Pink Stamp.
1983 Nissan #11 Tomica Skyline Turbo Super SilhouetteTo unlock this barn find, you must earn 20,000 Discover Japan points to obtain the Gold Stamp.
1984 Peugeot 205 Turbo 16To unlock this barn find, you must earn 8,000 Discover Japan points to obtain the Pink Stamp.
1987 Ford Sierra Cosworth RS500To unlock this barn find, you must earn 2,500 Discover Japan points to obtain the Green Stamp.
1989 Nissan PAOTo unlock this barn find, you must earn 5,000 Discover Japan points to obtain the Blue Stamp.
1991 Mazda #55 Mazda 787BTo unlock this barn find, you must earn 20,000 Discover Japan points to obtain the Gold Stamp.
1997 Lamborghini Diablo SVTo unlock this barn find, you must earn 12,000 Discover Japan points to obtain the Orange Stamp.
1997 Mitsubishi Montero EvolutionTo unlock this barn find, you must earn 12,000 Discover Japan points to obtain the Orange Stamp.
1998 Nissan #23 Pennzoil NISMO Skyline GT-RTo unlock this barn find, you must earn 8,000 Discover Japan points to obtain the Pink Stamp.
1998 Nissan R390 (GT1)To unlock this barn find, you must earn 16,000 Discover Japan points to obtain the Purple Stamp.
2005 Honda NSX-R GTTo unlock this barn find, you must earn 1,250 Discover Japan points to obtain the Yellow Stamp.
2005 Mitsubishi #1 Sierra Sierra Enterprises Lancer Evolution Time AttackTo unlock this barn find, you must earn 16,000 Discover Japan points to obtain the Purple Stamp.
Player Houses
Player Houses are homes you can buy around the map that work as your personal bases. You can use them as spawn locations, manage your garage, and unlock bonuses like Wheelspins or extra Credits. Some houses also let you customize your garage, display cars, and decorate the space.
Fuji Unkai HouseTo unlock this house, you must earn 12,000 Discover Japan points to obtain the Orange Stamp.
Price: 830,000 CR
Description: A classically styled Japanese house with an unmatched view of Mount Fuji. You can display 4 cars here.
Perk:
Career Driver - You earn an extra 10% credits when completing Horizon Jobs.
Hakusan Mountain LodgeTo unlock this house, you must earn 5,000 Discover Japan points to obtain the Blue Stamp.
Price: 635,000 CR
Description: A mountain lodge in the high alps of the Sotoyama region. You can display 4 cars here.
Perks:
Additional Garage Slot - Adds the ability to place +1 Display Car Locator.
Cool Credits - You earn an extra 10% credits in Horizon Life Events.
Mei's HouseIt's your first house. It's FREE.
Description: A place to stay in Japan, on the main road to Tokyo City.
Perk:
Wheeler Dealer - You can trade cars at the Autoshow.
Minka HouseTo unlock this house, you must earn 2,500 Discover Japan points to obtain the Green Stamp.
Price: 450,000 CR
Description: A seaside house in the Ito region. You can display 2 cars here.
Perk:
Credit Stunts - You earn an extra 10% credits in Horizon Stunt Party Events.
Soko 78To unlock this house, you must earn 16,000 Discover Japan points to obtain the Purple Stamp.
Price: 980,000 CR
Description: A spacious warehouse in the Tokyo City docklands.
Perk:
Import / Export - You pay 5% less credits when purchasing cars from the Autoshow.
Tokyo HousePrice: 3,000,000 (Free with VIP)
Description: A Japanese house on the outskirts of Tokyo City, with a four car garage.
Perk:
Daily Wheelspin - Get a free Wheelspin each day you attend Horizon Japan.
Vision HouseTo unlock this house, you must earn 20,000 Discover Japan points to obtain the Gold Stamp.
Price: 1,500,000 CR
Description: An architectural masterpiece, with a view of Tokyo City. You can display 4 cars here.
Perks:
Driving With Friends - You earn an extra 10% skill score when doing LINK Skills.
Additional Garage Slot - Adds the ability to place +1 Display Car Locator
Yashiki HouseTo unlock this house, you must earn 1,250 Discover Japan points to obtain the Yellow Stamp.
Price: 10,000 CR
Description: A house in need of repairs in the Hokubu region.
Perk:
Estate Builder - you can build at the Estate.
Festival Sites
In Forza Horizon-style games, Festival Sites are the main "hub locations" tied to the Horizon Festival - essentially the game's central bases of operation spread across the map. Festival Sites function as outposts where you interact with most core systems of the game.
Legend Island Festival SiteIt will be unlocked after completing Horizon Legend (Gold).
Wristband Events
Wristband Events are part of the game's main progression system, designed to control how players unlock new content as they advance through the Horizon Festival. Instead of giving access to everything from the start, the game uses Wristbands as a ranking structure that reflects your progress and reputation within the festival.
Horizon Invitational (Yellow)1. Yellow Wristband Event. Requires 1,250 [H] to unlock.
Unlocks 5 new events.
Next Wristband Event: Pier Pressure (Green).
Reward: 2020 BMW M2 Competition Coupe
Pier Pressure (Green)2. Green Wristband Event. Requires 2,500 [H] to unlock.
Unlocks 25 new events.
Previous Wristband Event: Horizon Invitational (Yellow).
Next Wristband Event: Mech My Day (Blue).
★ 10m
★★ 4m 25s
★★★ 4m
Reward: 1985 Ford RS200 Evolution
Mech My Day (Blue)3. Blue Wristband Event. Requires 6,000 [H] to unlock.
Unlocks 26 new events.
Previous Wristband Event: Pier Pressure (Green).
Next Wristband Event: Off Piste (Pink).
Reward: 2022 Acura NSX Type S
Off Piste (Pink)4. Pink Wristband Event. Requires 10,000 [H] to unlock.
Unlocks 33 new events.
Previous Wristband Event: Mech My Day (Blue).
Next Wristband Event: Flight Club (Orange).
★ 10m
★★ 4m 25s
★★★ 4m 15s
Reward: 2007 Peugeot 207 Super 2000
Flight Club (Orange)5. Orange Wristband Event. Requires 15,000 [H] to unlock.
Unlocks 37 new events.
Previous Wristband Event: Off Piste (Pink).
Next Wristband Event: Launch Control (Purple).
Reward: 2023 Prosche 911 Rallye
Launch Control (Purple)6. Puple Wristband Event. Requires 20,000 [H] to unlock.
Unlocks 38 new events.
Previous Wristband Event: Flight Club (Orange).
Next Wristband Event: Horizon Legend (Gold).
★ 10m
★★ 4m 25s
★★★ 4m 15s
Reward: 2018 Subaru WRX STI ARX Supercar
Horizon Legend (Gold)7. Gold Wristband Event. Requires 32,500 [H] to unlock.
Unlocks 12 new events.
Previous Wristband Event: Launch Control (Purple).
Reward: 2021 Lamborghini Aventador LP 780-4 Ultimate
Stories
Stories are narrative-driven mission chains that focus on specific characters, car cultures, and themed challenges within the Horizon Festival. Unlike regular races or championships, stories are designed to feel like short "mini-campaigns" that combine driving, storytelling, and unique gameplay scenarios.
Drift Club JapanDescription: Join Jordan in Drift Club Japan.
Chapters : 6
1 - Tokyo Drifters - ★ 70,000 pts, ★★ 150,000 pts, ★★★ 200,000 pts
2 - Welcome to Drift Club - ★ 150,000 pts, ★★ 200,000 pts, ★★★ 275,000 pts
3 - One Word: 'Touge' - ★ 45,000 pts, ★★ 85,000 pts, ★★★ 120,000 pts
4 - Don't Look Down - ★ 100,000 pts, ★★ 200,000 pts, ★★★ 300,000 pts
5 - Ready, Set... - ★ 70,000 pts, ★★ 150,000 pts, ★★★ 200,000 pts
6 - Drift-zoku - ★ 20 Drift, ★★ 50 Drift, ★★★ 90 Drift
All Stars Reward: 1997 Formula Drift #777 Nissan 240SX
Hokubu and Minamino Day TripDescription: Enjoy a Day Trip along Hokubu and Minamino.
Chapters :1
1 - Hokubu and Minamino - ★ 3 mins 20 secs, ★★ 3 mins, ★★★ 2 mins
Ito Day TripDescription: Meet with Mei and her Day Trippers at the Ito region.
Chapters: 1
1 - Ito - ★ 50,000 pts, ★★ 80,000 pts, ★★★ 100,000 pts
Moto Auto ZineDescription: Help Lary Chen make it on Moto Auto's cover.
Chapters: 6
1 - In Focus - Get to the Point + Photo - ★ 3 mins 20 secs, ★★ 2 mins, ★★★ 1 Min 30 secs
2 - Shutter Speed - Get to the Point + Photo - ★ 2 mins 30 secs, ★★ 1 Min 40 secs, ★★★ 1 Min
3 - Flying Shot - Get to the Point + Photo - ★ 2 mins 30 secs, ★★ 1 Min, ★★★ 30 secs
4 - Smoke and Tires - Start Drifting + Photo - ★ 2 mins 30 secs, ★★ 1 Min, ★★★ 30 secs
5 - Modern Tradition - Get to the Point + Photo - ★ 4 mins, ★★ 2 mins 30 secs, ★★★ 1 Min 40 secs
6 - Shibuya Showstopper - Get to the Point + Photo - ★ 2 mins, ★★ 1 Min 20 secs, ★★★ 40 secs
All Stars Reward: 1884 Honda Civic CRX Mugen
Nangan Day TripDescription: Explore the Nangan region with Mei.
Chapters: 1
1 - Nangan - ★ 3 mins, ★★ 2 mins 30 secs, ★★★ 1 Min 40 secs
Shimanoyama Day TripDescription: Sign up for the Shimanoyama Day Trip.
Chapters: 2
1 - North Shimanoyama - Speed Zone - ★ 40 mph, ★★ 90 mph, ★★★ 110 mph
2 - South Shimanoyama - Speed Zone - ★ 60 mph, ★★ 100 mph, ★★★ 125 mph
Sotoyama and Takashiro Day TripDescription: Learn more about Sotoyama and Takashiro.
Chapters: 2
1 - Sotoyama - Skill Points - ★ 60,000 pts, ★★ 100,000 pts, ★★★ 125,000 pts
2 - Takashiro - Danger Sign - ★ 329 ft, ★★ 657 ft, ★★★ 985 ft
Tokyo City Day TripDescription: Join Mei's Tokyo City Day Trip.
Chapters: 2
1 - Tokyo City - ★ 2 mins, ★★ 1 Min 20 secs, ★★★ 1 Min
2 - Daikoku - ★ 5 mins, ★★ 3 mins 20 secs, ★★★ 2 mins 5 secs
Yuji's AutoDescription: Help Yuji and Keiko prepare a fleet of cars for a Festival parade.
Chapters: 6
1 - Comfort and Speed - ★ 40 mph, ★★ 60 mph, ★★★ 100 mph
2 - Flying Finish - ★ 3 mins, ★★ 2 mins 20 secs, ★★★ 2 mins
3 - Rush Hour - Street Race (80+ mph) - ★ 3 mins 20 secs, ★★ 2 mins 30 secs, ★★★ 2 mins
4 - No Chill - Street Race - ★ 4 mins 10 secs, ★★ 3 mins 20 secs, ★★★ 2 mins 20 secs
5 - Headline Act - Skill Points - ★ 50,000 pts, ★★ 85,000 pts, ★★★ 120,000 pts
6 - To the Parade! - ★ 10 mins, ★★ 9 mins 10 secs, ★★★ 8 mins 20 secs
All Stars Reward: 2013 Toyota 86 'Stories'
Car Meets
Car Meets are social gathering spots where players can bring their cars to showcase builds, interact with other players, etc. These areas act as hubs for the game's automotive community rather than traditional race events.
Daikoku Parking Area
Evolving World Car MeetIt was available during the "Horizon Decades" season. It may return in future seasons.
Horizon Festival
Okuibuki
Jobs
Jobs are side activities and missions you can complete outside the main racing career. They're part of the new progression systems and are designed to give players extra ways to earn credits, and XP.
Tokyo City Food DeliveryYou work as a delivery driver for the fictional Raku-Raku Express service in Tokyo City. You drive through dense Tokyo traffic picking up and delivering meals under time limits.
Road Racing Events
Road Racing Events are the game's main street and asphalt racing series, focused on high-speed driving across Japan's highways, cities, mountain passes, and scenic roads.
Coastline SprintComplete Off Piste (Pink) to unlock it.
Restriction: A-700 Modern Super Saloons
Tateyama Kurobe SprintComplete Launch Control (Purple) to unlock it.
Restriction: S2-900 Hypercars
The ColossusComplete Horizon Legend (Gold) to unlock it.
Restriction: S2-900 Hypercars
The GoliathComplete Horizon Legend (Gold) to unlock it.
Restriction: R-998 Track Life
Tokyo Railway SprintComplete Pier Pressure (Green) to unlock it.
Restriction: B-600 Country: Japan
Venus SprintComplete Off Piste (Pink) to unlock it.
Restriction: A-700 Total Muscle
Dirt Racing Events
Dirt Racing Events in Forza Horizon 6 are off-road festival races focused on gravel, mud, forest trails, mountain roads, and rally-style driving across Japan's countryside.
Airfield TrailThis event is available from the start of the game.
Restriction: C-500 Total Rally
Bamboo Forest ScrambleComplete Flight Club (Orange) to unlock it.
Restriction: S1-800 Total Rally
Oyashirazu TrailComplete Launch Control (Purple) to unlock it.
Restriction: Classic Rally Cars
Sekibe ScrambleComplete Pier Pressure (Green) to unlock it.
Restriction: B-600 Evo vs Impreza
Sotoyama ScrambleComplete Mech My Day (Blue) to unlock it.
Restriction: Retro Rally Cars
Sunflower ScrambleComplete Flight Club (Orange) to unlock it.
Restriction: S1-800 Rally Monsters
Taiyaki ScrambleComplete Pier Pressure (Green) to unlock it.
Restriction: B-600 Total Rally
Takashiro TrailComplete Off Piste (Pink) to unlock it.
Restriction: A-700 Unlimited Offroad
The GauntletComplete Horizon Legend (Gold) to unlock it.
Restriction: Rally Monsters
Waterfall TrailComplete Mech My Day (Blue) to unlock it.
Restriction: A-700 Total AWD
Cross Country Racing Events
Cross Country Racing Events are the game's most extreme off-road races, built around rough terrain, massive jumps, water crossings, and unrestricted driving routes across Japan's wilderness areas.
City Docks Cross Country CircuitComplete Pier Pressure (Green) to unlock it.
Restriction: B-600 Total Rally
Edogawa Cross Country CircuitComplete Launch Control (Purple) to unlock it.
Restriction: Sports Utility Heroes
Izu Cross CountryComplete Flight Club (Orange) to unlock it.
Restriction: Sports Utility Heroes
Legend Island Cross Country CircuitComplete Horizon Legend (Gold) to unlock it.
Restriction: Pickups & 4x4s
Nangan Cross Country CircuitComplete Flight Club (Orange) to unlock it.
Restriction: Modern Rally Cars
Naruo Cross Country CircuitComplete Off Piste (Pink) to unlock it.
Restriction: A-700 Unlimited Buggies
Oka Cross Country CircuitComplete Mech My Day (Blue) to unlock it.
Restriction: A-700 Unlimited Offroad
Ruriko-ji Cross CountryComplete Launch Control (Purple) to unlock it.
Restriction: Unlimited Offroad
Shimanoyama Cross CountryComplete Mech My Day (Blue) to unlock it.
Restriction: A-700 Sports Utility Heroes
Shinjuku Gyoen Cross CountryComplete Pier Pressure (Green) to unlock it.
Restriction: B-600 Heavy Hitters
Snow Forest Cross Country CircuitComplete Mech My Day (Blue) to unlock it.
Restriction: A-700 Total Buggies & Offroad
Soni Highlands Cross CountryComplete Off Piste (Pink) to unlock it.
Restriction: A-700 Total Buggies & Offroad
Stadium Cross Country CircuitComplete Pier Pressure (Green) to unlock it.
Restriction: B-600 Total Rally
Takashiro Cross CountryComplete Off Piste (Pink) to unlock it.
Restriction: A-700 Total Buggies & Offroad
Tateyama Alpine Cross CountryComplete Launch Control (Purple) to unlock it.
Restriction: Total Buggies & Offroad
The TitanComplete Horizon Legend (Gold) to unlock it.
Restriction: Total Buggies & Offroad
Wind Farm Cross CountryThis event is available from the start of the game.
Restriction: C-500 Pickups & 4x4s
Yahikoyama Cross CountryComplete Flight Club (Orange) to unlock it.
Restriction: Unlimited Offroad
Touge Battles
Touge Battles are one-on-one mountain pass races inspired by Japanese street-racing culture, focused on tight corners, downhill and uphill driving, drifting, and precision rather than top speed. They mainly take place at night on narrow winding roads and are designed to test car control and driving skill in intense head-to-head battles.
Arashiyama TakaoRestriction: S2-900
Bandai AzumaRestriction: A-700
Hakone NanamagariRestriction: B-600
Mt. HarunaRestriction: B-600
Norikura SkylineRestriction: S1-800
Street Racing Events
In Forza Horizon 6, Street Racing Events are illegal-style nighttime races that take place on open public roads instead of closed festival circuits. These races focus on high-speed driving through active traffic routes rather than organized festival tracks.
Cedar Run
Daikoku Chase
Festival Chase
Hokubu Ascent
Kita Ine
Matsumi Climb
Minami Chase
Nachi Run
Norikura Descent
Okishinaimura Run
Rainbow Bridge Descent
River Descent
Shimanoyama Charge
Sunflower Charge
Tokyo City Docks Charge
Drag Racing Events
Drag Racing Events are straight-line sprint races where the only goal is to reach the finish line as quickly as possible, with no corners or technical driving involved. These events take place on dedicated drag strips or specially designated long, straight sections of highway or airport-style runways.
Horizon Festival Drag StripComplete Pier Pressure (Green) to unlock it.
Restriction: Anything Goes
Irokawa Space Center Drag StripComplete Off Piste (Pink) to unlock it.
Restriction: Anything Goes
Ito Airfield Drag StripComplete Flight Club (Orange) to unlock it.
Restriction: Anything Goes
Time Attacks
Time Attack Events are a new type of open-world racing activity focused on setting the fastest possible lap times on dedicated circuits across Japan. Instead of entering races through menus, players simply drive through the gate to instantly begin a session with no loading screens.
Speed Traps are places on the road where your current speed will be measured. The speed measurement takes place when you drive in any direction through a gate located at that location.
Airfield RunwayComplete Flight Club (Orange) to unlock it.
★ 115.0 mph / 185.1 km/h
★★ 175.0 mph / 281.6 km/h
★★★ 230.0 mph / 370.1 km/h
Akihabara StraightComplete Off Piste (Pink) to unlock it.
★ 100.0 mph / 160.9 km/h
★★ 150.0 mph / 241.4 km/h
★★★ 195.0 mph / 313.8 km/h
Bamboo HilltopComplete Flight Club (Orange) to unlock it.
★ 65.0 mph / 104.6 km/h
★★ 100.0 mph / 160.9 km/h
★★★ 130.0 mph / 209.2 km/h
Cedar WoodlandComplete Launch Control (Purple) to unlock it.
★ 60.0 mph / 96.6 km/h
★★ 90.0 mph / 144.8 km/h
★★★ 120.0 mph / 193.1 km/h
CropfieldsComplete Flight Club (Orange) to unlock it.
★ 75.0 mph / 120.7 km/h
★★ 115.0 mph / 185.1 km/h
★★★ 150.0 mph / 241.4 km/h
CrossoverComplete Mech My Day (Blue) to unlock it.
★ 55.0 mph / 88.5 km/h
★★ 85.0 mph / 136.8 km/h
★★★ 115.0 mph / 185.1 km/h
Daikoku Parking AreaComplete Flight Club (Orange) to unlock it.
★ 80.0 mph / 128.7 km/h
★★ 120.0 mph / 193.1 km/h
★★★ 160.0 mph / 257.5 km/h
Festival LineComplete Mech My Day (Blue) to unlock it.
★ 80.0 mph / 128.7 km/h
★★ 120.0 mph / 193.1 km/h
★★★ 160.0 mph / 257.5 km/h
Flower RunComplete Mech My Day (Blue) to unlock it.
★ 60.0 mph / 96.6 km/h
★★ 90.0 mph / 144.8 km/h
★★★ 120.0 mph / 193.1 km/h
Highland RoadComplete Off Piste (Pink) to unlock it.
★ 75.0 mph / 120.7 km/h
★★ 115.0 mph / 185.1 km/h
★★★ 150.0 mph / 241.4 km/h
Hirosaki CastleComplete Off Piste (Pink) to unlock it.
★ 45.0 mph / 72.4 km/h
★★ 70.0 mph / 112.7 km/h
★★★ 90.0 mph / 144.8 km/h
Ine BeachComplete Flight Club (Orange) to unlock it.
★ 105.0 mph / 169.0 km/h
★★ 160.0 mph / 257.5 km/h
★★★ 210.0 mph / 338.0 km/h
Irabuohashi BridgeComplete Off Piste (Pink) to unlock it.
★ 95.0 mph / 152.9 km/h
★★ 140.0 mph / 225.3 km/h
★★★ 185.0 mph / 297.7 km/h
Island RoadComplete Horizon Legend (Gold) to unlock it.
★ 105.0 mph / 169.0 km/h
★★ 160.0 mph / 257.5 km/h
★★★ 215.0 mph / 346.0 km/h
Ito StraightComplete Pier Pressure (Green) to unlock it.
★ 75.0 mph / 120.7 km/h
★★ 115.0 mph / 185.1 km/h
★★★ 150.0 mph / 241.4 km/h
Izu SkylineComplete Launch Control (Purple) to unlock it.
★ 115.0 mph / 185.1 km/h
★★ 175.0 mph / 281.6 km/h
★★★ 230.0 mph / 370.1 km/h
Jodogahama GroveComplete Launch Control (Purple) to unlock it.
★ 95.0 mph / 152.9 km/h
★★ 145.0 mph / 233.3 km/h
★★★ 195.0 mph / 313.8 km/h
Lake ViewComplete Flight Club (Orange) to unlock it.
★ 80.0 mph / 128.7 km/h
★★ 120.0 mph / 193.1 km/h
★★★ 160.0 mph / 257.5 km/h
Lakeside ValleyComplete Pier Pressure (Green) to unlock it.
★ 80.0 mph / 128.7 km/h
★★ 120.0 mph / 193.1 km/h
★★★ 160.0 mph / 257.5 km/h
Main StreetComplete Launch Control (Purple) to unlock it.
★ 95.0 mph / 152.9 km/h
★★ 145.0 mph / 233.3 km/h
★★★ 190.0 mph / 305.8 km/h
Nangan TurnComplete Flight Club (Orange) to unlock it.
★ 70.0 mph / 112.7 km/h
★★ 105.0 mph / 169.0 km/h
★★★ 140.0 mph / 225.3 km/h
Rainbow RunComplete Pier Pressure (Green) to unlock it.
★ 70.0 mph / 112.7 km/h
★★ 105.0 mph / 169.0 km/h
★★★ 140.0 mph / 225.3 km/h
River SplitThis challenge is available from the start of the game.
★ 60.0 mph / 96.6 km/h
★★ 85.0 mph / 136.8 km/h
★★★ 105.0 mph / 169.0 km/h
RiversideComplete Launch Control (Purple) to unlock it.
★ 100.0 mph / 160.9 km/h
★★ 150.0 mph / 241.4 km/h
★★★ 200.0 mph / 321.9 km/h
Shibuya CrossingComplete Launch Control (Purple) to unlock it.
★ 105.0 mph / 169.0 km/h
★★ 160.0 mph / 257.5 km/h
★★★ 210.0 mph / 338.0 km/h
Shirakawa-go StraightComplete Off Piste (Pink) to unlock it.
★ 90.0 mph / 144.8 km/h
★★ 135.0 mph / 217.3 km/h
★★★ 180.0 mph / 289.7 km/h
SnowbankComplete Launch Control (Purple) to unlock it.
★ 95.0 mph / 152.9 km/h
★★ 145.0 mph / 233.3 km/h
★★★ 190.0 mph / 305.8 km/h
Stadium BackroadComplete Launch Control (Purple) to unlock it.
★ 110.0 mph / 177.0 km/h
★★ 165.0 mph / 265.5 km/h
★★★ 220.0 mph / 354.0 km/h
Takashiro BridgeComplete Off Piste (Pink) to unlock it.
★ 85.0 mph / 136.8 km/h
★★ 130.0 mph / 209.2 km/h
★★★ 170.0 mph / 273.6 km/h
Tokyo City Run-UpComplete Mech My Day (Blue) to unlock it.
★ 85.0 mph / 136.8 km/h
★★ 130.0 mph / 209.2 km/h
★★★ 170.0 mph / 273.6 km/h
Speed Zones
Speed Zones are road sections where your average speed over the entire distance will be measured. Speed recording starts when you drive in the right direction through one of the two gates located on both sides of the designated road section.
Airfield GroveComplete Launch Control (Purple) to unlock it.
★ 60.0 mph / 96.6 km/h
★★ 90.0 mph /144.8 km/h
★★★ 120.0 mph / 193.1 km/h
Arashiyama RunComplete Flight Club (Orange) to unlock it.
★ 55.0 mph / 88.5 km/h
★★ 85.0 mph / 136.8 km/h
★★★ 115.0 mph / 185.1 km/h
City SightsComplete Launch Control (Purple) to unlock it.
★ 100.0 mph / 160.9 km/h
★★ 150.0 mph / 241.4 km/h
★★★ 200.0 mph / 321.9 km/h
Coastal CliffsideComplete Horizon Legend (Gold) to unlock it.
★ 50.0 mph / 80.5 km/h
★★ 75.0 mph / 120.7 km/h
★★★ 95.0 mph / 152.9 km/h
Deep ForestComplete Flight Club (Orange) to unlock it.
★ 65.0 mph / 104.6 km/h
★★ 100.0 mph / 160.9 km/h
★★★ 130.0 mph / 209.2 km/h
Farmland CurveComplete Off Piste (Pink) to unlock it.
★ 50.0 mph / 80.5 km/h
★★ 75.0 mph / 120.7 km/h
★★★ 95.0 mph / 152.9 km/h
Festival LoopComplete Pier Pressure (Green) to unlock it.
★ 30.0 mph / 48.3 km/h
★★ 60.0 mph / 96.6 km/h
★★★ 90.0 mph / 144.8 km/h
Forest StraightComplete Launch Control (Purple) to unlock it.
★ 65.0 mph / 104.6 km/h
★★ 100.0 mph / 160.9 km/h
★★★ 130.0 mph / 209.2 km/h
Fuji ShibazakuraComplete Mech My Day (Blue) to unlock it.
★ 60.0 mph / 96.6 km/h
★★ 90.0 mph / 144.8 km/h
★★★ 120.0 mph / 193.1 km/h
Hakone TurnsComplete Launch Control (Purple) to unlock it.
★ 55.0 mph / 88.5 km/h
★★ 85.0 mph / 136.8 km/h
★★★ 110.0 mph / 177.0 km/h
HanadoComplete Flight Club (Orange) to unlock it.
★ 100.0 mph / 160.9 km/h
★★ 150.0 mph / 241.4 km/h
★★★ 200.0 mph / 321.9 km/h
Highway ViewThis challenge is available from the start of the game.
★ 75.0 mph / 120.7 km/h
★★ 100.0 mph / 160.9 km/h
★★★ 120.0 mph / 193.1 km/h
Hirosaki TangleComplete Off Piste (Pink) to unlock it.
★ 45.0 mph / 72.4 km/h
★★ 70.0 mph / 112.7 km/h
★★★ 90.0 mph / 144.8 km/h
Ine BackstreetComplete Launch Control (Purple) to unlock it.
★ 45.0 mph / 72.4 km/h
★★ 70.0 mph / 112.7 km/h
★★★ 95.0 mph / 152.9 km/h
KōzokudōroComplete Mech My Day (Blue) to unlock it.
★ 95.0 mph / 152.9 km/h
★★ 140.0 mph / 225.3 km/h
★★★ 185.0 mph / 297.7 km/h
Matsumi CurveComplete Launch Control (Purple) to unlock it.
★ 60.0 mph / 96.6 km/h
★★ 95.0 mph / 152.9 km/h
★★★ 125.0 mph / 201.2 km/h
Minamino CurveComplete Flight Club (Orange) to unlock it.
★ 45.0 mph / 72.4 km/h
★★ 70.0 mph / 112.7 km/h
★★★ 95.0 mph / 152.9 km/h
Mountain PassComplete Mech My Day (Blue) to unlock it.
★ 55.0 mph / 88.5 km/h
★★ 85.0 mph / 136.8 km/h
★★★ 115.0 mph / 185.1 km/h
Ocean HighwayComplete Flight Club (Orange) to unlock it.
★ 105.0 mph / 169.0 km/h
★★ 155.0 mph / 249.4 km/h
★★★ 205.0 mph / 329.9 km/h
OkishinaimuraComplete Off Piste (Pink) to unlock it.
★ 85.0 mph / 136.8 km/h
★★ 125.0 mph / 201.2 km/h
★★★ 165.0 mph / 265.5 km/h
PylonsComplete Pier Pressure (Green) to unlock it.
★ 55.0 mph / 88.5 km/h
★★ 80.0 mph / 128.7 km/h
★★★ 105.0 mph / 169.0 km/h
Seaside ParkComplete Flight Club (Orange) to unlock it.
★ 65.0 mph / 104.6 km/h
★★ 100.0 mph / 160.9 km/h
★★★ 130.0 mph / 209.2 km/h
Snow SlopesComplete Mech My Day (Blue) to unlock it.
★ 40.0 mph / 64.4 km/h
★★ 60.0 mph / 96.6 km/h
★★★ 80.0 mph / 128.7 km/h
Tall TreesComplete Flight Club (Orange) to unlock it.
★ 50.0 mph / 80.5 km/h
★★ 75.0 mph / 120.7 km/h
★★★ 100.0 mph / 160.9 km/h
Tateyama Kurobe Alpine RouteComplete Off Piste (Pink) to unlock it.
★ 55.0 mph / 88.5 km/h
★★ 85.0 mph / 136.8 km/h
★★★ 110.0 mph / 177.0 km/h
Tea FarmComplete Off Piste (Pink) to unlock it.
★ 55.0 mph / 88.5 km/h
★★ 85.0 mph / 136.8 km/h
★★★ 115.0 mph / 185.1 km/h
Temple Run-UpComplete Mech My Day (Blue) to unlock it.
★ 45.0 mph / 72.4 km/h
★★ 65.0 mph / 104.6 km/h
★★★ 85.0 mph / 136.8 km/h
Underground TunnelComplete Launch Control (Purple) to unlock it.
★ 95.0 mph / 152.9 km/h
★★ 145.0 mph / 233.3 km/h
★★★ 190.0 mph / 305.8 km/h
Yahikoyama CurveComplete Pier Pressure (Green) to unlock it.
★ 60.0 mph / 96.6 km/h
★★ 90.0 mph / 144.8 km/h
★★★ 120.0 mph / 193.1 km/h
Yama TrailComplete Off Piste (Pink) to unlock it.
★ 45.0 mph / 72.4 km/h
★★ 65.0 mph / 104.6 km/h
★★★ 85.0 mph / 136.8 km/h
Danger Signs
Danger Signs are special challenges in which you have to make a jump from a special ramp and fly as far as possible in the air. It is important to land correctly, otherwise the jump will not be scored. The distance achieved will be rated with 1-3 stars.
Airfield TakeoffComplete Off Piste (Pink) to unlock it.
★ 200.0 ft / 61.0 m
★★ 500.0 ft / 152.4 m
★★★ 800.0 ft / 243.8 m
Alpine HeightsComplete Off Piste (Pink) to unlock it.
★ 500.0 ft / 152.4 m
★★ 800.0 ft / 243.8 m
★★★ 1,100.0 ft / 335.3 m
Azure DiveComplete Flight Club (Orange) to unlock it.
★ 600.0 ft / 182.9 m
★★ 900.0 ft / 274.3 m
★★★ 1,200.0 ft / 365.8 m
Circuit LeapComplete Off Piste (Pink) to unlock it.
★ 400.0 ft / 121.9 m
★★ 700.0 ft / 213.4 m
★★★ 1,000.0 ft / 304.8 m
Clifftop CrestComplete Mech My Day (Blue) to unlock it.
★ 300.0 ft / 91.4 m
★★ 600.0 ft / 182.9 m
★★★ 900.0 ft / 274.3 m
Farmland FallsComplete Flight Club (Orange) to unlock it.
★ 1,200.0 ft / 365.8 m
★★ 1,500.0 ft / 457.2 m
★★★ 1,800.0 ft / 548.6 m
Festival LeapComplete Horizon Invitational (Yellow) to unlock it.
★ 300.0 ft / 91.4 m
★★ 600.0 ft / 182.9 m
★★★ 900.0 ft / 274.3 m
HighlandsComplete Off Piste (Pink) to unlock it.
★ 1,000.0 ft / 304.8 m
★★ 1,300.0 ft / 396.2 m
★★★ 1,600.0 ft / 487.7 m
Highway JumpComplete Mech My Day (Blue) to unlock it.
★ 250.0 ft / 76.2 m
★★ 550.0 ft / 167.6 m
★★★ 850.0 ft / 259.1 m
Irokawa LaunchComplete Launch Control (Purple) to unlock it.
★ 800.0 ft / 243.8 m
★★ 1,100.0 ft / 335.3 m
★★★ 1,400.0 ft / 426.7 m
Mt. Fuji ViewComplete Pier Pressure (Green) to unlock it.
★ 150.0 ft / 45.7 m
★★ 450.0 ft / 137.2 m
★★★ 750.0 ft / 228.6 m
Nangan HeightsComplete Launch Control (Purple) to unlock it.
★ 700.0 ft / 213.4 m
★★ 1,000.0 ft / 304.8 m
★★★ 1,300.0 ft / 396.2 m
Railway BridgeComplete Launch Control (Purple) to unlock it.
★ 550.0 ft / 167.6 m
★★ 850.0 ft / 259.1 m
★★★ 1,150.0 ft / 350.5 m
Rollercoaster LeapComplete Pier Pressure (Green) to unlock it.
★ 100.0 ft / 30.5 m
★★ 400.0 ft / 121.9 m
★★★ 700.0 ft / 213.4 m
Seaside HeightsComplete Flight Club (Orange) to unlock it.
★ 500.0 ft / 152.4 m
★★ 800.0 ft / 243.8 m
★★★ 1,100.0 ft / 335.3 m
Shirakawa-goComplete Flight Club (Orange) to unlock it.
★ 500.0 ft / 152.4 m
★★ 800.0 ft / 243.8 m
★★★ 1,100.0 ft / 335.3 m
Stadium JumpComplete Mech My Day (Blue) to unlock it.
★ 600.0 ft / 182.9 m
★★ 900,0 ft / 274.3 m
★★★ 1,200 ft / 365.8 m
Tanbo LaunchComplete Flight Club (Orange) to unlock it.
★ 500.0 ft / 152.4 m
★★ 800.0 ft / 243.8 m
★★★ 1,100.0 ft / 335.3 m
Tokyo City DocksideComplete Launch Control (Purple) to unlock it.
★ 900.0 ft / 274.3 m
★★ 1,300.0 ft / 396.2 m
★★★ 1,700.0 ft / 518.2 m
Tokyo City LookoutComplete Launch Control (Purple) to unlock it.
★ 1,300.0 ft / 396.2 m
★★ 1,700.0 ft / 518.2 m
★★★ 2,100.0 ft / 640.1 m
Drift Zones
Drift Zones are sections of road where your drifting skills will be rated. The evaluation starts when you drive onto the defined section of the road from either side. The score you achieve will be rated with 1-3 stars.
Bandai Azuma SkylineComplete Pier Pressure (Green) to unlock it.
★ 80,000
★★ 120,000
★★★ 160,000
Cedar GroveComplete Off Piste (Pink) to unlock it.
★ 80,000
★★ 120,000
★★★ 160,000
Seaside TrailComplete Flight Club (Orange) to unlock it.
★ 50,000
★★ 80,000
★★★ 105,000
Shirakawa CurvesComplete Flight Club (Orange) to unlock it.
★ 45,000
★★ 70,000
★★★ 95,000
Shiro SwitchComplete Off Piste (Pink) to unlock it.
★ 50,000
★★ 75,000
★★★ 100,000
Sunflower FieldsComplete Launch Control (Purple) to unlock it.
★ 50,000
★★ 75,000
★★★ 100,000
ThunderbirdComplete Off Piste (Pink) to unlock it.
★ 65,000
★★ 100,000
★★★ 130,000
Tokyo City DocksComplete Launch Control (Purple) to unlock it.
★ 60,000
★★ 95,000
★★★ 125,000
Turbine TrailComplete Flight Club (Orange) to unlock it.
★ 80,000
★★ 120,000
★★★ 160,000
Trailblazers
Trailblazers are special challenges in which you must drive from the starting gate to the finish gate in the shortest possible time. Depending on how much time you have left, you will be rated with 1 - 3 stars.
Aftermarket Car Locations are special spawn points around the Japan map where you can discover pre-tuned cars for sale at discounted prices. These cars often come with custom builds or setups already installed.
Aftermarket Car
Aftermarket Car
Aftermarket Car
Aftermarket Car
Aftermarket Car
Aftermarket Car
Aftermarket Car
Aftermarket Car
Aftermarket Car
Aftermarket Car
Aftermarket Car
Aftermarket Car
Aftermarket Car
Aftermarket Car
Aftermarket Car
Aftermarket Car
Aftermarket Carx3
Aftermarket Car
Aftermarket Car
Aftermarket Car
Aftermarket Car
Aftermarket Car
Aftermarket Car
Aftermarket Car
Aftermarket Car
Aftermarket Car
Aftermarket Car
Aftermarket Carx2
Aftermarket Car
Aftermarket Car
Aftermarket Car
Aftermarket Car
XP Board (5K)
Bonus Boards are a type of collectibles with which you can gather some XP and Horizon points. Here are the boards that will grant you 5,000 XP.
Hokubu 20: 5,000 XPThis board is on the building's roof. Pick up speed in your car through the marshy fields behind the building and launch into the air using the bumps in the terrain.
Hokubu 21: 5,000 XPThis XP board is located on the roof of a small outbuilding right next to the road. Pick up speed in your car and launch yourself into the air using the slope on the other side of the road. Drive diagonally across the river where the vegetation is thick so you don’t slow down too much.
Hokubu 22: 5,000 XPThis XP board is located on the roof of the building. You can reach it by using the slope across the street. Not straight on, but at an angle.
Ito 31: 5,000 XPThis board is on a container. To destroy it, pick up some speed and launch your car into the air using the nearby sandpile.
Ito 32: 5,000 XPThe sign is located on the rocks. To destroy it, gather speed and launch your car into the air using the nearby sandpile.
Ito 33: 5,000 XP
Ito 34: 5,000 XPThe sign is on the roof of the building. To destroy it, accelerate your car and launch yourself into the air using the slope at the back of the house, on the side facing the sea.
Legend Island 8: 5,000 XP
Legend Island 9: 5,000 XP
Minamino 25: 5,000 XPBuild up speed on the nearby slope so you can jump and hit the XP board on the blue excavator.
Minamino 26: 5,000 XPThis XP board is located in Takashiro, but it is marked in the collection as "Minamino 26" - which is clearly an error and will likely be corrected at some point. On the roof of the building - jump up onto it by launching yourself from the steep slope behind it.
Nangan 12: 5,000 XP
Nangan 13: 5,000 XPThis XP board is located on the roof of a large, tall building, which you can reach by jumping down from the hill on the west side.
Nangan 14: 5,000 XP
Ohtani 18: 5,000 XP
Shimanoyama 20: 5,000 XP
Shimanoyama 21: 5,000 XP
Shimanoyama 22: 5,000 XP
Sotoyama 17: 5,000 XPThis is likely the most difficult board to collect. It is located on a ski lift pylon - you must launch yourself from the nearby hill covered in snow-capped trees.
Sotoyama 18: 5,000 XP
Sotoyama 19: 5,000 XP
Takashiro 18: 5,000 XP
Takashiro 19: 5,000 XP
Tokyo City 16: 5,000 XPThe board is located on the roof of a large, oval tank surrounded by scaffolding. You can jump onto the roof by launching yourself off the nearby large pile of dirt. The scaffolding is not an obstacle - it will break upon impact.
Tokyo City 17: 5,000 XP
XP Board (3K)
Bonus Boards are a type of collectibles with which you can gather some XP and Horizon points. Here are the boards that will grant you 3,000 XP.
Hokubu 14: 3,000 XP
Hokubu 15: 3,000 XP
Hokubu 16: 3,000 XP
Hokubu 17: 3,000 XP
Hokubu 18: 3,000 XP
Hokubu 19: 3,000 XP
Ito 21: 3,000 XP
Ito 22: 3,000 XP
Ito 23: 3,000 XP
Ito 24: 3,000 XP
Ito 25: 3,000 XP
Ito 26: 3,000 XP
Ito 27: 3,000 XP
Ito 28: 3,000 XP
Ito 29: 3,000 XP
Ito 30: 3,000 XP
Legend Island 2: 3,000 XP
Legend Island 3: 3,000 XP
Legend Island 4: 3,000 XP
Legend Island 5: 3,000 XP
Legend Island 6: 3,000 XP
Legend Island 7: 3,000 XP
Minamino 18: 3,000 XP
Minamino 19: 3,000 XP
Minamino 20: 3,000 XP
Minamino 21: 3,000 XP
Minamino 22: 3,000 XP
Minamino 23: 3,000 XP
Minamino 24: 3,000 XP
Nangan 7: 3,000 XP
Nangan 8: 3,000 XP
Nangan 9: 3,000 XP
Nangan 10: 3,000 XP
Nangan 11: 3,000 XP
Ohtani 12: 3,000 XP
Ohtani 13: 3,000 XP
Ohtani 14: 3,000 XP
Ohtani 15: 3,000 XP
Ohtani 16: 3,000 XP
Ohtani 17: 3,000 XP
Shimanoyama 12: 3,000 XP
Shimanoyama 13: 3,000 XP
Shimanoyama 14: 3,000 XP
Shimanoyama 15: 3,000 XP
Shimanoyama 16: 3,000 XP
Shimanoyama 17: 3,000 XP
Shimanoyama 18: 3,000 XP
Shimanoyama 19: 3,000 XP
Sotoyama 8: 3,000 XP
Sotoyama 9: 3,000 XP
Sotoyama 10: 3,000 XP
Sotoyama 11: 3,000 XP
Sotoyama 12: 3,000 XP
Sotoyama 13: 3,000 XP
Sotoyama 14: 3,000 XP
Sotoyama 15: 3,000 XP
Sotoyama 16: 3,000 XP
Takashiro 11: 3,000 XP
Takashiro 12: 3,000 XP
Takashiro 13: 3,000 XP
Takashiro 14: 3,000 XP
Takashiro 15: 3,000 XP
Takashiro 16: 3,000 XP
Takashiro 17: 3,000 XP
Tokyo City 5: 3,000 XP
Tokyo City 6: 3,000 XP
Tokyo City 7: 3,000 XP
Tokyo City 8: 3,000 XP
Tokyo City 9: 3,000 XP
Tokyo City 10: 3,000 XP
Tokyo City 11: 3,000 XP
Tokyo City 12: 3,000 XP
Tokyo City 13: 3,000 XP
Tokyo City 14: 3,000 XPThis board is on a shipping container. You can simply drive up the ramp and over the containers - no jumping is required.
Tokyo City 15: 3,000 XP
XP Boards (1K)
Bonus Boards are a type of collectibles with which you can gather some XP and Horizon points. Here are the boards that will grant you 1,000 XP.
Hokubu 1: 1,000 XP
Hokubu 2: 1,000 XP
Hokubu 3: 1,000 XP
Hokubu 4: 1,000 XP
Hokubu 5: 1,000 XP
Hokubu 6: 1,000 XP
Hokubu 7: 1,000 XP
Hokubu 8: 1,000 XP
Hokubu 9: 1,000 XP
Hokubu 10: 1,000 XP
Hokubu 11: 1,000 XP
Hokubu 12: 1,000 XP
Hokubu 13: 1,000 XP
Ito 1: 1,000 XP
Ito 2: 1,000 XP
Ito 3: 1,000 XP
Ito 4: 1,000 XP
Ito 5: 1,000 XP
Ito 6: 1,000 XP
Ito 7: 1,000 XP
Ito 8: 1,000 XP
Ito 9: 1,000 XP
Ito 10: 1,000 XP
Ito 11: 1,000 XP
Ito 12: 1,000 XP
Ito 13: 1,000 XP
Ito 14: 1,000 XP
Ito 15: 1,000 XP
Ito 16: 1,000 XP
Ito 17: 1,000 XP
Ito 18: 1,000 XP
Ito 19: 1,000 XP
Ito 20: 1,000 XP
Legend Island 1: 1,000 XP
Minamino 1: 1,000 XP
Minamino 2: 1,000 XP
Minamino 3: 1,000 XP
Minamino 4: 1,000 XP
Minamino 5: 1,000 XP
Minamino 6: 1,000 XP
Minamino 7: 1,000 XP
Minamino 8: 1,000 XP
Minamino 9: 1,000 XP
Minamino 10: 1,000 XP
Minamino 11: 1,000 XP
Minamino 12: 1,000 XP
Minamino 13: 1,000 XP
Minamino 14: 1,000 XP
Minamino 15: 1,000 XP
Minamino 16: 1,000 XP
Minamino 17: 1,000 XP
Nangan 1: 1,000 XP
Nangan 2: 1,000 XP
Nangan 3: 1,000 XP
Nangan 4: 1,000 XP
Nangan 5: 1,000 XP
Nangan 6: 1,000 XP
Ohtani 1: 1,000 XP
Ohtani 2: 1,000 XP
Ohtani 3: 1,000 XP
Ohtani 4: 1,000 XP
Ohtani 5: 1,000 XP
Ohtani 6: 1,000 XP
Ohtani 7: 1,000 XP
Ohtani 8: 1,000 XP
Ohtani 9: 1,000 XP
Ohtani 10: 1,000 XP
Ohtani 11: 1,000 XP
Shimanoyama 1: 1,000 XP
Shimanoyama 2: 1,000 XP
Shimanoyama 3: 1,000 XP
Shimanoyama 4: 1,000 XP
Shimanoyama 5: 1,000 XP
Shimanoyama 6: 1,000 XP
Shimanoyama 7: 1,000 XP
Shimanoyama 8: 1,000 XP
Shimanoyama 9: 1,000 XP
Shimanoyama 10: 1,000 XP
Shimanoyama 11: 1,000 XP
Sotoyama 1: 1,000 XP
Sotoyama 2: 1,000 XP
Sotoyama 3: 1,000 XP
Sotoyama 4: 1,000 XP
Sotoyama 5: 1,000 XP
Sotoyama 6: 1,000 XP
Sotoyama 7: 1,000 XP
Takashiro 1: 1,000 XP
Takashiro 2: 1,000 XP
Takashiro 3: 1,000 XP
Takashiro 4: 1,000 XP
Takashiro 5: 1,000 XP
Takashiro 6: 1,000 XP
Takashiro 7: 1,000 XP
Takashiro 8: 1,000 XP
Takashiro 9: 1,000 XP
Takashiro 10: 1,000 XP
Tokyo City 1: 1,000 XP
Tokyo City 2: 1,000 XP
Tokyo City 3: 1,000 XP
Tokyo City 4: 1,000 XP
Regional Mascots
Forza Horizon 6 takes the festival to Japan, and with it comes a new scavenger hunt. Scattered across the diverse landscape are 200 food-themed Regional Mascots. Smashing each mascot rewards you with 5,000 Credits, totaling a 1,000,000 CR for those who find them all.
Curry Rice 1: Shimanoyama
Curry Rice 2: Shimanoyama
Curry Rice 3: Shimanoyama
Curry Rice 4: Shimanoyama
Curry Rice 5: Shimanoyama
Curry Rice 6: Shimanoyama
Curry Rice 7: Shimanoyama
Curry Rice 8: Shimanoyama
Curry Rice 9: Shimanoyama
Curry Rice 10: Shimanoyama
Curry Rice 11: Shimanoyama
Curry Rice 12: Shimanoyama
Curry Rice 13: Shimanoyama
Curry Rice 14: Shimanoyama
Curry Rice 15: Shimanoyama
Curry Rice 16: Shimanoyama
Curry Rice 17: Shimanoyama
Curry Rice 18: Shimanoyama
Curry Rice 19: Shimanoyama
Curry Rice 20: Shimanoyama
Dango 1: Tokyo City
Dango 2: Tokyo City
Dango 3: Tokyo City
Dango 4: Tokyo City
Dango 5: Tokyo City
Dango 6: Tokyo City
Dango 7: Tokyo City
Dango 8: Tokyo City
Dango 9: Tokyo City
Dango 10: Tokyo City
Dango 11: Tokyo City
Dango 12: Tokyo City
Dango 13: Tokyo City
Dango 14: Tokyo City
Dango 15: Tokyo City
Dango 16: Tokyo City
Dango 17: Tokyo City
Dango 18: Tokyo City
Dango 19: Tokyo City
Dango 20: Tokyo City
Dango 21: Tokyo City
Dango 22: Tokyo City
Dango 23: Tokyo City
Dango 24: Tokyo City
Dango 25: Tokyo City
Edamame 1: Minamino
Edamame 2: Minamino
Edamame 3: Minamino
Edamame 4: Minamino
Edamame 5: Minamino
Edamame 6: Minamino
Edamame 7: Minamino
Edamame 8: Minamino
Edamame 9: Minamino
Edamame 10: Minamino
Edamame 11: Minamino
Edamame 12: Minamino
Edamame 13: Minamino
Edamame 14: Minamino
Edamame 15: Minamino
Edamame 16: Minamino
Edamame 17: Minamino
Edamame 18: Minamino
Edamame 19: Minamino
Edamame 20: Minamino
Kakigori 1: Hokubu
Kakigori 2: Hokubu
Kakigori 3: Hokubu
Kakigori 4: Hokubu
Kakigori 5: Hokubu
Kakigori 6: Hokubu
Kakigori 7: Hokubu
Kakigori 8: Hokubu
Kakigori 9: Hokubu
Kakigori 10: Hokubu
Kakigori 11: Hokubu
Kakigori 12: Hokubu
Kakigori 13: Hokubu
Kakigori 14: Hokubu
Kakigori 15: Hokubu
Kakigori 16: Hokubu
Kakigori 17: Hokubu
Kakigori 18: Hokubu
Kakigori 19: Hokubu
Kakigori 20: Hokubu
Matcha Tea 1: Takashiro
Matcha Tea 2: Takashiro
Matcha Tea 3: Takashiro
Matcha Tea 4: Takashiro
Matcha Tea 5: Takashiro
Matcha Tea 6: Takashiro
Matcha Tea 7: Takashiro
Matcha Tea 8: Takashiro
Matcha Tea 9: Takashiro
Matcha Tea 10: Takashiro
Matcha Tea 11: Takashiro
Matcha Tea 12: Takashiro
Matcha Tea 13: Takashiro
Matcha Tea 14: Takashiro
Matcha Tea 15: Takashiro
Matcha Tea 16: Takashiro
Matcha Tea 17: Takashiro
Matcha Tea 18: Takashiro
Matcha Tea 19: Takashiro
Matcha Tea 20: Takashiro
Matcha Tea 21: Takashiro
Matcha Tea 22: Takashiro
Matcha Tea 23: Takashiro
Matcha Tea 24: Takashiro
Matcha Tea 25: Takashiro
Omurice 1: Sotoyama
Omurice 2: Sotoyama
Omurice 3: Sotoyama
Omurice 4: Sotoyama
Omurice 5: Sotoyama
Omurice 6: Sotoyama
Omurice 7: Sotoyama
Omurice 8: Sotoyama
Omurice 9: Sotoyama
Omurice 10: Sotoyama
Omurice 11: Sotoyama
Omurice 12: Sotoyama
Omurice 13: Sotoyama
Omurice 14: Sotoyama
Omurice 15: Sotoyama
Onigiri 1: Ito
Onigiri 2: Ito
Onigiri 3: Ito
Onigiri 4: Ito
Onigiri 5: Ito
Onigiri 6: Ito
Onigiri 7: Ito
Onigiri 8: Ito
Onigiri 9: Ito
Onigiri 10: Ito
Onigiri 11: Ito
Onigiri 12: Ito
Onigiri 13: Ito
Onigiri 14: Ito
Onigiri 15: Ito
Onigiri 16: Ito
Onigiri 17: Ito
Onigiri 18: Ito
Onigiri 19: Ito
Onigiri 20: Ito
Onigiri 21: Ito
Onigiri 22: Ito
Onigiri 23: Ito
Onigiri 24: Ito
Onigiri 25: Ito
Ramen 1: Ohtani
Ramen 2: Ohtani
Ramen 3: Ohtani
Ramen 4: Ohtani
Ramen 5: Ohtani
Ramen 6: Ohtani
Ramen 7: Ohtani
Ramen 8: Ohtani
Ramen 9: Ohtani
Ramen 10: Ohtani
Ramen 11: Ohtani
Ramen 12: Ohtani
Ramen 13: Ohtani
Ramen 14: Ohtani
Ramen 15: Ohtani
Ramen 16: Ohtani
Ramen 17: Ohtani
Ramen 18: Ohtani
Ramen 19: Ohtani
Ramen 20: Ohtani
Ramen 21: Ohtani
Ramen 22: Ohtani
Ramen 23: Ohtani
Ramen 24: Ohtani
Ramen 25: Ohtani
Tempura 1: Nangan
Tempura 2: Nangan
Tempura 3: Nangan
Tempura 4: Nangan
Tempura 5: Nangan
Tempura 6: Nangan
Tempura 7: Nangan
Tempura 8: Nangan
Tempura 9: Nangan
Tempura 10: Nangan
Tempura 11: Nangan
Tempura 12: Nangan
Tempura 13: Nangan
Tempura 14: Nangan
Tempura 15: Nangan
Tempura 16: Nangan
Tempura 17: Nangan
Tempura 18: Nangan
Tempura 19: Nangan
Tempura 20: Nangan
Tempura 21: Nangan
Tempura 22: Nangan
Tempura 23: Nangan
Tempura 24: Nangan
Tempura 25: Nangan
Landmarks
Landmarks are named locations or notable points of interest on the map. They're part of the game's world discovery system - when you drive into a new landmark area, the game announces and records it as "discovered."
Akihabara Electric Town
Arashiyama Bamboo Forest
Bandai Azuma Skyline
Cedar Avenue
Daikoku Parking Area
Edogawa Baseball Stadium
Fuji Shibazakura
Hakone Nanamagari
Hirosaki Castle
Hokubu Circuit
Hokuryu Sunflower Farm
Horizon Festival Site
Horizon Legend Island Festival Site
Horizon Stadium
Hotel Thunderbird
Inakadate Tanbo Rice Art
Ine
Irabuohashi Bridge
Irokawa Space Center
Ito Airfield
Izu Skyline
Jodogahama Beach
Kawazu Nandaru Loop Bridge
Kinkaku-ji Temple
Kitayama Big Daisugi
Lake Nukabira
Lake Viewing Platform
Legend Island Circuit
Matsumi Great Bridge
Meiji Jingu Gaien Ginkgo Avenue
Meoto Iwa Rock
Minami Awa Double Road
Mt. Haruna
Narai-Juku
Naruo Golf Course
Norikura Skyline
Okishinaimura
Okuibuki Parking Area
Osaka Tunnels
Oyashirazu Cliff Tunnels
Radio Towers
Rainbow Bridge
Rollercoaster Road
Ruriko-ji Temple
Satta Pass
Sawamura
Seabed Road
Seaside Park
Sekibe Circuit
Sekibe Kaijo Bridge Road
Shibazakura Lawn Cherry Fields
Shibuya Crossing
Shikisai-no-oka
Shimanoyama Drift Circuit
Shinjuku Gyoen National Garden
Shirakawa-go
Snow Monster Forest
Soni Circuit
Soni Highlands
Sotoyama Ski Resort
Tateyama Kurobe Alpine Route
Tatsumi Parking Area
Tea Farm
Temple of Nachi Falls
Tokyo Central Railway Station
Tokyo Central Railway Station Cut Through
Tokyo City Broadway
Tokyo City Docks
Tokyo Tower
Torii Gate
Venus Line
Wind Farm
Yahikoyama Ropeway
Yoshinoyama
Regions
Regions are the main named areas of the map that divide the world into different locations and environments, helping organize exploration, events, and progression throughout the game.