Welcome to guides4gamers.com

Forza Horizon 5 Map - Mexico

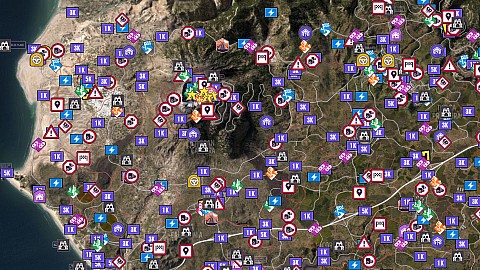
Forza Horizon 5 Map. An interactive map of a fictional part of Mexico that is the open world setting of Forza Horizon 5. It shows the locations of collectibles and various activities such as Fast Travel Boards, XP Boards, Barn Finds, Landmarks, Expeditions, Player Houses, Trailblazers, Danger Signs, Speed Zones, Speed Traps, Drift Zones and more.

The map below shows Mexico in the springtime. In other seasons the map looks slightly different, for example the water level in some reservoirs changes, but the road layout, location of events, etc. is the same.

How to fast travel anywhere in Forza Horizon 5?

If you want to unlock the ability to fast travel to any road on the map, you need to purchase the Buenas Vistas house. It costs 2,000,000 CR. To reduce the cost of such a travel, collect the Fast Travel Boards. When you collect all 50, you will be able to travel for free.

Mexico

Mexico - Map Markers Summary

Barn Finds x14, Player Houses x7, Festival Sites x6, Expeditions x7, Expedition Objectives x14, Speed Traps x35, Danger Signs x24, Speed Zones x26, Trailblazers x17, Trailblazer (Finish Lines) x17, Drift Zones x20, Fast Travel Boards x50, XP Boards (5K) x25, XP Boards (3K) x75, XP Boards (1K) x100, Road Racing Events x25, Dirt Racing Events x20, Cross Country Racing Events x20, Street Racing Events x21, Drag Racing Events x3, Showcases x4, Stories x11, Playgrounds x4, Landmarks x56, Murals x7, Treasure Chests x30, Other x11

Legend / Points of interest

The following legend of Mexico interactive game map defines the points of interest / markers displayed on the map. Each marker corresponds to a specific element to facilitate efficient navigation and interaction with the map.

Icon of Other Bikes (x15) There are 15 bikes here (2 groups). You need to smash 25 of them to complete the daily #Forzathon challenge "Parking Ticket". Easy way to do this is to switch to Horizon Solo, smash some of them, rewind and smash them again.
Icon of Other Chinese Lanterns There are quite a few of them scattered around the dunes. You need to smash them for "Light the Beacons" challenge (Series 3 - Winter) or for "Another One Lights the Dust!" accolade (Evolving World).
Icon of Other Giant Christmas Tree You need to discover this giant christmas tree in Guanajuato to complete "Your Presents is Required" accolade (Evolving World).
Icon of Other Houses at Los Jardines The starting point for the "Taking the High Road" accolade (Festivals / Horizon Apex Outpost).
Icon of Other Neon Tank You need to find it for the #NEONNIGHTS Photo Challenge (Midnight at Horizon).
Icon of Other Picnic Tables One of the places where you can find the picnic tables needed to complete the "One of the places where you will find the picnic tables needed to complete the "Sandwich" #Forzathon Daily Challenge.
Icon of Other Snowmen (x5) There are 5 snowmen in the crater. Two near the houses and three more near the larger lake (one of which is on a mountainside). You need to smash them to complete the seasonal accolade "Mazda of all Trades". The fastest way to destroy 25 snowmen is: Go to the volcano, find a snowman that registers for you, switch to solo mode, hit the snowman, rewind and repeat.
Icon of Other Solar Panels You need to smash 20 solar panels for the "Shocking" #Forzathon weekly challenge.
Icon of Other T-Rexes You need to smash 15 of them for collectibles challenge "T-Rex On the Run" (Series 6 - Winter). The best way is to switch to Horizon Solo mode and use the "rewind method".
Icon of Other Traffic Cones There are 4 traffic cones at each of the four entrances to the stadium. You need to smash 5 of them for the "Open Road" daily #Forzathon challenge.
Icon of Other Wheeled Carts Around here you can find some carts after smashing which you can get the Cart Wheels skill.

Barn Finds

The Barn Finds are hidden garages containing wrecked iconic cars that you can restore in your garage.

Icon of Barn Find BMW 2002 Turbo 1973
Icon of Barn Find Chevrolet Corvette 1953
Icon of Barn Find Dodge Dart Hemi Super Stock 1968
Icon of Barn Find Dodge Viper GTS ACR 1999
Icon of Barn Find Ferrari 250 GTO 1962
Icon of Barn Find Ferrari F40 Competizione 1989
Icon of Barn Find Ford F-100 1956
Icon of Barn Find Ford Mustang GT 2+2 Fastback 1968
Icon of Barn Find Ford Racing Escort MK1 1967
Icon of Barn Find GMC Jimmy 1970
Icon of Barn Find Jaguar Sport XJR-15 1991
Icon of Barn Find Porsche 911 Carrera RS 1973
Icon of Barn Find Renault 4L Export 1968
Icon of Barn Find Toyota #1 T100 Baja Truck 1993

Player Houses

Player Houses are properties that you can buy as long as you have enough CR. They can be used as fast travel destinations, and most of them also unlock additional perks.

Icon of Player House Buena Esperanza Price: 700,000. Perk: None. Rewards: Porsche #185 959 Prodrive Rally Raid 1985, Chicken Suit.
Icon of Player House Buenas Vistas Price: 2,000,000. Perk: Fast Travel - Instantly travel to any road on the map.
Icon of Player House Casa Bella Price: Free. Perk: Skill Songs - DJs will occasionally play Skill Songs (double skills XP during the songs).
Icon of Player House Hotel Castillo Price: 5,000,000. Perk: Daily Wheelspin - Get a free Wheelspin each day you attend Horizon Mexico.
Icon of Player House La Cabana Price: 150,000. Perk: None. Rewards: Barn Find Rumor.
Icon of Player House La Casa Solariega Price: 1,500,000. Perk: #FORZATHON Points Boost - You now earn double #FORZATHON Points.
Icon of Player House Lugar Tranquilo Price: 700,000. Perk: Horizon Promo - Photograph your car collection.

Festival Sites

Festival Sites. In order to unlock some of them you need to complete corresponding Expeditions.

Icon of Festival Site Horizon Festival Mexico This is the main festival site.
Icon of Festival Site Horizon Apex Outpost To unlock it you must complete Tulum Expedition. It unlocks the Road Racing events.
Icon of Festival Site Horizon Wilds Outpost To unlock it you must complete Jungle Expedition. It unlocks the Dirt Racing events.
Icon of Festival Site Horizon Baja Outpost To unlock it you must complete Baja Expedition. It unlocks the Cross Country Racing events.
Icon of Festival Site Horizon Rush Outpost To unlock it you must complete Canyon Expedition. It unlocks the PR Stunts events.
Icon of Festival Site Horizon Street Scene Outpost To unlock it you must complete Guanajuato Expedition. It unlocks the Street Racing events.

Expeditions

Expeditions are special events that, when completed, will unlock new festival outposts.

Icon of Expedition Baja Expedition Complete this expedition to establish the Horizon Baja Outpost.
Icon of Expedition Canyon Expedition Complete this expedition to establish the Horizon Rush Outpost.
Icon of Expedition Guanajuato Expedition Complete this expedition to establish the Horizon Street Scene Outpost.
Icon of Expedition Horizon Badlands Expedition Complete this expedition to establish the Horizon Badlands Outpost (Rally Adventure DLC).
Icon of Expedition Hot Wheels Expedition Complete this expedition to establish the Horizon Hot Wheels Outpost (Hot Wheels DLC).
Icon of Expedition Jungle Expedition Complete this expedition to establish the Horizon Wilds Outpost.
Icon of Expedition Tulum Expedition Complete this expedition to establish the Horizon Apex Outpost.

Expedition Objectives

Optional objectives which can be completed while playing certain expeditions and thus receive extra Accolades for them.

Icon of Expedition Objective Golden Statue Photograph the Golden Statue. Optional objective of Tulum Expedition.
Icon of Expedition Objective Horizon Radio Beacon Find a location for the Horizon Radio Beacon. Optional objective of Tulum Expedition.
Icon of Expedition Objective Hot Spring Lake Collect a sample from the hot spring lake. Optional opjective of Baja Expedition.
Icon of Expedition Objective Jade Statue Photograph the Jade Statue. Optional objective of Tulum Expedition.
Icon of Expedition Objective Lost Barn Find Notes Discover the lost barn find notes. Optional objective of Jungle Expedition.
Icon of Expedition Objective Rami's Plane Find where Ramiro has landed. Objective (Exit) of Tulum Expedition.
Icon of Expedition Objective Ramiro's Pilot Helmet Find Ramiro's pilot helmet. To get to the box, speed up and use the ramp. Optional objective of Jungle Expedition.
Icon of Expedition Objective Ramiro's Pilot Outfit Find Ramiro's pilot outfit. The box is located on the container. To get here, use the wing of the plane leaning against the hangar as a ramp, break through the wall and land on the containers standing in the hangar. Then drive to the container with the box. Optional objective of Jungle Expedition.
Icon of Expedition Objective Ramiro's Rainy Day Fund Discover Ramiro's rainy day fund. Optional objective of Jungle Expedition.
Icon of Expedition Objective Ramiro's Recorder Discover Ramiro's flight recorder. Optional objective of Jungle Expedition.
Icon of Expedition Objective Seismometer Find a location for the seismometer. Optional opjective of Baja Expedition.
Icon of Expedition Objective Steam Vents Smash steam vents to release geothermal energy (x5). They can be found throughout the crater area. Optional opjective of Baja Expedition.
Icon of Expedition Objective Top of the Central Ruin Reach the top of the Central Ruin. Optional objective of Tulum Expedition.
Icon of Expedition Objective Volcanologist Thermal Suit Put on the Volcanologist Thermal Suit. Optional opjective of Baja Expedition.

Speed Traps

Speed Traps are places on the road where your current speed will be measured. The speed measurement takes place when you drive in any direction through a gate located at that location.

Icon of Speed Trap Arid Hills ★ 55 mph / 88.5 km/h ★★ 155 mph / 249.4 km/h ★★★ 225 mph / 362.1 km/h
Icon of Speed Trap Autopista ★ 75 mph / 120.7 km/h ★★ 175 mph / 281.6 km/h ★★★ 240 mph / 386.2 km/h
Icon of Speed Trap Avenida ★ 35 mph / 56.3 km/h ★★ 135 mph / 217.3 km/h ★★★ 205 mph / 329.9 km/h
Icon of Speed Trap Baja California ★ 35 mph / 56.3 km/h ★★ 100 mph / 160.9 km/h ★★★ 140 mph / 225.3 km/h
Icon of Speed Trap Bulevar ★ 35 mph / 56.3 km/h ★★ 130 mph / 209.2 km/h ★★★ 195 mph / 313.8 km/h
Icon of Speed Trap Bypass ★ 55 mph / 88.5 km/h ★★ 125 mph / 201.2 km/h ★★★ 170 mph / 273.6 km/h
Icon of Speed Trap Caballo Blanco ★ 35 mph / 56.3 km/h ★★ 100 mph / 160.9 km/h ★★★ 145 mph / 233.3 km/h
Icon of Speed Trap Calle Principal ★ 45 mph / 72.4 km/h ★★ 145 mph / 233.3 km/h ★★★ 215 mph / 346.0 km/h
Icon of Speed Trap Callejon ★ 35 mph / 56.3 km/h ★★ 110 mph / 177.0 km/h ★★★ 160 mph / 257.5 km/h
Icon of Speed Trap Canyon Pass ★ 55 mph / 88.5 km/h ★★ 125 mph / 201.2 km/h ★★★ 175 mph / 281.6 km/h
Icon of Speed Trap Cloverleaf ★ 55 mph / 88.5 km/h ★★ 145 mph / 233.3 km/h ★★★ 210 mph / 338.0 km/h
Icon of Speed Trap Coast View ★ 45 mph / 72.4 km/h ★★ 130 mph / 209.2 km/h ★★★ 185 mph / 297.7 km/h
Icon of Speed Trap Drag Strip ★ 65 mph / 104.6 km/h ★★ 150 mph / 241.4 km/h ★★★ 205 mph / 329.9 km/h
Icon of Speed Trap Dustbowl ★ 35 mph / 56.3 km/h ★★ 100 mph / 160.9 km/h ★★★ 145 mph / 233.3 km/h
Icon of Speed Trap East Resort ★ 90 mph / 144.8 km/h ★★ 130 mph / 209.2 km/h ★★★ 200 mph / 321.9 km/h
Icon of Speed Trap Escarpment ★ 55 mph / 88.5 km/h ★★ 120 mph / 193.1 km/h ★★★ 165 mph / 265.5 km/h
Icon of Speed Trap Estadio ★ 55 mph / 88.5 km/h ★★ 130 mph / 209.2 km/h ★★★ 180 mph / 289.7 km/h
Icon of Speed Trap Federal Highway ★ 65 mph / 104.6 km/h ★★ 170 mph / 273.6 km/h ★★★ 270 mph / 434.5 km/h
Icon of Speed Trap Gran Puente ★ 65 mph / 104.6 km/h ★★ 165 mph / 265.5 km/h ★★★ 250 mph / 402.3 km/h
Icon of Speed Trap Horizon Baja Speed Trap ★ 35 mph / 56.3 km/h ★★ 70 mph / 112.7 km/h ★★★ 110 mph / 177.0 km/h
Icon of Speed Trap Levee ★ 35 mph / 56.3 km/h ★★ 110 mph / 177.0 km/h ★★★ 160 mph / 257.5 km/h
Icon of Speed Trap Los Arboles ★ 35 mph / 56.3 km/h ★★ 100 mph / 160.9 km/h ★★★ 140 mph / 225.3 km/h
Icon of Speed Trap Mountainside ★ 30 mph / 48.3 km/h ★★ 95 mph / 152.9 km/h ★★★ 135 mph / 217.3 km/h
Icon of Speed Trap Mudflows ★ 35 mph / 56.3 km/h ★★ 105 mph / 169.0 km/h ★★★ 150 mph / 241.4 km/h
Icon of Speed Trap Northern Passage ★ 55 mph / 88.5 km/h ★★ 145 mph / 233.3 km/h ★★★ 215 mph / 346.0 km/h
Icon of Speed Trap Oceano Azul ★ 45 mph / 72.4 km/h ★★ 150 mph / 241.4 km/h ★★★ 225 mph / 362.1 km/h
Icon of Speed Trap Pantano Pass ★ 70 mph / 112.7 km/h ★★ 100 mph / 160.9 km/h ★★★ 165 mph / 265.5 km/h
Icon of Speed Trap Paso Inferior ★ 35 mph / 56.3 km/h ★★ 80 mph / 128.7 km/h ★★★ 105 mph / 169.0 km/h
Icon of Speed Trap Pequeno Puente ★ 35 mph / 56.3 km/h ★★ 110 mph / 177.0 km/h ★★★ 160 mph / 257.5 km/h
Icon of Speed Trap Pyramid Of The Sun ★ 30 mph / 48.3 km/h ★★ 110 mph / 177.0 km/h ★★★ 165 mph / 265.5 km/h
Icon of Speed Trap San De Las Minas ★ 35 mph / 56.3 km/h ★★ 110 mph / 177.0 km/h ★★★ 160 mph / 257.5 km/h
Icon of Speed Trap Sendero ★ 35 mph / 56.3 km/h ★★ 95 mph / 152.9 km/h ★★★ 135 mph / 217.3 km/h
Icon of Speed Trap Swamplands ★ 46 mph / 72.4 km/h ★★ 110 mph / 177.0 km/h ★★★ 155 mph / 249.4 km/h
Icon of Speed Trap Tulum ★ 80 mph / 128.7 km/h ★★ 130 mph / 209.2 km/h ★★★ 170 mph / 273.6 km/h
Icon of Speed Trap Vado Del Rio ★ 35 mph / 56.3 km/h ★★ 95 mph / 152.9 km/h ★★★ 135 mph / 217.3 km/h

Danger Signs

Danger Signs in Forza Horizon 5 are special challenges in which you have to make a jump from a special ramp and fly as far as possible in the air.

Icon of Danger Sign Baja Showjump ★ 150 ft / 45.7 m ★★ 550 ft / 167.6 m ★★★ 850 ft / 259.1 m
Icon of Danger Sign Basejump ★ 250 ft / 76.2 m ★★ 800 ft / 243.8 m ★★★ 1,650 ft / 502.9 m
Icon of Danger Sign Broadwalk ★ 100 ft / 30.5 m ★★ 200 ft / 61.0 m ★★★ 300 ft / 91.4 m
Icon of Danger Sign Cannonball ★ 100 ft / 30.5 m ★★ 400 ft / 121.9 m ★★★ 600 ft / 182.9 m
Icon of Danger Sign Cascadas ★ 250 ft / 76.2 m ★★ 450 ft / 137.2 m ★★★ 950 ft / 289.6 m
Icon of Danger Sign Colina ★ 350 ft / 106.7 m ★★ 1,000 ft / 304.8 m ★★★ 1,550 ft / 472.4 m
Icon of Danger Sign Desert Dunes ★ 150 ft / 45.7 m ★★ 500 ft / 152.4 m ★★★ 1,050 ft / 320.0 m
Icon of Danger Sign Eagle's Perch ★ 150 ft / 45.7 m ★★ 400 ft / 121.9 m ★★★ 950 ft / 289.6 m
Icon of Danger Sign Event Horizon ★ 100 ft / 30.5 m ★★ 650 ft / 198.1 m ★★★ 1,000 ft / 304.8 m
Icon of Danger Sign Heights of Mulege ★ 250 ft / 76.2 m ★★ 400 ft / 121.9 m ★★★ 850 ft / 259.1 m
Icon of Danger Sign Hotel ★ 100 ft / 30.5 m ★★ 250 ft / 76.2 m ★★★ 450 ft / 137.2 m
Icon of Danger Sign La Cruz ★ 100 ft / 30.5 m ★★ 300 ft / 91.4 m ★★★ 650 ft / 198.1 m
Icon of Danger Sign La Mesa ★ 150 ft / 45.7 m ★★ 350 ft / 106.7 m ★★★ 650 ft / 198.1 m
Icon of Danger Sign Launch Control ★ 150 ft / 45.7 m ★★ 800 ft / 243.8 m ★★★ 1,450 ft / 442.0 m
Icon of Danger Sign Los Jardines ★ 100 ft / 30.5 m ★★ 650 ft / 198.1 m ★★★ 1,100 ft / 335.3 m
Icon of Danger Sign Metal Bird ★ 200 ft / 61.0 m ★★ 370 ft / 112.8 m ★★★ 400 ft / 121.9 m
Icon of Danger Sign Mountain Top ★ 500 ft / 152.4 m ★★ 1,000 ft / 304.8 m ★★★ 1,650 ft / 502.9 m
Icon of Danger Sign Ranas Saltarinas ★ 250 ft / 76.2 m ★★ 450 ft / 137.2 m ★★★ 820 ft / 249.9 m
Icon of Danger Sign Ridge Crest ★ 250 ft / 76.2 m ★★ 650 ft / 198.1 m ★★★ 1,150 ft / 350.5 m
Icon of Danger Sign Runway ★ 100 ft / 30.5 m ★★ 850 ft / 259.1 m ★★★ 1,750 ft / 533.4 m
Icon of Danger Sign Salto De Rio ★ 300 ft / 91.4 m ★★ 360 ft / 109.7 m ★★★ 420 ft / 128.0 m
Icon of Danger Sign San Juan Jump ★ 250 ft / 76.2 m ★★ 300 ft / 91.4 m ★★★ 380 ft / 115.8 m
Icon of Danger Sign Stadium Jump ★ 100 ft / 30.5 m ★★ 400 ft / 121.9 m ★★★ 900 ft / 274.3 m
Icon of Danger Sign Valle ★ 250 ft / 76.2 m ★★ 550 ft / 167.6 m ★★★ 750 ft / 228.6 m

Speed Zones

Speed Zones are road sections where your average speed over the entire distance will be measured. Speed recording starts when you drive in the right direction through one of the two gates located on both sides of the designated road section.

Icon of Speed Zone Airfield Speed Zone ★ 100 mph / 160.9 km/h ★★ 125 mph / 201.2 km/h ★★★ 150 mph / 241.4 km/h
Icon of Speed Zone Atlantes De Tula ★ 40 mph / 64.4 km/h ★★ 105 mph / 169.0 km/h ★★★ 150 mph / 241.4 km/h
Icon of Speed Zone Camino Del Cielo ★ 50 mph / 80.5 km/h ★★ 100 mph / 160.9 km/h ★★★ 135 mph / 217.3 km/h
Icon of Speed Zone Carretera ★ 45 mph / 72.4 km/h ★★ 110 mph / 177.0 km/h ★★★ 150 mph / 241.4 km/h
Icon of Speed Zone Cliffside ★ 40 mph / 64.4 km/h ★★ 100 mph / 160.9 km/h ★★★ 135 mph / 217.3 km/h
Icon of Speed Zone Cordillera ★ 30 mph / 48.3 km/h ★★ 80 mph / 128.7 km/h ★★★ 110 mph / 177.0 km/h
Icon of Speed Zone Costa Rocosa ★ 35 mph / 56.3 km/h ★★ 70 mph / 112.7 km/h ★★★ 90 mph / 144.8 km/h
Icon of Speed Zone Desierto Viviente ★ 40 mph / 64.4 km/h ★★ 70 mph / 112.7 km/h ★★★ 90 mph / 144.8 km/h
Icon of Speed Zone El Gancho ★ 30 mph / 48.3 km/h ★★ 60 mph / 96.6 km/h ★★★ 75 mph / 120.7 km/h
Icon of Speed Zone Festival Speed Zone ★ 45 mph / 72.4 km/h ★★ 85 mph / 136.8 km/h ★★★ 110 mph / 177.0 hm/h
Icon of Speed Zone La Silica ★ 35 mph / 56.3 km/h ★★ 90 mph / 144.8 km/h ★★★ 125 mph / 201.2 km/h
Icon of Speed Zone La Subida ★ 35 mph / 56.3 km/h ★★ 85 mph / 136.8 km/h ★★★ 115 mph / 185.1 km/h
Icon of Speed Zone Ladera ★ 45 mph / 72.4 km/h ★★ 80 mph / 128.7 km/h ★★★ 95 mph / 152.9 km/h
Icon of Speed Zone Mountain Pass ★ 50 mph / 80.5 km/h ★★ 105 mph / 169.0 km/h ★★★ 135 mph / 217.3 km/h
Icon of Speed Zone Orilla Del Rio ★ 30 mph / 48.3 km/h ★★ 80 mph / 128.7 km/h ★★★ 110 mph / 177.0 km/h
Icon of Speed Zone Punta Allen ★ 40 mph / 64.4 km/h ★★ 95 mph / 152.9 km/h ★★★ 135 mph / 217.3 km/h
Icon of Speed Zone Punto De Vista ★ 30 mph / 48.3 km/h ★★ 65 mph / 104.6 km/h ★★★ 90 mph / 144.8 km/h
Icon of Speed Zone Pyramid of The Moon ★ 40 mph / 64.4 km/h ★★ 95 mph / 152.9 km/h ★★★ 130 mph / 209.2 km/h
Icon of Speed Zone Ranchito ★ 30 mph / 48.3 km/h ★★ 65 mph / 104.6 km/h ★★★ 90 mph / 144.8 km/h
Icon of Speed Zone Ringroad ★ 45 mph / 72.4 km/h ★★ 80 mph / 128.7 km/h ★★★ 95 mph / 152.9 km/h
Icon of Speed Zone Rio Fuerte ★ 50 mph / 80.5 km/h ★★ 95 mph / 152.9 km/h ★★★ 125 mph / 201.2 km/h
Icon of Speed Zone Riviera Maya ★ 35 mph / 56.3 km/h ★★ 90 mph / 144.8 km/h ★★★ 130 mph / 209.2 km/h
Icon of Speed Zone Rocky Hills ★ 35 mph / 56.3 km/h ★★ 60 mph / 96.6 km/h ★★★ 70 mph / 112.7 km/h
Icon of Speed Zone Switchbacks ★ 30 mph / 48.3 km/h ★★ 75 mph / 120.7 km/h ★★★ 100 mph / 160.9 km/h
Icon of Speed Zone Trebol ★ 100 mph / 160.9 km/h ★★ 190 mph / 305.8 km/h ★★★ 260 mph / 418.4 km/h
Icon of Speed Zone Watersplash ★ 30 mph / 48.3 km/h ★★ 65 mph / 104.6 km/h ★★★ 90 mph / 144.8 km/h

Trailblazers

Trailblazers in Forza Horizon 5 are special challenges in which you must drive from the starting gate to the end gate in the shortest possible time.

Icon of Trailblazer Barranco Time limit: 65s ★ 5s ★★ 15s ★★★ 30s
Icon of Trailblazer Canyon Run Time limit: 65s ★ 5s ★★ 15s ★★★ 25s
Icon of Trailblazer Cascadas Time limit: 65s ★ 5s ★★ 15s ★★★ 25s
Icon of Trailblazer City Escape Time limit: 65s ★ 5s ★★ 20s ★★★ 35s
Icon of Trailblazer Cruse De Granja Time limit: 75s ★ 5s ★★ 15s ★★★ 23s
Icon of Trailblazer Desert Descent Time limit: 120s ★ 5s ★★ 15s ★★★ 25s
Icon of Trailblazer Festival Descent Time limit: 60s ★ 5s ★★ 15s ★★★ 25s
Icon of Trailblazer Granjas Time limit: 65s ★ 5s ★★ 15s ★★★ 25s
Icon of Trailblazer Jungle Traversal Time limit: 55s ★ 3s ★★ 8s ★★★ 12s
Icon of Trailblazer La Marisma Time limit: 65s ★ 5s ★★ 15s ★★★ 20s
Icon of Trailblazer Malpais Time limit: 35s ★ 5s ★★ 10s ★★★ 15s
Icon of Trailblazer Over The Dune Time limit: 140s ★ 5s ★★ 15s ★★★ 25s
Icon of Trailblazer Puerta Petrea Time limit: 65s ★ 5s ★★ 15s ★★★ 25s
Icon of Trailblazer Quebrada Time limit: 50s ★ 10s ★★ 20s ★★★ 30s
Icon of Trailblazer River Rapids Time limit: 65s ★ 3s ★★ 10s ★★★ 20s
Icon of Trailblazer Sand and Deliver Time limit: 65s ★ 5s ★★ 15s ★★★ 25s
Icon of Trailblazer The Juggernaut An epic mega-trailblazer across all of Mexico (Horizon Rush). Time limit: 300s ★ 1s ★★ 30s ★★★ 100s

Trailblazer (Finish Lines)

The locations of the finish gates / lines of each Trailblazer.

Icon of Trailblazer Barranco (Finish Gate) Start: Barranco.
Icon of Trailblazer Canyon Run (Finish Gate) Start: Canyon Run.
Icon of Trailblazer Cascadas (Finish Gate) Start: Cascadas.
Icon of Trailblazer City Escape (Finish Gate) Start: City Escape.
Icon of Trailblazer Cruse De Granja (Finish Gate) Start: Cruse De Granja.
Icon of Trailblazer Desert Descent (Finish Gate) Start: Desert Descent.
Icon of Trailblazer Festival Descent (Finish Gate) Start: Festival Descent.
Icon of Trailblazer Granjas (Finish Gate) Start: Granjas.
Icon of Trailblazer Jungle Traversal (Finish Gate) Start: Jungle Traversal.
Icon of Trailblazer La Marisma (Finish Gate) Start: La Marisma.
Icon of Trailblazer Malpais (Finish Gate) Start: Malpais.
Icon of Trailblazer Over The Dune (Finish Gate) Start: Over The Dune.
Icon of Trailblazer Puerta Petrea (Finish Gate) Start: Puerta Petrea.
Icon of Trailblazer Quebrada (Finish Gate) Start: Quebrada.
Icon of Trailblazer River Rapids (Finish Gate) Start: River Rapids.
Icon of Trailblazer Sand and Deliver (Finish Gate) Start: Sand and Deliver.
Icon of Trailblazer The Juggernaut (Finish Gate) Start: The Juggernaut.

Drift Zones

Drift Zones are sections of road where your drifting skills will be rated. The evaluation starts when you drive onto the defined section of the road from either side.

Icon of Drift Zone Arbolada ★ 10,000 pts ★★ 55,000 pts ★★★ 110,000 pts
Icon of Drift Zone Camino De Montana ★ 10,000 pts ★★ 65,000 pts ★★★ 120,000 pts
Icon of Drift Zone Cara Este ★ 50,000 pts ★★ 250,000 pts ★★★ 500,000 pts
Icon of Drift Zone Costera ★ 5,000 pts ★★ 40,000 pts ★★★ 70,000 pts
Icon of Drift Zone East Coast ★ 10,000 pts ★★ 70,000 pts ★★★ 130,000 pts
Icon of Drift Zone Esquisto ★ 10,000 pts ★★ 70,000 pts ★★★ 130,000 pts
Icon of Drift Zone Farmland Trail ★ 10,000 pts ★★ 70,000 pts ★★★ 130,000 pts
Icon of Drift Zone Giro Encorvado ★ 2,500 pts ★★ 15,000 pts ★★★ 30,000 pts
Icon of Drift Zone Hillside ★ 10,000 pts ★★ 75,000 pts ★★★ 130,000 pts
Icon of Drift Zone Las Curvas ★ 5,000 pts ★★ 30,000 pts ★★★ 60,000 pts
Icon of Drift Zone Las Dunas ★ 15,000 pts ★★ 75,000 pts ★★★ 150,000 pts
Icon of Drift Zone Los Campos ★ 10,000 pts ★★ 60,000 pts ★★★ 120,000 pts
Icon of Drift Zone Otro Mundo ★ 5,000 pts ★★ 40,000 pts ★★★ 70,000 pts
Icon of Drift Zone Panoramica ★ 5,000 pts ★★ 30,000 pts ★★★ 50,000 pts
Icon of Drift Zone Polytunnels ★ 10,000 pts ★★ 65,000 pts ★★★ 120,000 pts
Icon of Drift Zone Precipice ★ 5,000 pts ★★ 35,000 pts ★★★ 70,000 pts
Icon of Drift Zone Punto Norte ★ 5,000 pts ★★ 40,000 pts ★★★ 80,000 pts
Icon of Drift Zone Rancheria ★ 5,000 pts ★★ 30,000 pts ★★★ 60,000 pts
Icon of Drift Zone Reservoir ★ 20,000 pts ★★ 115,000 pts ★★★ 240,000 pts
Icon of Drift Zone Trailbreaker ★ 10,000 pts ★★ 55,000 pts ★★★ 100,000 pts

Fast Travel Boards

Fast Travel Boards are road signs located throughout the Forza Horizon 5 map which you can find and destroy. There are 50 of them. After destroying a fast travel board, the CR cost to use Fast Travel option will be reduced.

Icon of Fast Travel Board Fast Travel Board #01
Icon of Fast Travel Board Fast Travel Board #02
Icon of Fast Travel Board Fast Travel Board #03
Icon of Fast Travel Board Fast Travel Board #04
Icon of Fast Travel Board Fast Travel Board #05
Icon of Fast Travel Board Fast Travel Board #06
Icon of Fast Travel Board Fast Travel Board #07
Icon of Fast Travel Board Fast Travel Board #08
Icon of Fast Travel Board Fast Travel Board #09
Icon of Fast Travel Board Fast Travel Board #10
Icon of Fast Travel Board Fast Travel Board #11 It's under the bridge.
Icon of Fast Travel Board Fast Travel Board #12
Icon of Fast Travel Board Fast Travel Board #13
Icon of Fast Travel Board Fast Travel Board #14 It's under the bridge.
Icon of Fast Travel Board Fast Travel Board #15
Icon of Fast Travel Board Fast Travel Board #16
Icon of Fast Travel Board Fast Travel Board #17
Icon of Fast Travel Board Fast Travel Board #18
Icon of Fast Travel Board Fast Travel Board #19
Icon of Fast Travel Board Fast Travel Board #20
Icon of Fast Travel Board Fast Travel Board #21
Icon of Fast Travel Board Fast Travel Board #22
Icon of Fast Travel Board Fast Travel Board #23 Not so easy to get becouse it's on the roof of the building. To get to it you must speed up and jump into the air from a small hill located at the back of the house.
Icon of Fast Travel Board Fast Travel Board #24
Icon of Fast Travel Board Fast Travel Board #26
Icon of Fast Travel Board Fast Travel Board #27
Icon of Fast Travel Board Fast Travel Board #28
Icon of Fast Travel Board Fast Travel Board #29 You must jump off the ramp on the hill (the Heights of Mulege danger sign) and hit the roof of the building. I was able to do this when I accelerated to about 103 MPH. Rewind is very useful here.
Icon of Fast Travel Board Fast Travel Board #30
Icon of Fast Travel Board Fast Travel Board #31
Icon of Fast Travel Board Fast Travel Board #32 It's under the bridge.
Icon of Fast Travel Board Fast Travel Board #33
Icon of Fast Travel Board Fast Travel Board #34
Icon of Fast Travel Board Fast Travel Board #35
Icon of Fast Travel Board Fast Travel Board #36
Icon of Fast Travel Board Fast Travel Board #37
Icon of Fast Travel Board Fast Travel Board #38 It's under the bridge.
Icon of Fast Travel Board Fast Travel Board #39
Icon of Fast Travel Board Fast Travel Board #40
Icon of Fast Travel Board Fast Travel Board #41
Icon of Fast Travel Board Fast Travel Board #42
Icon of Fast Travel Board Fast Travel Board #43
Icon of Fast Travel Board Fast Travel Board #44 It's under the bridge.
Icon of Fast Travel Board Fast Travel Board #45
Icon of Fast Travel Board Fast Travel Board #46
Icon of Fast Travel Board Fast Travel Board #47
Icon of Fast Travel Board Fast Travel Board #48
Icon of Fast Travel Board Fast Travel Board #49
Icon of Fast Travel Board Fast Travel Board #50

XP Boards (5K)

XP Boards are a type of collectibles with which you can gather some XP. Here are the boards that will grant you 5,000 XP.

Icon of XP Board 5,000 XP To get to the roof of the building with the board you must jump off the cliff above.
Icon of XP Board 5,000 XP This board is located on the roof of a building. You can get there by jumping off a nearby hill.
Icon of XP Board 5,000 XP It's on the roof of the building. Just use the bump on the other side of the road (south side).
Icon of XP Board 5,000 XP The board is located on top of a rock pillar. You can get to it by jumping off the top of the rock formation located on the south side of the pillar.
Icon of XP Board 5,000 XP It is easy to collect this board.
Icon of XP Board 5,000 XP The board is located at the top of the hill and is easily accessible.
Icon of XP Board 5,000 XP This board is on a hill. It's easy to get there.
Icon of XP Board 5,000 XP The board is located at the top of the hill and is easily accessible.
Icon of XP Board 5,000 XP This board sits atop a large white tent / greenhouse. To get to it you must use the Los Jardines Danger Sign ramp.
Icon of XP Board 5,000 XP This board is relatively easy to get. All it takes is a little bit of speed and a jump off the edge of the dune.
Icon of XP Board 5,000 XP This board is located on top of the shipping container. You must jump there using the nearby pile of gravel.
Icon of XP Board 5,000 XP This board is easy to get. You can find it on the beach, under a rocky arch.
Icon of XP Board 5,000 XP This XP Board is on the wing of the plane. To get here you must use the Launch Control Danger Sign ramp, which means you must first unlock PR Stunts.
Icon of XP Board 5,000 XP This XP Board is located on the span of the bridge, under the highway.
Icon of XP Board 5,000 XP The board is located up at the top of a high voltage pole.
Icon of XP Board 5,000 XP This board is located on the roof of the building. To get there you must take advantage of the uneven terrain nearby.
Icon of XP Board 5,000 XP This XP board is located on the roof of a building that stands at the top of the hill.
Icon of XP Board 5,000 XP The board is located on the balcony of one of the tall buildings. You must use the nearby ramp (Hotel Danger Sign) to get to it.
Icon of XP Board 5,000 XP The board is located on the roof of the building that you must jump onto using the nearby hill.
Icon of XP Board 5,000 XP The board is located on top of the ruins. You can get here when the reservoir is dry, such as in the spring.
Icon of XP Board 5,000 XP The board is located at the base of the waterfall and is easily accessible.
Icon of XP Board 5,000 XP Inside the building. Easy to collect.
Icon of XP Board 5,000 XP The board is located at the bottom of the pit and is easily accessible.
Icon of XP Board 5,000 XP It's on the roof of the building. You can jump to the roof using the hill at the back of the building.
Icon of XP Board 5,000 XP This XP Board is quite easy to get. You only need to speed up a little and jump out of the ramp.

XP Boards (3K)

XP Boards are a type of collectibles with which you can gather some XP. Here are the boards that will grant you 3,000 XP.

Icon of XP Board 3,000 XP
Icon of XP Board 3,000 XP It's under the bridge.
Icon of XP Board 3,000 XP
Icon of XP Board 3,000 XP It's under the bridge.
Icon of XP Board 3,000 XP
Icon of XP Board 3,000 XP It's under the bridge.
Icon of XP Board 3,000 XP
Icon of XP Board 3,000 XP It's under the bridge.
Icon of XP Board 3,000 XP
Icon of XP Board 3,000 XP It's under the bridge.
Icon of XP Board 3,000 XP
Icon of XP Board 3,000 XP It's under the bridge.
Icon of XP Board 3,000 XP
Icon of XP Board 3,000 XP This XP board is on the wing of the plane.
Icon of XP Board 3,000 XP

XP Boards (1K)

XP Boards are a type of collectibles with which you can gather some XP. Here are the boards that will grant you 1,000 XP.

Icon of XP Board 1,000 XP
Icon of XP Board 1,000 XP It's under the bridge.
Icon of XP Board 1,000 XP

Road Racing Events

A series of Road Racing Events. The first two races will be unlocked at the beginning of the game. To unlock other road racing events, you must complete the Tulum Expedition and thus unlock the Horizon Apex Outpost.

Icon of Road Racing Event Arch of Mulege Circuit Length: 1.8 mile. 3 Laps. Race through the iconic Arch of Mulegé and follow the twisting back-streets of this quintessential Mexican village, before blasting along the riverbank straight.
Icon of Road Racing Event Bahia De Plano Circuit Length: 1.6 mile. 3 Laps. A favourite among thrill-seekers, Bahía de Plano Circuit has high-speed sweeping turns with a couple of heavy breaking areas, perfect for daring overtakes.
Icon of Road Racing Event Bola Ocho Circuit Length: 1.2 mile. 3 Laps. A small figure-eight circuit located around the Estadio José Aguilar in the southern part of Guanajuato. A steep hill provides the elevation change for the cross-over.
Icon of Road Racing Event Cathedral Circuit Length: 1.4 mile. 3 Laps. A highly technical circuit that threads around and underneath the narrow city streets of Guanajuato, passing numerous landmarks along the way. Time your overtakes carefully.
Icon of Road Racing Event Chihuahua Circuit Length: 1.5 mile. 3 Laps. This circuit is small but fearsome! Hosted on the plateau behind Hotel Mirador Balderrama, you can enjoy panoramic views of the surrounding countryside in all directions from here.
Icon of Road Racing Event Copper Canyon Sprint Length: 5.9 miles. Descending into Copper Canyon, this route runs the entire length of it, following each twist and turn of the river as it snakes through the valley while the railroad crosses overhead.
Icon of Road Racing Event Descansar Dorado Sprint Length: 3.9 miles. Head north along Costa Rocosa before turning inland through the living desert and over the mudflows of Descansar Dorado.
Icon of Road Racing Event Dunas Blancas Sprint Length: 5.3 miles. Whether it's heat-haze distorting your view of the road during the day, or cold temperatures affecting your tires at night, this sunbleached route can throw you some unexpected curveballs, including sudden dust storms!
Icon of Road Racing Event Emerald Circuit Length: 1.6 mile. 3 Laps. A challenging, technical circuit passing the Palacio Azul del Océano hotel. No time to admire the scenery though, as a series of chicanes will test your driving skills.
Icon of Road Racing Event Estadio Circuit Length: 2.0 miles. 3 Laps. Turns out we can host epic events around the outside of the stadium as well as the inside! The ring road makes a perfect high-speed circuit for daring drivers to show what they're made of.
Icon of Road Racing Event Gran Pantano Sprint Length: 5.9 miles. A steady downhill route that takes you on a tour of the jungle and past the ruins of Ek Balam and Tulum, before emerging by the swamp and finishing at the beautiful Playa Azul.
Icon of Road Racing Event Horizon Mexico Circuit Length: 2.0 miles. 3 Laps. A circuit that is well-balanced for rookies and veterans alike, the Horizon Mexico Circuit is the ideal place to hone your racing skills and thrill the crowds.
Icon of Road Racing Event Llanuras Sprint Length: 4.9 miles. A mostly high-speed route with a few technical sections to watch out for, you'll cross under and over the highway before climbing the hill to Guanajuato.
Icon of Road Racing Event Lookout Circuit Length: 1.6 mile. 3 Laps. This helter-skelter circuit winds up and around the Horizon Rush outpost atop Copper Canyon, before dropping through a technical downhill section ready for another lap.
Icon of Road Racing Event Los Jardines Circuit Length: 1.6 mile. 3 Laps. A compact circuit around the modern settlement of Los Jardines. Short straights followed by sharp corners will favour lighter, more agile vehicles.
Icon of Road Racing Event Panoramica Sprint Length: 3.7 miles. Escaping from the city centre, this route climbs into the hills overlooking Guanajuato, hence its name. A duo of hairpin turns bookend the route, leading to dramatic overtakes.
Icon of Road Racing Event Playa Azul Circuit Length: 2.5 miles. 3 Laps. Playa Azul may be a sleepy seaside town, but don't be lulled into a false sense of security! This circuit is as tough as they come. Watch out for water on the apex of turn 2.
Icon of Road Racing Event Plaza Circuit Length: 2.2 miles. 3 Laps. Blast along a main thoroughfare before heading into the suburbs of Guanajuato, this undulating and technical circuit will keep you on your toes throughout.
Icon of Road Racing Event Reservorio Sprint Length: 4.3 miles. Launching from the Horizon Festival Mexico site, you'll head south to Mulegé before turning east to follow the edge of the reservoir. See if you can spot the submerged Temple of Quechula as you pass by.
Icon of Road Racing Event Riviera Sprint Length: 6.1 miles. Breath-taking views at breakneck speeds as you hurtle down this sweeping route from the Canyon to the coastline. A cold drink will be waiting for the winner at Playa Azul!
Icon of Road Racing Event Sierra Verde Sprint Length: 4.7 miles. A technical route that dips into a deep valley, snakes up the other side, circles around the hilltops, and then descends on Sierra Verde Dam at the reservoir.
Icon of Road Racing Event The Colossus The epitome of road racing (Horizon Apex). Length: 34.3 miles. Inspired by the infamous Carrera Panamericana, this is the ultimate point-to-point road race, weighing in at 34.3 miles (55.2 km) as it zig-zags across Mexico.
Icon of Road Racing Event The Goliath The ultimate Horizon Festival Mexico event. Length: 33.9 miles. 1 Lap. The “final boss” of Horizon Mexico, this 34 mile (54.5 km) circuit visits every corner of the region, threading its way through the canyon, jungle, and along both coastlines.
Icon of Road Racing Event Tierra Prospera Circuit Length: 2.1 miles. 3 Laps. Set in the heart of the region's farmland, this circuit provides plenty of room to rumble. The entire route sits on the side of a low hill, providing a near constant gradient.
Icon of Road Racing Event Volcan Sprint Length: 5.0 miles. Winding its way back and forth up an asphalt road on the side of La Gran Caldera, you'll have to tackle hairpin after hairpin along the way. Trust me, the view from the top is worth it.

Dirt Racing Events

A series of Dirt Racing Events. The first two races will be unlocked at the beginning of the game. To unlock other dirt racing events, you must complete the Jungle Expedition and thus unlock the Horizon Wilds Outpost.

Icon of Dirt Racing Event Baja California Trail Length: 4.0 miles. Head south from Lago Blanco through the deserts of Baja California, picking up speed through the dunes as you make a break for the coast.
Icon of Dirt Racing Event Bajio Trail Length: 4.9 miles. With only a few short stretches of asphalt, this long and narrow farmland trail is a definitive rally experience through the gorgeous scenery of Tierra Próspera.
Icon of Dirt Racing Event Barranca Trail Length: 3.9 miles. After climbing to the top of Copper Canyon, this route dramatically tumbles down a series of switchbacks to the Canyon floor. Make sure your brakes are in good working order!
Icon of Dirt Racing Event Caldera Scramble Length: 1.1 mile. 4 Laps. What could be more exciting than rallying on top of a volcano!? Just watch out for those giant boulders, hitting those won't buff out.
Icon of Dirt Racing Event Cascada Trail Length: 4.0 miles. Starting near the Cascadas de Agua Azul, this route takes you into the outskirts of the jungle, presenting rough terrain and challenging corners as it weaves among the trees.
Icon of Dirt Racing Event Cordillera Trail Length: 4.7 miles. Be ready for some serious speed as your descend from the arid hills of Cordillera. There are a few sharp corners to watch out for though.
Icon of Dirt Racing Event Desierto Trail Length: 3.8 miles. A dusty trail that picks its way through the rocky desert and alternates between paved and dirt roads, finishing at the main Horizon Festival Mexico site.
Icon of Dirt Racing Event El Pipila Scramble Length: 2.6 miles. 3 Laps. Under the watchful gaze of El Pípila's statue, this route has steep elevation changes, narrow tunnels, and tight corners to put your driving skills to the test.
Icon of Dirt Racing Event Fuera Del Camino Trail Length: 4.5 miles. Narrow and twisting, this dusty trail will test the mettle of any rally driver. Keep your eyes up and looking ahead, so that you can get the car ready for the next corner in plenty of time.
Icon of Dirt Racing Event Horizon Baja Scramble Length: 1.9 mile. 3 Laps. With jumps, bumps, and deep water, this gruelling off-road circuit will put your vehicle through its paces. Make sure you bring a few spare dust filters.
Icon of Dirt Racing Event La Selva Scramble Length: 2.4 miles. 3 Laps. This scramble is split between a high-speed run on asphalt, and a gruelling dirt section splashing through the waterways of the Cascadas de Agua Azul.
Icon of Dirt Racing Event Mangrove Scramble Length: 2.1 miles. 3 Laps. Split between the coastal road and lush swamp of Riviera Maya, this scramble is challenging for both cars and drivers due to its high humidity and thick mud.
Icon of Dirt Racing Event Montana Trail Length: 5.4 miles. Braking downhill on a loose surface takes practice, but by the time you reach the bottom you'll be a master at the Scandinavian Flick! These brutal switchbacks always draw a big crowd.
Icon of Dirt Racing Event Mulege Town Scramble Length: 1.7 mile. 3 Laps. Tackle a winding hillside trail through the heights of Mulegé, then wrap around through the narrow back-streets of the town.
Icon of Dirt Racing Event River Scramble Length: 2.0 miles. 3 Laps. Popular with rally-cross enthusiasts, this action-packed scramble climbs the side of the valley beneath the spectacular “Gran Puente” before crashing through the river on the return run.
Icon of Dirt Racing Event San Juan Scramble Length: 2.3 miles. 3 Laps. A famous landmark, the church of San Juan fell victim to a volcanic eruption and was engulfed by lava. As it happens, this site is also really good as a scramble route!
Icon of Dirt Racing Event Tapalpa Trail Length: 4.0 miles. A fast rally course that starts near the polytunnels of Granjas de Tapalpa, heading south over the many waterways of Cascadas de Agua Azul.
Icon of Dirt Racing Event Teotihuacan Scramble Length: 2.3 miles. 3 Laps. Looping around the mighty Pyramid of the Sun, this route follows a bumpy dirt trail through the ancient city of Teotihuacán. With enough speed you can catch some big air on the straights!
Icon of Dirt Racing Event The Gauntlet The pinnacle of dirt routes (Horizon Wilds). Length: 36.5 miles. The Gauntlet is the toughest rally trail of them all. Alternating between paved and dirt roads, it winds through the jungle, open farmland, over La Gran Caldera, and into the desert on a 36.5 mile (58.7 km) journey.
Icon of Dirt Racing Event Tulum Trail Length: 4.3 miles. A tenacious dirt trail that dives ever deeper into the Gran Pantano with each twist and turn, until you suddenly burst from the trees at the ruins of Tulum.

Cross Country Racing Events

A series of Cross Country Racing Events. The first two races will be unlocked at the beginning of the game. To unlock other cross country racing events, you must complete the Baja Expedition and thus unlock the Horizon Baja Outpost.

Icon of Cross Country Racing Event Airfield Cross Country Circuit Length: 1.8 mile. 3 Laps. A unique Cross Country experience, this abandoned airfield is very flat with rough surfaces that were once paved, meaning you can rip around at surprising speed.
Icon of Cross Country Racing Event Baja Cross Country Circuit Length: 2.4 miles. 2 Laps. If you thought the Horizon Baja Scramble wasn't brutal enough, this Cross Country Circuit spills over into the open desert, bounding through massive sand dunes.
Icon of Cross Country Racing Event Copper Canyon Cross Country Length: 3.6 miles. An intense Cross Country route that bounds along the bottom of Copper Canyon, over road, river, and even the railway! Let nothing stand in your way as you conquer this difficult terrain.
Icon of Cross Country Racing Event Costa Este Cross Country Length: 3.8 miles. Smash through the undergrowth as you follow the river towards the Playa Tranquila resort, then head around the outskirts of Playa Azul to finish by the seaside.
Icon of Cross Country Racing Event Costera Cross Country Circuit Length: 2.1 miles. 3 Laps. Leap through the hotel courtyard and on to the beach, then cut through the dunes and the golf course ready for another lap of this punishing circuit.
Icon of Cross Country Racing Event Ek' Balam Cross Country Circuit Length: 1.6 mile. 3 Laps. A compact Cross Country Circuit set among the ruins of Ek’ Balam, crossing over the boardwalks and splashing through passages beneath the ancient acropolis.
Icon of Cross Country Racing Event El Descenso Cross Country Length: 4.5 miles. Hurtle down the side of a volcano at extreme speeds, then roar across a riverbed and hop, skip and jump over a lake as you head south to finish near El Estadio Horizon.
Icon of Cross Country Racing Event Estadio Cross Country Length: 1.7 mile. 3 Laps. A route that passes straight through the centre of Estadio Horizon, complete with giant bowling pins to knock down and ramps to jump from, you'll be putting on quite a show!
Icon of Cross Country Racing Event Festival Cross Country Length: 3.2 miles. Pack your surfboards, this Cross Country is an express route from the main Horizon Festival Mexico site to the west coast resorts!
Icon of Cross Country Racing Event Foto Final Cross Country Length: 4.0 miles. Starting from the top of Copper Canyon, this route offers spectacular views of Guanajuato as it tumbles down the hillsides, ending with a photo finish at El Estadio Horizon.
Icon of Cross Country Racing Event Herencia Cross Country Circuit Length: 1.3 mile. 3 Laps. This Cross Country Circuit delicately threads between the enormous pyramid complex of Teotihuacán to create a figure-of-eight route. Perfect if you don't have much time for sight-seeing.
Icon of Cross Country Racing Event Las Dunas Cross Country Length: 4.3 miles. Starting from the “Gran Telescopio” atop the volcano, you'll rush down the western rockface to crash through the Baja Circuit, then leap across the desert dunes to arrive at the beach.
Icon of Cross Country Racing Event Las Granjas Cross Country Length: 4.2 miles. The farmer agreed with us that it would be fun to race through these fields! The route also criss-crosses the highway before finishing at Mulegé.
Icon of Cross Country Racing Event Las Ranas Cross Country Length: 3.9 miles. Start by crashing through a series of fields before following the river through Las Ranas, a valley filled with spectacular rock formations said to look like frogs.
Icon of Cross Country Racing Event Oasis Cross Country Length: 3.5 miles. Tearing across the desert, this route launches you into Mulegé with one of several epic jumps, before splashing down in the river for a bombastic finish.
Icon of Cross Country Racing Event Restos Cross Country Length: 4.8 miles. A whistle-stop tour of Mexico's heritage sites, you'll race from Teotihuacán, leap into Atlantes de Tula, and finish up in the village of San Sebastian.
Icon of Cross Country Racing Event Ribera Rocosa Cross Country Length: 3.3 miles. Starting from “De Otro Mundo” crop circles, this route leaps and bounds onto the rocky beach of Cabo San Lucas and past its distinctive arch of rock, before heading north into the desert.
Icon of Cross Country Racing Event The Titan The Grand Finale of Cross Country Racing (Horizon Baja). Length: 16.6 miles. From the top of La Gran Caldera to the depths of La Selva, this epic Cross Country route rampages across a 16.5 mile (26.5 km) tour of Mexico's wildest countryside.
Icon of Cross Country Racing Event Tropico Cross Country Length: 3.6 miles. Welcome to the jungle! Take a running jump into the ruined city of Ek’ Balam, before bursting out of the trees and into the open farmland to the north.
Icon of Cross Country Racing Event Urban Cross Country Circuit Length: 1.3 mile. 3 Laps. A small Cross Country Circuit that packs a surprising amount of verticality, resulting in some big drops. Make sure you've got the suspension to handle it!

Street Racing Events

A series of Street Racing Events. To unlock street racing events, you must complete the Guanajuato Expedition and thus unlock the Horizon Street Scene Outpost.

Icon of Street Racing Event Bosque Del Sur Length: 5.5 miles. A true test of driving ability, almost every corner is coupled with an elevation change, making it hard to read the road ahead. The race can be won or lost at the hairpin before the end!
Icon of Street Racing Event Canon Run Length: 4.9 miles. Emerging from Copper Canyon, this route thunders along the forested region of Riviera Maya, opening up to stunning views of the coast and finally arriving at Playa Azul.
Icon of Street Racing Event Carretera Chase Length: 5.7 miles. After skirting around the ancient city of Teotihuacán, this route joins the highway for a high-speed battle to the finish next to the Horizon Street Scene outpost.
Icon of Street Racing Event Castillo Del Mar Length: 4.2 miles. Loop around the west coast, passing the hotel resort, golf course, and the beachside resort near Cabo San Lucas. Put your favourite tunes on for this one.
Icon of Street Racing Event Coast Run Length: 4.7 miles. A fan favourite, spectators at Playa Azul listen out for the roar of approaching racers, then watch them blaze into the distance along the smooth coastal roads.
Icon of Street Racing Event Costa Rocosa Length: 4.9 miles. Starting in a beautiful area of the “living desert”, this route takes you around the outskirts of the Horizon Festival Mexico site, before detouring to Punta Allen and finishing at the golf course.
Icon of Street Racing Event Cruce Del Valle Length: 5.5 miles. Speed through the lava fields of San Juan, past the living desert, and over the Sierra Verde Dam. The finish line awaits at the Aeródromo en la Selva.
Icon of Street Racing Event El Lago Blanco Length: 5.4 miles. Watch out for sand that has crept on to the road in this desert hillclimb event, as you blast across Baja California and Bahía de Plano on your way inland.
Icon of Street Racing Event Festival Gatecrash Length: 5.0 miles. Starting in the shadow of la Gran Caldera volcano, this route thunders across the “Colinas Áridas”, and ends with a dramatic photo finish at the Horizon Festival Mexico site.
Icon of Street Racing Event Granjas De Tapalpa Length: 4.8 miles. This route starts out in the hillside forests but opens up into rolling farmland with flowing turns, meaning you can also open up the throttle!
Icon of Street Racing Event Guanajuato Sur Length: 4.9 miles. As this route departs the back streets of Guanajuato, the road opens up and allows for higher speeds. Loop around the hillsides, then dive back into the heart of the city to finish.
Icon of Street Racing Event Highland Climb Length: 5.5 miles. After a hard day's racing on the highway, this route is a popular way of heading back to the city for a big night out. Loser buys the drinks.
Icon of Street Racing Event Hilltop Descent Length: 4.3 miles. After cresting the hills surrounding Guanajuato, you'll start barrelling towards the coast on a steep gradient, so make sure your car is geared for top speed!
Icon of Street Racing Event Horizon Callejera Length: 3.7 miles. Departing from the Horizon Street Scene outpost, this route was chosen as a definitive Street Scene racing experience, with both high-speed straights and tricky corners for overtaking.
Icon of Street Racing Event Jungle Descent Length: 4.7 miles. Race to the river at Mulegé, starting from the lofty heights of Gran Puente. With a steep downhill section, you'll pick up a lot of speed before having to deal with a set of alternating hairpins on the home run.
Icon of Street Racing Event Las Afueras Length: 5.0 miles. Passing by the spectacular Hotel Castillo Santa Cecilia, this route dives into the city centre of Guanajuato before heading east and roaring into the open countryside.
Icon of Street Racing Event Las Laderas Length: 3.9 miles. This street race is held in the rolling hills west of Guanajuato, darting along narrow country roads. It's a good place to learn the ropes of Street Scene racing.
Icon of Street Racing Event Ruta Norte Length: 5.2 miles. Will you choose an agile setup to gain an early lead on the switchbacks, or a speed-focussed setup to sprint for the finish in the latter part of this route? The choice is yours.
Icon of Street Racing Event The Marathon The definitive street scene event (Horizon Street Scene). Length: 18.0 miles. The Marathon is the definitive Street Scene Event, with narrow city streets, a stretch of the highway, and a dramatic finish atop La Gran Puente, there is something to test the skill of every driver on this route.
Icon of Street Racing Event Tunnel Run Length: 3.5 miles. Diving underground, this route makes extensive use of Guanajuato's tunnel network before bursting onto the surface and heading back across town.
Icon of Street Racing Event Wetland Charge Length: 5.6 miles. A high-speed chase along the best roads in Mexico's jungle and swamp regions, you'll want to tune your aerodynamics to take these sweeping turns flat out.

Drag Racing Events

A series of Drag Racing Events.

Icon of Drag Racing Event Aerodromo Drag Strip Length: 1.0 mile. This derelict runway has a new lease of life as a 1 mile (1.6 km) drag strip. Runways are especially hard-wearing, so even without maintenance it's survived pretty well.
Icon of Drag Racing Event Festival Drag Strip Length: 0.6 mile. A modern desert runway that has been converted into a dedicated drag strip. Warm up the tires and lay down some rubber for a 0.6 mile (0.96 km) sprint!
Icon of Drag Racing Event Teotihuacan Drag Strip Length: 0.5 mile. Though the original surface is ancient, the central thoroughfare of Teotihuacán has been maintained for tourism in recent years, and it makes a pretty good half-mile (0.8 km) drag strip!

Showcases

Showcases are special races where you face off against unusual opponents. In each of these events you will drive a specific vehicle that will be provided to you.

Icon of Showcase Buggy And The Beast Unlockable through Horizon Baja.
Icon of Showcase Catch Me If You Canyon Unlockable through Horizon Rush.
Icon of Showcase Flood, Sweat, And Gears Unlockable through Horizon Wilds.
Icon of Showcase On A Wing And A Prayer This is the first of the showcases. You will take part in it as soon as the game starts. Reward: 1994 Hoonigan Ford Escort RS Cosworth WRC "Cossie V2".

Stories

Forza Horizon 5 Stories are special missions that tell some unique narratives, combining different types of gameplay that are available in the game.

Icon of Story Born Fast Unlockable through Horizon Street Scene. This story consists of 8 chapters.
Icon of Story El Camino Unlockable through Horizon Wilds. This story consists of 9 chapters.
Icon of Story Lucha De Carreteras Unlockable through Horizon Apex. This story consists of 8 chapters. Complete all of them to get 2017 Ford M-Sport Fiesta RS.
Icon of Story Made in Mexico This story consists of 9 chapters.
Icon of Story Test Driver: Horizon Apex This story consists of 3 chapters.
Icon of Story Test Driver: Horizon Baja This story consists of 3 chapters.
Icon of Story Test Driver: Horizon Rush This story consists of 3 chapters.
Icon of Story Test Driver: Horizon Street Scene This story consists of 3 chapters.
Icon of Story Test Driver: Horizon Wilds This story consists of 3 chapters.
Icon of Story V10 Unlockable through Horizon Baja. This story consists of 12 chapters.
Icon of Story Vocho Unlockable through Horizon Mexico. This story consists of 13 chapters. Reward: Volkswagen Beetle 1963 (You will receive your reward before chapter 13).

Playgrounds

Playgrounds are specially prepared arenas where two teams of players (or solo) face each other in various competitions.

Icon of Playground Aerodromo en La Selva Rumble in the jungle at a disused airport in the heart of the Mexican jungle.
Icon of Playground Baja Circuit Be ready for thrills and spills on this desert race track.
Icon of Playground Ek' Balam Ek' Balam, meaning "black jaguar", is an ancient Mayan city, hidden deep in the jungle.
Icon of Playground El Estadio Horizon This epic stadium is host to all sorts of Horizon Events and is perfect playground for EventLab creations!

Landmarks

If you want to find all the landmarks available in Forza Horizon 5, here is a list of all 56 of them.

Icon of Landmark Aeródromo en La Selva
Icon of Landmark Arch of Mulegé
Icon of Landmark Atlantes de Tula
Icon of Landmark Bahía de Plano
Icon of Landmark Baja California
Icon of Landmark Baja Circuit
Icon of Landmark Caldera
Icon of Landmark Cascadas de Agua Azul
Icon of Landmark Cascadas de Pantano
Icon of Landmark Club de Ópalo de Fuego
Icon of Landmark Colinas Áridas
Icon of Landmark Copper Canyon
Icon of Landmark Copper Canyon Lookout
Icon of Landmark Cordillera
Icon of Landmark Costa Rocosa
Icon of Landmark De Otro Mundo
Icon of Landmark Descansar Dorado
Icon of Landmark Dunas Blancas
Icon of Landmark Ek' Balam
Icon of Landmark El Arco de Cabo San Lucas
Icon of Landmark El Estadio Horizon
Icon of Landmark Estadio José Aguilar
Icon of Landmark Gran Pantano
Icon of Landmark Gran Puente
Icon of Landmark Gran Telescopio
Icon of Landmark Granjas de Tapalpa
Icon of Landmark Guanajuato
Icon of Landmark Horizon Apex
Icon of Landmark Horizon Baja
Icon of Landmark Horizon Festival México
Icon of Landmark Horizon Rush
Icon of Landmark Horizon Street Scene
Icon of Landmark Horizon Wilds
Icon of Landmark Hotel Castillo Santa Cecilia
Icon of Landmark Hotel Mirador Balderrama
Icon of Landmark La Gran Caldera
Icon of Landmark La Selva
Icon of Landmark Lago Blanco
Icon of Landmark Los Jardines
Icon of Landmark Misión Santa Rosalía de Mulegé
Icon of Landmark Mulegé
Icon of Landmark Palacio Azul del Océano
Icon of Landmark Pantano de La Selva
Icon of Landmark Playa Azul
Icon of Landmark Playa Tranquila
Icon of Landmark Riviera Maya
Icon of Landmark San Juan
Icon of Landmark San Sebastian
Icon of Landmark Sierra Verde Dam
Icon of Landmark Temple of Quechula
Icon of Landmark Teotihuacan
Icon of Landmark Tierra Próspera
Icon of Landmark Tulum
Icon of Landmark Universidad de Guanajuato
Icon of Landmark Uxmal
Icon of Landmark Valle de Las Ranas

Murals

A list of murals that need to be found in order to complete challenges, earn extra accolades, etc.

Icon of Mural CIX’s Mural in the Jungle Finding it is one of the Horizon Wilds Outpost challenges (The Festivals section of the Accolades tab).
Icon of Mural Farid Rueda's Bear Mural Finding it is one of the Horizon Apex Outpost challenges (The Festivals section of the Accolades tab).
Icon of Mural Farid Rueda's Lion Mural Finding it is one of the Horizon Apex Outpost challenges (The Festivals section of the Accolades tab).
Icon of Mural Raul Urias's Mural Finding it is one of the Horizon Street Scene Outpost challenges (The Festivals section of the Accolades tab).
Icon of Mural Senkoe's Mural Finding it is one of the Horizon Apex Outpost challenges (The Festivals section of the Accolades tab).
Icon of Mural Spaik's Mural Finding it is one of the Horizon Street Scene Outpost challenges (The Festivals section of the Accolades tab).
Icon of Mural Star 27's Mural in Mulege Finding it and making a photo of any modern sports car in front of it is one of the seasonal challenges.

Treasure Chests

A list of treasure chests that can be found by completing certain seasonal challenges, etc.

Icon of Treasure Chest Acura Me Treasure! Treasure Chest The prize chest location for the seasonal challenge (Series 5 - Spring). Reward 50,000 CR. To get a clue you should get at least 1 star at Horizon Baja Speed Trap in any Acura car.
Icon of Treasure Chest Blazing Thunder Treasure Chest The prize chest location for the seasonal challenge (Series 2 - Summer). Reward 50,000 CR. To get a clue you should earn 3 stars from the any Trailblazers in Alumni Craft Class 10 Race Car 2015. Note: This challenge is currently bugged for many people, especially those who have completed all trailblazers. The circle indicating where to find the treasure does not appear.
Icon of Treasure Chest Blind Slided Treasure Chest The prize chest location for the seasonal challenge (Series 4 - Spring). Reward 50,000 CR. To get a clue you should earn 2 stars (75,000 points) from the Las Dunas Drift Zone in 1989 Porsche #65 Rothsport Racing 911 "Desert Flyer".
Icon of Treasure Chest Double Up Treasure Chest The prize chest location for the seasonal challenge (Series 6 - Autumn). Reward Painter Hoodie (Clothing). To get a clue you should get and upgrade 1973 AMC Gremlin X and accelerate it to 200 mph.
Icon of Treasure Chest Dragstrip Demons Treasure Chest The prize chest location for the seasonal challenge (Series 9 - Autumn). Reward 100 #FORZATHON Points. To get a clue you should win one of the Drag Racing Events while driving 2018 Dodge Challenger SRT Demon. Note: A bug can cause a chest to be invisible in the PC version. In this case it helps to log into the game on the Xbox console.
Icon of Treasure Chest Dune Buggy Treasure Chest The prize chest location for the seasonal challenge (Horizon Road Trip - Autumn). Reward 100 #FORZATHON Points. To get a clue win any cross country race in any car from the "Buggies" category.
Icon of Treasure Chest Fame and Fortune Treasure Chest The prize chest location for the seasonal challenge (Horizon 10 Year Anniversary - Spring). Reward 250,000 CR. To get a clue you should earn at least 1 star at the Airfield Speed Zone while driving the 1945 Willys MB Jeep.
Icon of Treasure Chest Fast Track Treasure Chest The prize chest location for the seasonal challenge (Horizon Road Trip - Summer). Reward 100 #FORZATHON Points. To get a clue win any race in any car from the "Track Toys" category.
Icon of Treasure Chest Fine Tuned Treasure Chest The prize chest location for the seasonal challenge (Series 6 - Spring). Reward 100 #FORZATHON Points. To get a clue you should get and tune 1992 Ford Escort RS Cosworth and win any Road Racing Sprint Race.
Icon of Treasure Chest Fireflies Treasure Chest The prize chest location for the seasonal challenge (Series 7 - Summer). Reward 100 #FORZATHON Points. To get a clue you should get 5 stars in total at Danger Signs while driving any Pontiac Firebird, for example 1977 Pontiac Firebird Trans AM.
Icon of Treasure Chest Flying Customs Treasure Chest The prize chest location for the seasonal challenge (Series 9 - Summer). Reward 100 #FORZATHON Points. To get a clue you should complete at least the first round of the Air Horizon Arcade Event while driving 1967 Chevrolet Corvette Stingray 427. Note: A bug can cause a chest to be invisible in the PC version. In this case it helps to log into the game on the Xbox console.
Icon of Treasure Chest Give Me Five Treasure Chest The prize chest location for the seasonal challenge (Rami's Racing History - Summer). Reward 100 #FORZATHON Points. To get a clue you have to drive 5 miles in 1932 Ford De Luxe Five-Window Coupe.
Icon of Treasure Chest High Five Treasure Chest The prize chest location for the seasonal challenge (Series 3 - Spring). Reward 50,000 CR. To get a clue you should earn 5 stars in total from the Danger Signs in the 2020 Land Rover Defender 110X.
Icon of Treasure Chest High Jump Treasure Chest The prize chest location for the seasonal challenge (Series 8 - Winter). Reward 100 #FORZATHON Points. To get a clue you should get at least 1 stars at Heights of Mulege danger sign while driving 2016 Mercedes-AMG C 63 S COUPE.
Icon of Treasure Chest Hold Your Horses Treasure Chest The prize chest location for the seasonal challenge (Series 1 - Spring). Reward 50,000 CR. To get a clue you should earn 10 stars from PR Stunts in any Mustang.
Icon of Treasure Chest Hot and Sandy Treasure Chest The prize chest location for the seasonal challenge (Series 10 - Spring). Reward 100 #FORZATHON Points. To get a clue you have to get at least one star at the Sand and Deliver trailblazer hile driving any electric car.
Icon of Treasure Chest Incey Wincey Spyder Treasure Chest The prize chest location for the seasonal challenge (Series 5 - Autumn). Reward 50,000 CR. To get a clue you should jump to the other side of the river at the Salto De Rio Danger Sign in 2014 Porsche 918 Spyder.
Icon of Treasure Chest Lucky Skills Treasure Chest The prize chest location for the seasonal challenge (Series 2 - Autumn). Reward 50,000 CR. To get a clue you should earn 35(?) wreckage skills in 2017 Nissan GT-R (R35). You can do this anywhere but imo the fastest way is to destroy lampposts, signs, guardrails, etc on the highway.
Icon of Treasure Chest New Heights Treasure Chest The prize chest location for the seasonal challenge (Series 1 - Summer). Reward 50,000 CR. To get a clue you should earn 2 stars from the Heights of Mulege Danger Sign in the Chevrolet C8 Corvette Stingray 2020.
Icon of Treasure Chest On Target Treasure Chest The prize chest location for the seasonal challenge (Series 4 - Winter). Reward 50,000 CR. To get a clue you should hit 5 bullseye targets in the 2017 Ford M-Sport Fiesta RS. You can do this while doing Air Horizon Arcade Events. But it's much faster to search for player made event blueprints. Go to Creative Hub > Eventlab > Event Blueprints > Search > Title = type "On Target".
Icon of Treasure Chest On Top Of The World Treasure Chest The prize chest location for the seasonal challenge (Series 7 - Winter). Reward 100 #FORZATHON Points. To get a clue you should get 3 stars at Puerta Petrea trailblazer while driving any car.
Icon of Treasure Chest Power Up Treasure Chest The prize chest location for the seasonal challenge (Series 8 - Summer). Reward 100 #FORZATHON Points. To get a clue you should get at least 1 stars at Trebol speed zone while driving 2020 Porshe Taycan Turbo S.
Icon of Treasure Chest Practical Metal Treasure Chest The prize chest location for the seasonal challenge (Series 10 - Winter). Reward 100 #FORZATHON Points. To get a clue you have to win the Copper Canyon Cross Country racing event while while driving any electric car.
Icon of Treasure Chest Race Against Time Treasure Chest The prize chest location for the seasonal challenge (Rami's Racing History - Winter). Reward 100 #FORZATHON Points. To get a clue you have to win any race while driving 1999 Ford Racing Puma.
Icon of Treasure Chest Rally on the Wild Side Treasure Chest The prize chest location for the seasonal challenge (Horizon Road Trip - Spring). Reward 100 #FORZATHON Points. To get a clue win any dirt race in any car from the "Retro Rally" category.
Icon of Treasure Chest Speed Machines Treasure Chest The prize chest location for the seasonal challenge (Series 9 - Spring). Reward 100 #FORZATHON Points. To get a clue you should get three stars at any of the Speed Zones while driving 1983 Volkswagen Golf GTI.
Icon of Treasure Chest Super Street Treasure Chest The prize chest location for the seasonal challenge (Horizon Road Trip - Winter). Reward 100 #FORZATHON Points. To get a clue win any street race in any car from the "Super Hot Hatch" category.
Icon of Treasure Chest Sustanable Energy Treasure Chest The prize chest location for the seasonal challenge (Series 10 - Autumn). Reward 100 #FORZATHON Points. To get a clue you should , while driving in Guanajuato, you must maintain a speed of 100 mph for at least 15 seconds while driving any electric car, such as a 2021 Ford Mustang Mach-E 1400.
Icon of Treasure Chest Too Cool To Air Treasure Chest The prize chest location for the seasonal challenge (Series 2 - Spring). Reward 50,000 CR. To get a clue you should earn 25 air skills in 1957 Chevrolet Bel Air.
Icon of Treasure Chest Tropical Fruits Treasure Chest The prize chest location for the seasonal challenge (Series 10 - Summer). Reward 100 #FORZATHON Points. To get a clue you should get 5 Cart Wheels skills while driving any of the electric cars. In order to get this skill you must directly hit the Wheeled Carts.