Welcome to guides4gamers.com

Forza Horizon 5 Map - Hot Wheels

Forza Horizon 5 Hot Wheels Map. An interactive map of the fictional terrains that were added to Forza Horizon 5 it the Hot Wheels DLC. It shows the locations of collectibles and various activities such as XP Boards, Tank Balloons, Landmarks, Speed Racing Events, Hazard Racing Events, Danger Signs, Speed Zones, Speed Traps, Drift Zones and more.

Where / how to get off the tracks?

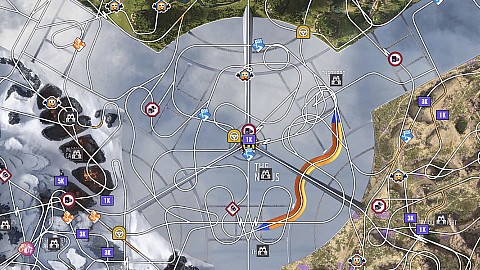
Getting off the tracks onto the ground is necessary to reach most of the XP boards or tank balloons. Most of the tracks have barriers preventing you from leaving them, but in the places marked on the ingame map as orange sections with a white dashed line in the middle the tracks run on the ground and barriers are not there so it is possible to get off the tracks there. There are some other places on the tracks where there are also no barriers but they are located above the ground and it is necessary to jump down and land properly on the ground below. They are not marked on the map.

Hot Wheels Park

Hot Wheels Park - Map Markers Summary

Tank Balloons x20, XP Boards (5K) x5, XP Boards (3K) x10, XP Boards (1K) x10, Landmarks / Areas x28, Festival Site x1, Hot Wheels Qualifiers x4, Speed Traps x5, Danger Signs x5, Speed Zones x5, Drift Zones x5, Hazard Racing Events x8, Speed Racing Events x10, Stories x5, Other x3

Legend / Points of interest

The following legend of Hot Wheels Park interactive game map defines the points of interest / markers displayed on the map. Each marker corresponds to a specific element to facilitate efficient navigation and interaction with the map.

Icon of Other (Hot Wheels) Hot Wheels Park Tour (Finish Location) This is the place you should reach in order to complete the "Hot Wheels Park Tour" mission. You should start at the Hot Wheels Park Tour (Starting Location).
Icon of Other (Hot Wheels) Hot Wheels Park Tour (Starting Location) Starting location for the "Hot Wheels Park Tour" major mission (Pro Rank - A). You need to get to the Hot Wheels Park Tour (Finish Location).
Icon of Other (Hot Wheels) Tank Balloon #16 (Starting Location) Get down on the concrete span below (the railing is breakable) and you will get to the ramp and Tank Balloon #16 this way.

Tank Balloons

Tank Balloons are giant balloons that you can find all over the Forza Horizon 5: Hot Wheels map. A total of 20 such balloons can be found. They are suspended in the air and will usually require a ramp to get to.

Icon of Tank Balloon Tank Balloon #1
Icon of Tank Balloon Tank Balloon #2
Icon of Tank Balloon Tank Balloon #3
Icon of Tank Balloon Tank Balloon #4 There is a ramp nearby that you should use.
Icon of Tank Balloon Tank Balloon #5
Icon of Tank Balloon Tank Balloon #6
Icon of Tank Balloon Tank Balloon #7
Icon of Tank Balloon Tank Balloon #8
Icon of Tank Balloon Tank Balloon #9
Icon of Tank Balloon Tank Balloon #10
Icon of Tank Balloon Tank Balloon #11
Icon of Tank Balloon Tank Balloon #12
Icon of Tank Balloon Tank Balloon #13 Jump into the air using a nearby hill.
Icon of Tank Balloon Tank Balloon #14 The track running nearby does not have a barrier at this location.
Icon of Tank Balloon Tank Balloon #15
Icon of Tank Balloon Tank Balloon #16 The ramp you can use to get to this balloon is located on the concrete span below the tracks. You can get there by starting at the place marked as "Tank Balloon #16 (Starting Location)" on the map.
Icon of Tank Balloon Tank Balloon #17
Icon of Tank Balloon Tank Balloon #18
Icon of Tank Balloon Tank Balloon #19
Icon of Tank Balloon Tank Balloon #20

XP Boards (5K)

XP Boards, Hot Wheels are a type of collectibles with which you can gather some bonus experience. Here are the boards that will grant you 5,000 XP.

Icon of XP Board 5,000 XP The board is located at the base of the waterfall.
Icon of XP Board 5,000 XP
Icon of XP Board 5,000 XP The board is located at the base of the waterfall.
Icon of XP Board 5,000 XP

XP Boards (3K)

XP Boards, Hot Wheels are a type of collectibles with which you can gather some bonus experience. Here are the boards that will grant you 3,000 XP.

Icon of XP Board 3,000 XP

XP Boards (1K)

XP Boards, Hot Wheels are a type of collectibles with which you can gather some bonus experience. Here are the boards that will grant you 1,000 XP.

Icon of XP Board 1,000 XP
Icon of XP Board 1,000 XP The board is located at the base of the waterfall.
Icon of XP Board 1,000 XP

Landmarks / Areas

If you want to find and visit all the areas / landmarks available in Forza Horizon 5: Hot Wheels, here is a list of all of them. Note: The "dragon landmarks" or festival site don't have markers on the map and that seems to be intentional but two other markers: The Knot Rock and The Supersonic Spiral don't have map markers either and it seems to be a bug (at least for me :-) It's just a map display bug because I was able to find all 28/28.

Icon of Landmark Bonedust Pit
Icon of Landmark Cloud Forest
Icon of Landmark Dragon's Fall
Icon of Landmark Forest Falls
Icon of Landmark Forest Falls Dragon
Icon of Landmark Frostbite Flame Loop
Icon of Landmark Giant's Canyon
Icon of Landmark Hammer Mountain
Icon of Landmark Hammer Mountain Dragon
Icon of Landmark Hot Wheels Outpost
Icon of Landmark Hydra Gorge
Icon of Landmark Hydra's Revenge
Icon of Landmark Ice Cauldron Dragon
Icon of Landmark Magma Canyon
Icon of Landmark Supersonic Speedway
Icon of Landmark The Cauldron
Icon of Landmark The Duo-naught
Icon of Landmark The Forgotten Gorge
Icon of Landmark The Frozen Apostles
Icon of Landmark The Hammer Drop
Icon of Landmark The Ice Cauldron
Icon of Landmark The Knot Rock It is just a guess that this landmark is located somewhere here. It is probably bugged and currently does not appear on the map, but I scored it near this location (check the screenshot).
Icon of Landmark The Lookout
Icon of Landmark The Nexus
Icon of Landmark The Ram
Icon of Landmark The Supersonic Spiral No marker on the map (a bug?), but I scored it near this location (check the screenshot).
Icon of Landmark The Turbo Clef
Icon of Landmark Treetop Towers

Festival Sites

There is only one festival site on the map released in the Hot Wheels DLC.

Icon of Festival Site Horizon Hot Wheels Outpost To unlock it you must complete the Hot Wheels Expedition. This is the main festival site of Hot Wheels DLC.

Hot Wheels Qualifiers

Hot Wheel Qualifiers are special story missions that are made available when you earn enough medals and which you must complete to unlock the next stage of the Hot Wheels Academy.

Icon of Story Bad To The Blade Runner Hot Wheels Elite Qualifier (S2). ★ 6 mins ★★ 1 min 55 secs ★★★ 1 min 40 secs
Icon of Story Ice, Ice, Maybe? Hot Wheels Rookie Qualifier (B). ★ 20 mph / 32 km/h ★★ 80 mph / 129 km/h ★★★ 100 mph / 161 km/h
Icon of Story Now This Isn't Pod Racing Hot Wheels Expert Qualifier (S1). ★ 6 mins ★★ 3 mins 20 secs ★★★ 2 mins 30 secs
Icon of Story Surf's Down Hot Wheels Pro Qualifier (A). ★ 6 mins ★★ 2 mins 30 secs ★★★ 2 mins

Speed Traps

Speed Traps, Hot Wheels are places on the track where your current speed will be measured. The speed measurement takes place when you drive in any direction through a gate located at that location. Mark (B) (A) (S1) or (S2) specifies at which stage of the Hot Wheels Academy the PR Stunt will become available.

Icon of Speed Trap Dragon's Fall Speed Trap (S2) ★ 200 mph / 321.9 km/h ★★ 220 mph / 354.1 km/h ★★★ 230 mph / 370.1 km/h
Icon of Speed Trap Forest Edge (S1) ★ 210 mph / 338.0 km/h ★★ 230 mph / 370.1 km/h ★★★ 240 mph / 386.2 km/h
Icon of Speed Trap Hammer's Shadow (S2) ★ 185 mph / 297.7 km/h ★★ 200 mph / 321.9 km/h ★★★ 220 mph / 354.1 km/h
Icon of Speed Trap Horizon Nexus (A) ★ 200 mph / 321.9 km/h ★★ 215 mph / 346.0 km/h ★★★ 225 mph / 362.1 km/h
Icon of Speed Trap Nexus View (B) ★ 100 mph / 160.9 km/h ★★ 135 mph / 217.3 km/h ★★★ 140 mph / 225.3 km/h

Danger Signs

Danger Signs, Hot Wheels in Forza Horizon 5: Hot Wheels are special challenges in which you have to make a jump from a special ramp and fly as far as possible in the air. Mark (B) (A) (S1) or (S2) specifies at which stage of the Hot Wheels Academy the PR Stunt will become available.

Icon of Danger Sign Canyon Fire (A) ★ 500 ft / 152.4 m ★★ 900 ft / 274.3 m ★★★ 1,100 ft / 335.3 m
Icon of Danger Sign Canyon Jump (S1) ★ 900 ft / 274.3 m ★★ 1,000 ft / 304.8 m ★★★ 1,100 ft / 335.3 m
Icon of Danger Sign Forest Escape (S2) ★ 900 ft / 274.3 m ★★ 980 ft / 298.7 m ★★★ 1,025 ft / 312.4 m
Icon of Danger Sign Forest Leap (S2) ★ 1,050 ft / 320.0 m ★★ 1,175 ft / 358.1 m ★★★ 1,250 ft / 381.0 m
Icon of Danger Sign Ice Crash (A) ★ 900 ft / 274.4 m ★★ 1,000 ft / 304.8 m ★★★ 1,300 ft / 396.2 m

Speed Zones

Speed Zones, Hot Wheels are track sections where your average speed over the entire distance will be measured. Speed recording starts when you drive in the right direction through one of the two gates located on both sides of the designated track section. Mark (B) (A) (S1) or (S2) specifies at which stage of the Hot Wheels Academy the PR Stunt will become available.

Icon of Speed Zone Forest Flume (S2) ★ 145 mph / 233.4 km/h ★★ 165 mph / 265.5 km/h ★★★ 175 mph / 281.6 km/h
Icon of Speed Zone Frozen Rush (S1) ★ 120 mph / 193.1 km/h ★★ 135 mph / 217.3 km/h ★★★ 145 mph / 233.4 km/h
Icon of Speed Zone Supersonic Spiral (S1) ★ 110 mph / 177.0 km/h ★★ 130 mph / 209.2 km/h ★★★ 140 mph / 225.3 km/h
Icon of Speed Zone The Ribbon (B) ★ 75 mph / 120.7 km/h ★★ 115 mph / 185.1 km/h ★★★ 125 mph / 201.2 km/h
Icon of Speed Zone Treetops (A) ★ 100 mph / 160.9 km/h ★★ 140 mph / 225.3 km/h ★★★ 145 mph / 233.4 km/h

Drift Zones

Drift Zones, Hot Wheels are sections of track where your drifting skills will be rated. The evaluation starts when you drive onto the defined section of the track from either side. Mark (B) (A) (S1) or (S2) specifies at which stage of the Hot Wheels Academy the PR Stunt will become available.

Icon of Drift Zone Horizon Nexus (S1) ★ 80,000 ★★ 110,000 ★★★ 125,000
Icon of Drift Zone Ice Cauldron (S2) ★ 130,000 ★★ 140,000 ★★★ 160,000
Icon of Drift Zone Rockslide (A) ★ 80,000 ★★ 160,000 ★★★ 170,000
Icon of Drift Zone Turbo Knot (S2) ★ 140,000 ★★ 160,000 ★★★ 190,000
Icon of Drift Zone Water's Edge (S1) ★ 80,000 ★★ 100,000 ★★★ 130,000

Hazard Racing Events

Icon of Hazard Racing Event Canyon's Drop Hazard Sprint (A) Length: 4.5 miles. Leave the track and drop down into the depths of Giant's Canyon in this Hazard Sprint that will test any offroad car.
Icon of Hazard Racing Event Forest Falls Hazard Sprint (B) Length: 4.2 miles. Explore the wilds of Forest Falls in this punishing Hazard Sprint.
Icon of Hazard Racing Event Forest Gorge Hazard Sprint (B) Length: 3.8 miles. Enjoy the scenic views in this Hazard Sprint but watch out for the Rumble Track.
Icon of Hazard Racing Event Ice Canyon Hazard Sprint (B) Length: 4.7 miles. This Hazard Sprint is treacherous, complete with an ice lake, canyon and deep snow.
Icon of Hazard Racing Event Ice Loop Hazard Sprint (A) Length: 4.2 miles. The Ice Track section and technical corners of this Hazard Sprint are best taken with caution.
Icon of Hazard Racing Event Lava Loop Hazard Sprint (S1) Length: 5.5 miles. This Hazard Sprint will test you with a loop and Rumble Track.
Icon of Hazard Racing Event Snow Fields Hazard Circuit (S1) Length: 3.3 miles. Race around the Ice Cauldron and watch out for the section of Ice Track.
Icon of Hazard Racing Event Volcano Pass Hazard Sprint (A) Length: 4.9 miles. Keep an eye out for the Rumble Track and try to keep cool as you race past the Ice Cauldron volcano.

Speed Racing Events

Icon of Speed Racing Event Canyon Loop Speed Sprint (S1) Length: 5.8 miles. High speed sections and intense stunts will test your car as it races through Giant's Canyon.
Icon of Speed Racing Event Canyon Racer Speed Sprint (S2) Length: 3.7 miles. Race through the heart of Giant's Canyon in this stunt filled high Speed Sprint.
Icon of Speed Racing Event Canyon's Edge Speed Sprint (S2) Length: 5.1 miles. Race around the rocks of Giant's Canyon before finishing this Speed Sprint in Forest Falls.
Icon of Speed Racing Event Dragon's Fall Speed Circuit (S1) Length: 5.2 miles. Race around the Ice Cauldron volcano and drop down into the heart of it.
Icon of Speed Racing Event Hot Wheels Goliath Length: 16.4 miles. The “Legend Maker”, this giant Hot Wheels race is the ultimate test at Hot Wheels Park.
Icon of Speed Racing Event Nexus Speed Circuit (S2) Length: 5.0 miles. Show off to the fans at the Hot Wheels Outpost as you race circuit in The Nexus.
Icon of Speed Racing Event Nexus Speed Sprint (S1) Length: 6.7 miles. This high-Speed Sprint twists and turns around The Nexus; ideal for high speed cars.
Icon of Speed Racing Event Ram's Head Speed Sprint (S2) Length: 4.0 miles. This technical Speed Sprint will see you tackling half of The Ram.
Icon of Speed Racing Event Twin Loop Speed Circuit (S2) Length: 5.4 miles. Multiple loops will test your skill as you race around Giant's Canyon on this Speed Circuit.
Icon of Speed Racing Event Waterslide Speed Circuit (A) Length: 5.7 miles. Race past the giant trees and waterfalls but hold your nerve when it comes to the Water Flume section.

Stories

Stories, Hot Wheels are special missions that tell some unique narratives, combining different types of gameplay that are available in the game.

Icon of Story Hot Wheels: A History of Speed #1 (The Beginning) ★ 6 mins ★★ 3 mins 30 secs ★★★ 2 mins 40 secs
Icon of Story Hot Wheels: A History of Speed #2 (The Iconic Orange Track) ★ 329 ft / 101 m ★★ 788 ft / 241 m ★★★ 1,198 ft / 366 m
Icon of Story Hot Wheels: A History of Speed #3 (The Snake & The Mongoose) ★ 5 mins ★★ 2 mins ★★★ 1 min 20 secs
Icon of Story Hot Wheels: A History of Speed #4 (Treasure Hunting) ★ 5 ★★ 20 ★★★ 25
Icon of Story Hot Wheels: A History of Speed #5 (Hot Wheels Today) ★ 5 mins ★★ 3 mins ★★★ 2 mins 20 secs