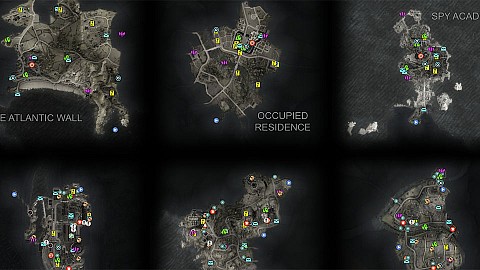
Campaign Maps - Map Markers Summary
Personal Letters x41, Stone Eagles x24, Hidden Items x24, Classified Documents x39, Workbenches x24, Kill Targets x8, Cardboard Pigeons x10, Gnomes x10, Medal-Related x21, Keys & Codes x46, Satchel Charge x82, Alarms x30, Alarm Sirens x26, Tanks x8, Bolt Cutters x42, Crowbars x47, Starting Locations x26, Exfiltrate Locations x11, Weapons x45, Main Objectives x28, Optional Objectives x21, Poison x1, Rat Bombs x2, Fuse Boxes x8, Passages x7
The following legend of Campaign Maps interactive game map defines the points of interest / markers displayed on the map. Each marker corresponds to a specific element to facilitate efficient navigation and interaction with the map.
Personal Letters are special collectible documents we look for in Sniper Elite 5. You need to collect 41 of them to unlock the "From Paris with Love" achievement / trophy.
Barely Escaped!
Boches At The Door
This letter is lying on the couch that stands in a room on the first floor.
Brother, I Have A Plan
You will find this letter in a small room above the entrance gate of the castle.
Clean Out The Sewer
You'll find it as soon as you enter the sewers.
Confiscated Goods
Drops from a soldier.
Do Not Be Late!
Drops from one of the soldiers.
Do Not Fail Me, Nephew
You will find this letter on the desk in the office located on the second / middle floor of the castle.
Ehrlich's Done For
Escaping Islanders
Fragile, Do Not Break
Getting Off The Island
You can find it on a table in the basement of a small house that you can get to by climbing down a ladder. Right next to it you will find Crystal Radio.
Give Me Strength
Good Plan Let's Do It
You will find this letter in the sniper's hideout. It sits on a small chest.
Harass The Huns!
It is lying on a table in the same basement as the SMG Workbench is in.
He's Not The Sharpest
In a locked crate (Crowbar).
I Can't Work Like This!
It's Easy Money
It's Not Over Yet!
Just Attend One
Drops from an officer. If he has not been alerted then you should find him at the top of the church tower.
Klaus! You Idiot!
Losing The Time
Möller Is Moving!
Need A Scapegoat
No Need To Worry
Drops from an officer.
Parking Problems
This note lies on a trash can.
Pests In The Garden
On a table in a gazebo at the end of the boardwalk.
Picked Some Violets
The letter sits on a crate that you will find near a small building.
Sheers' Notebook
The Suspense
The V2's Are Obsolete!
They're Out There
Drops from one of the soldiers.
Thinking Outside The Box
Upcoming Delivery
This letter is located in the attic of the building.
Vengeance Is Nigh!
You will find it in the attic of the building.
Violet's Don't Wilt
You will find this letter in the safe located in a small room on the upper floor of the building.
Violets Are Wilting
You will find this letter in the attic of the building. To get there go to the upper floor of the building and then use the ladder.
Watch Your Back
You will find it in the corpse of one of the soldiers you come across here.
We Had A Deal!
Your Man Talked!
Upper floor of the building. You need the Building Key to unlock this room.
Your Order Awaits
Stone Eagles are Dead-eye targets that you simply have to destroy with an accurate shot. You need to destroy 24 of them to unlock the "Eagle Eyed" achievement / trophy.
Stone Eagle #01
Outside the map area. It sits on the chimney of a house.
Stone Eagle #02
This eagle sits atop a bunker.
Stone Eagle #03
The eagle is located on the roof of the building.
Stone Eagle #04
This eagle is on top of a chimney on the roof of one of the buildings.
Stone Eagle #05
The eagle sits on the edge of a river cliff. You can shoot at it while standing on the bridge.
Stone Eagle #06
The eagle is located on the roof of the building. You can shoot it from the inner courtyard.
Stone Eagle #07
You can shoot down this eagle relatively early, while still on the beach, or a little later when you enter the town.
Stone Eagle #08
The eagle is located on the side of one of the towers. You can shoot it while standing on the road passing nearby.
Stone Eagle #09
The eagle stands on the rocks on a small island located near where you will be leaving the mission area.
Stone Eagle #10
An eagle stands atop the ruins.
Stone Eagle #11
Stone Eagle #12
The eagle stands on top of a building standing outside the mission area, and you can shoot it while you are near the exfiltrate point.
Stone Eagle #13
The eagle is located on top of the church tower.
Stone Eagle #14
Stone Eagle #15
Stone Eagle #16
Stone Eagle #17
Stone Eagle #18
Stone Eagle #19
Stone Eagle #20
Stone Eagle #21
Stone Eagle #22
Stone Eagle #23
This eagle can be shot down through the Sea View Offices window.
Stone Eagle #24
You can shoot this eagle while standing on the road near where the Tank is.
Hidden Items are various items that can be found during missions. You need to collect 24 of them to unlock the "Souvenir hunter" achievement / trophy.
An "Original" Adolf
Comfort Bag
Covert Ops Field Manual
Crystal Radio
You can find it on a table in the basement of a small house that you can get to by climbing down a ladder. Right next to it you will find the "Getting Off The Island" personal letter.
Engraved Lighter
FFI Flag
Gold Pocket Watch
Group Statuette
You will find this item in a locked crate (Pick Lock or Bolt Cutters) in the same room as the personal letter "Brother, I Have A Plan".
I-400 V2 Hanger
Kriegsmarine Playing Cards
The cards sit on a table at the bar.
Lucky Rabbit's Foot
Kill the soldier you come across near the glider wreckage and you will find this in his corpse.
Luftwaffe Playing Cards
Old Man Statuette
In a locked safe hidden behind a painting (to open it you need safe code which you will learn after reading Do Not Fail Me, Nephew letter or Satchel Charge).
P.1000 Ratte Plans
Peenemünde Lab ID
Prüfstand XII Plans
Radio Tin
Resistance Photo
The photo lies on a small table in a room on the upper floor of the building.
Soldier Statuette
Kill the sniper and loot his corpse.
Stealth Plating
Stolen Medals
Stolen Tantō
To get to this room you need Sewer Pump Room Key or Satchel Charge. You need a crowbar to open the crate.
TODT Uniform Badge
Classified Documents are special collectible documents we look for in Sniper Elite 5. You need to collect 39 of them to unlock the "Burn after reading" achievement / trophy.
A Surplus Bridge
A-4B Logistical Issues
Armoury Exposed
In the room at the top floor of the building.
Atlantikwall Report
The documents are in a safe which is located on the first floor of the building. One of the local soldiers has the code (Northern Farm Safe Code). You can also use a Satchel Charge.
Beach Defences
In a locked safe (Battery Armoury Safe Code or Satchel Charge).
Broken Resistance
Bureaucratic OAF!
Cut Costs Cost Lives
Dr Jungers' Schedule
One of the places where you can find this document. You only need to collect one of these.
Dr Jungers' Schedule
One of the places where you can find this document. You only need to collect one of these.
Dr Jungers' Schedule
One of the places where you can find this document. You only need to collect one of these.
Drastic Measures
At the ground level.
Flagship Fuel Risks
In a safe in a locked room (Hotel Key or Satchel Charge) located at the upper floor. You can also enter through the window. Read the "It's Not Over Yet!" letter to learn the code to the safe.
Grateful Thanks
It's in a hidden side room of the Möller's office.
Grin And Bear It!
In a locked Safe (Hommet Safe Combination or Satchel Charge). You can get into the room by climbing the vines and through the window.
Hold The Line
Immediate Request for Attic Repairs
Inbound Deliveries
In a locked safe (Office Key or Satchel Charge).
Incoming Armour
Increase Security!
Intruder Sighted
It is owned by a soldier who patrols the area.
Intruder Sighted
Lacking Air Support
In the bunker, in a locked safe (Radar Bunker Safe Code or Satchel Charge).
New Orders, Effective Immediately
One of the places where you can find this document. You only need to collect one of these.
New Orders, Effective Immediately
One of the places where you can find this document. You only need to collect one of these.
New Orders, Effective Immediately
One of the places where you can find this document. You only need to collect one of these.
No More Games
Oafish Officers
Operation Kraken
It's in a hidden side room of the Möller's office.
Orders Of The Day
One of the places where you can find this document. You only need to collect one of these.
Orders Of The Day
One of the places where you can find this document. You only need to collect one of these.
Orders Of The Day
One of the places where you can find this document. You only need to collect one of these. In a locked crate (Pick Lock or Bolt Cutters).
Orders Of The Day
One of the places where you can find this document. You only need to collect one of these.
Pressurisation Report
Priority Package!
Priority Pick Up
The documents are lying in the attic.
Renovations Completed
This document sits on a desk in Möller's office.
Resistance Captured
Collecting this document is the main objective of the mission.
Resistance Fanatic Located
In a locked room on the upper floor (Pick Lock or Bolt Cutters).
Resource Request
You will find this documents at the top of the church tower.
Secure Radio Lines
Training Scenarios
Transport Troubles
Unfit For Duty
It lies on a cabinet standing in a room on the upper floor of the house.
Won't Be Attending
In the room at the top floor of the building. The same room as the "Armoury Exposed" classified document.
At the Workbenches, you can choose which weapons you will have equipped, and customise them by adding Attachments. The first time you use each new workbench, you'll unlock new Attachments. When you interact with 24 workbenches you will unlock the "Tinkerer" achievement.
Pistol Workbench
In a locked armory building (Armory Key or Satchel Charge).
Unlocks: Pistol Mobility Mods.
Pistol Workbench
This workbench is located in a locked room, which you can get to if you have a key or an explosive charge.
Unlocks: Pistol Magazine Tech.
Pistol Workbench
Unlocks: Pistol Contraband Crate.
Pistol Workbench
Unlock: Pistol Rate Of Fire Pack.
Pistol Workbench
Unlocks: Pistol Suppressor Kit.
In the locked Radio Room (Refinery Armoury Key or Satchel Charge).
Pistol Workbench
You will get here through a hole in the roof.
Unlocks: Pistol Recoil Control Crate.
Pistol Workbench
In the cave. The entrance to the cave is near the waterfall.
Unlocks: Pistol Stealth Supplies.
Pistol Workbench
To open the door inside the church that leads here you will need the Crypt Key or Satchel Charge. But you can also get here through a hole in the roof.
Unlocks: Pistol Power Package.
Rifle Workbench
You can get here in two ways. By shooting the padlock on the door or by climbing the vines.
Unlocks: Rifle Rate of Fire Kit.
Rifle Workbench
This workbench is located in the basement of the castle.
Unlocks: Rifle Stealth Supplies.
Rifle Workbench
In a locked (Pick Lock or Bolt Cutters) room on the upper floor of the building.
Unlocks: Rifle Power Package.
Rifle Workbench
Unlocks: Rifle Magazine Mods.
Rifle Workbench
Get to the locked room (Pick Lock or Bolt Cutters) and then use the ladder to go down.
Unlocks: Rifle Mobility Tech.
Rifle Workbench
In a room in the tower of the church. You need to climb up the outer wall of the tower there.
Unlocks: Rifle Suppressor Tech.
Rifle Workbench
Unlocks: Rifle M40 Conversion Case.
Rifle Workbench
You need Armoury Key or Satchel Charge to get inside this room.
Unlocks: Rifle Control Cache.
SMG Workbench
The workbench is located in the attic. You can get there by climbing the vines. Unlocks: SMG Magazine Mods.
SMG Workbench
You can get here by climbing up the walls on the roadside south-east of the workbench marker.
Unlocks: SMG Suppressor Pack.
SMG Workbench
The workbench is located on the top floor of the building which you can reach by climbing the vines that grow on the outer walls of the building.
Unlocks: SMG Control Kit.
SMG Workbench
In the basement of the building. When you enter the house then you have to crawl under the table and go down the ladder.
Unlocks: SMG Power Cache.
SMG Workbench
Unlocks: SMG Stealth Supplies.
SMG Workbench
Locked room (Shipping Armoury Key or Satchel Charge).
Unlocks: SMG Rate Of Fire Kit.
SMG Workbench
Unlocks: SMG Control Package.
SMG Workbench
Unlocks: SMG Mobility Package.
Kill List Targets are the enemy leaders marked for death. Eliminate them for bonus XP. Use a specific method to kill them, and you will earn a unique weapon by doing so.
Steffen Beckendorf
He cruises around the town streets in his car and occasionally gets out of it.
Kill Challenge: Kill Beckendorf with an explosion. A simple grenade will do. Reward: M.Pist.40.
Friedrich Kümmler
Kill Challenge: Crush him with one of the Chateau's chandeliers. Get to the upper balcony and sabotage the chandelier controls when Kümmler is under the chandelier. The chandelier will fall and kill him. Reward: K98k.
Fabian Richter
Kill Challenge: Kill the target using a stealth takedown. Reward: P08.
Matthaus Ehrlich
Kill Challenge: Kill Ehrlich using a rat bomb.
Lanzo Baumann
Kill Challenge: Kill Baumann by burying him in concrete.
Jaan Trautman
Kill Challenge: Kill Trautmaan with poison.
Christian Jungers
Kill Challenge: Kill Dr Jungers With a V2.
Shinji Yoshikawa
Kill Challenge: Kill Yoshikawa with a Japanese weapon (Type 100, Type 14 Nambu).
You need to find and shoot 10 Cardboard Pigeons on Beaumont-Saint-Denis to earn "Pigeon Hunter" medal.
Cardboard Pigeon #6
Cardboard Pigeon #7
Cardboard Pigeon #8
Cardboard Pigeon #9
Cardboard Pigeon #10
You need to find and shoot 10 Gnomes in Guernsey to earn "The Gnome Guard" medal.
Gnome #1
Gnome #2
Gnome #4
Gnome #5
Gnome #6
Gnome #7
Gnome #8
Gnome #9
Gnome #10
Other locations related in some way to the medals that can be earned in the game.
Abelard Möller
If you want to earn the "Möllertov Cocktail" medal then you should shoot the car engine when Möller is near it. The car will explode and kill Möller. If Möller gets into the second, military vehicle and drives away, you can shoot the back of this car once it is on the road outside the estate.
Crane Operator
Shoot him and then the crane will cause an incident resulting in the destruction of the train and you will earn the "Locomotion Commotion" medal/achievement.
Mission 1 Long Shot Gold Medal
Make a 600 meters shot in Colline-Sur-Mer. You need to stand very close to the fence wall and aim at the soldier patrolling the area nearby near the radar that is, look in the northeast direction.
Mission 2 Long Shot Gold Medal
Take a 525 meters shot in Chateau De Berengar. Look in the direction of the mansion and locate the soldier on the hill behind it which means look in the northeast direction.
Mission 3 Long Shot Gold Medal
Take a 675 meters shot in Beaumont-Saint-Denis. The spot is at the top of the cathedral tower. You will also find a sniper rifle with a high zoom here. Look through the window facing south and you will see a soldier on the fortifications at the top of the mountain.
Mission 4 Long Shot Gold Medal
Take a 457 meters shot in Martressac. Your target is on the roof of the refinery, that is, look east and a bit south.
Mission 5 Long Shot Gold Medal
Your target is the soldier who guards the tower with the stone eagle on it, which means look west. You can shoot him when he approaches the window.
Mission 6 Long Shot Gold Medal
Take a 560 meters shot in Desponts-Sur-Douve. Look north and slightly west. Your target is a sniper on the tower of a destroyed church.
Mission 7 Long Shot Gold Medal
Take a 500 meters shot in Massif Central. Your target is the soldier on the guard tower near the dam, so look north and a bit east.
Mission 8 Long Shot Gold Medal
Take a 575 meters shot in St. Nazaire. Look north and slightly east. Your target is a soldier in an anti-air defense site.
Mission 9 Long Shot Gold Medal
Shoot Abelard Möller when he gets far enough away and you will receive two medals - "Can't Outrun A Bullet" and "Mission 9 Long Shot Gold Medal".
Möller's Shiny New Car
A white car standing in the courtyard. Destroy it and you will receive the medal "It'll Buff Right Out".
Searchlight #1
One of the searchlights that you must properly destroy to earn the "Saboteur" medal. Its fuse is inside the nearby Fuse Box.
Searchlight #2
One of the searchlights that you must properly destroy to earn the "Saboteur" medal. Its fuse is inside the nearby Fuse Box.
Searchlight #3
One of the searchlights that you must properly destroy to earn the "Saboteur" medal. Its fuse is inside the nearby Fuse Box.
Shooting Target #1
One of the five targets you must hit to earn the "Show Off" medal. You can do this by shooting from the location marked as Practice Shooting Range.
Shooting Target #2
One of the five targets you must hit to earn the "Show Off" medal. You can do this by shooting from the location marked as Practice Shooting Range.
Shooting Target #3
One of the five targets you must hit to earn the "Show Off" medal. You can do this by shooting from the location marked as Practice Shooting Range.
Shooting Target #4
One of the five targets you must hit to earn the "Show Off" medal. You can do this by shooting from the location marked as Practice Shooting Range.
Shooting Target #5
One of the five targets you must hit to earn the "Show Off" medal. You can do this by shooting from the location marked as Practice Shooting Range.
Armory Key
An officer has it.
Armoury Key
An officer has it.
Armoury Key
An officer has it.
Armoury Key
One of the soldiers has it.
Armoury Key
In a locked crate (Crowbar).
Boathouse Key
Drops from an officer walking around here.
Building Key
The front door to this room is locked and you would need Satchel Charge to open it or this key itself. But you can climb up the ladder at the back of the house to the upper floor and then go down the stairs here.
Bunker
An officer has it.
Bunker Key
An officer has it.
Castle Tower Key
The soldiers have it.
Crane Control Room Key
Kill the scientist in the white lab coat and search his body.
Crypt Key
In a locked crate (Crowbar) at the top of the tower. To get here start by climbing up to the roof using the scaffolding standing by the outside wall of the church.
Farmhouse Safe Combination
Fischer's Safe Combination
An officer has it.
Generator Room Key
One of the soldiers has it.
Hommet Safe Combination
Hotel Key
Hotel Key
In a locked crate (Crowbar) located at the upper floor.
House Key
In a locked crate (Crowbar) located at the ground floor.
Interrogation Room Key
Kill the officer you encounter around here.
Key to Cellar
Marcel's Key
Search Marcel's corpse lying in the attic.
Master Dome Key
Master Dome Key
An officer has it.
Master Dome Key
Drops from a soldier in the arsenal (middle level, you get here by descending the stairs from the main dome).
Medbay Key
Drops from an officer.
Meeting Room Key
An officer has it.
Mirus Facility Safe Combination
An officer has it.
Northern Farm Safe Code
One of the soldiers has it.
Office Key
Drops from an officer.
Old Tunnels Key
Production Plant Key
A scientist has it.
Production Plant Key
An officer has it.
Production Plant Key
An engineer has it.
Refinery Armoury Key
One of the soldiers has it.
Sewer Pump Room Key
In a locked safe (read "Clean Out The Sewer" for safe code or use Satchel Charge).
Shipping Armoury Key
An officer has it.
Shipping Warehouse Safe Combination
Kill and check the body of the officer who is in the small room on the upper floor.
Southern Farm Safe Code
One of the soldiers has it.
Townhall Office Key
In a locked crate (Crowbar).
Townhall Office Key
Drops from an officer you encounter here.
Weapons Lab Key
Drops from an officer.
Weapons Lab Key
Weapons Lab Key
Weapons Lab Key
A scientist has it.
An enemy that sees you may run to an alarm. Once the alarm is sounding, they'll start calling reinforcements - kill them or destroy the alarm before more enemies arrive.
Abandoned House
Unlockable starting location of the "Secret Weapons" mission. To get inside, you have to climb up the pipe and then go around along the ledges.
Beaumont Marshland
Initial starting location of the "Spy Academy" mission.
Bridge Charlie
Unlockable starting location of the "Libération" mission.
Château Overlook
Initial starting location of the "Loose Ends" mission.
Chateau Stables
City Limits
Initial starting location of the "Rubble and Ruin" mission.
Countryside House
Unlockable starting location of the "Festung Guernsey" mission.
Facility Overlook
Initial starting location of the "Secret Weapons" mission.
Forest Clearing
Initial starting location of the "Occupied Residence" mission.
Forest Glider Crash
Initial starting location of the "Libération" mission.
French Countryside
Unlockable starting location of "The Atlantic Wall" mission.
Hommet Cove
Initial starting location of the "Festung Guernsey" mission.
Interrogation Block
Unlockable starting location of "The Atlantic Wall" mission.
Lake Overlook
Unlockable starting location of the "Secret Weapons" mission.
Munitions Farmhouse
Resistance Café
Unlockable starting location of the "Rubble And Run" mission. Room on the upper floor of the building.
Resistance Safehouse
Initial starting location of the "War Factory" mission.
Riverside House
Unlockable starting location of the "Libération" mission.
Roadside House
Unlockable starting location of the "Festung Guernsey" mission.
Scrapyard Overlook
Unlockable starting location of the "War Factory" mission.
Sea View Offices
Unlockable starting location of the "Rubble And Run" mission. Upper floor of the house.
Smugglers Landing
Submarine Deck
Initial starting location of "The Atlantic Wall" mission.
Town Promenade
Unlockable starting location of "The Atlantic Wall" mission.
Town Wall
Trainyard Office
Unlockable starting location of the "War Factory" mission.
Armoured Vehicle
Objective: Liberate the Southern Town.
Barricade
Objective: Liberate the Northern Town, Connect the Barricade Explosives.
Battery Mirus
Beach
Boathhouse
Bridge Explosives x 2
Objective: Secure a Crossing, Option B - Defuse Bridge Explosives.
Chateau
Communications Equipment
In a room on the upper floor. Objective: Liberate the Southern Town.
Furnace
Objectives: Destroy the Furnace - Investigate the Furnace / Option A - Destroy the Injector Pipe / Option B - Overload the Furnace (x/2).
German Sniper
Objective: Secure a Crossing, Option A - Kill Snipers (x/3).
German Sniper
Objective: Secure a Crossing, Option A - Kill Snipers (x/3).
German Sniper
Objective: Secure a Crossing, Option A - Kill Snipers (x/3).
German Sniper
Objective: Liberate the Southern Town.
Hidden Facility
Lake Compound
Objectives: Sabotage the V2 Capsule Test - Investigate the Lake compound / Sabotage the Capsule Release Hatch / Launch V2 Rocket.
Launch Site
Objectives: Sabotage the V2 Launch Site - Sabotage the Guidance System.
Logistics Office
Objectives: Find the Kraken shipping manifest - Search the Logistics Office / Acquire the Manifest.
Processing Plant
Radar
Refinery
Objectives: Destroy the Refinery - Sabotage the Smelting Vat.
Refueling Site
Objectives: Sabotage the V2 Refueling Site - Overload the Pipelines (0/2).
Resistance Safe House
Sewer Entrance
Objectives: Infiltrate Krakens U-Boat Pen / Find the way in / Find the Sewer Entrance.
The Dome / War Room
Objectives: Investigate Operation Kraken - Infiltrate the Dome / Locate Krakens War Room / Infiltrate the War Room / Inspect the Kraken Plans.
The Kraken Meeting
Tiger Tank
Objective: Liberate the Northern Town, Destroy the Tiger Tank.
Underground Hospital
Academy Instructor
Objective: Stop the Spy Training.
Anti-Air Gun
Objective: Neutralize Anti-Air Guns (x/3).
Anti-Air Gun
Objective: Neutralize Anti-Air Guns (x/3).
Anti-Air Gun
Objective: Neutralize Anti-Air Guns (x/3).
Anti-Air Gun
Objective: Neutralise Anti-Air Guns.
Anti-Air Gun
Objective: Neutralise Anti-Air Guns.
Anti-Air Gun
Objective: Neutralise Anti-Air Guns.
Bunker
Locked (Bunker Key or Satchel Charge). Locate the Radio Operator, Investigate the Trenches.
Coastal Battery
Objective: Neutralize the Coastal Defenses (x/3).
Construction Site
Objective: Stop the Construction of the Second Mirus Gun.
Crashed Glider
Objective: Locate the Radio Operator.
Fort Hommet
Objectives: Neutralise Radio Communications.
Gun Battery
Objective: Destroy the Gun Battery.
Hidden Coastal Battery
Objective: Neutralize the Coastal Defenses (x/3).
Machine Gun Nest
Objective: Neutralize the Coastal Defenses (x/3).
Pump Room Generator
Objectives: Destroy the Generator - Investigate Pump Room / Option A - Destroy Generator with Satchel Charge / Option B - Overload the Pressure Valves (0/2).
Radio Equipment
Objectives: Neutralise Radio Communications / Option A - Sabotage the Cables (0/2) / Option B - Disable the Radio Equipment (0/3).
Radio Tower
Objectives: Neutralise the Radio Tower - Infiltrate the Castle / Option A - Sabotage the Cables (x/2) / Option B - Sabotage Radio Tower Generator.
Shipment Manifest
Objectives: Acquire Intel on the Shipments - Acquire the Manifest / Take Recon Images (x/2).
Steelworks Control Room
Objectives: Destroy the Steelworks - Investigate the Steelworks / Access the Control Room / Sabotage Controls.
Weapons Lab
Objectives: Investigate Weapons Lab - Raid Weapons Lab (0/5).