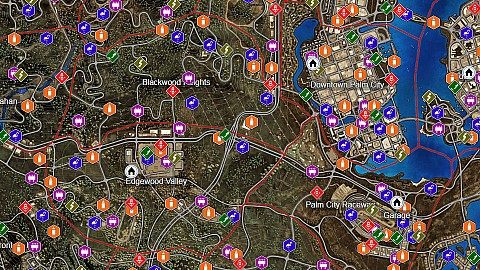
Palm City - Map Markers Summary
Safe Houses x13, Districts x18, Gas Stations x28, Billboards x85, Flamingos x100, Street Art x130, Speed Traps x45, Long Jumps x40, Drift zones x35
The following legend of Palm City interactive game map defines the points of interest / markers displayed on the map. Each marker corresponds to a specific element to facilitate efficient navigation and interaction with the map.
Safe houses can be used as places where you can fast travel to. To make this possible, you must first unlock such a safe house by simply driving to it. You can only fast travel if your wanted level is low.
 Garage
Hideout
Available on completion of Party Crashers mission.
Safe House
Safe House
Safe House
Safe House
Safe House
Safe House
Safe House
Safe House
Safe House
Safe House
Safe House
Eighteen different districts that make up the entire area available in the game.
 Bayview Park
5 x Billboard
8 x Street Art
6 x Flamingo
3 x Drift Zone
4 x Speed Trap
2 x Long Jump
Bayview Park
5 x Billboard
8 x Street Art
6 x Flamingo
3 x Drift Zone
4 x Speed Trap
2 x Long Jump
Blackwood Heights
3 x Billboard
5 x Street Art
6 x Flamingo
2 x Drift Zone
2 x Speed Trap
1 x Long Jump
Cape Castille
5 x Billboard
7 x Street Art
6 x Flamingo
2 x Drift Zone
3 x Speed Trap
3 x Long Jump
Cloudbank
4 x Billboard
5 x Street Art
5 x Flamingo
2 x Drift Zone
2 x Speed Trap
1 x Long Jump
Downtown Palm City
5 x Billboard
8 x Street Art
6 x Flamingo
2 x Drift Zone
2 x Speed Trap
4 x Long Jump
Eden Shores
5 x Billboard
8 x Street Art
6 x Flamingo
3 x Drift Zone
2 x Speed Trap
2 x Long Jump
Edgewood Valley
5 x Billboard
8 x Street Art
5 x Flamingo
2 x Drift Zone
2 x Speed Trap
3 x Long Jump
Fairview Fields
5 x Billboard
8 x Street Art
6 x Flamingo
1 x Drift Zone
3 x Speed Trap
3 x Long Jump
Fort Callahan
5 x Billboard
5 x Street Art
5 x Flamingo
2 x Drift Zone
2 x Speed Trap
2 x Long Jump
Frontera Hills
6 x Billboard
8 x Street Art
6 x Flamingo
1 x Drift Zone
2 x Speed Trap
2 x Long Jump
Grenada Wetlands
5 x Billboard
8 x Street Art
5 x Flamingo
1 x Drift Zone
2 x Speed Trap
2 x Long Jump
Mendoza Keys
5 x Billboard
9 x Street Art
6 x Flamingo
2 x Drift Zone
3 x Speed Trap
3 x Long Jump
Palm City Raceway
4 x Billboard
8 x Street Art
5 x Flamingo
2 x Drift Zone
3 x Speed Trap
2 x Long Jump
Port Murphy
6 x Billboard
8 x Street Art
6 x Flamingo
2 x Drift Zone
2 x Speed Trap
2 x Long Jump
Rockville
4 x Billboard
6 x Street Art
6 x Flamingo
2 x Drift Zone
3 x Speed Trap
3 x Long Jump
Sandino Ranches
5 x Billboard
8 x Street Art
5 x Flamingo
2 x Drift Zone
2 x Speed Trap
1 x Long Jump
Sandpiper Forest
4 x Billboard
5 x Street Art
5 x Flamingo
2 x Drift Zone
3 x Speed Trap
2 x Long Jump
Westside
4 x Billboard
8 x Street Art
5 x Flamingo
2 x Drift Zone
3 x Speed Trap
2 x Long Jump
To repair your car, simple drive through a gas station. You do not have to stop your vehicle. During the day, you can do this as many times as you like. However, during the night time you can only repair your vehicle three times.
 Gas Station
Gas Station
Gas Station
Gas Station
Gas Station
Gas Station
Gas Station
Gas Station
Gas Station
Gas Station
Gas Station
Gas Station
Gas Station
Gas Station
Gas Station
Gas Station
Gas Station
Gas Station
Gas Station
Gas Station
Gas Station
Gas Station
Gas Station
Gas Station
Gas Station
Gas Station
Gas Station
Gas Station
You can start collecting Billboards right at the beginning of the game. Billboards can be collected by driving or jumping through them.
 Bayview Park #1
Bayview Park #2
Bayview Park #3
Bayview Park #4
Bayview Park #5
Blackwood Heights #1
Blackwood Heights #2
Blackwood Heights #3
Cape Castille #1
Cape Castille #2
Cape Castille #3
Cape Castille #4
Cape Castille #5
Cloudbank #1
Cloudbank #2
Cloudbank #3
Cloudbank #4
Downtown Palm City #1
Downtown Palm City #2
Downtown Palm City #3
Downtown Palm City #4
Downtown Palm City #5
Eden Shores #1
Eden Shores #2
Eden Shores #3
Eden Shores #4
Eden Shores #5
Edgewood Valley #1
Edgewood Valley #2
Edgewood Valley #3
Edgewood Valley #4
Edgewood Valley #5
Fairview Fields #1
Fairview Fields #2
Fairview Fields #3
Fairview Fields #4
Fairview Fields #5
Fort Callahan #1
Fort Callahan #2
Fort Callahan #3
Fort Callahan #4
Fort Callahan #5
Frontera Hills #1
Frontera Hills #2
Frontera Hills #3
Frontera Hills #4
Frontera Hills #5
Frontera Hills #6
Grenada Wetlands #1
Grenada Wetlands #2
Grenada Wetlands #3
Grenada Wetlands #4
Grenada Wetlands #5
Mendoza Keys #1
Mendoza Keys #2
Mendoza Keys #3
Mendoza Keys #4
Mendoza Keys #5
Palm City Raceway #1
Palm City Raceway #2
Palm City Raceway #3
Palm City Raceway #4
Port Murphy #1
Port Murphy #2
Port Murphy #3
Port Murphy #4
Port Murphy #5
Port Murphy #6
Rockville #1
Rockville #2
Rockville #3
Rockville #4
Sandino Ranches #1
Sandino Ranches #2
Sandino Ranches #3
Sandino Ranches #4
Sandino Ranches #5
Sandpiper Forest #1
Sandpiper Forest #2
Sandpiper Forest #3
Sandpiper Forest #4
Westside #1
Westside #2
Westside #3
Westside #4
Flamingos can be collected when the 13th REP level is reached. Flamingos can be collected by driving into them. Find them all to unlock a Porsche Cayman GT4 '15.
 Bayview Park #1
Bayview Park #2
Bayview Park #3
Bayview Park #4
Bayview Park #5
Bayview Park #6
Blackwood Heights #1
Blackwood Heights #2
Blackwood Heights #3
Blackwood Heights #4
Blackwood Heights #5
Blackwood Heights #6
Cape Castille #1
Cape Castille #2
Cape Castille #3
Cape Castille #4
Cape Castille #5
Cape Castille #6
Cloudbank #1
Cloudbank #2
Cloudbank #3
Cloudbank #4
Cloudbank #5
Downtown Palm City #1
Downtown Palm City #2
Downtown Palm City #3
Downtown Palm City #4
To get to this flamingo you have to jump on the overhead railway at its other end.
Downtown Palm City #5
Downtown Palm City #6
Eden Shores #1
Eden Shores #2
Eden Shores #3
Eden Shores #4
Eden Shores #5
Eden Shores #6
Edgewood Valley #1
Edgewood Valley #2
Edgewood Valley #3
Edgewood Valley #4
Edgewood Valley #5
Fairview Fields #1
Fairview Fields #2
Fairview Fields #3
Fairview Fields #4
Fairview Fields #5
The nearest entrace to the tunnel is to the south, near the Fairview Fields #6 street art.
Fairview Fields #6
Fort Callahan #1
Fort Callahan #2
Fort Callahan #3
Fort Callahan #4
Fort Callahan #5
Frontera Hills #1
Frontera Hills #2
Update: If you don't find this flamingo outside, then you will find it in the underground tunnel. One of the entrances to the tunel is near the Frontera Hills #2 street art, and the other is south of the flamingo.
Frontera Hills #3
Frontera Hills #4
Frontera Hills #5
Frontera Hills #6
Grenada Wetlands #1
Grenada Wetlands #2
Grenada Wetlands #3
Grenada Wetlands #4
Grenada Wetlands #5
Mendoza Keys #1
Mendoza Keys #2
Mendoza Keys #3
Mendoza Keys #4
Mendoza Keys #5
Mendoza Keys #6
Palm City Raceway #1
Palm City Raceway #2
Palm City Raceway #3
Palm City Raceway #4
Palm City Raceway #5
Port Murphy #1
Port Murphy #2
Port Murphy #3
Port Murphy #4
Port Murphy #5
Port Murphy #6
Rockville #1
Rockville #2
Rockville #3
Rockville #4
Rockville #5
Rockville #6
Sandino Ranches #1
Sandino Ranches #2
Sandino Ranches #3
Sandino Ranches #4
Sandino Ranches #5
Sandpiper Forest #1
Sandpiper Forest #2
Sandpiper Forest #3
Sandpiper Forest #4
Sandpiper Forest #5
Westside #1
Westside #2
Westside #3
Westside #4
Westside #5
Street Art - stencil art, graffiti tags and stickers are located on the walls, and they are collected by driving up near them and pressing a button prompt. You can start collecting street art when you reach the 6th REP level. Find them all to unlock a Nissan 370Z Nismo.
 Bayview Park #1
Bayview Park #2
Bayview Park #3
Bayview Park #4
Bayview Park #5
Bayview Park #6
Bayview Park #7
Bayview Park #8
Blackwood Heights #1
Blackwood Heights #2
Blackwood Heights #3
Blackwood Heights #4
Blackwood Heights #5
Cape Castille #1
Cape Castille #2
Cape Castille #3
Cape Castille #4
Cape Castille #5
Cape Castille #6
Cape Castille #7
Cloudbank #1
Cloudbank #2
Cloudbank #3
Cloudbank #4
Cloudbank #5
Downtown Palm City #1
Downtown Palm City #2
Downtown Palm City #3
Downtown Palm City #4
Downtown Palm City #5
Downtown Palm City #6
Downtown Palm City #7
Downtown Palm City #8
Eden Shores #1
Eden Shores #2
Eden Shores #3
Eden Shores #4
Eden Shores #5
Eden Shores #6
Eden Shores #7
Eden Shores #8
Edgewood Valley #1
Edgewood Valley #2
Edgewood Valley #3
Edgewood Valley #4
Edgewood Valley #5
Edgewood Valley #6
Edgewood Valley #7
Edgewood Valley #8
Fairview Fields #1
Fairview Fields #2
Fairview Fields #3
Fairview Fields #4
Fairview Fields #5
Fairview Fields #6
Fairview Fields #7
Fairview Fields #8
Fort Callahan #1
Fort Callahan #2
Fort Callahan #3
Fort Callahan #4
Fort Callahan #5
Frontera Hills #1
Frontera Hills #2
Frontera Hills #3
Frontera Hills #4
Frontera Hills #5
Frontera Hills #6
Frontera Hills #7
Frontera Hills #8
Grenada Wetlands #1
Grenada Wetlands #2
Grenada Wetlands #3
Grenada Wetlands #4
Grenada Wetlands #5
Grenada Wetlands #6
Grenada Wetlands #7
Grenada Wetlands #8
Mendoza Keys #1
Mendoza Keys #2
Mendoza Keys #3
Mendoza Keys #4
Mendoza Keys #5
Mendoza Keys #6
Mendoza Keys #7
Mendoza Keys #8
Mendoza Keys #9
Palm City Raceway #1
Palm City Raceway #2
Palm City Raceway #3
Palm City Raceway #4
Palm City Raceway #5
Palm City Raceway #6
Palm City Raceway #7
Palm City Raceway #8
Port Murphy #1
Port Murphy #2
Port Murphy #3
Port Murphy #4
Port Murphy #5
Port Murphy #6
You have to jump to get to that graffiti.
Port Murphy #7
Port Murphy #8
Rockville #1
Rockville #2
Rockville #3
Rockville #4
Rockville #5
Rockville #6
Sandino Ranches #1
Sandino Ranches #2
Sandino Ranches #3
Sandino Ranches #4
Sandino Ranches #5
Sandino Ranches #6
Sandino Ranches #7
Sandino Ranches #8
Sandpiper Forest #1
Sandpiper Forest #2
It can be collected from the ground level. Drive close to the wall of the building.
Sandpiper Forest #3
Sandpiper Forest #4
Sandpiper Forest #5
Westside #1
Westside #2
Westside #3
Westside #4
Westside #5
Westside #6
Westside #7
Westside #8
Speed Traps are on paved roads and require passing through them at a certain speed to score from 1 to 3 stars. Once you collect all speed traps, you'll unlock a McLaren 600LT.
 Bayview Park #1: Get Over It!
110 / 150 / 200 mph
Bayview Park #1: Get Over It!
110 / 150 / 200 mph
Bayview Park #2: The Broken Golf Cart
100 / 120 / 142 mph
Bayview Park #3: Acceleration
90 / 130 / 190 mph
Bayview Park #4: Hi Cop, Bye Cop!
100 / 150 / 210 mph
Blackwood Heights #1: Downhill is Better
130 / 160 / 220 mph
Blackwood Heights #2: Quick Camping
110 / 140 / 180 mph
Cape Castille #1: Security Breach
100 / 130 / 170 mph
Cape Castille #2: Astronaut Wannabe
90 / 120 / 150 mph
Cape Castille #3: Damn! That's Hot!
90 / 130 / 170 mph
Cloudbank #1: Upgraded Ski Gear
130 / 170 / 220 mph
Cloudbank #2: Speed Under The Radar
100 / 130 / 178 mph
Downtown Palm City #1: I'm Not a Jump!
100 / 110 / 130 mph
Downtown Palm City #2: Downtown Cruise
90 / 130 / 140 mph
Eden Shores #1: Eden Spinner
80 / 130 / 170 mph
Eden Shores #2: Hyperloop Photoshoot
110 / 160 / 230 mph
Edgewood Valley #1: It's Black Friday???
90 / 130 /180 mph
Edgewood Valley #2: Faster on horse
100 / 130 / 160 mph
Fairview Fields #1: Straight on the Bridge
110 / 160 / 190 mph
Fairview Fields #2: Fastest Bread Maker
90 / 120 / 160 mph
Fairview Fields #3: Catch My Good Side!
121 / 170 / 210 mph
Fort Callahan #1: River Fever
120 / 150 / 210 mph
Fort Callahan #2: Back in Town
100 / 150 / 200 mph
Frontera Hills #1: Get Off My Land!
80 / 110 / 130 mph
Frontera Hills #2: Late for Work!
90 / 120 / 150 mph
Grenada Wetlands #1: Quick Visit
100 / 150 / 170 mph
Grenada Wetlands #2: Fishy Smell
110 / 150 / 188 mph
Mendoza Keys #1: Bridge Ridge
110 / 150 / 180 mph
Mendoza Keys #2: Dragonfly Catcher
110 / 150 / 180 mph
Mendoza Keys #3: Lighthouse Sightseeing
90 / 130 / 150 mph
Palm City Raceway #1: Go Fast or Go home
140 / 160 / 190 mph
Palm City Raceway #2: Speed Demon
110 / 140 / 170 mph
Palm City Raceway #3: Race Warm-Up
110 / 150 / 170 mph
Port Murphy #1: Speed Package
110 / 150 / 180 mph
Port Murphy #2: Heavy Container
100 / 150 / 180 mph
Rockville #1: Under the Red Light
100 / 130 / 190 mph
Rockville #2: The Growling Stone
110 / 140 / 200 mph
Rockville #3: Raced with a Deer
120 / 150 / 210 mph
Sandino Ranches #1: Out of business
90 / 110 / 130 mph
Sandino Ranches #2: Gas Refill
100 / 150 / 170 mph
Sandpiper Forest #1: Splinter Boulevard
130 / 140 / 190 mph
Sandpiper Forest #2: super Drive
120 / 150 / 200 mph
Sandpiper Forest #3: Brake Not Found
110 / 160 / 220 mph
Westside #1: Fastest Car in the West
130 / 150 / 190 mph
Westside #2: Boulevard of Broken Rims
80 / 130 / 180 mph
Westside #3: Seaside Speeding Ticket
94 / 150 / 170 mph
Try to beat Long Jumps distance challenges on a set of special ramps all over Palm City. Beat them all to unlock a Lamborghini Huracan Performante Spyder.
 Bayview Park #1: Aerial Sailor
55 / 77 /121 yd
Bayview Park #1: Aerial Sailor
55 / 77 /121 yd
Bayview Park #2: Bridge Builder
55 / 77 / 132 yd
Blackwood Heights #1: Tent Landing
44 / 66 / 88 yd
Cape Castille #1: Space Z Star Race
55 / 88 / 99 yd
Cape Castille #2: Lil' Rocket
55 / 88 / 121 yd
Cape Castille #3: Becoming a Space Car
44 / 66 / 99 yd
Cloudbank #1: Takeoff Array
77 / 110 / 154 yd
Downtown Palm City #1: Avesta
77 / 121 / 143 yd
Downtown Palm City #2: The Ice-Cream Van
44 / 88 / 110 yd
Downtown Palm City #3: Turbine Upgrade
72 / 93 / 110 yd
Downtown Palm City #4: Tip of the Water
77 / 88 / 99 yd
Eden Shores #1: Out of Marine School
77 / 110 / 165 yd
Eden Shores #2: It's a Car? It's a Dolphin!
66 / 88 / 132 yd
Edgewood Valley #1: Shopping's in the Air
77 / 121 / 143 yd
Edgewood Valley #2: Traffic Jam Skipper
66 / 121 / 154 yd
Edgewood Valley #3: City With a View
121 / 143 / 186 yd
Fairview Fields #1: Grassy Landway
72 / 99 / 148 yd
Fairview Fields #2: Interstate 25 Flyby
88 / 132 / 175 yd
Fairview Fields #3: The Tree Hugger
132 / 165 / 219 yd
Fort Callahan #1: Jailbreaker
44 / 66 / 110 yd
Fort Callahan #2: Bridge? What Bridge?
66 / 88 / 121 yd
Frontera Hills #1: Sky Seeker
88 / 121 / 132 yd
Frontera Hills #2: Beach Landing
44 / 121 / 143 yd
Grenada Wetlands #1: Cars Can Fly?
33 / 55 / 99 yd
Grenada Wetlands #2: I've Got the Tower
55 / 77 / 99 yd
Mendoza Keys #1: Sandy Wheels!
77 / 88 / 121 yd
Mendoza Keys #2: Going on Vacation
77 / 99 / 121 yd
Mendoza Keys #3: Bridge Enthusiast
44 / 55 / 77 yd
Palm City Raceway #1: Rusty Takeoff
44 / 77 / 132 yd
Palm City Raceway #2: Get Into the Raceway!
83 / 110 / 121 yd
Port Murphy #1: Abandon Ship!
55 / 77 / 110 yd
Port Murphy #2: Shipped in a Box
55 / 88 / 99 yd
Rockville #1: Clean Avalanche
110 / 165 / 197 yd
Rockville #2: Finding Pebbles
33 / 44 / 66 yd
Rockville #3: Flying Shun
154 / 197 / 274 yd
Sandino Ranches #1: Countryside Showdown
50 / 72 / 93 yd
Sandpiper Forest #1: Leaves Under the Hood
121 / 165 / 186 yd
Sandpiper Forest #2: Timber Date
88 / 110 / 143 yd
Westside #1: Parking Problems
77 / 110 / 165 yd
Westside #2: Yeet The Rich
44 / 99 / 143 yd
Drift here, beat all the Drift Zones scores and unlock a BMW M4 GTS.
 Bayview Park #1: Sandstorm on the Beach
10,000 / 20,000 / 30,000
Bayview Park #1: Sandstorm on the Beach
10,000 / 20,000 / 30,000
Bayview Park #2: Gotta Skid
15,000 / 25,000 / 40,000
Bayview Park #3: Golf Club Trial
15,000 / 25,000 / 40,000
Blackwood Heights #1: Stuck Between the Rocks
15,000 / 25,000 / 35,000
Blackwood Heights #2: Jack-O-Lumber
18,000 / 35,000 / 58,000
Cape Castille #1: Abandoned Grounds
35,000 / 50,000 / 85,000
Cape Castille #2: Space Traveller
5,000 / 15,000 / 30,000
Cloudbank #1: Crazy Sled Ride
25,000 / 40,000 / 50,000
Cloudbank #2: Summer Drifter
20,000 / 30,000 / 40,000
Downtown Palm City #1: Parking Lot King
5,000 / 10,000 / 15,000
Downtown Palm City #2: Lunar Dust
13,000 / 20,000 / 35,000
Eden Shores #1: Drifting Islander
15,000 / 25,000 / 35,000
Eden Shores #2: Dome Ruler
25,000 / 50,000 / 90,000
Eden Shores #3: Sandy Tires
20,000 / 40,000 / 70,000
Edgewood Valley #1: No Shipping Zone
15,000 / 25,000 / 40,000
Edgewood Valley #2: Drifting Cowboy
15,000 / 25,000 / 40,000
Fairview Fields #1: Clean Air? Not Anymore
15,000 / 45,000 / 75,000
Fort Callahan #1: Detention
10,000 / 20,000 / 30,000
Fort Callahan #2: Let It Slide
15,000 / 30,000 / 50,000
Frontera Hills #1: Skidding Downhill
25,000 / 65,000 / 100,000
Grenada Wetlands #1: Nothing to See Here!
15,000 / 30,000 / 50,000
Mendoza Keys #1: Brotherhood Drive
5,000 / 10,000 / 20,000
Mendoza Keys #2: Cylinder' Stairs
7,000 / 13,000 / 17,000
Palm City Raceway #1: Hairpin smoke
20,000 / 40,000 / 70,000
Palm City Raceway #2: Neighbor With Style
10,000 / 20,000 / 30,000
Port Murphy #1: Coal Drift Bro
15,000 / 28,000 / 35,000
Port Murphy #2: Shun Was Here
4,000 / 8,000 / 12,500
Rockville #1: Kraken Dust
20,000 / 30,000 / 50,000
Rockville #2: One With the Nature
25,000 / 40,000 / 55,000
Sandino Ranches #1: Into the Turns
10,000 / 25,000 / 40,000
Sandino Ranches #2: Countryside Tire Smoke
10,000 / 25,000 / 30,000
Sandpiper Forest #1: Climate Change Problem
25,000 / 50,000 / 65,000
Sandpiper Forest #2: Watch Out for Traffic!
25,000 / 40,000 / 50,000
Westside #1: Water Leak
15,000 / 25,000 / 40,000
Westside #2: City Snake
20,000 / 45,000 / 65,000