An interactive map of Caladrias: Forbidden Lands, the first of the areas we can explore while playing Atlas Fallen. This map features such locations as: Anvils, Vantage Points, Sand Echoes, Wildlife Habitats, Treasure Maps, Heavenly Shrines, Watchtowers, Lore Items, Artefacts, Formulas, Gauntlet Shards, etc.
Advertisement
Caladrias: Forbidden Lands - Atlas Fallen Map
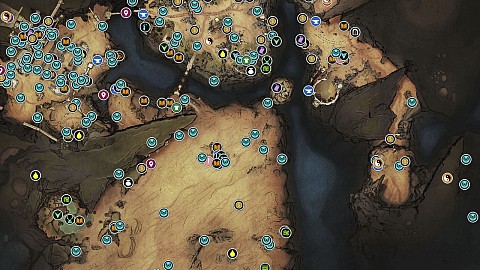
Markers on the map
- Anvils12
- Artefacts125
- Cosmetic Items5
- Dyes4
- Elite Foes3
- Errands6
- Essence Stones12
- Formulas15
- Gauntlet Shards8
- Heavenly Shrines3
- Idols2
- Lore Items33
- Material Chests6
- Other5
- Passage1
- Quest Related1
- Sand Echos3
- Sealing Totems7
- Side Quests7
- Traders7
- Treasure Map Locations6
- Treasure Maps9
- Tributes22
- Vantage Points5
- Watchtower1
- Wildlife Habitats4
Points of interest
Anvils
A total of 41 Anvils are available in the game and 12 of them are located in Caladrias: Forbidden Lands. Anvils can be used to perform various activities, such as restoring health, upgrading Gauntlet and Armor, or buying new Perks. Furthermore, they also serve as Fast Travel points.
 Castrum VII
Eastern Desert Graveyard
Eastern Desert Passage
Eastern Ruins
Lost Hideout
Moose Pond
Shattered Keep: Inner Skirts
Shattered Keep: North Entrance
Shattered Keep: Outlook
Shattered Keep: South Entrance
Wastelands
Watchtower
Castrum VII
Eastern Desert Graveyard
Eastern Desert Passage
Eastern Ruins
Lost Hideout
Moose Pond
Shattered Keep: Inner Skirts
Shattered Keep: North Entrance
Shattered Keep: Outlook
Shattered Keep: South Entrance
Wastelands
Watchtower
Lore Items
Lore Items are mostly light blue collectible books that provide more information about the world of Atlas Fallen. There are 33 Lore Items in the Caladrias: Forbidden Lands area. Some of them appear only after completing main or side story quests.
 Before they were forbiddenCaladrias: The Forbidden Lands 1/33.
The Knights of BastengarCaladrias: The Forbidden Lands 2/33.
TyrannyCaladrias: The Forbidden Lands 3/33.
Outcast KnightsCaladrias: The Forbidden Lands 4/33.
You need it to complete the "History of the Shattered Keep" side quest.
Survival of the fewCaladrias: The Forbidden Lands 5/33.
The Knight's GateCaladrias: The Forbidden Lands 6/33.
The Shelter StonesCaladrias: The Forbidden Lands 7/33.
Castrum VIICaladrias: The Forbidden Lands 8/33.
What a ViewCaladrias: The Forbidden Lands 9/33.
The Old MineCaladrias: The Forbidden Lands 10/33.
Treasure MapsCaladrias: The Forbidden Lands 11/33.
The ever-watching WatcherCaladrias: The Forbidden Lands 12/33.
Aftermath of the battleCaladrias: The Forbidden Lands 13/33.
The Animals of AtlasCaladrias: The Forbidden Lands 14/33.
What are the shards in the sand?Caladrias: The Forbidden Lands 15/33.
The Sealing TotemsCaladrias: The Forbidden Lands 16/33.
Quickfeet's journalCaladrias: The Forbidden Lands 17/33.
The AnvilsCaladrias: The Forbidden Lands 18/33.
So closeCaladrias: The Forbidden Lands 19/33.
Desert AdventureCaladrias: The Forbidden Lands 20/33.
ReportCaladrias: The Forbidden Lands 21/33.
The WatchtowersCaladrias: The Forbidden Lands 22/33.
Strange noisesCaladrias: The Forbidden Lands 23/33.
I see himCaladrias: The Forbidden Lands 24/33.
Where to start...Caladrias: The Forbidden Lands 25/33.
Old BattlesCaladrias: The Forbidden Lands 26/33.
To my familyCaladrias: The Forbidden Lands 27/33.
You need it to complete the "History of the Shattered Keep" side quest.
BloodbathCaladrias: The Forbidden Lands 28/33.
You need it to complete the "History of the Shattered Keep" side quest.
HidingCaladrias: The Forbidden Lands 29/33.
You need it to complete the "History of the Shattered Keep" side quest.
The Shattered KeepCaladrias: The Forbidden Lands 30/33.
Old MemoryCaladrias: The Forbidden Lands 31/33.
Mysterious Anvil StructuresCaladrias: The Forbidden Lands 32/33.
The Vantage PointsCaladrias: The Forbidden Lands 33/33.
Before they were forbiddenCaladrias: The Forbidden Lands 1/33.
The Knights of BastengarCaladrias: The Forbidden Lands 2/33.
TyrannyCaladrias: The Forbidden Lands 3/33.
Outcast KnightsCaladrias: The Forbidden Lands 4/33.
You need it to complete the "History of the Shattered Keep" side quest.
Survival of the fewCaladrias: The Forbidden Lands 5/33.
The Knight's GateCaladrias: The Forbidden Lands 6/33.
The Shelter StonesCaladrias: The Forbidden Lands 7/33.
Castrum VIICaladrias: The Forbidden Lands 8/33.
What a ViewCaladrias: The Forbidden Lands 9/33.
The Old MineCaladrias: The Forbidden Lands 10/33.
Treasure MapsCaladrias: The Forbidden Lands 11/33.
The ever-watching WatcherCaladrias: The Forbidden Lands 12/33.
Aftermath of the battleCaladrias: The Forbidden Lands 13/33.
The Animals of AtlasCaladrias: The Forbidden Lands 14/33.
What are the shards in the sand?Caladrias: The Forbidden Lands 15/33.
The Sealing TotemsCaladrias: The Forbidden Lands 16/33.
Quickfeet's journalCaladrias: The Forbidden Lands 17/33.
The AnvilsCaladrias: The Forbidden Lands 18/33.
So closeCaladrias: The Forbidden Lands 19/33.
Desert AdventureCaladrias: The Forbidden Lands 20/33.
ReportCaladrias: The Forbidden Lands 21/33.
The WatchtowersCaladrias: The Forbidden Lands 22/33.
Strange noisesCaladrias: The Forbidden Lands 23/33.
I see himCaladrias: The Forbidden Lands 24/33.
Where to start...Caladrias: The Forbidden Lands 25/33.
Old BattlesCaladrias: The Forbidden Lands 26/33.
To my familyCaladrias: The Forbidden Lands 27/33.
You need it to complete the "History of the Shattered Keep" side quest.
BloodbathCaladrias: The Forbidden Lands 28/33.
You need it to complete the "History of the Shattered Keep" side quest.
HidingCaladrias: The Forbidden Lands 29/33.
You need it to complete the "History of the Shattered Keep" side quest.
The Shattered KeepCaladrias: The Forbidden Lands 30/33.
Old MemoryCaladrias: The Forbidden Lands 31/33.
Mysterious Anvil StructuresCaladrias: The Forbidden Lands 32/33.
The Vantage PointsCaladrias: The Forbidden Lands 33/33.
Vantage Points
A total of 23 Vantage Points are available in the game and 5 of them are located in Caladrias: Forbidden Lands. Vantage Points can be used to activate the location of nearby points of interest on the map.
 Vantage Point (Caladrias #1)
Vantage Point (Caladrias #2)
Vantage Point (Caladrias #3)To be able to activate this point you must first clear a nearby Watchtower (Caladrias).
Vantage Point (Caladrias #4)
Vantage Point (Caladrias #5)
Vantage Point (Caladrias #1)
Vantage Point (Caladrias #2)
Vantage Point (Caladrias #3)To be able to activate this point you must first clear a nearby Watchtower (Caladrias).
Vantage Point (Caladrias #4)
Vantage Point (Caladrias #5)
Essence Stones
Essence Stones can be slotted into the Gauntlet to provide an active or passive boost that activates during specific Momentum bars.
 Crystaline KnuckleDefeat the Tailguarder.
Idol's Fortune
Piercing HookTo unlock this treasure you have to complete the Sealing Totems (Caladrias #7).
Hitting a foe with your Sandwhip's hook attack significantly reduces its defence for 3s.
Restless ExecutionerPerform an attack which has no cooldown when it defeats a foe or destroys a body part.
Shattering FortuneIncrease the chance to receive loot when defeating a foe or destroying a body part with your Shatter.
Stronghold StrikePerform a jump attack and leave behind an area of effect greatly increasing the defence of you and your ally for 10s.
Thick Skin
Unstable GenerationDefeat Scrimmur to get it.
Significantly increase your Momentum generation, but you lose a small amount of Momentum when you get hit.
Crystaline KnuckleDefeat the Tailguarder.
Idol's Fortune
Piercing HookTo unlock this treasure you have to complete the Sealing Totems (Caladrias #7).
Hitting a foe with your Sandwhip's hook attack significantly reduces its defence for 3s.
Restless ExecutionerPerform an attack which has no cooldown when it defeats a foe or destroys a body part.
Shattering FortuneIncrease the chance to receive loot when defeating a foe or destroying a body part with your Shatter.
Stronghold StrikePerform a jump attack and leave behind an area of effect greatly increasing the defence of you and your ally for 10s.
Thick Skin
Unstable GenerationDefeat Scrimmur to get it.
Significantly increase your Momentum generation, but you lose a small amount of Momentum when you get hit.
Idols
 Idol of ShatterYour Shatter attack heals you for a significant amount of thedamage it deals.
Sand Echos
 Sand Echo (Caladrias #1)
Sand Echo (Caladrias #2)
Sand Echo (Caladrias #3)
Sand Echo (Caladrias #1)
Sand Echo (Caladrias #2)
Sand Echo (Caladrias #3)
Cosmetic Items
 Buckler
Ever Burning Sun PauldronIt can be bought from the Traveling Vendor.
Jousting Shield: Sun KingdomTo unlock this chest you have to complete the Sealing Totems (Caladrias #4).
Buckler
Ever Burning Sun PauldronIt can be bought from the Traveling Vendor.
Jousting Shield: Sun KingdomTo unlock this chest you have to complete the Sealing Totems (Caladrias #4).
Dyes
 Green Dye
Red Dye
Green Dye
Red Dye
Wildlife Habitats
To find the buried treasure hidden somewhere in the habitat area, you must watch the animals in the habitat from a distance unseen. After a while, one of them should glow gold and lead you to the treasure. Follow the glowing animal until it starts digging the ground. After a while the animal will dig up the treasure. Get the treasure.
Treasure Maps
 "Near a Watchtower" Treasure Map Piece 1/3
"Near a Watchtower" Treasure Map Piece 2/3
"Near a Watchtower" Treasure Map Piece 3/3It's given by a NPC you can meet here.
"The Great View" Treasure Map Piece 1/3
"The Great View" Treasure Map Piece 2/3
"The Great View" Treasure Map Piece 3/3It can be bought from a Travelling Vendor for 250 Tributes.
"Near a Watchtower" Treasure Map Piece 1/3
"Near a Watchtower" Treasure Map Piece 2/3
"Near a Watchtower" Treasure Map Piece 3/3It's given by a NPC you can meet here.
"The Great View" Treasure Map Piece 1/3
"The Great View" Treasure Map Piece 2/3
"The Great View" Treasure Map Piece 3/3It can be bought from a Travelling Vendor for 250 Tributes.
Treasure Map Locations

Sealing Totems
 Sealing Totems (Caladrias #2)
Sealing Totems (Caladrias #5)
Sealing Totems (Caladrias #2)
Sealing Totems (Caladrias #5)
Heavenly Shrines
 Heavenly Shrine (Caladrias #1)
Heavenly Shrine (Caladrias #2)
Heavenly Shrine (Caladrias #3)
Heavenly Shrine (Caladrias #1)
Heavenly Shrine (Caladrias #2)
Heavenly Shrine (Caladrias #3)
Watchtowers
Watchtowers are huge towers that can be deactivated if you kill the Elite Wraith roaming around them. You must do this to unlock additional activities located near the towers. There is one Watchtower in the Caladrias: Forbidden Lands area.

Elite Foes
Elite Foes are stronger and evolved versions of normal foes. There are 13 Elite Wraiths in the game in total and 3 of them can be found and killed in the Caladrias: Forbidden Lands area.

Formulas
 Active Formula IITalk to the Researcher.
Dazzling Impact
Active Formula V
Biting Sandstorm
Formula I
Ruthless Generation
Ruthless Slayer
Formula IITo unlock this chest you have to complete the Sealing Totems (Caladrias #2).
Ruthless Protection
Rippling Destruction
Formula IV
Reigniting Shatter
Roaring Shatter
Formula VIt's a reward for completing the "The Watcher's Fury" side quest.
Idol's Frenzy
Idol's Restoration
Formula VIIt's a reward for completing the side quest "A Lost Soul".
Impetuous Retribution
Invigorating Pain
Formula VIII
Idol's Breath
Innate Parry
Formula IX
Generating Parry
Tenacious Parry
Formula X
Impairing Outburst
Slowing Plunge
Active Formula IITalk to the Researcher.
Dazzling Impact
Active Formula V
Biting Sandstorm
Formula I
Ruthless Generation
Ruthless Slayer
Formula IITo unlock this chest you have to complete the Sealing Totems (Caladrias #2).
Ruthless Protection
Rippling Destruction
Formula IV
Reigniting Shatter
Roaring Shatter
Formula VIt's a reward for completing the "The Watcher's Fury" side quest.
Idol's Frenzy
Idol's Restoration
Formula VIIt's a reward for completing the side quest "A Lost Soul".
Impetuous Retribution
Invigorating Pain
Formula VIII
Idol's Breath
Innate Parry
Formula IX
Generating Parry
Tenacious Parry
Formula X
Impairing Outburst
Slowing Plunge
Artefacts
Artefacts are a type of collectibles in Atlas Fallen. Artefacts can be sold to vendors for a certain amount of Tributes. Artefacts are divided into several groups and each artefact comes in one of three versions: common, rare and special. It is possible to find multiple pieces of the same artefact.
Gauntlet Shards
Gauntlet Shards in Atlas Fallen are needed to unlock and upgrade new abilities for the Gauntlet. There are 17 of them in total and 8 of them are located in Caladrias: Forbidden Lands.
 Enhanced Dash Shard
Enhanced Dash Shard
Enhanced Dash Shard
Unearth Shard
Unearth Shard
Enhanced Dash Shard
Enhanced Dash Shard
Enhanced Dash Shard
Enhanced Dash Shard
Unearth Shard
Unearth Shard
Side Quests
 A Lost SoulTalk to the Worried Mother.
Rewards: Formula VI (Impetuous Retribution, Invigorating Pain), Essence Dust.
Building BridgesTalk to Wornblade.
Rewards: Essence Dust.
Food for the PeopleTalk to Appleseed.
Rewards: Essence Dust, Straw Cover.
History of the Shattered KeepTalk to Lector.
Rewards: Scout's Gear, Essence Dust.
Honing Your SkillsTalk to Sarge.
Rewards: Disruptive Throw, Essence Dust.
Protecting the VillageTalk to Old Seven.
Rewards: Tributes, Active Formula I, Essence Dust.
The Watcher's FuryTalk to the Travelling Vendor.
Rewards: Formula V, Essence Dust.
A Lost SoulTalk to the Worried Mother.
Rewards: Formula VI (Impetuous Retribution, Invigorating Pain), Essence Dust.
Building BridgesTalk to Wornblade.
Rewards: Essence Dust.
Food for the PeopleTalk to Appleseed.
Rewards: Essence Dust, Straw Cover.
History of the Shattered KeepTalk to Lector.
Rewards: Scout's Gear, Essence Dust.
Honing Your SkillsTalk to Sarge.
Rewards: Disruptive Throw, Essence Dust.
Protecting the VillageTalk to Old Seven.
Rewards: Tributes, Active Formula I, Essence Dust.
The Watcher's FuryTalk to the Travelling Vendor.
Rewards: Formula V, Essence Dust.
Errands
 A Swamp HuntTalk to Lightbow.
Rewards: Idol of Time, Essence Dust.
Eyes in the DesertTalk to Goggles.
Rewards: Orange Dust, Essence Dust.
The Old MineTalk to Reck and Staid.
The Old MineTalk to Cutstone.
Rewards: Essence Dust, Nodrite, Ferdrite.
Unwanted AltarTalk to the Village Guard.
Rewards: Tributes, Mine... and yours, Essence Dust.
Weight of ResponsibilityTalk to David the Guard.
Rewards: Essence Dust.
A Swamp HuntTalk to Lightbow.
Rewards: Idol of Time, Essence Dust.
Eyes in the DesertTalk to Goggles.
Rewards: Orange Dust, Essence Dust.
The Old MineTalk to Reck and Staid.
The Old MineTalk to Cutstone.
Rewards: Essence Dust, Nodrite, Ferdrite.
Unwanted AltarTalk to the Village Guard.
Rewards: Tributes, Mine... and yours, Essence Dust.
Weight of ResponsibilityTalk to David the Guard.
Rewards: Essence Dust.
Quest Related
Not mentioned elsewhere, various quest items, NPCs or places that you must find, collect or talk to, to complete some of the quests.

Traders
 Travelling Vendor
Idol of Wound (1250)
Idol of Deflection (1250)
Hurling Lance (1250)
Crystallised Rage (1250)
The Great View (250)
Ever Burning Sun Pauldron (950)
Gold Dye (1250)
White Dye (1250)
Copper Dye (950)
Cyan Dye (950)
Pink Dye (950)
Travelling Vendor
Travelling Vendor
Travelling Vendor
Travelling Vendor
Village Vendor
Purger's Warsuit (1500)
Active Formula III (650)
Active Formula IV (650)
Hidden on the Cliffs (950)
Black Dye (1250)
Travelling Vendor
Travelling Vendor
Idol of Wound (1250)
Idol of Deflection (1250)
Hurling Lance (1250)
Crystallised Rage (1250)
The Great View (250)
Ever Burning Sun Pauldron (950)
Gold Dye (1250)
White Dye (1250)
Copper Dye (950)
Cyan Dye (950)
Pink Dye (950)
Travelling Vendor
Travelling Vendor
Travelling Vendor
Travelling Vendor
Village Vendor
Purger's Warsuit (1500)
Active Formula III (650)
Active Formula IV (650)
Hidden on the Cliffs (950)
Black Dye (1250)
Tributes
These are various chests or other places where you will find a certain amount of Tributes.
Material Chests
These are different chests in which you will find some materials.
Passage

Other
 KnuckledustWeapon. Defeat the Tailguarder.
PassageYou need an Enhanced Air Dash to get to the other side.
PassageYou need an Enhanced Air Dash to get to the other side.
PassageYou need an Enhanced Air Dash to get to the other side.
Stone PlatformYou need upgraded Uneart to move this up. It will allow you to reach Old Battles and Red Dye.
KnuckledustWeapon. Defeat the Tailguarder.
PassageYou need an Enhanced Air Dash to get to the other side.
PassageYou need an Enhanced Air Dash to get to the other side.
PassageYou need an Enhanced Air Dash to get to the other side.
Stone PlatformYou need upgraded Uneart to move this up. It will allow you to reach Old Battles and Red Dye.