Merlin Trials Hogwarts Legacy Points of interest
There are a total of 95 Merlin Trials in the Hogwarts Legacy. All of them can be found in the Highlands. They are simple puzzles that in most cases require the use of one of the spells you can learn to achieve a certain goal. To unlock Merlin Trials you must complete the main quest "Trials of Merlin".
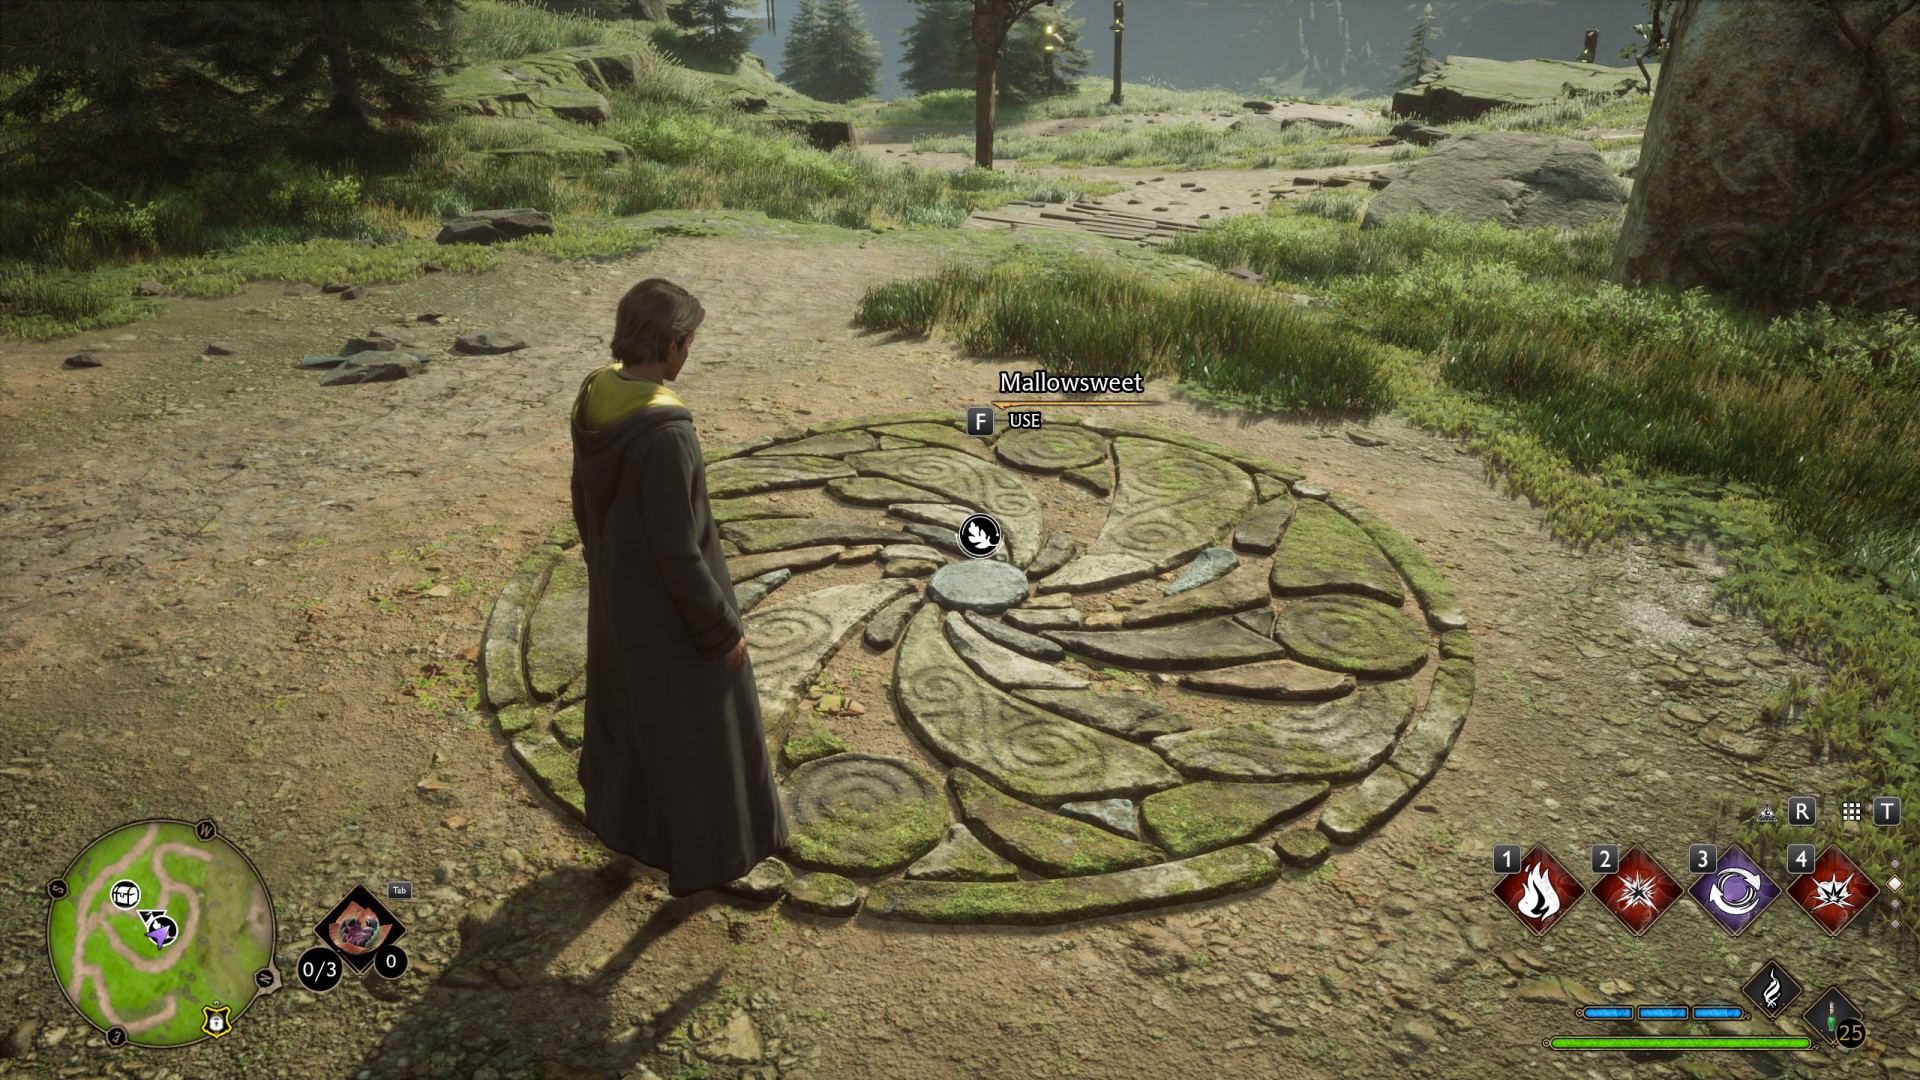
To start the trial you need to approach the stone circle and interact with it. To be able to do this you need the Mallowsweet Leaf. You can grow it yourself in the Room of Requirement. Mallowsweet seeds can be purchased from The Magic Neep. They can be grown in pots of any size.
As a reward for solving the Merlin Trials and completing the Merlin Trials challenges, your inventory capacity will increase.
- +4 additional gear slots when you complete 2 trials
- +4 additional gear slots after completing a total of 8 trials
- +4 additional gear slots after completing a total of 18 trials
- +4 additional gear slots after completing a total of 32 trials
- +4 additional gear slots after completing a total of 52 trials
Index
- Merlin Trial (Clagmar Coast 1/5)
- Merlin Trial (Clagmar Coast 2/5)
- Merlin Trial (Clagmar Coast 3/5)
- Merlin Trial (Clagmar Coast 4/5)
- Merlin Trial (Clagmar Coast 5/5)
- Merlin Trial (Cragcroftshire 1/5)
- Merlin Trial (Cragcroftshire 2/5)
- Merlin Trial (Cragcroftshire 3/5)
- Merlin Trial (Cragcroftshire 4/5)
- Merlin Trial (Cragcroftshire 5/5)
- Merlin Trial (Feldcroft Region 1/16)
- Merlin Trial (Feldcroft Region 2/16)
- Merlin Trial (Feldcroft Region 3/16)
- Merlin Trial (Feldcroft Region 4/16)
- Merlin Trial (Feldcroft Region 5/16)
- Merlin Trial (Feldcroft Region 6/16)
- Merlin Trial (Feldcroft Region 7/16)
- Merlin Trial (Feldcroft Region 8/16)
- Merlin Trial (Feldcroft Region 9/16)
- Merlin Trial (Feldcroft Region 10/16)
- Merlin Trial (Feldcroft Region 11/16)
- Merlin Trial (Feldcroft Region 12/16)
- Merlin Trial (Feldcroft Region 13/16)
- Merlin Trial (Feldcroft Region 14/16)
- Merlin Trial (Feldcroft Region 15/16)
- Merlin Trial (Feldcroft Region 16/16)
- Merlin Trial (Forbidden Forest 1/3)
- Merlin Trial (Forbidden Forest 2/3)
- Merlin Trial (Forbidden Forest 3/3)
- Merlin Trial (Hogsmeade Valley 1/5)
- Merlin Trial (Hogsmeade Valley 2/5)
- Merlin Trial (Hogsmeade Valley 3/5)
- Merlin Trial (Hogsmeade Valley 4/5)
- Merlin Trial (Hogsmeade Valley 5/5)
- Merlin Trial (Hogwarts Valley 1/16)
- Merlin Trial (Hogwarts Valley 2/16)
- Merlin Trial (Hogwarts Valley 3/16)
- Merlin Trial (Hogwarts Valley 4/16)
- Merlin Trial (Hogwarts Valley 5/16)
- Merlin Trial (Hogwarts Valley 6/16)
- Merlin Trial (Hogwarts Valley 7/16)
- Merlin Trial (Hogwarts Valley 8/16)
- Merlin Trial (Hogwarts Valley 9/16)
- Merlin Trial (Hogwarts Valley 10/16)
- Merlin Trial (Hogwarts Valley 11/16)
- Merlin Trial (Hogwarts Valley 12/16)
- Merlin Trial (Hogwarts Valley 13/16)
- Merlin Trial (Hogwarts Valley 14/16)
- Merlin Trial (Hogwarts Valley 15/16)
- Merlin Trial (Hogwarts Valley 16/16)
- Merlin Trial (Manor Cape 1/5)
- Merlin Trial (Manor Cape 2/5)
- Merlin Trial (Manor Cape 3/5)
- Merlin Trial (Manor Cape 4/5)
- Merlin Trial (Manor Cape 5/5)
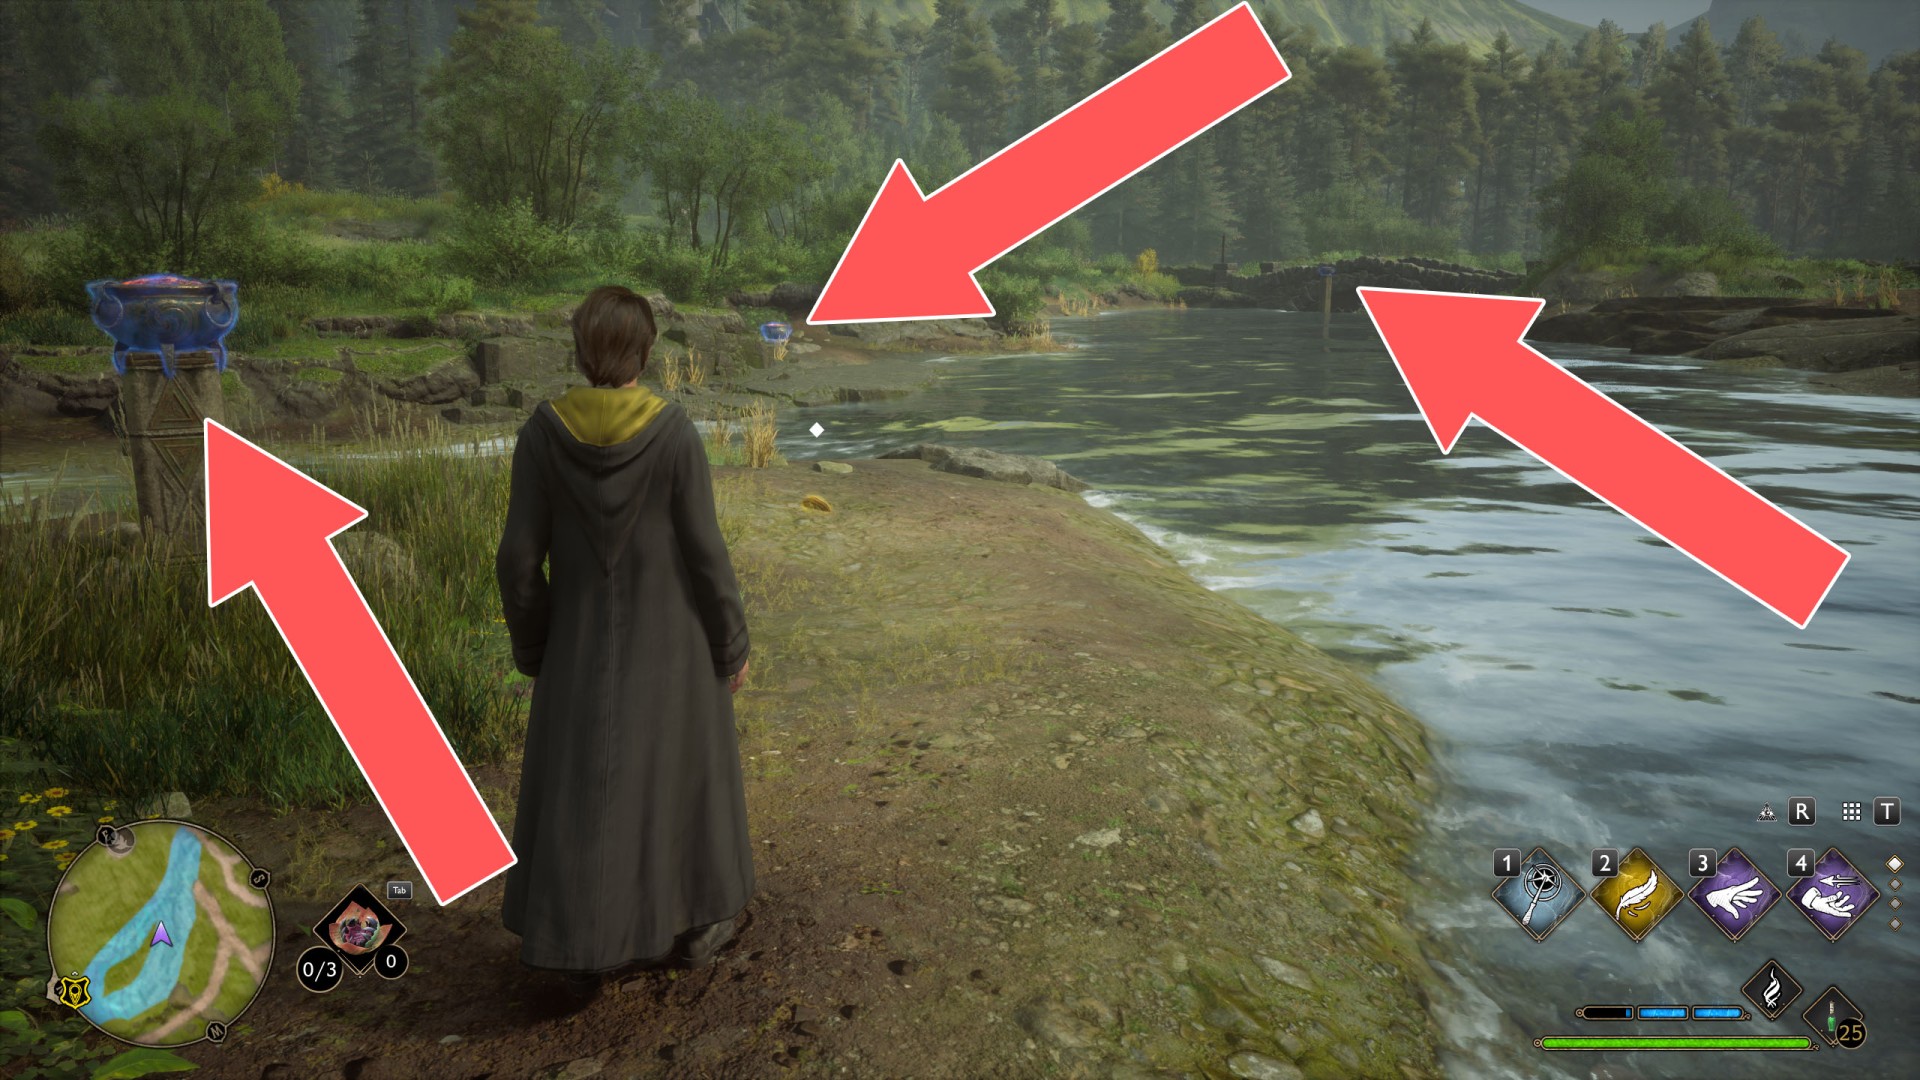
- Merlin Trial (Marunweem Lake 1/4)
- Merlin Trial (Marunweem Lake 2/4)
- Merlin Trial (Marunweem Lake 3/4)
- Merlin Trial (Marunweem Lake 4/4)
- Merlin Trial (North Ford Bog 1/4)
- Merlin Trial (North Ford Bog 2/4)
- Merlin Trial (North Ford Bog 3/4)
- Merlin Trial (North Ford Bog 4/4)
- Merlin Trial (North Hogwarts Region 1/5)
- Merlin Trial (North Hogwarts Region 2/5)
- Merlin Trial (North Hogwarts Region 3/5)
- Merlin Trial (North Hogwarts Region 4/5)
- Merlin Trial (North Hogwarts Region 5/5)
- Merlin Trial (Poidsear Coast 1/10)
- Merlin Trial (Poidsear Coast 2/10)
- Merlin Trial (Poidsear Coast 3/10)
- Merlin Trial (Poidsear Coast 4/10)
- Merlin Trial (Poidsear Coast 5/10)
- Merlin Trial (Poidsear Coast 6/10)
- Merlin Trial (Poidsear Coast 7/10)
- Merlin Trial (Poidsear Coast 8/10)
- Merlin Trial (Poidsear Coast 9/10)
- Merlin Trial (Poidsear Coast 10/10)
- Merlin Trial (South Hogwarts Region 1/15)
- Merlin Trial (South Hogwarts Region 2/15)
- Merlin Trial (South Hogwarts Region 3/15)
- Merlin Trial (South Hogwarts Region 4/15)
- Merlin Trial (South Hogwarts Region 5/15)
- Merlin Trial (South Hogwarts Region 6/15)
- Merlin Trial (South Hogwarts Region 7/15)
- Merlin Trial (South Hogwarts Region 8/15)
- Merlin Trial (South Hogwarts Region 9/15)
- Merlin Trial (South Hogwarts Region 10/15)
- Merlin Trial (South Hogwarts Region 11/15)
- Merlin Trial (South Hogwarts Region 12/15)
- Merlin Trial (South Hogwarts Region 13/15)
- Merlin Trial (South Hogwarts Region 14/15)
- Merlin Trial (South Hogwarts Region 15/15)
- Merlin Trial (South Sea Bog 1/2)
- Merlin Trial (South Sea Bog 2/2)
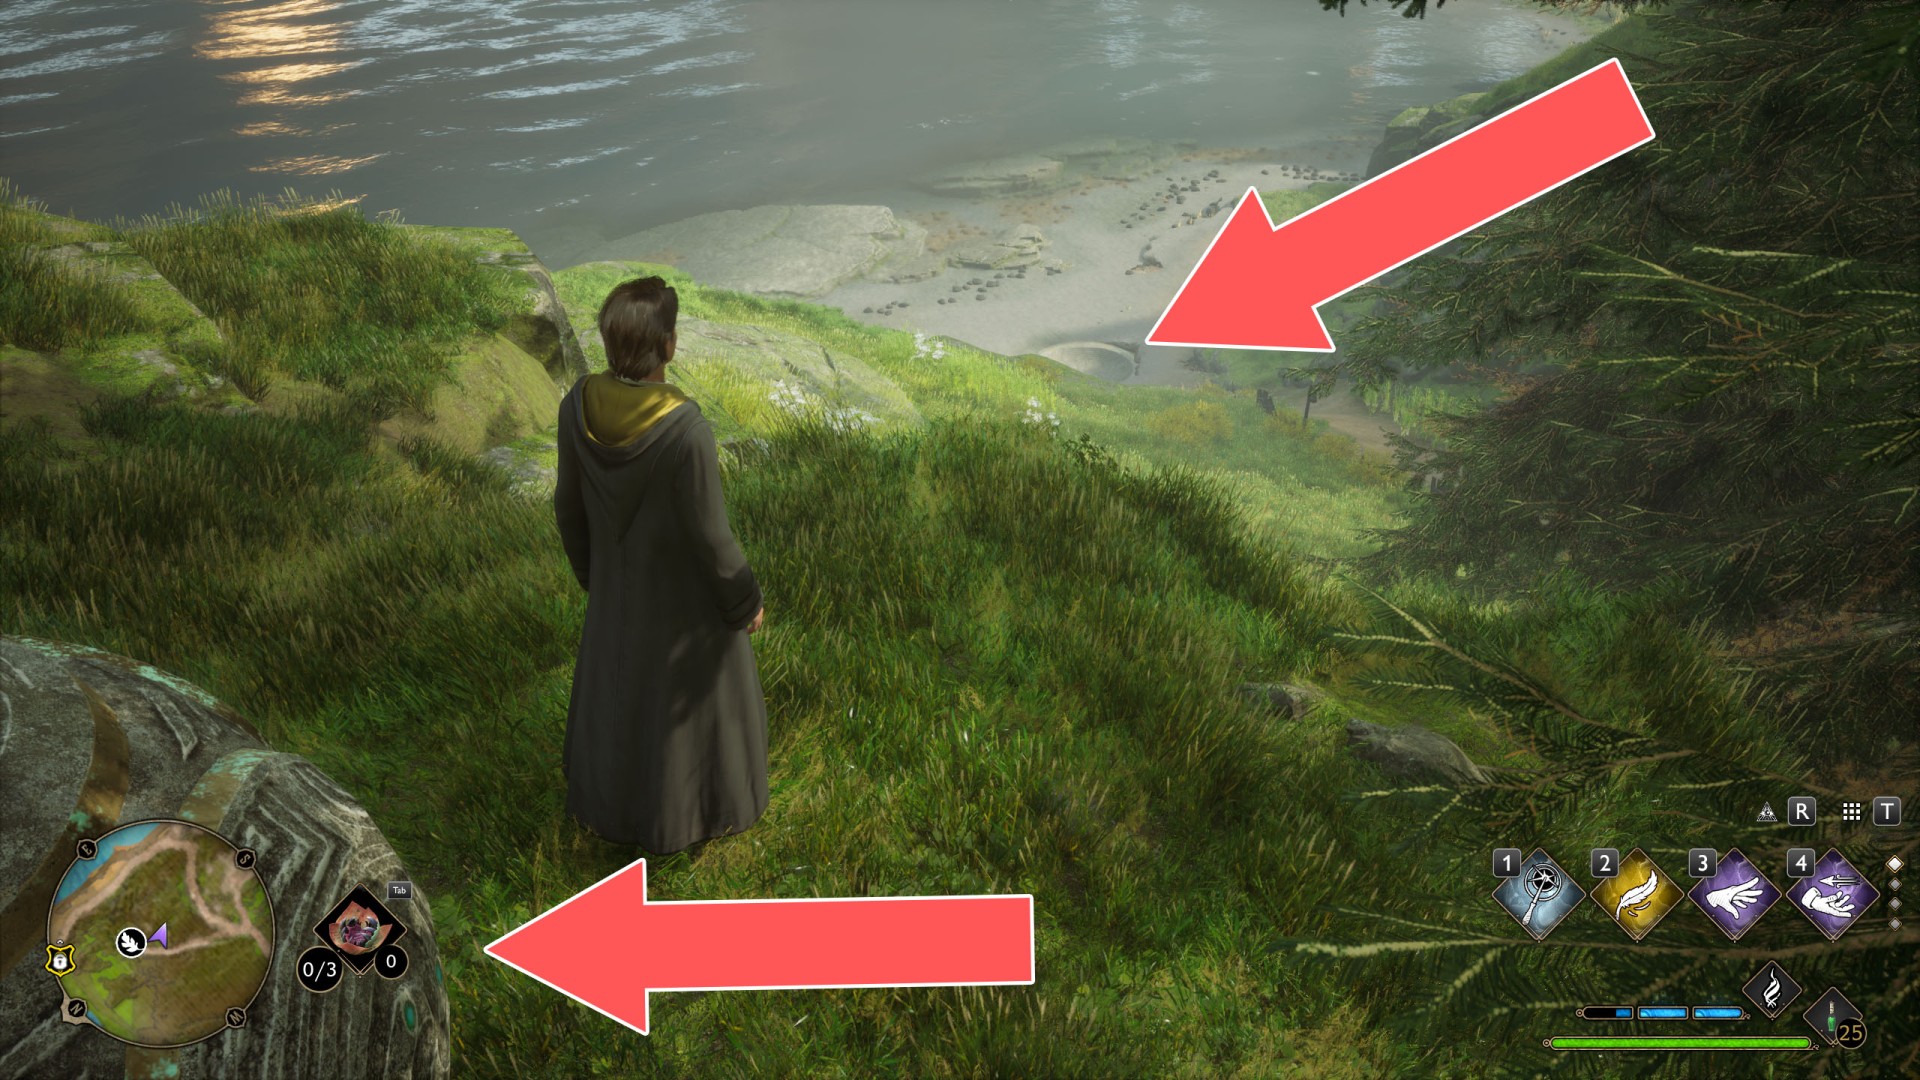
All known locations on the map Highlands / World
 Merlin Trial (Clagmar Coast 1/5)▶ show the map ◀
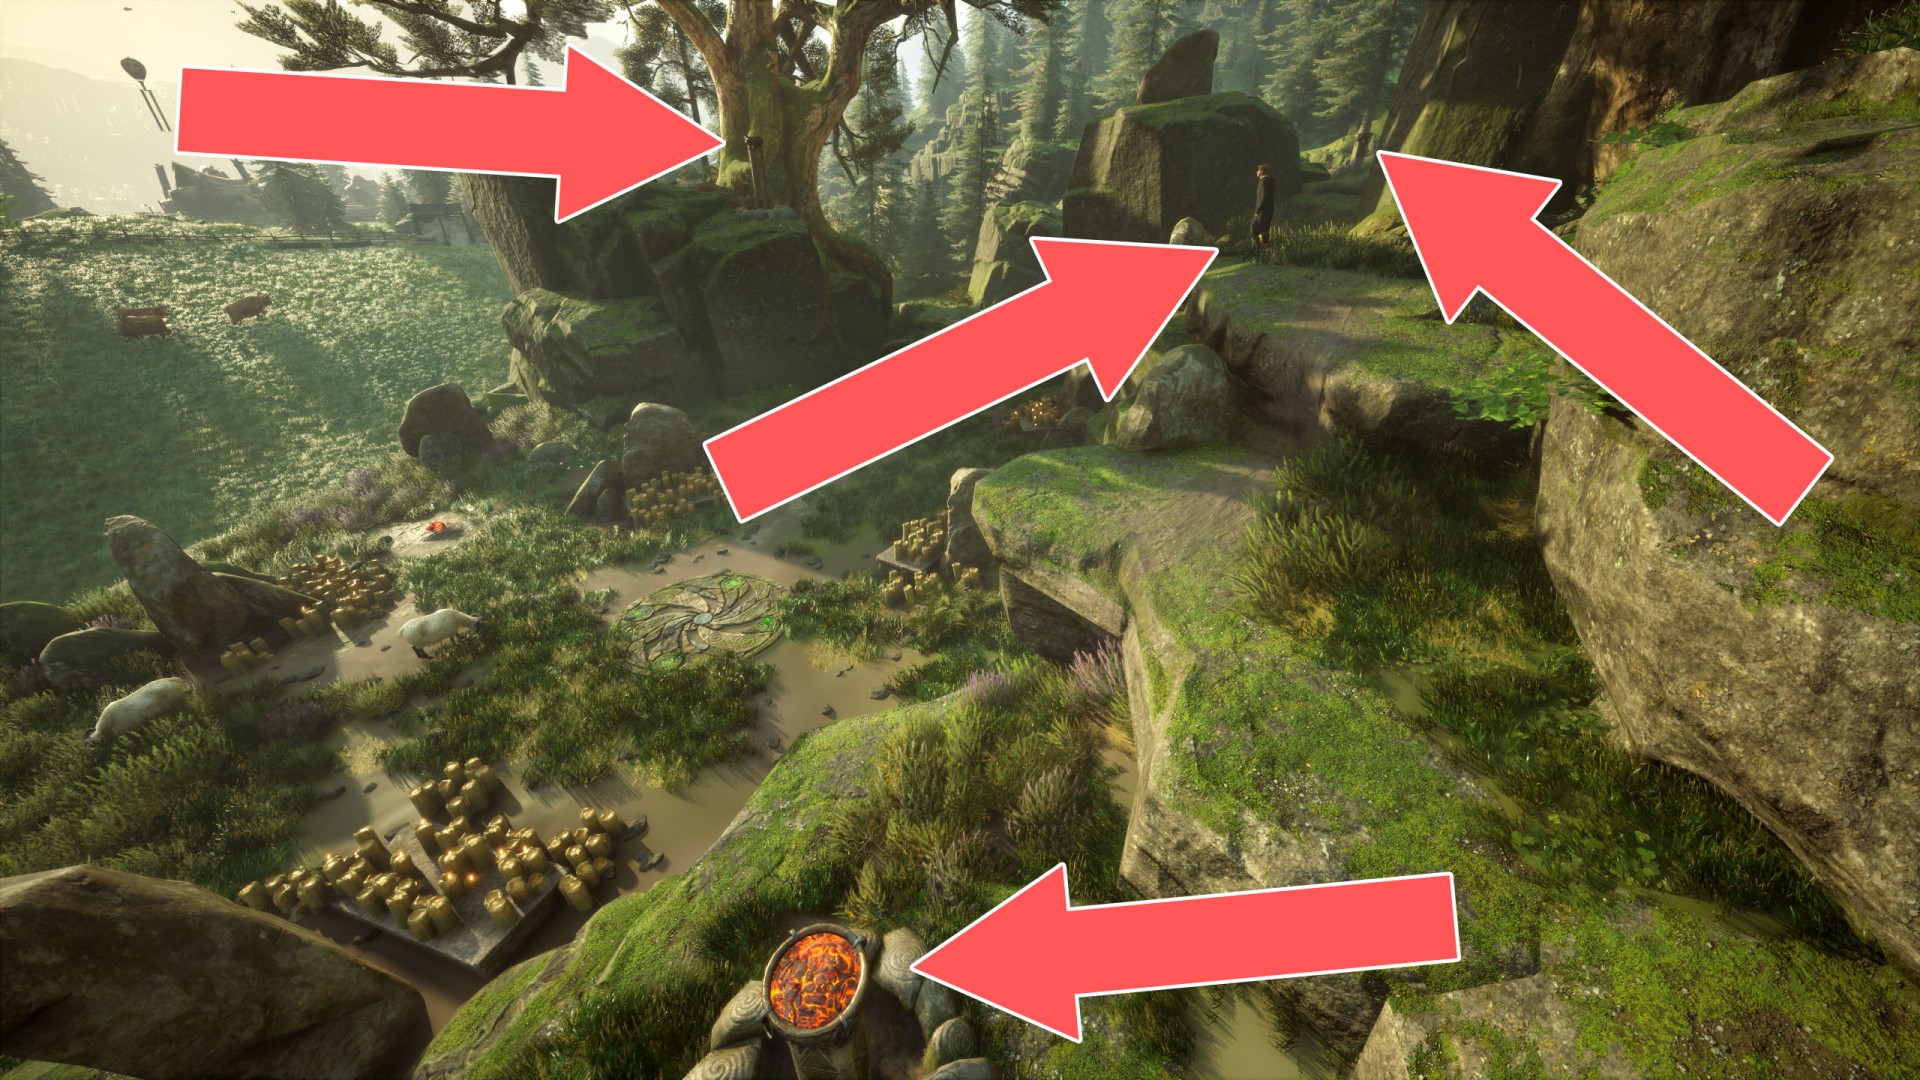
Using Lumos, bring the glowing butterflies to the lantern pillars surrounding the stone circle located on the hill. The first butterflies are down, in front of the elevator, the second ones are at the crossroads to the north, and tle last ones are to the southeast of the hill. To operate the elevator you have to use Depulso and then recast Lumos to attract the butterflies again.
Merlin Trial (Clagmar Coast 2/5)▶ show the map ◀
Using Flipendo, rotate the cubes on the pillars so that the symbols on the cubes and pillars match. One pillar is in the ruins to the north and two more are in the ruins on the hill to the east.
Merlin Trial (Clagmar Coast 3/5)▶ show the map ◀
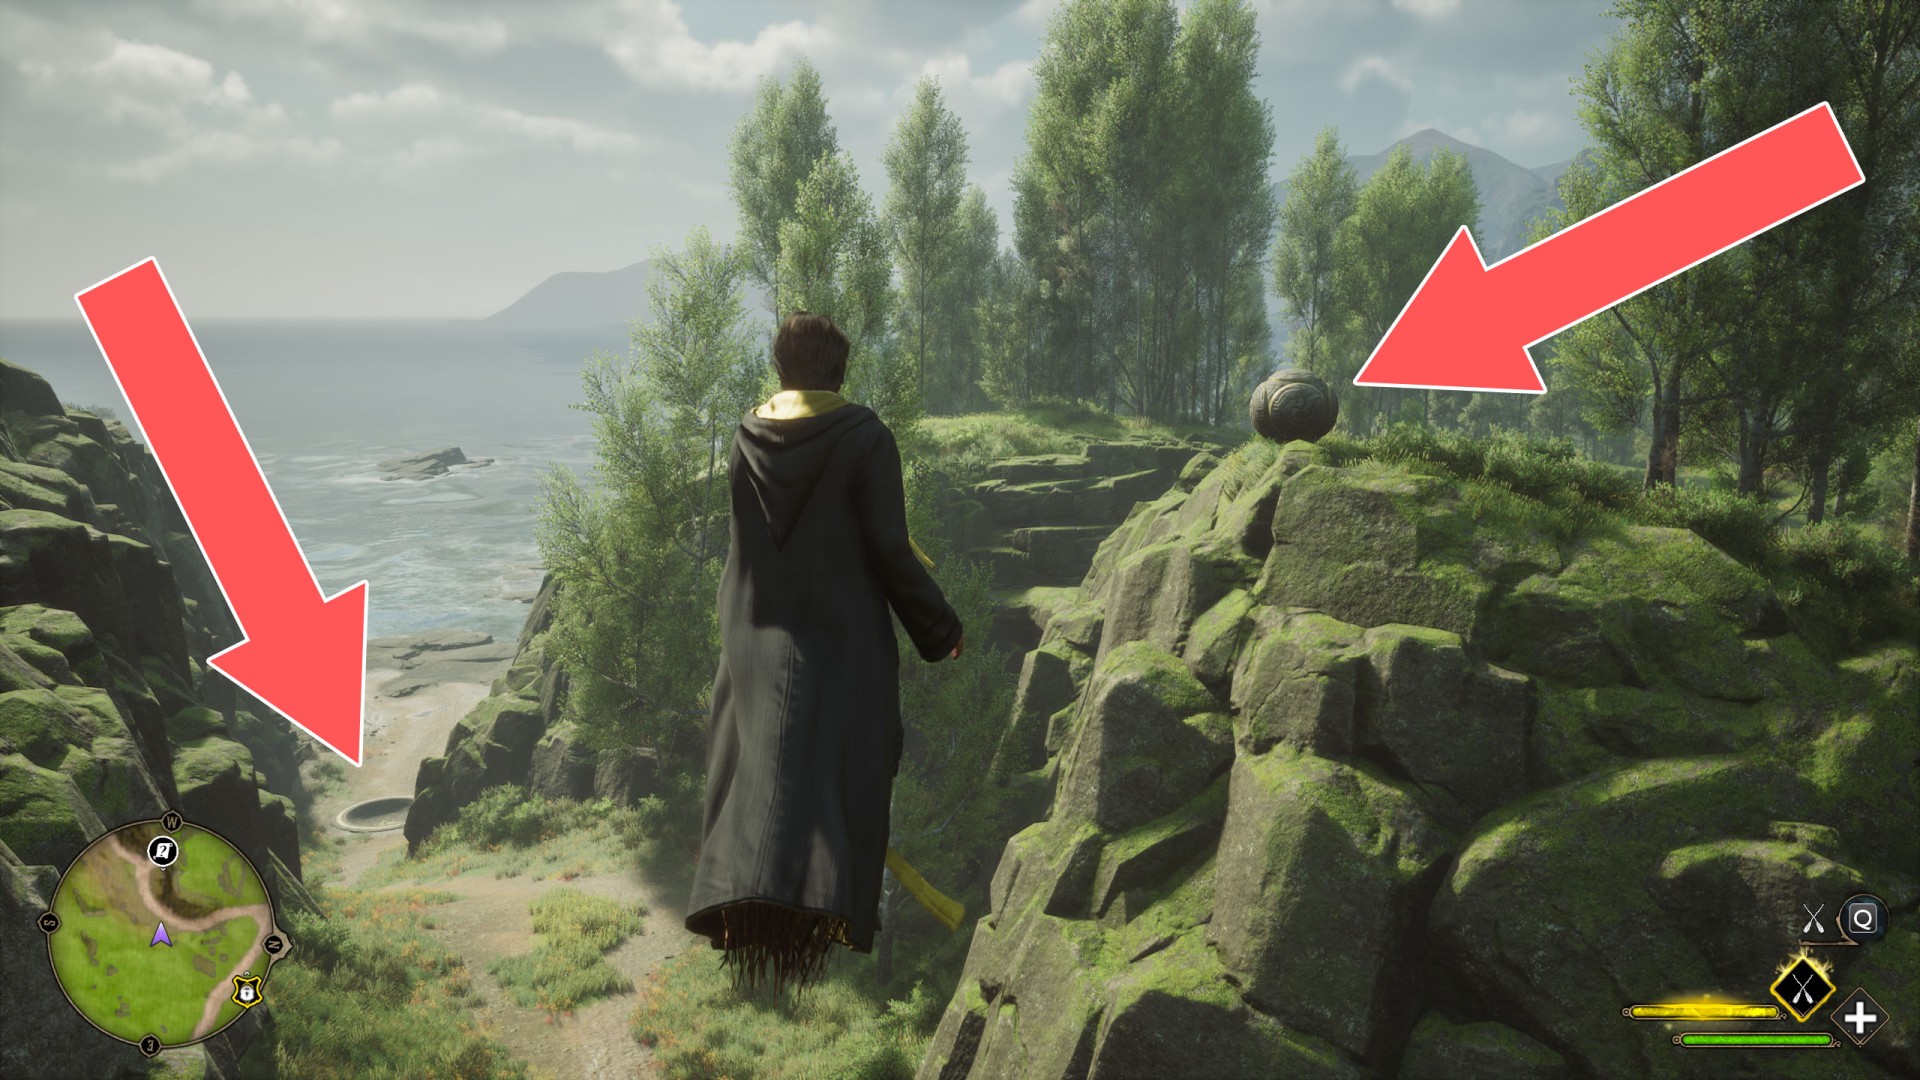
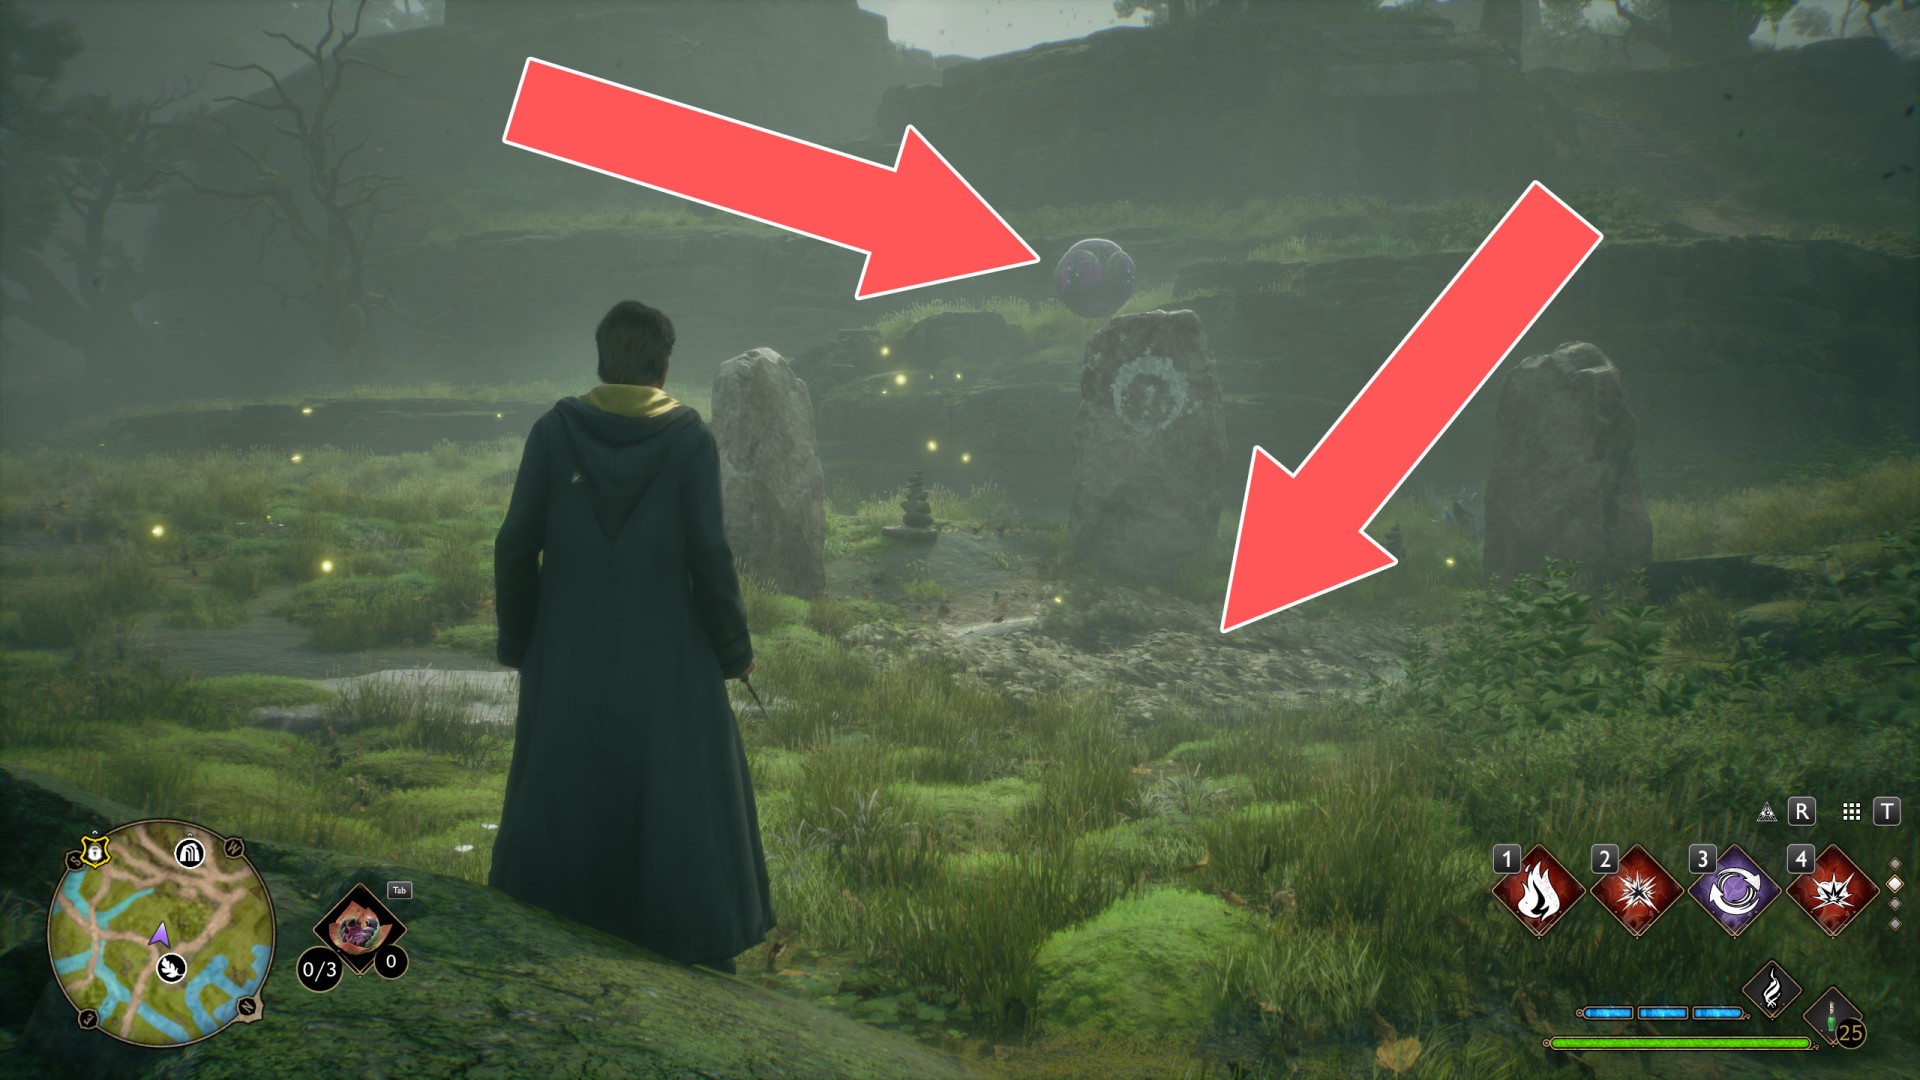
Use your wand to destroy the nine balls with small holes that you will find in or near the field located south of the stone circle.
Merlin Trial (Clagmar Coast 4/5)▶ show the map ◀
Use Confringo or Bombarda to blast the five stone boulders / pillars. Two of them are on the lower level, two more are on top of the rocks so look up, and the last one you will find on a tiny rocky island in the sea, slightly to the south.
Merlin Trial (Clagmar Coast 5/5)▶ show the map ◀
Use Reparo on three broken pillars located on the rocks sticking out of the sea.
Merlin Trial (Cragcroftshire 1/5)▶ show the map ◀
Use Confringo or Bombarda to blast the five stone boulders palced around the ruins. One is in the courtyard, east of the stone circle. The other is on top of the rock southeast of the stone circle. The third is on top of the rock to the north of the stone circle. The fourth is in the ruins northeast of the stone circle (destroy the wooden door to spot it). The last one is on a rock southeast of the ruins. You can see it through a hole in the wall.
Merlin Trial (Cragcroftshire 2/5)▶ show the map ◀
Merlin Trial (Cragcroftshire 3/5)▶ show the map ◀
Merlin Trial (Cragcroftshire 4/5)▶ show the map ◀
Merlin Trial (Cragcroftshire 5/5)▶ show the map ◀
Merlin Trial (Feldcroft Region 1/16)▶ show the map ◀
Use Confringo or Bombarda to blast the five stone boulders / pillars. You will find two of them to the southwest, one at the base of the rocks and the other on top. Two more are to the east, one on the hill and the other more in the center of the camp. The last one is on top of a rock to the northeast, next to the triangular canopy.
Merlin Trial (Feldcroft Region 2/16)▶ show the map ◀
Using Flipendo, rotate the cubes on the pillars so that the symbols on the cubes and pillars match. One pillar is to the west (by the rocks), another one is to the east (next to the wooden cart), the last one is to the southwest (behind the tent).
Merlin Trial (Feldcroft Region 3/16)▶ show the map ◀
Jump over all five stone pillars located near the stone circle without falling to the ground. You can't use the wooden platform either. You must destroy the crates, etc. standing on one of the pillars.
Merlin Trial (Feldcroft Region 4/16)▶ show the map ◀
Use Confringo or Bombarda to blast the five stone boulders / pillars. Four of them are visible from the stone circle. You can find the last one in the rock alcove. Follow the path down to the southwest of the stone circle. It is additionally overgrown with vines.
Merlin Trial (Feldcroft Region 5/16)▶ show the map ◀
Use your wand to destroy the nine balls with small holes that you will find around the stone circle. To the southeast, on the hill to the southwest, and to the west, on the other bank.
Merlin Trial (Feldcroft Region 6/16)▶ show the map ◀
Using Confringo, light all three braziers located on the pillars before the first one of them sinks into the water and resets. One of the braziers is to the east, the second one is on the rocks to the southeast and the last one is on the rocks to the south.
Merlin Trial (Feldcroft Region 7/16)▶ show the map ◀
Jump over all four stone platforms without falling into the water.
Merlin Trial (Feldcroft Region 8/16)▶ show the map ◀
Using Reparo, repair three stone statues. One of them is to the northwest, another one is on the rocks to the northeast. You will find the last one by following the road to the north.
Merlin Trial (Feldcroft Region 9/16)▶ show the map ◀
Use your wand to destroy the nine balls with small holes. Three of them are few steps from the stone circle, six more are in the ruins to the northeast.
Merlin Trial (Feldcroft Region 10/16)▶ show the map ◀
Use Confringo or Bombarda to blast the five stone boulders / pillars. Two of them are on the beach, one is right next to the stone circle, the other is more to the south on the other side of the hill. Three more are at the top of three nearby hills.
Merlin Trial (Feldcroft Region 11/16)▶ show the map ◀
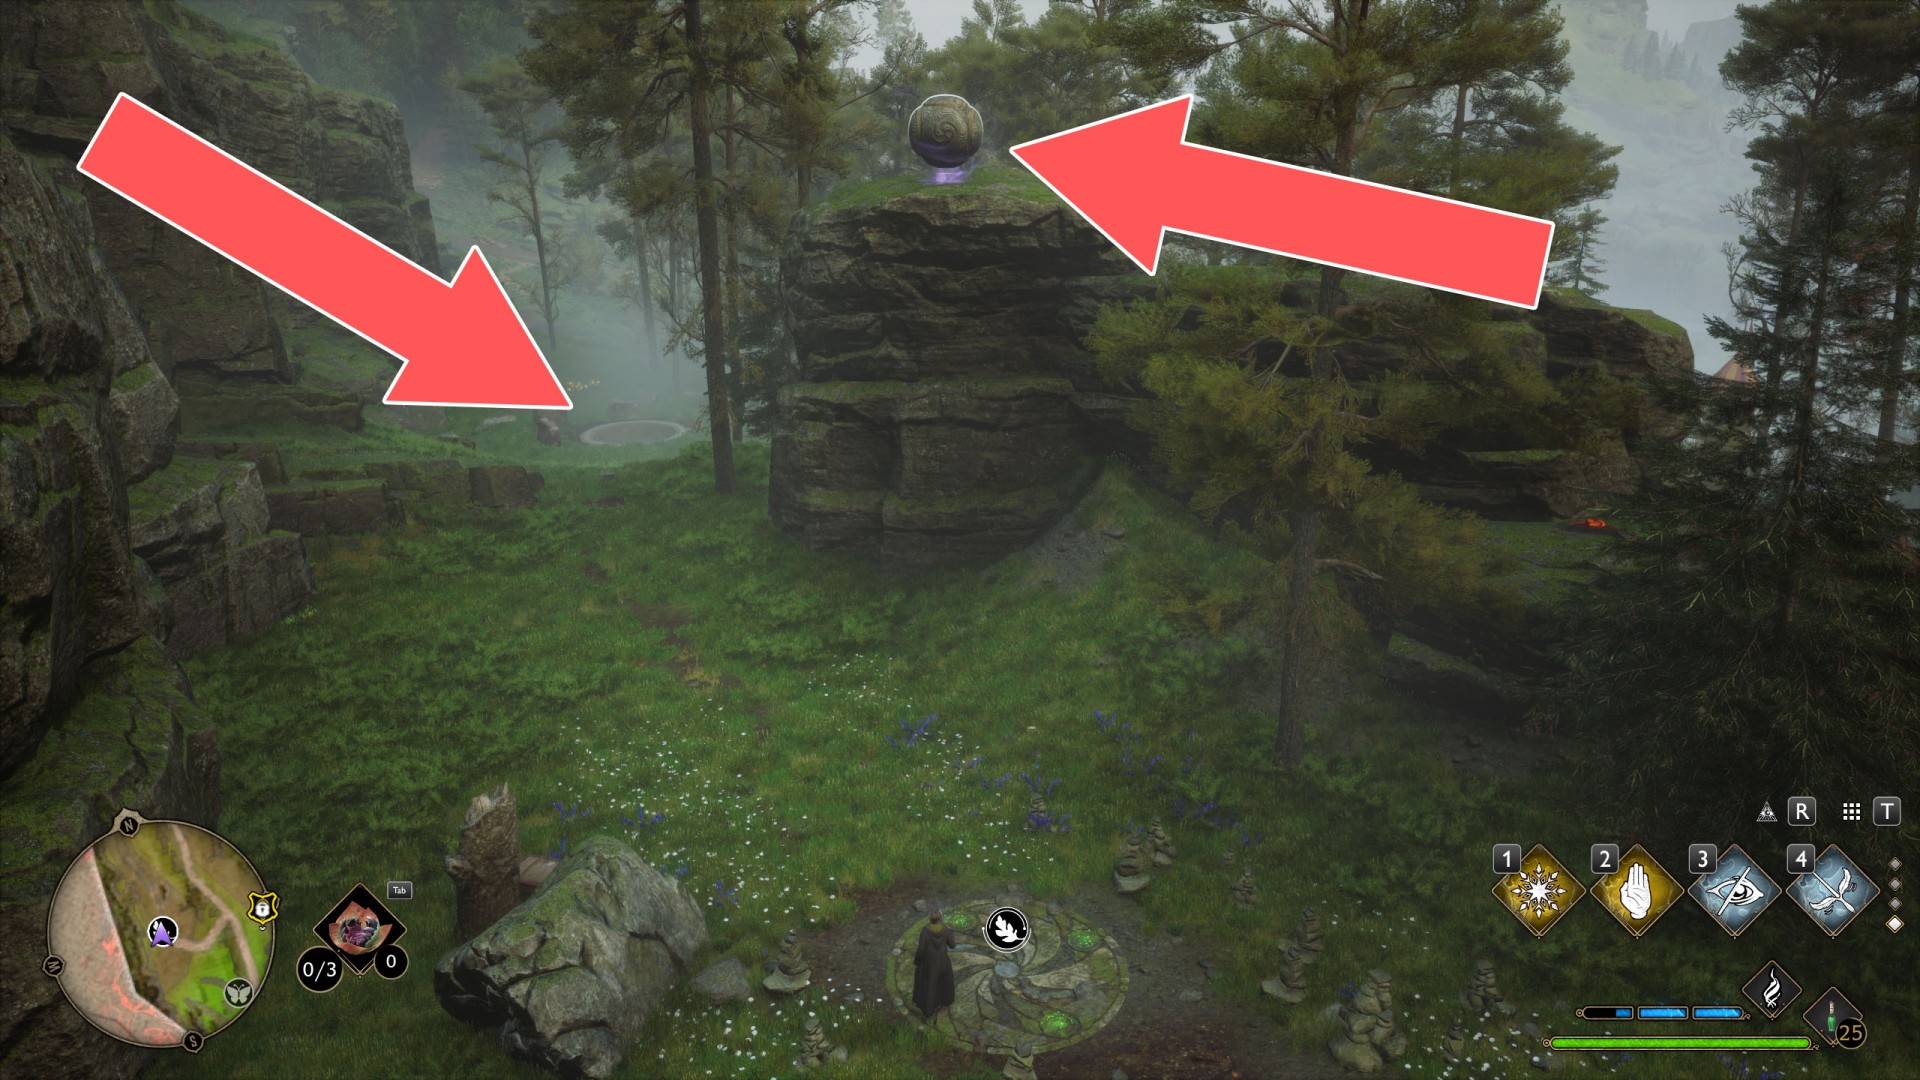
On the rocks to the northeast of the stone circle you will find a stone ball which you must bring to the hollow at the bottom of the path. The easiest way to do this is to use Depulso.
Merlin Trial (Feldcroft Region 12/16)▶ show the map ◀
Use Confringo or Bombarda to blast the five stone boulders / pillars. One of them is on the hill to the southwest, another one a bit more to the west, at the base of the rocks (it blocks the access to the legendary chest), third one is to the north, next one is to the east, and the last one is to the north-northeast (on top of the rocks).
Merlin Trial (Feldcroft Region 13/16)▶ show the map ◀
Using Lumos, bring the glowing butterflies to the three lantern pillars. The butterflies are on the cliff to the west, to the south of the stone circle, and to the northeast, by the entrance to the treasure vault located there.
Merlin Trial (Feldcroft Region 14/16)▶ show the map ◀
Use Confringo or Bombarda to blast the five stone boulders / pillars. Four of them are situated not far from the stone circle, and the last one is slightly to the east, next to the path leading up the mountain.
Merlin Trial (Feldcroft Region 15/16)▶ show the map ◀
Using Confringo, light all three braziers located on the pillars before the first one of them sinks into the water and resets. The first brazier is to the northeast, on the other side of the bridge, the next one is to the west of the stone circle, the last one is to the southeast, on the river (Hit it as the last one because it has the shortest pillar so it resets quickly).
Merlin Trial (Feldcroft Region 16/16)▶ show the map ◀
Use your wand to destroy the nine balls with small holes. Three of them are to the east, three more are to the south, near the floo flame, and the last three are on the hill, nortwest of the stone circle.
Merlin Trial (Forbidden Forest 1/3)▶ show the map ◀
Using Lumos, bring the glowing butterflies to three lantern pillars. The butterflies are: few steps to the south of the stone circle, next to the vines; in a small alcove located to the west, use Depulso or Confringo to blast the boulders blocking the access; in the wooden tower located to the east of the stone circle.
Merlin Trial (Forbidden Forest 2/3)▶ show the map ◀
There are 8 stone pillars nearby, climb up the first one and then jump over all the others without falling to the ground.
Merlin Trial (Forbidden Forest 3/3)▶ show the map ◀
Using Confringo, light all three braziers located on the pillars before the first one of them sinks into the water. One of the braziers is to the southeast (look for the spider webs), the second one is to the north, and the last one is to the west. Revelio should help you locate them.
Merlin Trial (Hogsmeade Valley 1/5)▶ show the map ◀
Use Confringo or Bombarda to blast the five stone boulders / pillars. They are all around a stone circle. Only one of them is slightly hidden behind a larger boulder, the rest are clearly visible when you stand in the middle.
Merlin Trial (Hogsmeade Valley 2/5)▶ show the map ◀
Using Confringo, ignite all three braziers located on the pillars before the first one sinks into the water and resets. All of them will be within your reach if you climb onto the rocks east of the stone circle.
Merlin Trial (Hogsmeade Valley 3/5)▶ show the map ◀
Use a spell that allows you to move objects, such as Depulso or Wingardium Leviosa to push a large stone ball located to the north of the stone circle down the path to the left of the ball. The pit where ball should reach is at the other end of this path. Be careful because if you get too close to this path you will slide down it yourself.
Merlin Trial (Hogsmeade Valley 4/5)▶ show the map ◀
The easiest way to get here is by using a broom. To get here on foot you must burn the vines and destroy the grate covering the entrance to the small cave (located near the river) and walk through it.
Using Lumos, bring the glowing butterflies to three lantern pillars. The first butterflies are next to the stone circle, the second butterflies are in the hole (descent into the cave), few steps to the east of the stone circle, and the last ones are to the south. The lanterns are to the southeast, to the southwest, and to the west.
Merlin Trial (Hogsmeade Valley 5/5)▶ show the map ◀
Using Lumos, bring the glowing butterflies to the lantern pillars surrounding the platform. The first butterflies are to the east, down the road. The next ones are further up that road, behind the wooden barricade. The last ones are visible from the stone circle and they are on top of the rock, overlooking the trial, but you are likely to reach them last.
Merlin Trial (Hogwarts Valley 1/16)▶ show the map ◀
Use a spell that allows you to move objects, such as Accio or Wingardium Leviosa (required for one of the sets) to transport three sets of small round balls to the plates with holes. First set is on the rocks to the south and the plate with the holes is at the base of the rocks, slightly to the right. The second plate with holes is to the west and set of balls is to the north of it (use Depulso or Confringo to remove the rocks blocking the access). The last plate with holes is to the east. The balls are inside the tent you should spot on the hill to the north of it.
Merlin Trial (Hogwarts Valley 2/16)▶ show the map ◀
Use your wand to destroy the nine balls with small holes that you will find on the piles located around the stone circle. Some are obscured by rocks so you have to move around a bit.
Merlin Trial (Hogwarts Valley 3/16)▶ show the map ◀
Using Lumos, bring the glowing butterflies to the lantern pillars. The butterflies are in the open field to the north; to the east, against a wooden fence; in the open field to the west, slightly down.
Merlin Trial (Hogwarts Valley 4/16)▶ show the map ◀
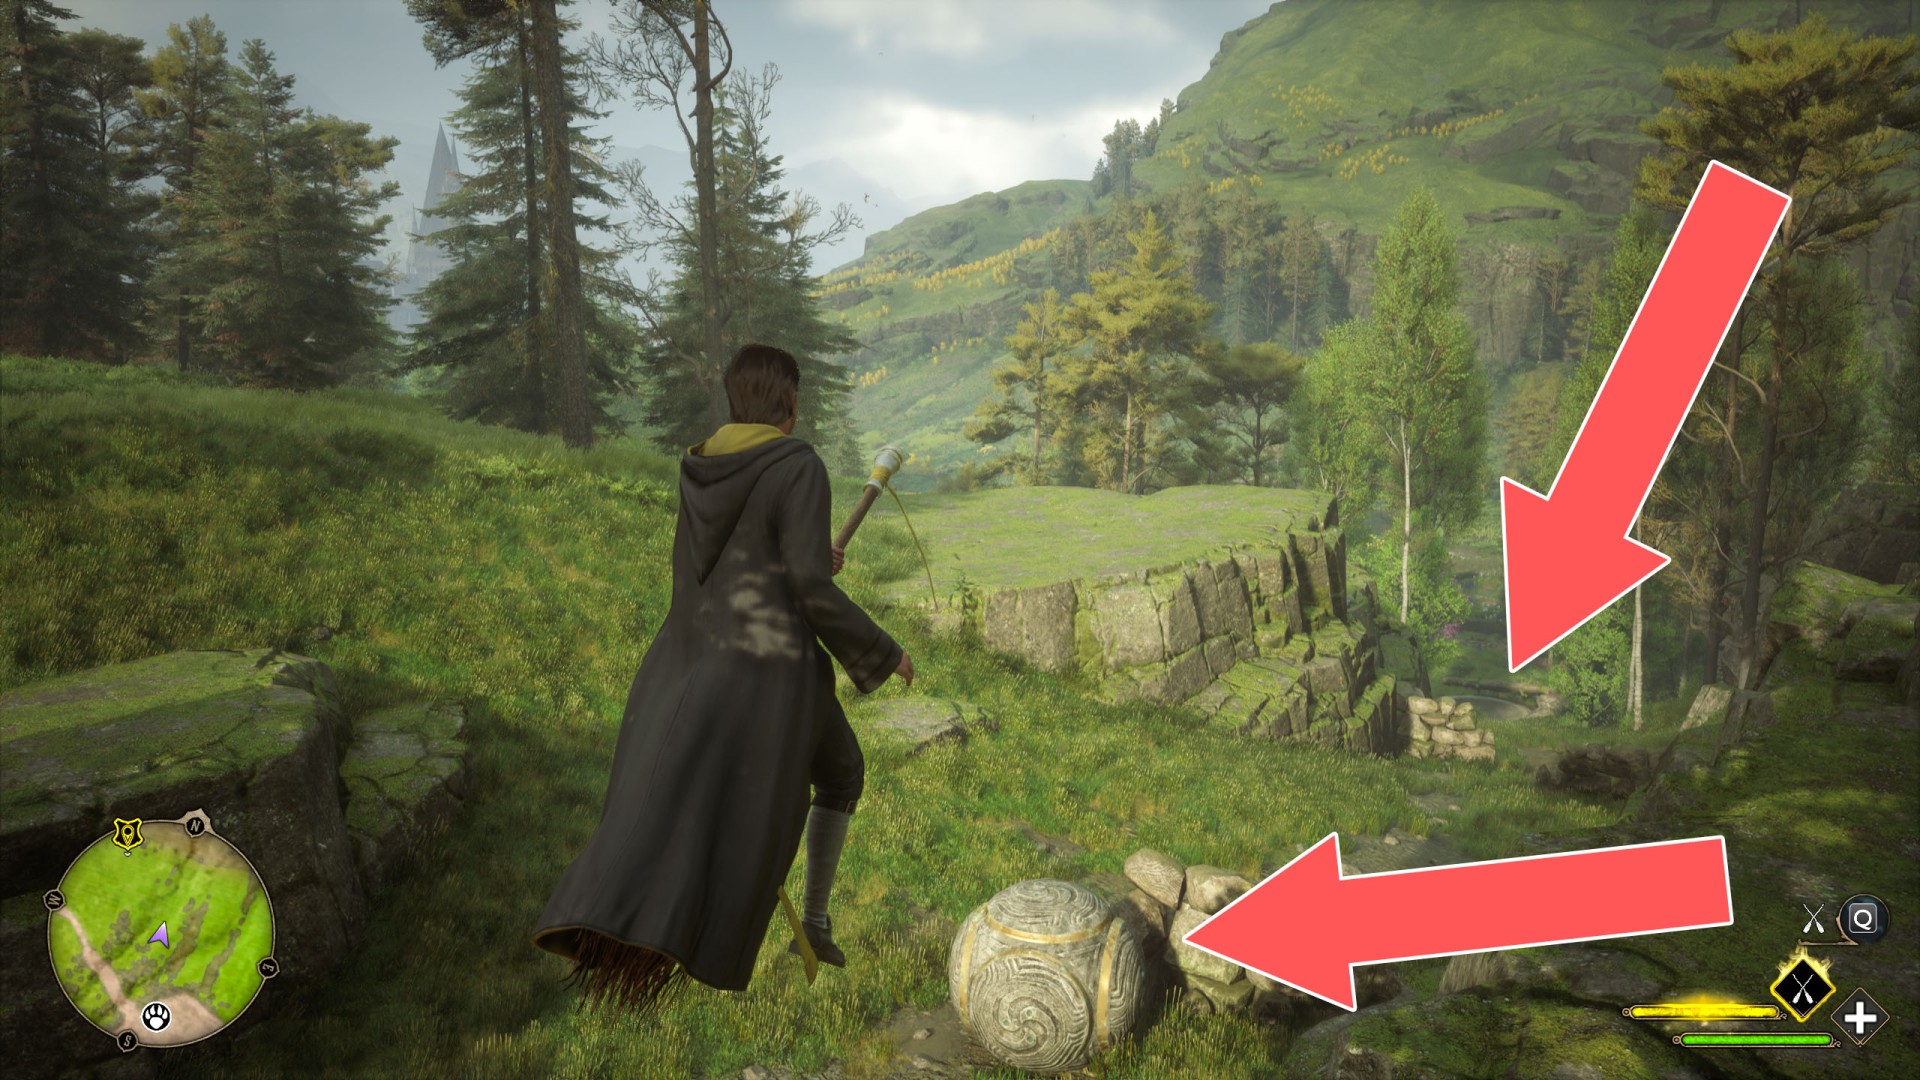
Head to the south of the village. There you will find a hole in the ground and at the end of the path going up a large stone ball. Use a spell that allows you to move objects, such as Depulso or Wingardium Leviosa to relocate this large stone ball to the hole.
Merlin Trial (Hogwarts Valley 5/16)▶ show the map ◀
Jump from one to another on four stone platforms without falling to the ground.
Merlin Trial (Hogwarts Valley 6/16)▶ show the map ◀
Using Confringo, ignite all three braziers located on the pillars before the first one sinks into the water and resets. All of them are located near the river. Start with the one by the bridge because it has the longest pillar meaning it will reset the slowest.
Merlin Trial (Hogwarts Valley 7/16)▶ show the map ◀
Use a spell that allows you to move objects, such as Accio or Wingardium Leviosa to transport three sets of small stone balls to the plates with holes. The first platform is a few steps to the southeast and the balls are a little further away, on the other side of the fence. The second platform and the balls for it are located to the west. You'll find the last platform and balls to the east, outside the camp. To relocate the balls you must first burn the vines blocking access to them.
Merlin Trial (Hogwarts Valley 8/16)▶ show the map ◀
Use your wand to destroy the nine balls with small holes that you will find around the ruins. Three of them are few steps to the north of the stone circle, three more are on top of the ruins located to the west, the last three are near the tower, to the southwest (one of them is hidden behind a pile of stones so you have to destroy them first).
Merlin Trial (Hogwarts Valley 9/16)▶ show the map ◀
Using Lumos, bring the glowing butterflies to the lantern pillars surrounding the platform. The butterflies are under the bridge, to the southwest; to the west, across the road; to the northeast, amidst the trees.
Merlin Trial (Hogwarts Valley 10/16)▶ show the map ◀
Use Confringo or Bombarda to blast the five stone boulders. They are all around the stone circle. One of them is obscured by another "ordinary" boulder, the rest are clearly visible when you stand on the stone circle.
Merlin Trial (Hogwarts Valley 11/16)▶ show the map ◀
Jump from one stone pillar to another (there are 3 of them) without falling off them.
Merlin Trial (Hogwarts Valley 12/16)▶ show the map ◀
Use a spell that allows you to move objects, such as Depulso or Wingardium Leviosa to relocate the large stone ball located to the west, in the middle of the village, next to the merchat, to the hole located on the other side of the bridge / river.
Merlin Trial (Hogwarts Valley 13/16)▶ show the map ◀
Using Reparo repair three statues. One of them is to the south, another one is to the north, under a circular canopy, and the last one, obscured by vines, is to the west.
Merlin Trial (Hogwarts Valley 14/16)▶ show the map ◀
Jump over all the stone platforms & one pillar from one to another (there are 5 of them) without falling off them.
Merlin Trial (Hogwarts Valley 15/16)▶ show the map ◀
Use a spell that allows you to move objects, such as Depulso or Wingardium Leviosa to relocate the large stone ball that you can find to the north of the stone circle to the hole located at the bottom of the path going down, on the other side of the rail tracks.
Merlin Trial (Hogwarts Valley 16/16)▶ show the map ◀
Using Confringo, light all three braziers located on the pillars before the first one of them sinks into the water and resets. First brazier (the tallest one) is on the cliff to the southwest, the second one is on the cliff to the northwest, the last one (shortest one) is behind some crates and an overturned cart just northeast of the stone circle.
Merlin Trial (Manor Cape 1/5)▶ show the map ◀
Using Confringo, light all three braziers located on the pillars before the first one of them sinks into the water and resets. Start with the brazier located next to the stone circle. The next one is on the hill to the west, next to the gazebo. The last one is to the southwest, by the stone stairs near the entrance to the hedge maze.
Merlin Trial (Manor Cape 2/5)▶ show the map ◀
Using Flipendo, rotate the cubes on the pillars so that the symbols on the cubes and pillars match. All cubes are visible from the stone circle.
Merlin Trial (Manor Cape 3/5)▶ show the map ◀
Merlin Trial (Manor Cape 4/5)▶ show the map ◀
Merlin Trial (Manor Cape 5/5)▶ show the map ◀
Merlin Trial (Marunweem Lake 1/4)▶ show the map ◀
Merlin Trial (Marunweem Lake 2/4)▶ show the map ◀
Merlin Trial (Marunweem Lake 3/4)▶ show the map ◀
Use a spell that allows you to move objects, such as Depulso or Wingardium Leviosa to relocate the large stone ball that is on the wooden platform in the nearby ruins to the hole located to the northeast, outside the ruins, on the other side of the wooden bridge.
Merlin Trial (Marunweem Lake 4/4)▶ show the map ◀
Using Flipendo, rotate the cubes on the pillars so that the symbols on the cubes and pillars match. All pillars are visible from the stone circle. Two of them are at the same level as stone circle, the last one is at the rocks to the southwest.
Merlin Trial (North Ford Bog 1/4)▶ show the map ◀
Jump from one to another on all six stone steps / platforms without falling to the ground.
Merlin Trial (North Ford Bog 2/4)▶ show the map ◀
Use Confringo or Bombarda to blast the five stone boulders / pillars. Three of them are covered by the vines (so burn them first) at the water level, and two more are on top of the cliff, to the southeast and to the north.
Merlin Trial (North Ford Bog 3/4)▶ show the map ◀
Using Flipendo, rotate the cubes on the pillars so that the symbols on the cubes and pillars match. all pillars are literally a few steps away from the stone circle.
Merlin Trial (North Ford Bog 4/4)▶ show the map ◀
Use a spell that allows you to move objects, such as Depulso or Wingardium Leviosa to relocate the large stone ball located on the hill to the southwest to the hole located in the same direction but a little closer, between the stone slabs. The hole is covered with vines which you must first burn.
Merlin Trial (North Hogwarts Region 1/5)▶ show the map ◀
Using Confringo, ignite all three braziers located on the pillars before the first one sinks into the water and resets. The first brazier is to the south west, the second one is inside ruined tower to the northwest (first burn the vines), and the last one is on the rocks to the north, slightly uphill. All of them should be within your reach from the wooden bridge.
Merlin Trial (North Hogwarts Region 2/5)▶ show the map ◀
Using Reparo repair four statues. Two of them are on the same side of the river as the stone circle and two more are on the other side.
Merlin Trial (North Hogwarts Region 3/5)▶ show the map ◀
Using Flipendo, rotate the cubes on the pillars so that the symbols on the cubes and pillars match. One pillar is right next to the starting platform, the next one is on the edge of the lake, and the last one is on the island, in the middle of the lake.
Merlin Trial (North Hogwarts Region 4/5)▶ show the map ◀
Destroy nine stone balls mounted on piles. They all are located to the west of the stone circle.
Merlin Trial (North Hogwarts Region 5/5)▶ show the map ◀
Using Lumos, bring the glowing butterflies to the lantern pillars surrounding the platform. The first butterflies are near the tent, the next ones are next to a tree growing in the northwest, and the last ones are near a wooden bench located at the base of the cliff in the north.
Merlin Trial (Poidsear Coast 1/10)▶ show the map ◀
Jump over all the stone platforms & pillars from one to another (there are 4 of them) without falling off them.
Merlin Trial (Poidsear Coast 2/10)▶ show the map ◀
Using Confringo, ignite all three braziers located on the posts before the first one dips into the water and resets. All of them can be targeted from the crossroads just east of the stone circle. Start with the brazier closest to the stone circle because its post is the longest. One of the braziers is obscured by vines.
Merlin Trial (Poidsear Coast 3/10)▶ show the map ◀
Use Confringo or Bombarda to blast the five stone boulders. All of them will be visible when you stand on the stone circle. One of them is a bit farther away so you have to approach it a bit to get it within your spell range.
Merlin Trial (Poidsear Coast 4/10)▶ show the map ◀
Using Lumos, bring the glowing butterflies to three lantern pillars. The butterflies are: to the northeast; to the east; to the south. You will find the last of the lantern pillars to the west, down at the base of the cliff on which the stone circle is located.
Merlin Trial (Poidsear Coast 5/10)▶ show the map ◀
Using Lumos, bring the glowing butterflies to the three lantern pillars. The butterflies are: down the path to the southwest of the stone circle; on the wooden platform in the ruins, to the northeast; at the back of the ruins, to the southeast (you will have to destroy the wooden boards blocking the access to them).
Merlin Trial (Poidsear Coast 6/10)▶ show the map ◀
Using Reparo, repair three stone statues. The first one is next to the stone circle. Another one is to the west, on the other side of the road. The last one is located on top of a hill to the north.
Merlin Trial (Poidsear Coast 7/10)▶ show the map ◀
Using Flipendo, rotate the cubes on the pillars so that the symbols on the cubes and pillars match. All pillars are visible from the stone circle.
Merlin Trial (Poidsear Coast 8/10)▶ show the map ◀
Use a spell that allows you to move objects, such as Accio or Wingardium Leviosa to transport three sets of small stone balls to the plates with holes. Plates are: to the east, behind the leftovers of a brick wall; to the south, inside the ruins; to the east, on the other side of the ruins. The balls are located nearby, the best way to locate them is to use Revelio.
Merlin Trial (Poidsear Coast 9/10)▶ show the map ◀
Use a spell that allows you to move objects, such as Depulso or Wingardium Leviosa ("easy mode") to relocate the large stone ball that will spawn next to the stone circle to the hole located to the southwest, on the other side of the ravine with the wooden ramp.
Merlin Trial (Poidsear Coast 10/10)▶ show the map ◀
Use a spell that allows you to move objects, such as Depulso or Wingardium Leviosa to relocate the large stone ball that is few steps south of the stone circle to the hole located to the east, near the river. The hole is covered with the wooden boards.
Merlin Trial (South Hogwarts Region 1/15)▶ show the map ◀
The first of Merlin Trials which you will complete during the main quest "Trials of Merlin". Use Incendio to set fire to the three braziers placed on poles.

Merlin Trial (South Hogwarts Region 2/15)▶ show the map ◀
Use a spell that allows you to move objects, such as Depulso or Wingardium Leviosa to relocate the large stone ball that is at the top of a rocks to the northeast of the stone circle to the hole that is located to the north of the stone circle.
Merlin Trial (South Hogwarts Region 3/15)▶ show the map ◀
Using Lumos, bring the glowing butterflies to the lantern pillars. The first butterflies are to the northwest of the stone circle and lantern is at the top of the rocks, to the west of the stone circle. The second butterfies are to the southeast, near the stone bridge and lantern is to the east of the stone circle (is somewhat buried and thus poorly visible). The last butterflies are to the south, across the river and the lantern is by the rocks, southwest of them.
Merlin Trial (South Hogwarts Region 4/15)▶ show the map ◀
Use Confringo or Bombarda to blast the five stone boulders / pillars placed around the stone circle. They are all visible and within your reach when you stand on the stone circle.
Merlin Trial (South Hogwarts Region 5/15)▶ show the map ◀
Use a spell that allows you to move objects, such as Depulso or Wingardium Leviosa to relocate the large stone ball that is to the southeast of the stone circle to the hole that is located down the hill on the beach of the lake.
Merlin Trial (South Hogwarts Region 6/15)▶ show the map ◀
Use a spell that allows you to move objects, such as Accio or Wingardium Leviosa to transport three sets of small round balls to the plates with holes. They are to the southwest of the stone circle; to the southeast; and to the northeast.
Merlin Trial (South Hogwarts Region 7/15)▶ show the map ◀
Destroy nine stone balls mounted on piles. Most of them are located in close proximity to the stone circle. The one furthest away is located to the west.
Merlin Trial (South Hogwarts Region 8/15)▶ show the map ◀
Jump over all five pillars located near the stone circle without falling to the ground.
Merlin Trial (South Hogwarts Region 9/15)▶ show the map ◀
Using Confringo, light three braziers before the first one sinks into the water and resets. One of the braziers is in the southwest (at the end of the stone wall), the second is in the west (in front of the wall), and the last is in the north (in the corner of the small stone fence).
Merlin Trial (South Hogwarts Region 10/15)▶ show the map ◀
Using Lumos, bring the glowing butterflies to three lantern pillars. The butterflies and lanterns are to the east (at the base of the railroad bridge), to the southwest (on the beach), and to the north.
Merlin Trial (South Hogwarts Region 11/15)▶ show the map ◀
Using Lumos, bring the glowing butterflies to the three lantern pillars. All butterflies and lanterns are located to the west / southwest of the stone circle. You will find the last one in the lanterns to the southwest, near another merlin trial.
Merlin Trial (South Hogwarts Region 12/15)▶ show the map ◀
Use a spell that allows you to move objects, such as Accio or Wingardium Leviosa to transport three sets of small round stones to the plates with holes. The first plate is on top of the rock to the north and the round stones are a little further away near the road. The second plate is south of the stone circle and the balls are in the ravine below to the northwest of the stone circle. The last plate with holes is on the hill south of the stone circle and you will find the stone balls for it southeast of it.
Merlin Trial (South Hogwarts Region 13/15)▶ show the map ◀
Below, on the path south of the stone circle, a pit will pop up. You must use any spell that allows you to move objects (Accio, Depulso, Wingadium Leviosa) to move to it a large ball that you will find going further south up the path until you reach the well (you will find it near the wall).
Merlin Trial (South Hogwarts Region 14/15)▶ show the map ◀
Use a spell that allows you to move objects, such as Depulso or Wingardium Leviosa to transport a large stone ball standing on rocks to the northeast to a pit that will appear in the water south of the stone circle.
Merlin Trial (South Hogwarts Region 15/15)▶ show the map ◀
Use Confringo or Bombarda to blast the five stone boulders / pillars placed around the stone circle. They are all visible and within your reach when you stand on the stone circle.
Merlin Trial (South Sea Bog 1/2)▶ show the map ◀
Using Lumos, bring the glowing butterflies to the lantern pillars placed around the stone circle. The butterflies are: to the southeast; to the southwest; to the northeast.
Merlin Trial (South Sea Bog 2/2)▶ show the map ◀
Use your wand to destroy the nine balls with small holes that you will find around. Three of them are just to the south of the stone circle. Three more are to the north, down in the camp, by the water puddle. The last three are also down but to the east / northeast.