Welcome to guides4gamers.com

Need for Speed Unbound Map - Lakeshore City

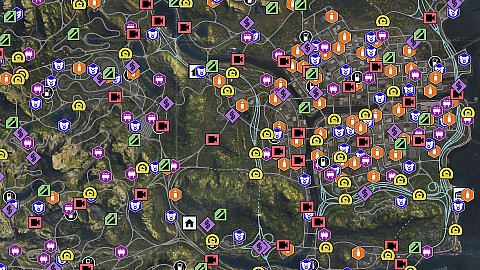
Interactive map of Lakeshore City, the place where the action of Need for Speed Unbound game takes place. All collectibles and activities. 80 Billboards, 80 Street Art, 100 Bear Champs, 50 Speed Traps, 30 Speed Runs, 35 Drift Zones, 45 Long Jumps, Gas Stations, Safe Houses and Districts.

Lakeshore Districts: Apolonia District, Belmont Lake, Cyrill Heights, Douglas Park, Duncan Bay, DuPoint View, Edgewater, Griffith Parklands, Jefferson Hills, Kennedy Drive, Kennedy Test Track, Lake Virgil, Lakeshore Quarry, North Oaks, Palemore, Rosehill Drive, Seba Ski Resort, Southland Drive, Underwood Gardens, University Central, West Brooks, Yams Park.

Lakeshore

Lakeshore - Map Markers Summary

Safehouse x1, Safehouses x7, Street Art x80, Bear Champs x100, Billboards x80, Speedruns x30, Speed Traps x50, Drift Zones x35, Long Jumps x45, Gas Stations x33

Legend / Points of interest

The following legend of Lakeshore interactive game map defines the points of interest / markers displayed on the map. Each marker corresponds to a specific element to facilitate efficient navigation and interaction with the map.

Safehouses

Use Safehouses to escape the cops and bank your cash.

Icon of Safehouse Rydell's Garage
Icon of Safehouse Anechka's Safehouse
Icon of Safehouse Boost's Safehouse
Icon of Safehouse Cha Cha's Safehouse
Icon of Safehouse Harlow's Safehouse
Icon of Safehouse Justicia's Safehouse
Icon of Safehouse Medusa's Safehouse
Icon of Safehouse Rudiger's Safehouse

Street Art

Street Art is a type of collectible objects present in the Need for Speed Unbound game. These are various types of graffitti paintings, larger or smaller, next to which there is always a painting ladder and cans of paint. Your task is to find them and get close enough to interact with them.

Icon of Street Art Apolonia District Street Art 1/5
Icon of Street Art Apolonia District Street Art 2/5
Icon of Street Art Apolonia District Street Art 3/5
Icon of Street Art Apolonia District Street Art 4/5
Icon of Street Art Apolonia District Street Art 5/5
Icon of Street Art Belmont Lake Street Art 1/1
Icon of Street Art Cyrill Heights Street Art 1/3
Icon of Street Art Cyrill Heights Street Art 2/3
Icon of Street Art Cyrill Heights Street Art 3/3
Icon of Street Art Douglas Park Street Art 1/8
Icon of Street Art Douglas Park Street Art 2/8
Icon of Street Art Douglas Park Street Art 3/8
Icon of Street Art Douglas Park Street Art 4/8
Icon of Street Art Douglas Park Street Art 5/8
Icon of Street Art Douglas Park Street Art 6/8
Icon of Street Art Douglas Park Street Art 7/8
Icon of Street Art Douglas Park Street Art 8/8
Icon of Street Art Duncan Bay Street Art 1/2
Icon of Street Art Duncan Bay Street Art 2/2
Icon of Street Art Dupoint View Street Art 1/2
Icon of Street Art Dupoint View Street Art 2/2
Icon of Street Art Edgewater Street Art 1/3
Icon of Street Art Edgewater Street Art 2/3
Icon of Street Art Edgewater Street Art 3/3
Icon of Street Art Griffith Parklands Street Art 1/1
Icon of Street Art Jefferson Hills Street Art 1/2
Icon of Street Art Jefferson Hills Street Art 2/2
Icon of Street Art Kennedy Drive Street Art 1/1
Icon of Street Art Kennedy Test Track Street Art 1/3
Icon of Street Art Kennedy Test Track Street Art 2/3
Icon of Street Art Kennedy Test Track Street Art 3/3
Icon of Street Art Lake Virgil Street Art 1/4
Icon of Street Art Lake Virgil Street Art 2/4
Icon of Street Art Lake Virgil Street Art 3/4
Icon of Street Art Lake Virgil Street Art 4/4
Icon of Street Art Lakeshore Quarry Street Art 1/3
Icon of Street Art Lakeshore Quarry Street Art 2/3
Icon of Street Art Lakeshore Quarry Street Art 3/3
Icon of Street Art North Oaks Street Art 1/2
Icon of Street Art North Oaks Street Art 2/2
Icon of Street Art Palemore Street Art 1/8
Icon of Street Art Palemore Street Art 2/8
Icon of Street Art Palemore Street Art 3/8
Icon of Street Art Palemore Street Art 4/8
Icon of Street Art Palemore Street Art 5/8
Icon of Street Art Palemore Street Art 6/8
Icon of Street Art Palemore Street Art 7/8
Icon of Street Art Palemore Street Art 8/8
Icon of Street Art Rosehill Drive Street Art 1/3
Icon of Street Art Rosehill Drive Street Art 2/3
Icon of Street Art Rosehill Drive Street Art 3/3
Icon of Street Art Seba Ski Resort Street Art 1/4
Icon of Street Art Seba Ski Resort Street Art 2/4
Icon of Street Art Seba Ski Resort Street Art 3/4
Icon of Street Art Seba Ski Resort Street Art 4/4
Icon of Street Art Southland Drive Street Art 1/1
Icon of Street Art Underwood Gardens Street Art 1/6
Icon of Street Art Underwood Gardens Street Art 2/6
Icon of Street Art Underwood Gardens Street Art 3/6
Icon of Street Art Underwood Gardens Street Art 4/6
Icon of Street Art Underwood Gardens Street Art 5/6
Icon of Street Art Underwood Gardens Street Art 6/6
Icon of Street Art University Central Street Art 1/10
Icon of Street Art University Central Street Art 2/10
Icon of Street Art University Central Street Art 3/10
Icon of Street Art University Central Street Art 4/10
Icon of Street Art University Central Street Art 5/10
Icon of Street Art University Central Street Art 6/10
Icon of Street Art University Central Street Art 7/10
Icon of Street Art University Central Street Art 8/10
Icon of Street Art University Central Street Art 9/10
Icon of Street Art University Central Street Art 10/10
Icon of Street Art West Brooks Street Art 1/4
Icon of Street Art West Brooks Street Art 2/4
Icon of Street Art West Brooks Street Art 3/4
Icon of Street Art West Brooks Street Art 4/4
Icon of Street Art Yams Park Street Art 1/4
Icon of Street Art Yams Park Street Art 2/4
Icon of Street Art Yams Park Street Art 3/4
Icon of Street Art Yams Park Street Art 4/4

Bear Champs

Bear Champs are a type of collectible objects present in the Need for Speed Unbound game. Your task is to smash them. To do this all you have to do is drive into them. After destroying each of them, you will receive $250.

Icon of Bear Champ Apolonia District Bear Champ 1/3
Icon of Bear Champ Apolonia District Bear Champ 2/3
Icon of Bear Champ Apolonia District Bear Champ 3/3
Icon of Bear Champ Belmont Lake Bear Champ 1/2
Icon of Bear Champ Belmont Lake Bear Champ 2/2
Icon of Bear Champ Cyrill Heights Bear Champ 1/1
Icon of Bear Champ Douglas Park Bear Champ 1/6
Icon of Bear Champ Douglas Park Bear Champ 2/6
Icon of Bear Champ Douglas Park Bear Champ 3/6
Icon of Bear Champ Douglas Park Bear Champ 4/6
Icon of Bear Champ Douglas Park Bear Champ 5/6
Icon of Bear Champ Douglas Park Bear Champ 6/6
Icon of Bear Champ Duncan Bay Bear Champ 1/4
Icon of Bear Champ Duncan Bay Bear Champ 2/4
Icon of Bear Champ Duncan Bay Bear Champ 3/4
Icon of Bear Champ Duncan Bay Bear Champ 4/4
Icon of Bear Champ Dupoint View Bear Champ 1/5
Icon of Bear Champ Dupoint View Bear Champ 2/5
Icon of Bear Champ Dupoint View Bear Champ 3/5
Icon of Bear Champ Dupoint View Bear Champ 4/5
Icon of Bear Champ Dupoint View Bear Champ 5/5
Icon of Bear Champ Edgewater Bear Champ 1/10
Icon of Bear Champ Edgewater Bear Champ 2/10
Icon of Bear Champ Edgewater Bear Champ 3/10
Icon of Bear Champ Edgewater Bear Champ 4/10
Icon of Bear Champ Edgewater Bear Champ 5/10
Icon of Bear Champ Edgewater Bear Champ 6/10
Icon of Bear Champ Edgewater Bear Champ 7/10
Icon of Bear Champ Edgewater Bear Champ 8/10
Icon of Bear Champ Edgewater Bear Champ 9/10
Icon of Bear Champ Edgewater Bear Champ 10/10
Icon of Bear Champ Griffith Parklands Bear Champ 1/3
Icon of Bear Champ Griffith Parklands Bear Champ 2/3
Icon of Bear Champ Griffith Parklands Bear Champ 3/3
Icon of Bear Champ Jefferson Hills Bear Champ 1/6
Icon of Bear Champ Jefferson Hills Bear Champ 2/6
Icon of Bear Champ Jefferson Hills Bear Champ 3/6
Icon of Bear Champ Jefferson Hills Bear Champ 4/6
Icon of Bear Champ Jefferson Hills Bear Champ 5/6
Icon of Bear Champ Jefferson Hills Bear Champ 6/6
Icon of Bear Champ Kennedy Drive Bear Champ 1/4
Icon of Bear Champ Kennedy Drive Bear Champ 2/4
Icon of Bear Champ Kennedy Drive Bear Champ 3/4
Icon of Bear Champ Kennedy Drive Bear Champ 4/4
Icon of Bear Champ Kennedy Test Track Bear Champ 1/6
Icon of Bear Champ Kennedy Test Track Bear Champ 2/6
Icon of Bear Champ Kennedy Test Track Bear Champ 3/6
Icon of Bear Champ Kennedy Test Track Bear Champ 4/6
Icon of Bear Champ Kennedy Test Track Bear Champ 5/6
Icon of Bear Champ Kennedy Test Track Bear Champ 6/6
Icon of Bear Champ Lake Virgil Bear Champ 1/5
Icon of Bear Champ Lake Virgil Bear Champ 2/5
Icon of Bear Champ Lake Virgil Bear Champ 3/5
Icon of Bear Champ Lake Virgil Bear Champ 4/5
Icon of Bear Champ Lake Virgil Bear Champ 5/5
Icon of Bear Champ Lakeshore Quarry Bear Champ 1/6
Icon of Bear Champ Lakeshore Quarry Bear Champ 2/6
Icon of Bear Champ Lakeshore Quarry Bear Champ 3/6
Icon of Bear Champ Lakeshore Quarry Bear Champ 4/6
Icon of Bear Champ Lakeshore Quarry Bear Champ 5/6
Icon of Bear Champ Lakeshore Quarry Bear Champ 6/6
Icon of Bear Champ North Oaks Bear Champ 1/4
Icon of Bear Champ North Oaks Bear Champ 2/4
Icon of Bear Champ North Oaks Bear Champ 3/4
Icon of Bear Champ North Oaks Bear Champ 4/4
Icon of Bear Champ Palemore Bear Champ 1/3
Icon of Bear Champ Palemore Bear Champ 2/3
Icon of Bear Champ Palemore Bear Champ 3/3
Icon of Bear Champ Rosehill Drive Bear Champ 1/3
Icon of Bear Champ Rosehill Drive Bear Champ 2/3
Icon of Bear Champ Rosehill Drive Bear Champ 3/3
Icon of Bear Champ Seba Ski Resort Bear Champ 1/8
Icon of Bear Champ Seba Ski Resort Bear Champ 2/8
Icon of Bear Champ Seba Ski Resort Bear Champ 3/8
Icon of Bear Champ Seba Ski Resort Bear Champ 4/8
Icon of Bear Champ Seba Ski Resort Bear Champ 5/8
Icon of Bear Champ Seba Ski Resort Bear Champ 6/8
Icon of Bear Champ Seba Ski Resort Bear Champ 7/8
Icon of Bear Champ Seba Ski Resort Bear Champ 8/8
Icon of Bear Champ Southland Drive Bear Champ 1/2
Icon of Bear Champ Southland Drive Bear Champ 2/2
Icon of Bear Champ Underwood Gardens Bear Champ 1/4
Icon of Bear Champ Underwood Gardens Bear Champ 2/4
Icon of Bear Champ Underwood Gardens Bear Champ 3/4
Icon of Bear Champ Underwood Gardens Bear Champ 4/4
Icon of Bear Champ University Central Bear Champ 1/7
Icon of Bear Champ University Central Bear Champ 2/7
Icon of Bear Champ University Central Bear Champ 3/7
Icon of Bear Champ University Central Bear Champ 4/7
Icon of Bear Champ University Central Bear Champ 5/7
Icon of Bear Champ University Central Bear Champ 6/7
Icon of Bear Champ University Central Bear Champ 7/7
Icon of Bear Champ West Brooks Bear Champ 1/1
Icon of Bear Champ Yams Park Bear Champ 1/7
Icon of Bear Champ Yams Park Bear Champ 2/7
Icon of Bear Champ Yams Park Bear Champ 3/7
Icon of Bear Champ Yams Park Bear Champ 4/7
Icon of Bear Champ Yams Park Bear Champ 5/7
Icon of Bear Champ Yams Park Bear Champ 6/7
Icon of Bear Champ Yams Park Bear Champ 7/7

Billboards

Billboards are a type of collectible objects present in the Need for Speed Unbound game. To destroy the vast majority of them you will have to gain enough speed and jump up to hit the billboard. Mostly you will find some kind of ramp, mound, hill, overpass, etc. nearby that would help you do this.

Icon of Billboard Apolonia District Billboard 1/3
Icon of Billboard Apolonia District Billboard 2/3
Icon of Billboard Apolonia District Billboard 3/3
Icon of Billboard Belmont Lake Billboard 1/2
Icon of Billboard Belmont Lake Billboard 2/2
Icon of Billboard Cyrill Heights Billboard 1/1
Icon of Billboard Douglas Park Billboard 1/5
Icon of Billboard Douglas Park Billboard 2/5
Icon of Billboard Douglas Park Billboard 3/5
Icon of Billboard Douglas Park Billboard 4/5
Icon of Billboard Douglas Park Billboard 5/5
Icon of Billboard Dupoint View Billboard 1/6
Icon of Billboard Dupoint View Billboard 2/6
Icon of Billboard Dupoint View Billboard 3/6
Icon of Billboard Dupoint View Billboard 4/6
Icon of Billboard Dupoint View Billboard 5/6
Icon of Billboard Dupoint View Billboard 6/6
Icon of Billboard Edgewater Billboard 1/5
Icon of Billboard Edgewater Billboard 2/5
Icon of Billboard Edgewater Billboard 3/5
Icon of Billboard Edgewater Billboard 4/5
Icon of Billboard Edgewater Billboard 5/5
Icon of Billboard Griffith Parklands Billboard 1/2
Icon of Billboard Griffith Parklands Billboard 2/2
Icon of Billboard Jefferson Hills Billboard 1/6
Icon of Billboard Jefferson Hills Billboard 2/6
Icon of Billboard Jefferson Hills Billboard 3/6
Icon of Billboard Jefferson Hills Billboard 4/6
Icon of Billboard Jefferson Hills Billboard 5/6
Icon of Billboard Jefferson Hills Billboard 6/6
Icon of Billboard Kennedy Drive Billboard 1/6
Icon of Billboard Kennedy Drive Billboard 2/6
Icon of Billboard Kennedy Drive Billboard 3/6
Icon of Billboard Kennedy Drive Billboard 4/6
Icon of Billboard Kennedy Drive Billboard 5/6
Icon of Billboard Kennedy Drive Billboard 6/6
Icon of Billboard Kennedy Test Track Billboard 1/3
Icon of Billboard Kennedy Test Track Billboard 2/3
Icon of Billboard Kennedy Test Track Billboard 3/3
Icon of Billboard Lake Virgil Billboard 1/3
Icon of Billboard Lake Virgil Billboard 2/3
Icon of Billboard Lake Virgil Billboard 3/3
Icon of Billboard Lakeshore Quarry Billboard 1/6
Icon of Billboard Lakeshore Quarry Billboard 2/6
Icon of Billboard Lakeshore Quarry Billboard 3/6
Icon of Billboard Lakeshore Quarry Billboard 4/6
Icon of Billboard Lakeshore Quarry Billboard 5/6
Icon of Billboard Lakeshore Quarry Billboard 6/6
Icon of Billboard North Oaks Billboard 1/4
Icon of Billboard North Oaks Billboard 2/4
Icon of Billboard North Oaks Billboard 3/4
Icon of Billboard North Oaks Billboard 4/4
Icon of Billboard Palemore Billboard 1/3
Icon of Billboard Palemore Billboard 2/3
Icon of Billboard Palemore Billboard 3/3
Icon of Billboard Rosehill Drive Billboard 1/1
Icon of Billboard Seba Ski Resort Billboard 1/9
Icon of Billboard Seba Ski Resort Billboard 2/9
Icon of Billboard Seba Ski Resort Billboard 3/9
Icon of Billboard Seba Ski Resort Billboard 4/9
Icon of Billboard Seba Ski Resort Billboard 5/9
Icon of Billboard Seba Ski Resort Billboard 6/9
Icon of Billboard Seba Ski Resort Billboard 7/9
Icon of Billboard Seba Ski Resort Billboard 8/9
Icon of Billboard Seba Ski Resort Billboard 9/9
Icon of Billboard Southland Drive Billboard 1/2
Icon of Billboard Southland Drive Billboard 2/2
Icon of Billboard Underwood Gardens Billboard 1/1
Icon of Billboard University Central Billboard 1/5
Icon of Billboard University Central Billboard 2/5
Icon of Billboard University Central Billboard 3/5
Icon of Billboard University Central Billboard 4/5
Icon of Billboard University Central Billboard 5/5
Icon of Billboard West Brooks Billboard 1/2
Icon of Billboard West Brooks Billboard 2/2
Icon of Billboard Yams Park Billboard 1/5
Icon of Billboard Yams Park Billboard 2/5
Icon of Billboard Yams Park Billboard 3/5
Icon of Billboard Yams Park Billboard 4/5
Icon of Billboard Yams Park Billboard 5/5

Speedruns

Speedruns are specific sections of road that you must drive from one end to the other at the maximum average speed you can reach. The direction in which you take the route does not matter. Depending on the average speed you manage to reach, you will be rated on a scale of 1 to 3 stars, and you will also receive a certain amount of cash.

Icon of Speedrun Douglas Park Speedrun 1/1 (A) 105 / 120 / 135 / 148 mph
Icon of Speedrun Douglas Park Speedrun 1/1 (B) 105 / 120 / 135 / 148 mph
Icon of Speedrun Duncan Bay Speedrun 1/1 (A) 120 /140 /160 / 173 mph
Icon of Speedrun Duncan Bay Speedrun 1/1 (B) 120 /140 /160 / 173 mph
Icon of Speedrun DuPoint View Speedrun 1/1 (A) 110 / 125 / 140 / 153 mph
Icon of Speedrun DuPoint View Speedrun 1/2 (B) 110 / 125 / 140 / 153 mph
Icon of Speedrun Edgewater Speedrun 1/2 (A) 125 / 140 / 155 / 172 mph
Icon of Speedrun Edgewater Speedrun 1/2 (B) 125 / 140 / 155 / 172 mph
Icon of Speedrun Edgewater Speedrun 2/2 (A) 100 /115 / 130 / 141 mph
Icon of Speedrun Edgewater Speedrun 2/2 (B) 100 /115 / 130 / 141 mph
Icon of Speedrun Griffith Parklands Speedrun 1/2 (A) 130 / 145 / 160 / 176 mph
Icon of Speedrun Griffith Parklands Speedrun 1/2 (B) 130 / 145 / 160 / 176 mph
Icon of Speedrun Griffith Parklands Speedrun 2/2 (A) 105 / 120 / 135 / 151 mph
Icon of Speedrun Griffith Parklands Speedrun 2/2 (B) 105 / 120 / 135 / 151 mph
Icon of Speedrun Jefferson Hills Speedrun 1/1 (A) The route runs inside an underground tunnel. 100 / 115 / 130 / 143 mph
Icon of Speedrun Jefferson Hills Speedrun 1/1 (B) The route runs inside an underground tunnel. 100 / 115 / 130 / 143 mph
Icon of Speedrun Kennedy Drive Speedrun 1/2 (A) 115 / 130 / 145 / 158 mph
Icon of Speedrun Kennedy Drive Speedrun 1/2 (B) 115 / 130 / 145 / 158 mph
Icon of Speedrun Kennedy Drive Speedrun 2/2 (A) 100 / 115 / 130 / 144 mph
Icon of Speedrun Kennedy Drive Speedrun 2/2 (B) 100 / 115 / 130 / 144 mph
Icon of Speedrun Kennedy Test Track Speedrun 1/1 (A) 140 / 160 / 180 / 194 mph
Icon of Speedrun Kennedy Test Track Speedrun 1/1 (B) 140 / 160 / 180 / 194 mph
Icon of Speedrun Lake Virgil Speedrun 1/2 (A) 130 / 150 / 170 / 189 mph
Icon of Speedrun Lake Virgil Speedrun 1/2 (B) 130 / 150 / 170 / 189 mph
Icon of Speedrun Lake Virgil Speedrun 2/2 (A) 125 / 140 / 155 / 171 mph
Icon of Speedrun Lake Virgil Speedrun 2/2 (B) 125 / 140 / 155 / 171 mph
Icon of Speedrun Lakeshore Quarry Speedrun 1/2 (A) 110 / 125 / 140 / 156 mph
Icon of Speedrun Lakeshore Quarry Speedrun 1/2 (B) 110 / 125 / 140 / 156 mph
Icon of Speedrun Lakeshore Quarry Speedrun 2/2 (A) 110 / 130 / 150 / 164 mph
Icon of Speedrun Lakeshore Quarry Speedrun 2/2 (B) 110 / 130 / 150 / 164 mph
Icon of Speedrun North Oaks Speedrun 1/1 (A) 135 / 155 / 175 / 192 mph
Icon of Speedrun North Oaks Speedrun 1/1 (B) 135 / 155 / 175 / 192 mph
Icon of Speedrun Rosehill Drive Speedrun 1/4 (A) 130 / 145 / 160 / 178 mph
Icon of Speedrun Rosehill Drive Speedrun 1/4 (B) 130 / 145 / 160 / 178 mph
Icon of Speedrun Rosehill Drive Speedrun 2/4 (A) 135 / 150 / 165 / 181 mph
Icon of Speedrun Rosehill Drive Speedrun 2/4 (B) 135 / 150 / 165 / 181 mph
Icon of Speedrun Rosehill Drive Speedrun 3/4 (A) 120 / 135 /150 / 168 mph
Icon of Speedrun Rosehill Drive Speedrun 3/4 (B) 120 / 135 /150 / 168 mph
Icon of Speedrun Rosehill Drive Speedrun 4/4 (A) 135 / 155 / 175 / 196 mph
Icon of Speedrun Rosehill Drive Speedrun 4/4 (B) 135 / 155 / 175 / 196 mph
Icon of Speedrun Seba Ski Resort Speedrun 1/2 (A) 110 / 125 / 140 / 151 mph
Icon of Speedrun Seba Ski Resort Speedrun 1/2 (B) 110 / 125 / 140 / 151 mph
Icon of Speedrun Seba Ski Resort Speedrun 2/2 (A) 115 / 130 / 145 / 162 mph
Icon of Speedrun Seba Ski Resort Speedrun 2/2 (B) 115 / 130 / 145 / 162 mph
Icon of Speedrun Southland Drive Speedrun 1/2 (A) 115 / 130 / 145 / 162 mph
Icon of Speedrun Southland Drive Speedrun 1/2 (B) 115 / 130 / 145 / 162 mph
Icon of Speedrun Southland Drive Speedrun 2/2 (A) 120 / 140 / 160 / 182 mph
Icon of Speedrun Southland Drive Speedrun 2/2 (B) 120 / 140 / 160 / 182 mph
Icon of Speedrun Underwood Gardens Speedrun 1/1 (A) 125 / 145 / 165 / 183 mph
Icon of Speedrun Underwood Gardens Speedrun 1/1 (B) 125 / 145 / 165 / 183 mph
Icon of Speedrun University Central Speedrun 1/4 (A) 120 / 135 / 150 / 162 mph
Icon of Speedrun University Central Speedrun 1/4 (B) 120 / 135 / 150 / 162 mph
Icon of Speedrun University Central Speedrun 2/4 (A) 115 / 135 / 155 / 174 mph
Icon of Speedrun University Central Speedrun 2/4 (B) 115 / 135 / 155 / 174 mph
Icon of Speedrun University Central Speedrun 3/4 (A) 100 / 115 / 130 / 141 mph
Icon of Speedrun University Central Speedrun 3/4 (B) 100 / 115 / 130 / 141 mph
Icon of Speedrun University Central Speedrun 4/4 (A) 120 / 140 / 160 / 177 mph
Icon of Speedrun University Central Speedrun 4/4 (B) 120 / 140 / 160 / 177 mph
Icon of Speedrun Yams Park Speedrun 1/1 (A) 100 / 115 / 130 / 142 mph
Icon of Speedrun Yams Park Speedrun 1/1 (B) 100 / 115 / 130 / 142 mph

Speed Traps

Speed Traps measure your current speed as you cross them. It doesn't matter which side you come at them from. Depending on what speed you reach, you will be rated on a scale of 1 to 3 stars. You will also receive a certain amount of cash.

Icon of Speed Trap Apolonia District Speed Trap 1/2 120 / 135 / 150 / 167 mph
Icon of Speed Trap Apolonia District Speed Trap 2/2 120 / 140 / 160 / 182 mph
Icon of Speed Trap Belmont Lake Speed Trap 1/2 110 / 125 / 140 / 152 mph
Icon of Speed Trap Belmont Lake Speed Trap 2/2 125 / 140 / 155 / 174 mph
Icon of Speed Trap Cyrill Heights Speed Trap 1/1 120 / 135 / 150 / 168 mph
Icon of Speed Trap Douglas Park Speed Trap 1/2 120 / 135 / 150 / 163 mph
Icon of Speed Trap Douglas Park Speed Trap 2/2 115 / 140 / 165 / 183 mph
Icon of Speed Trap Duncan Bay Speed Trap 1/1 125 / 150 / 170 / 186 mph
Icon of Speed Trap DuPoint View Speed Trap 1/2 130 / 150 / 170 / 187 mph
Icon of Speed Trap DuPoint View Speed Trap 2/2 130 / 150 / 170 /187 mph
Icon of Speed Trap Edgewater Speed Trap 1/4 110 / 125 / 140 / 153 mph
Icon of Speed Trap Edgewater Speed Trap 2/4 135 / 150 / 165 / 179 mph
Icon of Speed Trap Edgewater Speed Trap 3/4 110 / 125 / 140 / 148 mph
Icon of Speed Trap Edgewater Speed Trap 4/4 120 / 140 / 160 / 171 mph
Icon of Speed Trap Griffith Parklands Speed Trap 1/1 120 / 140 / 160 / 177 mph
Icon of Speed Trap Jefferson Hills Speed Trap 1/1 135 / 155 / 175 / 194 mph
Icon of Speed Trap Kennedy Drive Speed Trap 1/2 110 / 125 / 140 / 154 mph
Icon of Speed Trap Kennedy Drive Speed Trap 2/2 115 / 130 / 145 / 164 mph
Icon of Speed Trap Kennedy Test Track Speed Trap 1/3 120 / 135 / 150 / 164 mph
Icon of Speed Trap Kennedy Test Track Speed Trap 2/3 125 / 140 / 155 / 172 mph
Icon of Speed Trap Kennedy Test Track Speed Trap 3/3 125 / 140 / 155 / 177 mph
Icon of Speed Trap Lake Virgil Speed Trap 1/3 125 / 140 / 155 / 173 mph
Icon of Speed Trap Lake Virgil Speed Trap 2/3 125 / 145 / 165 / 182 mph
Icon of Speed Trap Lake Virgil Speed Trap 3/3 125 / 145 / 165 / 182 mph
Icon of Speed Trap Lakeshore Quarry Speed Trap 1/3 120 / 140 / 160 / 176 mph
Icon of Speed Trap Lakeshore Quarry Speed Trap 2/3 125 / 140 / 155 / 168 mph
Icon of Speed Trap Lakeshore Quarry Speed Trap 3/3 135 / 155 / 175 / 196 mph
Icon of Speed Trap North Oaks Speed Trap 1/2 120 / 140 / 160 / 173 mph
Icon of Speed Trap North Oaks Speed Trap 2/2 130 / 150 / 170 / 187 mph
Icon of Speed Trap Palemore Speed Trap 1/2 120 / 140 / 160 / 178 mph
Icon of Speed Trap Palemore Speed Trap 2/2 125 / 140 / 155 / 174 mph
Icon of Speed Trap Rosehill Drive Speed Trap 1/3 140 / 160 / 180 / 199 mph
Icon of Speed Trap Rosehill Drive Speed Trap 2/3 120 / 135 / 150 / 165 mph
Icon of Speed Trap Rosehill Drive Speed Trap 3/3 135 / 155 / 175 / 193 mph
Icon of Speed Trap Seba Ski Resort Speed Trap 1/4 125 / 145 / 165 / 185 mph
Icon of Speed Trap Seba Ski Resort Speed Trap 2/4 130 / 150 / 170 / 187 mph
Icon of Speed Trap Seba Ski Resort Speed Trap 3/4 130 / 150 / 170 / 194 mph
Icon of Speed Trap Seba Ski Resort Speed Trap 4/4 130 / 150 / 170 / 188 mph
Icon of Speed Trap Southland Drive Speed Trap 1/2 120 / 140 /160 / 178 mph
Icon of Speed Trap Southland Drive Speed Trap 2/2 120 / 145 / 170 / 196 mph
Icon of Speed Trap Underwood Gardens Speed Trap 1/2 130 / 150 / 170 / 189 mph
Icon of Speed Trap Underwood Gardens Speed Trap 2/2 135 / 155 / 175 / 202 mph
Icon of Speed Trap University Central Speed Trap 1/2 120 / 135 / 150 / 164 mph
Icon of Speed Trap University Central Speed Trap 2/2 125 / 145 / 165 / 184 mph
Icon of Speed Trap West Brooks Speed Trap 1/2 130 / 145 / 160 / 176 mph
Icon of Speed Trap West Brooks Speed Trap 2/2 125 / 145 / 165 / 187 mph
Icon of Speed Trap Yams Park Speed Trap 1/4 130 / 150 / 170 / 184 mph
Icon of Speed Trap Yams Park Speed Trap 2/4 110 / 125 / 140 / 157 mph
Icon of Speed Trap Yams Park Speed Trap 3/4 120 / 140 / 160 / 174 mph
Icon of Speed Trap Yams Park Speed Trap 4/4 120 / 140 / 160 / 177 mph

Drift Zones

Drift Zones are special routes, sometimes taking the form of closed loops and sometimes they are open sections of road, where you have to drive a sufficient amount of the total route drifting. You have a limited amount of time to accomplish this. Depending on the distance you cover, you will be rated on a scale of 1 to 3 stars, and you will also receive a certain amount of cash.

Icon of Drift Zone Apolonia District Drift Zone 1/1 143 / 197 / 252 / 303 yd - Time limit: 00:45
Icon of Drift Zone Belmont Lake Drift Zone 1/2 (A) 263 / 350 / 438 / 641 yd - Time limit: 01:30
Icon of Drift Zone Belmont Lake Drift Zone 1/2 (B) 263 / 350 / 438 / 641 yd - Time limit: 01:30
Icon of Drift Zone Belmont Lake Drift Zone 2/2 (A) 263 / 350 / 438 / 534 yd - Time limit: 01:15
Icon of Drift Zone Belmont Lake Drift Zone 2/2 (B) 263 / 350 / 438 / 534 yd - Time limit: 01:15
Icon of Drift Zone Douglas Park Drift Zone 1/1 143 / 197 / 252 / 311 yd - Time limit: 00:50
Icon of Drift Zone Duncan Bay Drift Zone 1/1 186 / 252 / 318 / 392 yd - Time limit: 00:55
Icon of Drift Zone DuPoint View Drift Zone 1/1 252 / 329 / 405 / 492 yd - Time limit: 01:05
Icon of Drift Zone Edgewater Drift Zone 1/3 186 / 241 / 296 / 355 yd - Time limit: 00:55
Icon of Drift Zone Edgewater Drift Zone 2/3 208 / 285 / 361 / 445 yd - Time limit: 00:55
Icon of Drift Zone Edgewater Drift Zone 3/3 175 / 252 / 329 / 412 yd - Time limit: 00:55
Icon of Drift Zone Jefferson Hills Drift Zone 1/2 (A) 175 / 241 / 307 / 392 yd - Time limit: 00:50
Icon of Drift Zone Jefferson Hills Drift Zone 1/2 (B) 175 / 241 / 307 / 392 yd - Time limit: 00:50
Icon of Drift Zone Jefferson Hills Drift Zone 2/2 241 / 318 / 394 / 485 yd - Time limit: 01:00
Icon of Drift Zone Kennedy Drive Drift Zone 1/2 (A) 165 / 230 / 296 / 385 yd - Time limit: 00:50
Icon of Drift Zone Kennedy Drive Drift Zone 1/2 (B) 165 / 230 / 296 / 385 yd - Time limit: 00:50
Icon of Drift Zone Kennedy Drive Drift Zone 2/2 (A) 186 / 247 / 307 / 370 yd - Time limit: 00:50
Icon of Drift Zone Kennedy Drive Drift Zone 2/2 (B) 186 / 247 / 307 / 370 yd - Time limit: 00:50
Icon of Drift Zone Kennedy Test Track Drift Zone 1/2 252 / 329 / 405 / 490 yd - Time limit: 01:00
Icon of Drift Zone Kennedy Test Track Drift Zone 2/2 241 / 307 / 372 / 446 yd - Time limit: 00:55
Icon of Drift Zone Lake Virgil Drift Zone 1/2 175 / 230 / 285 / 344 yd - Time limit: 00:50
Icon of Drift Zone Lake Virgil Drift Zone 2/2 219 / 274 / 329 / 392 yd - Time limit: 01:00
Icon of Drift Zone Lakeshore Quarry Drift Zone 1/4 (A) 208 / 274 / 340 / 423 yd - Time limit: 01:00
Icon of Drift Zone Lakeshore Quarry Drift Zone 1/4 (B) 208 / 274 / 340 / 423 yd - Time limit: 01:00
Icon of Drift Zone Lakeshore Quarry Drift Zone 2/4 219 / 307 / 394 / 489 yd - Time limit: 01:00
Icon of Drift Zone Lakeshore Quarry Drift Zone 3/4 (A) 274 / 372 / 471 / 577 yd - Time limit: 01:15
Icon of Drift Zone Lakeshore Quarry Drift Zone 3/4 (B) 274 / 372 / 471 / 577 yd - Time limit: 01:15
Icon of Drift Zone Lakeshore Quarry Drift Zone 4/4 186 / 263 / 340 / 420 yd - Time limit: 00:55
Icon of Drift Zone North Oaks Drift Zone 1/1 143 / 208 / 274 / 353 yd - Time limit: 00:45
Icon of Drift Zone Palemore Drift Zone 1/2 175 / 241 / 307 / 380 yd - Time limit: 01:00
Icon of Drift Zone Palemore Drift Zone 2/2 165 / 219 / 274 / 347 yd - Time limit: 00:50
Icon of Drift Zone Rosehill Drive Drift Zone 1/2 (A) 241 / 318 / 394 / 490 yd - Time limit: 01:00
Icon of Drift Zone Rosehill Drive Drift Zone 1/2 (B) 241 / 318 / 394 / 490 yd - Time limit: 01:00
Icon of Drift Zone Rosehill Drive Drift Zone 2/2 (A) 132 / 175 / 219 / 278 yd - Time limit: 00:35
Icon of Drift Zone Rosehill Drive Drift Zone 2/2 (B) 132 / 175 / 219 / 278 yd - Time limit: 00:35
Icon of Drift Zone Seba Ski Resort Drift Zone 1/3 (A) 241 / 307 / 372 / 442 yd - Time limit: 01:10
Icon of Drift Zone Seba Ski Resort Drift Zone 1/3 (B) 241 / 307 / 372 / 442 yd - Time limit: 01:10
Icon of Drift Zone Seba Ski Resort Drift Zone 2/3 165 / 219 / 274 / 385 yd - Time limit: 00:55
Icon of Drift Zone Seba Ski Resort Drift Zone 3/3 143 / 192 / 241 / 298 yd - Time limit: 00:50
Icon of Drift Zone Underwood Gardens Drift Zone 1/2 186 / 252 / 318 / 392 yd - Time limit: 00:50
Icon of Drift Zone Underwood Gardens Drift Zone 2/2 175 / 241 / 307 / 375 yd - Time limit: 00:50
Icon of Drift Zone University Central Drift Zone 1/1 208 / 285 / 361 / 442 yd - Time limit: 01:05
Icon of Drift Zone West Brooks Drift Zone 1/1 154 / 208 / 263 / 326 yd - Time limit: 00:50
Icon of Drift Zone Yams Park Drift Zone 1/2 132 / 175 / 219 / 271 yd - Time limit: 00:40
Icon of Drift Zone Yams Park Drift Zone 2/2 208 / 279 / 350 / 429 yd - Time limit: 01:00

Long Jumps

Try to beat Long Jumps distance challenges on a set of special ramps located all over Lakeshore. Depending on the achieved distance you will be rated on a scale of 1 to 3 stars, and you will also receive a certain amount of cash.

Icon of Long Jump Apolonia District Jump 1/1 66 / 83 / 99 / 120 yd
Icon of Long Jump Belmont Lake Jump 1/1 121 / 137 / 154 / 171 yd
Icon of Long Jump Douglas Park Jump 1/2 121 / 143 / 165 / 184 yd
Icon of Long Jump Douglas Park Jump 2/2 126 / 154 / 181 / 202 yd
Icon of Long Jump DuPoint View Jump 1/3 126 / 148 / 170 / 189 yd
Icon of Long Jump DuPoint View Jump 2/3 104 / 126 / 148 / 166 yd
Icon of Long Jump DuPoint View Jump 3/3 159 / 181 / 203 / 233 yd
Icon of Long Jump Edgewater Jump 1/5 93 / 121 / 148 / 174 yd
Icon of Long Jump Edgewater Jump 2/5 72 / 99 / 126 / 150 yd
Icon of Long Jump Edgewater Jump 3/5 115 / 132 / 148 / 162 yd
Icon of Long Jump Edgewater Jump 4/5 83 / 99 / 115 / 127 yd
Icon of Long Jump Edgewater Jump 5/5 99 / 121 / 143 / 156 yd
Icon of Long Jump Griffith Parklands Jump 1/2 126 / 143 / 159 / 184 yd
Icon of Long Jump Griffith Parklands Jump 2/2 93 / 110 / 126 / 136 yd
Icon of Long Jump Jefferson Hills Jump 1/3 77 / 93 / 110 / 124 yd
Icon of Long Jump Jefferson Hills Jump 2/3 121 / 137 / 154 / 172 yd
Icon of Long Jump Jefferson Hills Jump 3/3 104 / 121 / 137 / 153 yd
Icon of Long Jump Kennedy Drive Jump 1/4 104 / 121 / 137 / 149 yd
Icon of Long Jump Kennedy Drive Jump 2/4 110 / 126 / 143 / 157 yd
Icon of Long Jump Kennedy Drive Jump 3/4 132 / 154 / 175 / 200 yd
Icon of Long Jump Kennedy Drive Jump 4/4 110 / 132 / 154 / 169 yd
Icon of Long Jump Kennedy Test Track Jump 1/2 77 / 99 / 121 / 134 yd
Icon of Long Jump Kennedy Test Track Jump 2/2 104 / 121 / 137 / 151 yd
Icon of Long Jump Lakeshore Quarry Jump 1/4 132 / 148 / 165 / ... yd
Icon of Long Jump Lakeshore Quarry Jump 2/4 99 / 115 / 132 / 144 yd
Icon of Long Jump Lakeshore Quarry Jump 3/4 77 / 99 / 121 / 140 yd
Icon of Long Jump Lakeshore Quarry Jump 4/4 132 / 148 / 165 / 179 yd
Icon of Long Jump North Oaks Jump 1/2 93 / 110 / 126 / 147 yd
Icon of Long Jump North Oaks Jump 2/2 115 / 132 / 148 / 167 yd
Icon of Long Jump Palemore Jump 1/1 83 / 99 / 115 / 125 yd
Icon of Long Jump Rosehill Drive Jump 1/2 76 / 99 / 121 / 134 yd
Icon of Long Jump Rosehill Drive Jump 2/2 121 / 137 / 154 / 167 yd
Icon of Long Jump Seba Ski Resort Jump 1/4 137 / 159 / 181 / 205 yd
Icon of Long Jump Seba Ski Resort Jump 2/4 132 / 148 / 165 / 180 yd
Icon of Long Jump Seba Ski Resort Jump 3/4 99 / 121 / 143 / 160 yd
Icon of Long Jump Seba Ski Resort Jump 4/4 132 / 148 / 165 / 183 yd
Icon of Long Jump Southland Drive Jump 1/2 93 / 115 / 137 / 161 yd
Icon of Long Jump Southland Drive Jump 2/2 83 / 104 / 126 / 140 yd
Icon of Long Jump Underwood Gardens Jump 1/2 83 / 104 / 126 / 145 yd
Icon of Long Jump Underwood Gardens Jump 2/2 77 / 99 / 121 / 133 yd
Icon of Long Jump Yams Park Jump 1/5 121 / 137 / 154 / 173 yd
Icon of Long Jump Yams Park Jump 2/5 93 / 110 / 126 / 140 yd
Icon of Long Jump Yams Park Jump 3/5 121 / 137 / 154 / 172 yd
Icon of Long Jump Yams Park Jump 4/5 110 / 126 / 143 / 163 yd
Icon of Long Jump Yams Park Jump 5/5 93 / 115 / 137 / 153 yd

Gas Stations

To repair your car, simple drive through a gas station. You do not have to stop your vehicle. During the day, you can do this as many times as you like, only a certain interval between repairs is necessary.

Icon of Gas Station Apolonia District Gas Station 1/2
Icon of Gas Station Apolonia District Gas Station 2/2
Icon of Gas Station Belmont Lake Gas Station 1/2
Icon of Gas Station Belmont Lake Gas Station 2/2
Icon of Gas Station Cyrill Heights Gas Station 1/1
Icon of Gas Station Douglas Park Gas Station 1/1
Icon of Gas Station Duncan Bay Gas Station 1/2
Icon of Gas Station Duncan Bay Gas Station 2/2
Icon of Gas Station DuPoint View Gas Station 1/2
Icon of Gas Station DuPoint View Gas Station 2/2
Icon of Gas Station Edgewater Gas Station 1/2
Icon of Gas Station Edgewater Gas Station 2/2
Icon of Gas Station Griffith Parklands Gas Station 1/2
Icon of Gas Station Griffith Parklands Gas Station 2/2
Icon of Gas Station Jefferson Hills Gas Station 1/1
Icon of Gas Station Kennedy Drive Gas Station 1/1
Icon of Gas Station Kennedy Test Track Gas Station 1/2
Icon of Gas Station Kennedy Test Track Gas Station 2/2
Icon of Gas Station Lake Virgil Gas Station 1/3
Icon of Gas Station Lake Virgil Gas Station 2/3
Icon of Gas Station Lake Virgil Gas Station 3/3
Icon of Gas Station Lakeshore Quarry Gas Station 1/1
Icon of Gas Station North Oaks Gas Station 1/1
Icon of Gas Station Palemore Gas Station 1/1
Icon of Gas Station Seba Ski Resort Gas Station 1/3
Icon of Gas Station Seba Ski Resort Gas Station 2/3
Icon of Gas Station Seba Ski Resort Gas Station 3/3
Icon of Gas Station Southland Drive Gas Station 1/1
Icon of Gas Station Underwood Gardens Gas Station 1/1
Icon of Gas Station University Central Gas Station 1/2
Icon of Gas Station University Central Gas Station 2/2
Icon of Gas Station Yams Park Gas Station 1/2
Icon of Gas Station Yams Park Gas Station 2/2