DOOM: The Dark Ages Maps DOOM: The Dark Ages Guide
This page contains links to all the interactive maps I've been able to create for the game DOOM: The Dark Ages.
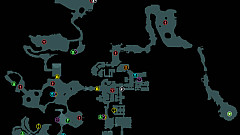
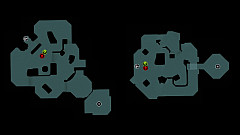
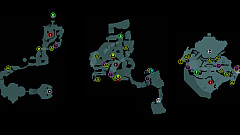
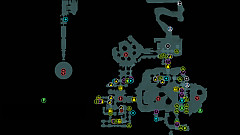
Village of Khalim - An interactive map for the Village of Khalim, the first chapter of Doom: The Dark Ages. It details the locations of various collectibles and secrets in this introductory level, which serves as a tutorial for players to learn the game's mechanics while navigating a demon-invaded town. The map highlights 6 Secret Areas and 5 Collectibles, including 2 Codex Entries, 2 Collectible Toys, and 1 Weapon Skin. Additional items marked on the map include Weapons, Life Sigils, Keys, Locked Passages, Large & Small Encounters, or Points of No Return. This map is part of a broader collection of interactive maps for the game, designed to help players achieve 100% completion by locating all hidden items and secrets in the Village of Khalim.
1 x Starting Point; 6 x Secret Area; 2 x Codex Entry; 2 x Collectible Toy; 1 x Weapon Skin; 2 x Arsenal; 3 x Life Sigil; 2 x Key; 4 x Locked Passage; 3 x Encounter (Large); 7 x Encounter (Small); 2 x Point of No Return;
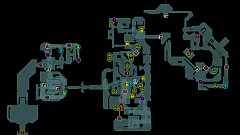
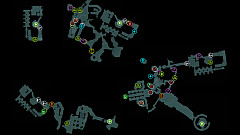
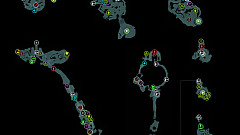
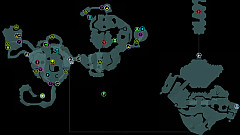
Hebeth - This interactive map for Hebeth, the second chapter of Doom: The Dark Ages details all collectibles and points of interest in the sprawling weapons facility, guiding players to 100% completion with 9 Secret Areas, 210 Gold, 1 Demonic Essence - Health, and 3 Collectibles: 1 Codex Entry, 1 Collectible Toy, and 1 Weapon Skin. Additional items marked on the map include Arsenal, Life Sigils, Keys, Locked Passages, Large & Small Encounters, Leader, Switches, Metal Locks, or Points of No Return.
1 x Starting Point; 9 x Secret Area; 1 x Codex Entry; 1 x Collectible Toy; 1 x Weapon Skin; 2 x Arsenal; 3 x Life Sigil; 2 x Sentinel Shrine; 1 x Demonic Essence; 210 x Gold; 1 x Key; 3 x Switch; 5 x Locked Passage; 6 x Metal Lock; 1 x Shield Recall Jump; 3 x Cultist Circle; 1 x Demonic Leader; 2 x Encounter (Large); 2 x Encounter (Small); 5 x Point of No Return;
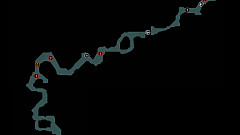
Barrier Core - This interactive map for Barrier Core, the third chapter of Doom: The Dark Ages, focuses on a linear, action-packed level where players pilot the Atlan, a massive war mech, shifting gameplay to intense mech-based combat. Unlike other chapters, it contains no secrets, collectibles, or resources. The map highlights key points, guiding players through this short and straightforward mission with no exploration-based rewards.
1 x Starting Point; 1 x Arsenal; 1 x Encounter (Large); 4 x Encounter (Small); 1 x Mission Objective; 3 x Point of No Return;
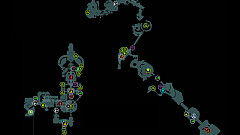
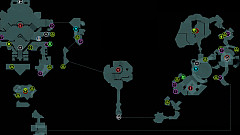
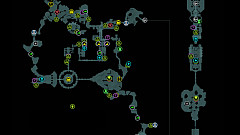
Sentinel Barracks - An interactive map for the Sentinel Barracks in Doom: The Dark Ages. It details the locations of various collectibles and secrets in this level, which is the fourth chapter of the game. The map highlights 6 Secret Areas, 212 Gold, 2 Rubies, 1 Demonic Essence - Armor, and 3 Collectibles (1 Codex Entry, 1 Collectible Toy, and 1 Weapon Skin). Additional elements include Weapons, Life Sigils, Sentinel Shrines, Leader, Large & Small Encounters, Points of No Return, and other. The map serves as a guide for players aiming for 100% completion by tracking these items and providing a visual reference for navigation through the Sentinel Barracks, a stronghold filled with enemies and challenges.
1 x Starting Point; 6 x Secret Area; 1 x Codex Entry; 1 x Collectible Toy; 1 x Weapon Skin; 2 x Arsenal; 2 x Life Sigil; 2 x Sentinel Shrine; 1 x Demonic Essence; 2 x Ruby; 212 x Gold; 3 x Switch; 1 x Metal Lock; 4 x Shield Recall Jump; 1 x Cultist Circle; 1 x Demonic Leader; 2 x Encounter (Large); 4 x Encounter (Small); 1 x Mission Objective; 4 x Point of No Return;
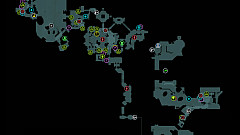
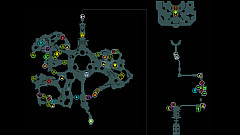
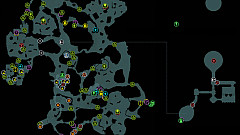
The Holy City of Aratum - The interactive map for "The Holy City of Aratum," the fifth chapter of Doom: The Dark Ages, details collectibles and secrets in the level where the Doom Slayer rides a dragon named Serrat to battle demonic forces and destroy four Hell Carriers besieging the city. It includes 9 Secret Areas, 240 Gold, 2 (+1) Rubies, 2 Demonic Essences (Health and Ammo), and 4 Collectibles (2 Codex Entries, 1 Toy, and 1 Weapon Skin), plus Weapons, Life Sigils, Cultist Circles, Sentinel Shrines, Keys, Locked Gates, Encounters, and more. The map guides players to 100% completion through mission challenges like "Countercult" and "Layover," while warning of careful exploration to avoid missing secrets due to inaccessible areas after points of no return.
7 x Starting Point; 9 x Secret Area; 2 x Codex Entry; 1 x Collectible Toy; 1 x Weapon Skin; 2 x Arsenal; 2 x Life Sigil; 2 x Soul Sphere; 2 x Sentinel Shrine; 2 x Demonic Essence; 3 x Ruby; 240 x Gold; 2 x Key; 3 x Switch; 2 x Locked Passage; 11 x Metal Lock; 3 x Cultist Circle; 2 x Demonic Leader; 1 x Encounter (Large); 9 x Point of No Return;
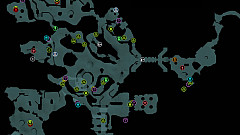
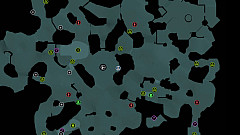
Siege - Part 1 - The interactive map for "Siege - Part 1," the sixth chapter of Doom: The Dark Ages, details a large, open battlefield where players combat a demonic assault. It marks 11 Secret Areas, 513 Gold, 4 Rubies, 2 Demonic Essences (Armor & Ammo), and 5 Collectibles (2 Codex Entries, 2 Collectible Toys, 1 Skin). Additional items include Weapons, Life Sigils, Sentinel Shrines, Wolf Statues, Artillery Cannons, Secret Key, Locked Passages, Demonic Leaders, and various encounters.
1 x Starting Point; 11 x Secret Area; 2 x Codex Entry; 2 x Collectible Toy; 2 x Weapon Skin; 2 x Arsenal; 4 x Life Sigil; 1 x Soul Sphere; 3 x Sentinel Shrine; 2 x Demonic Essence; 4 x Ruby; 513 x Gold; 1 x Key; 14 x Switch; 3 x Locked Passage; 6 x Metal Lock; 3 x Shield Recall Jump; 3 x Wolf Statue; 2 x Demonic Leader; 1 x Encounter (Large); 2 x Encounter (Small); 6 x Mission Objective; 4 x Point of No Return;
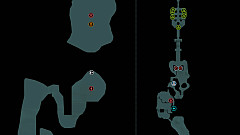
Siege - Part 2 - The interactive map guide for Siege - Part 2, the seventh chapter of Doom: The Dark Ages, details key locations and collectibles in a demon-infested stronghold to aid players in achieving 100% completion, featuring 9 Secret Areas, 2 Collectibles (1 Codex Entry and 1 Collectible Toy), 1 Demonic Essence (Health), 183 Gold, 2 Rubies, 3 Life Sigils for revival and health restoration, 1 Sentinel Shrine offering upgrades, 1 Secret Key with 2 Locked Passages, 1 Demonic Leader, 4 Small Encounters, and Points of No Return, all marked to streamline navigation and exploration in this chapter as the Doom Slayer progresses toward the hangar.
1 x Starting Point; 9 x Secret Area; 1 x Codex Entry; 1 x Collectible Toy; 1 x Weapon Skin; 3 x Life Sigil; 3 x Soul Sphere; 1 x Sentinel Shrine; 1 x Demonic Essence; 2 x Ruby; 183 x Gold; 1 x Key; 1 x Switch; 2 x Locked Passage; 5 x Metal Lock; 1 x Shield Recall Jump; 1 x Demonic Leader; 4 x Encounter (Small); 1 x Mission Objective; 4 x Point of No Return;
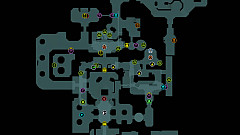
Abyssal Forest - The interactive map guide for Abyssal Forest, the eighth chapter of Doom: The Dark Ages, provides a comprehensive overview of collectibles and secrets in a misty, demon-infested woodland as the Doom Slayer journeys to a forge. The guide details 11 Secret Areas with hidden items, 2 Collectibles (1 Codex Entry and 1 Collectible Toy), 1 Demonic Essence (Armor) from defeating the Leader, 250 Gold, 2 Rubies, 3 Life Sigils, Soul Spheres, 1 Sentinel Shrine for weapon upgrades, 1 Yellow Key with 1 Locked Passage, Large & Small Encounters, or Points of No Return. Notable features include a new weapon - mighty grenade launcher - and puzzles, such as using the shield to access the Witch Toy in a cage, with markers to aid navigation for 100% completion.
1 x Starting Point; 11 x Secret Area; 1 x Codex Entry; 1 x Collectible Toy; 1 x Arsenal; 3 x Life Sigil; 3 x Soul Sphere; 1 x Sentinel Shrine; 1 x Demonic Essence; 3 x Ruby; 250 x Gold; 1 x Key; 1 x Switch; 1 x Locked Passage; 7 x Metal Lock; 3 x Shield Recall Jump; 1 x Demonic Leader; 2 x Encounter (Large); 1 x Encounter (Small); 1 x Mission Objective; 4 x Point of No Return;
Ancestral Forge - The Ancestral Forge is the ninth chapter in Doom: The Dark Ages, featuring a map where the Doom Slayer must charge the Ancestral Heart and reach the Forge. This interactive map details the locations of 9 Secret Areas, 230 Gold, 2 Rubies, 1 Wraithstone, 2 Demonic Essences (Health & Ammo), and 4 Collectibles (2 Codex Entries, 1 Collectible Toy, 1 Weapon Skin). Additional markers include Wolf Statues required to unlock a wraithstone, Life Sigils, Sentinel Shrines, Secret Key, Locked Passages, Leaders & other Encounters, Points of No Return, and other items. The map supports 100% completion by guiding players to all collectibles, secrets, and mission challenges, such as discovering 7 secret areas, etc.
1 x Starting Point; 9 x Secret Area; 2 x Codex Entry; 1 x Collectible Toy; 2 x Weapon Skin; 1 x Arsenal; 3 x Life Sigil; 3 x Soul Sphere; 2 x Sentinel Shrine; 2 x Demonic Essence; 1 x Wraithstone; 2 x Ruby; 230 x Gold; 1 x Key; 6 x Switch; 4 x Locked Passage; 5 x Metal Lock; 3 x Shield Recall Jump; 3 x Wolf Statue; 2 x Demonic Leader; 2 x Encounter (Large); 2 x Point of No Return;
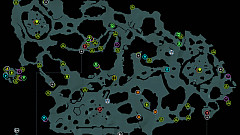
The Forsaken Plains - An interactive map of the Forsaken Plains, the tenth location traversed when playing Doom: The Dark Ages. There are 10 Secret Areas, 230 Gold, 3 Rubies, 1 Wraithstone, 3 Demonic Essences - Health, Armor & Ammo, and 4 Collectibles - 2 Codex Entries, 1 Collectible Toy, and 1 Skin - hidden on this map.
1 x Starting Point; 10 x Secret Area; 2 x Codex Entry; 1 x Collectible Toy; 2 x Weapon Skin; 1 x Arsenal; 3 x Life Sigil; 2 x Sentinel Shrine; 3 x Demonic Essence; 1 x Wraithstone; 3 x Ruby; 230 x Gold; 1 x Key; 3 x Locked Passage; 3 x Metal Lock; 3 x Shield Recall Jump; 3 x Demonic Leader; 2 x Encounter (Large); 2 x Encounter (Small); 3 x Mission Objective; 2 x Point of No Return;
Hellbreaker - An interactive map of the Hellbreaker, the evelenth location traversed when playing Doom: The Dark Ages. There is 1 Secret Area, 85 Gold, 1 Shield Rune, 1 Demonic Essence - Armor, and 1 Collectible - 1 Collectible Toy - hidden on this map.
1 x Starting Point; 1 x Secret Area; 1 x Collectible Toy; 2 x Arsenal; 1 x Soul Sphere; 1 x Sentinel Shrine; 1 x Demonic Essence; 85 x Gold; 2 x Metal Lock; 1 x Demonic Leader; 2 x Encounter (Large); 1 x Encounter (Small); 4 x Point of No Return;
Sentinel Command Station - An interactive map of the Sentinel Command Station, the twelfth location traversed when playing Doom: The Dark Ages. There are 9 Secret Areas, 177 Gold, 1 Ruby, 1 Wraithstone, 1 Demonic Essence - Health, 1 Shield Rune, and 3 Collectibles - 1 Codex Entry, 1 Collectible Toy, and 1 Skin - hidden on this map.
1 x Starting Point; 9 x Secret Area; 1 x Codex Entry; 1 x Collectible Toy; 1 x Weapon Skin; 2 x Arsenal; 2 x Life Sigil; 2 x Soul Sphere; 1 x Sentinel Shrine; 1 x Demonic Essence; 1 x Wraithstone; 2 x Ruby; 177 x Gold; 2 x Key; 5 x Switch; 5 x Locked Passage; 1 x Shield Recall Jump; 2 x Cultist Circle; 1 x Demonic Leader; 1 x Encounter (Large); 1 x Encounter (Small); 4 x Point of No Return;
From Beyond - The Far Beyond is the 13th, relatively short chapter of Doom: The Dark Ages. We mainly fly on a dragon, but we also land on two small platforms where we have to defeat two leaders in order to close two demonic portals. There are only 2 Demonic Essences - Armor & Ammo hidden on this map.
2 x Starting Point; 1 x Weapon Skin; 1 x Soul Sphere; 2 x Demonic Essence; 2 x Demonic Leader; 2 x Point of No Return;
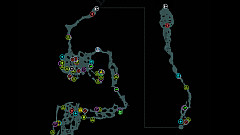
Spire of Nerathul - An interactive map for Chapter 14, "Spire of Nerathul," in Doom: The Dark Ages. This chapter features 11 Secret Areas, 359 Gold pieces, 3 Rubies, 2 Wraithstones, 2 Demonic Essences (Health & Ammo), and 5 Collectibles (2 Codex Entries, 2 Toys, and 1 Weapon Skin). The map details locations of these items, along with Demonic Leaders, Life Sigils, Sentinel Shrines, Soul Spheres, Encounters, Points of No Return, and other points of interest. It serves as a comprehensive guide for players aiming for 100% completion, navigating the complex environment of the Spire of Nerathul, which involves dragon-riding segments and intense combat arenas.
7 x Starting Point; 11 x Secret Area; 2 x Codex Entry; 2 x Collectible Toy; 1 x Weapon Skin; 2 x Arsenal; 3 x Life Sigil; 3 x Soul Sphere; 2 x Sentinel Shrine; 2 x Demonic Essence; 2 x Wraithstone; 3 x Ruby; 359 x Gold; 3 x Switch; 5 x Metal Lock; 2 x Shield Recall Jump; 2 x Demonic Leader; 4 x Encounter (Large); 5 x Encounter (Small); 4 x Mission Objective; 14 x Point of No Return;
City of Ry'uul - The interactive map for the City of Ry'uul, the fifteenth chapter of Doom: The Dark Ages, details key points of interest in this Cosmic Realm, including 10 Secret Areas with collectibles like Codex Entry, Toys, and Weapon Skins, alongside 182 Gold, 2 Rubies, 1 Wraithstone, and 2 Demonic Essences for health and armor upgrades.
1 x Starting Point; 10 x Secret Area; 1 x Codex Entry; 1 x Collectible Toy; 1 x Weapon Skin; 1 x Arsenal; 2 x Life Sigil; 2 x Soul Sphere; 1 x Sentinel Shrine; 2 x Demonic Essence; 1 x Wraithstone; 2 x Ruby; 182 x Gold; 7 x Switch; 1 x Metal Lock; 3 x Shield Recall Jump; 2 x Demonic Leader; 3 x Encounter (Large); 2 x Encounter (Small); 1 x Mission Objective; 3 x Point of No Return;
The Kar'Thul Marshes - The Kar'Thul Marshes is the sixteenth chapter in Doom: The Dark Ages, featuring an open-world map where the Doom Slayer continues the quest to find Thira. The map contains 5 Secret Areas, 188 Gold, 1 Ruby, 1 Wraithstone, 2 Demonic Essences (Armor & Ammo), and 2 Collectibles (a codex page and a toy).
1 x Starting Point; 5 x Secret Area; 1 x Codex Entry; 1 x Collectible Toy; 1 x Weapon Skin; 2 x Life Sigil; 1 x Soul Sphere; 1 x Sentinel Shrine; 2 x Demonic Essence; 1 x Wraithstone; 1 x Ruby; 188 x Gold; 3 x Switch; 1 x Metal Lock; 5 x Wolf Statue; 2 x Demonic Leader; 1 x Encounter (Large); 5 x Encounter (Small); 3 x Mission Objective; 2 x Point of No Return;
Temple of Lomarith - An interactive map for Chapter 17 of Doom: The Dark Ages, focusing on the Temple of Lomarith level. There are 9 Secret Areas, 194 Gold, 2 Rubies, 1 Wraithstone, 2 Demonic Essences - Ammo, and 3 Collectibles - 1 Codex Entry, 1 Collectible Toy, and 1 Skin - hidden on this map.
1 x Starting Point; 9 x Secret Area; 1 x Codex Entry; 1 x Collectible Toy; 2 x Weapon Skin; 2 x Life Sigil; 2 x Soul Sphere; 2 x Sentinel Shrine; 2 x Demonic Essence; 1 x Wraithstone; 2 x Ruby; 194 x Gold; 1 x Key; 4 x Switch; 1 x Locked Passage; 1 x Metal Lock; 2 x Shield Recall Jump; 2 x Demonic Leader; 4 x Encounter (Small); 2 x Point of No Return;
Belly of the Beast - An interactive map for Chapter 18 of Doom: The Dark Ages - "Belly of the Beast", set inside the stomach of a massive eldritch creature. There are 6 Secret Areas, 153 Gold, 1 Ruby, 1 Demonic Essence - Armor, and 2 Collectibles - 1 Codex Entry, and 1 Collectible Toy - hidden on this map.
1 x Starting Point; 6 x Secret Area; 1 x Codex Entry; 1 x Collectible Toy; 1 x Weapon Skin; 2 x Life Sigil; 2 x Soul Sphere; 2 x Sentinel Shrine; 1 x Demonic Essence; 1 x Ruby; 153 x Gold; 4 x Switch; 4 x Shield Recall Jump; 1 x Demonic Leader; 2 x Encounter (Large); 1 x Encounter (Small); 3 x Point of No Return;
Harbor of Souls - An interactive map of the Harbor of Souls, the nineteenth location traversed when playing Doom: The Dark Ages. There are 10 Secret Areas, 294 Gold, 1 Ruby, 1 Wraithstone, 2 Demonic Essences - Health & Ammo, and 3 Collectibles - 2 Codex Entries, and 1 Collectible Toy - hidden on this map.
1 x Starting Point; 10 x Secret Area; 2 x Codex Entry; 1 x Collectible Toy; 3 x Life Sigil; 3 x Soul Sphere; 3 x Sentinel Shrine; 2 x Demonic Essence; 1 x Wraithstone; 2 x Ruby; 294 x Gold; 2 x Key; 5 x Switch; 4 x Locked Passage; 1 x Metal Lock; 7 x Shield Recall Jump; 2 x Demonic Leader; 2 x Encounter (Large); 3 x Mission Objective; 3 x Point of No Return;
Resurrection - An interactive map for Chapter 20 of Doom: The Dark Ages - "The Resurection", where the Doom Slayer returns to the living world to exact revenge. There are 12 Secret Areas, 392 Gold, 3 Rubies, 1 Wraithstone, 3 Demonic Essences - Health, Armor & Ammo, and 5 Collectibles - 2 Codex Entries, 2 Collectible Toys, and 1 Skin - hidden on this map.
1 x Starting Point; 12 x Secret Area; 2 x Codex Entry; 2 x Collectible Toy; 2 x Weapon Skin; 3 x Life Sigil; 3 x Soul Sphere; 2 x Sentinel Shrine; 3 x Demonic Essence; 1 x Wraithstone; 3 x Ruby; 392 x Gold; 2 x Key; 9 x Switch; 6 x Locked Passage; 4 x Metal Lock; 4 x Wolf Statue; 3 x Cultist Circle; 3 x Demonic Leader; 2 x Encounter (Large); 5 x Mission Objective; 3 x Point of No Return;

Final Battle - The interactive map for the Final Battle, the twenty-first chapter of Doom: The Dark Ages, details a demon-infested battlefield where the Doom Slayer defends allies against an assault led by an enhanced Prince Ahzrak. This chapter lacks secrets, collectibles, or mission challenges, focusing solely on intense combat.
1 x Starting Point; 1 x Arsenal; 6 x Encounter (Large); 3 x Mission Objective;
Reckoning - The interactive map for Reckoning, the twenty-second and final chapter of Doom: The Dark Ages, details the climactic battle where the Doom Slayer confronts Prince Ahzrak to end his demonic invasion. This chapter contains 11 Secret Areas, 335 Gold, 3 Rubies, 1 Wraithstone, 1 Demonic Essence (Health), and 3 Collectibles (1 Codex Entry and 2 Collectible Toys). This map guides players through the expansive battlefield, highlighting resource locations and hidden collectibles to achieve 100% completion in this intense finale.
1 x Starting Point; 11 x Secret Area; 1 x Codex Entry; 2 x Collectible Toy; 1 x Weapon Skin; 3 x Life Sigil; 4 x Soul Sphere; 2 x Sentinel Shrine; 1 x Demonic Essence; 1 x Wraithstone; 3 x Ruby; 335 x Gold; 2 x Key; 8 x Switch; 12 x Locked Passage; 1 x Metal Lock; 2 x Demonic Leader; 5 x Encounter (Large); 1 x Encounter (Small); 3 x Mission Objective; 2 x Point of No Return;