All Totem Fragments in Avowed
A variety of Totems and their missing Totem Fragments are hidden throughout the Living Lands. You can display collected Totems and Totem Fragments at the Totem Shrine in Party Camp. Each Totem is dedicated to a particular god in Eora's pantheon.
In each of the four large lands, you can find fragments of one totem.
- Dawnshore - Scales of the Oathbinder
- Emerald Stair - The Schemer's Offering
- Shatterscarp - Eyes of the Obscured
- Galawain's Tusks - The Huntmaster's Spoils
Totems will provide powerful effects while they are active. Only one Totem can be active at a time.
Scales of the Oathbinder Totem Bonuses
- Reduces Companion ability cooldowns by 15%.
- Critical Hits deal high Fire Accumulation.
- Reviving a Companion grants rapid Health and Essence regeneration.
- Activating a Companion ability increases your damage for 5 seconds.
- +2 Intellect, +2 Resolve.
- Second Wind casts Ring of Fire.
The Schemer's Offering Totem Bonuses
- Second Wind casts Flurry of Blows.
- Increases your damage against unaware enemies by 25%.
- Critical Hits deal high Poison Accumulation.
- +2 Constitution, +2 Dexterity.
- Increases your damage against "skull" enemies.
- After taking damage from an enemy, your next attack within 10 seconds deals +20% of the original damage you received. Stacks with Retribution.
Eyes of the Obscured Totem Bonuses
- Critical Hits deal high random accumulation.
- Restoring Essence also restores a small amount of Health.
- Activating a Level 15 or Level 20 ability grants +5% Damage Reduction for 10 seconds.
- Second Wind casts Shadowing Beyond.
- +5% Critical Hit Chance
- +2 Intellect, +2 Perception
The Huntmaster's Spoils Totem Bonuses
- Increases your damage against prone enemies by 75%.
- Second Wind casts Barbaric Shout.
- +2 Might, +2 Constitution.
- Critical Hits deal high Bleed Accumulation.
- Killing an enemy gives you +4% Damage Reduction for 10 seconds
- Killing an enemy gives you +20% Move Speed for 10 seconds
Index
- Agate Eye
- Amethyst Eye
- Antler of the Persevering Stag
- Antler of the Pursued Stag
- Broken Crown Jewel
- Effigy Necklace
- Emerald Eye
- Eyes of the Obscured
- Golden Flames
- Golden Plaque of Oaths
- Golden Plaque of Promises
- Golden Scale of Justice
- Golden Scale of Order
- Hunter's Arrows of Seeking
- Hunter's Arrows of Slaying
- Hunter's Arrows of Surviving
- Idol of Covert Plots
- Idol of Secret Hatred
- Idol of Violent Rebellion
- Obsidian Prayer Beads
- Ruby Eye
- Sacrificial Dagger
- Sapphire Eye
- Scales of the Oathbinder
- The Huntmaster's Spoils
- The Schemer's Offering
- Topaz Eye
- Wolf's Pelt Trophy
All known locations on the map Dawnshore
 Broken Crown Jewel▶ show the map ◀
Totem Fragment - Woedica. On the table in the back room of the Sanza's Emporium.
Effect:
- Swift Orders: Reduces Companion ability cooldowns by 15%.
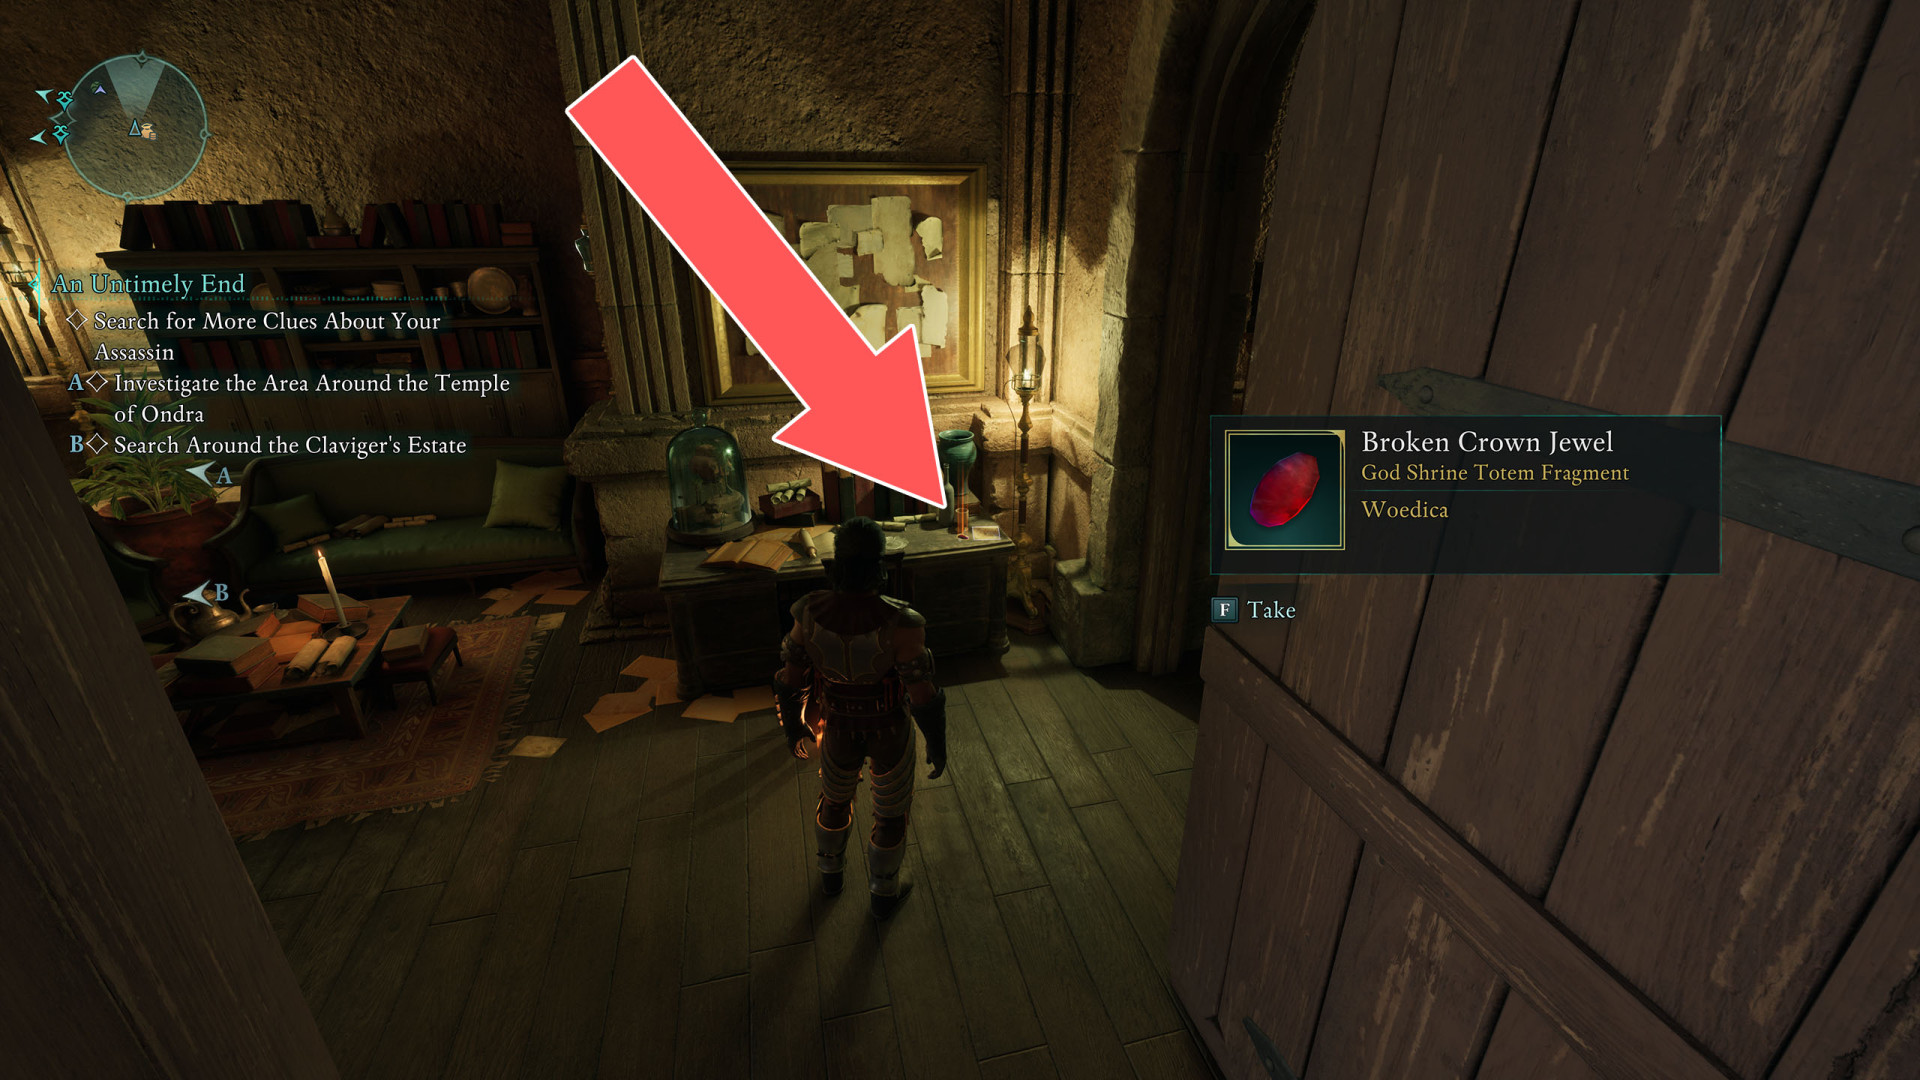
Description: This crimson jewel seems to emanate unbridled malice that you can't help but feel is directed at you.
Golden Flames▶ show the map ◀
Totem Fragment - Woedica. On the cliff edge near Castol's Folly camp.
Effect:
- Flames of Resurrection: Second Wind casts Ring of Fire.

Description: These beautifully wrought flames produce no light and yet are distinctly warm to the touch.
Golden Plaque of Oaths▶ show the map ◀
Totem Fragment - Woedica. In a cave that can be reached through a flooded tunnel.
Effect:
- The Queen's Burden: +2 Intellect, +2 Resolve.
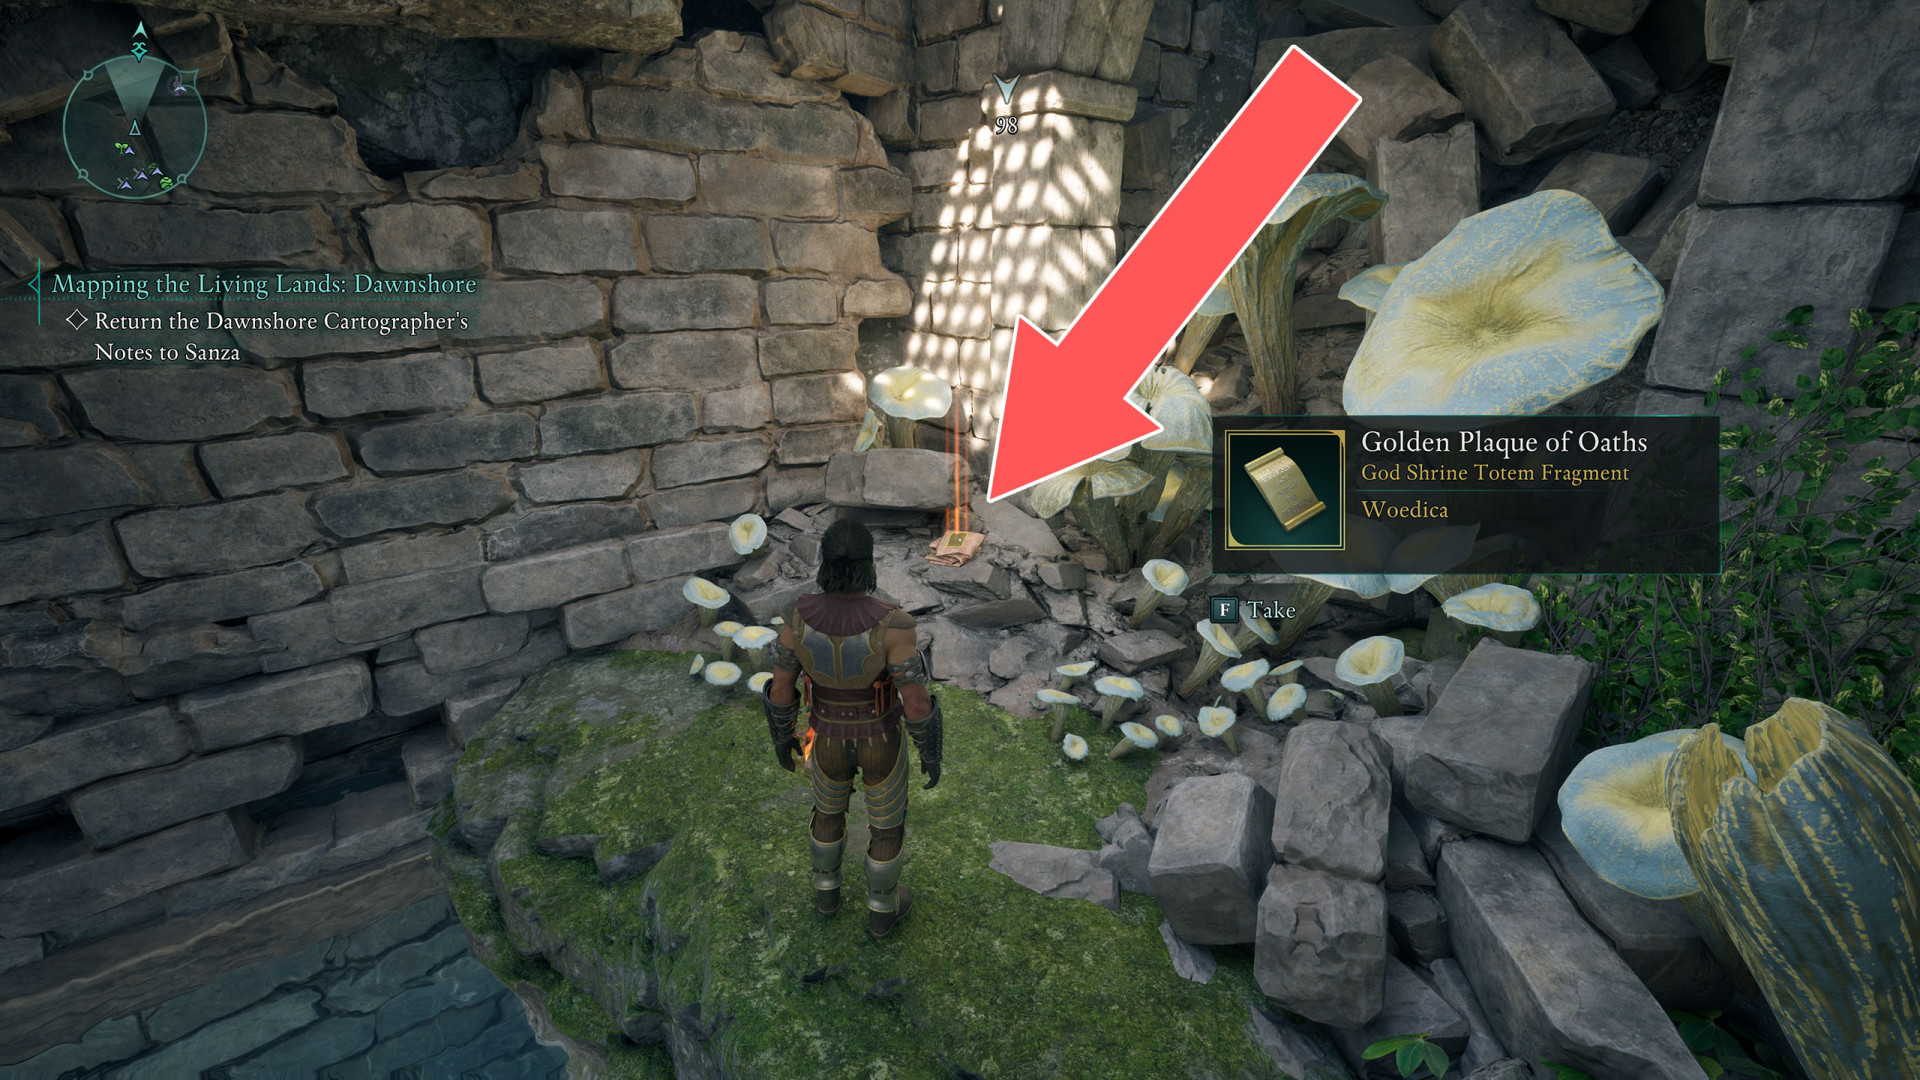
Description: Solemn oaths are engraved on this solid gold plaque. Each is stamped with Woedica's broken crown.
Golden Plaque of Promises▶ show the map ◀
Totem Fragment - Woedica. Inside the lighthouse. Accessible through a hole in the wall at the upper part of the lighthouse.
Effect:
- Noblesse Oblige: Reviving a Companion grants rapid Health and Essence regeneration.
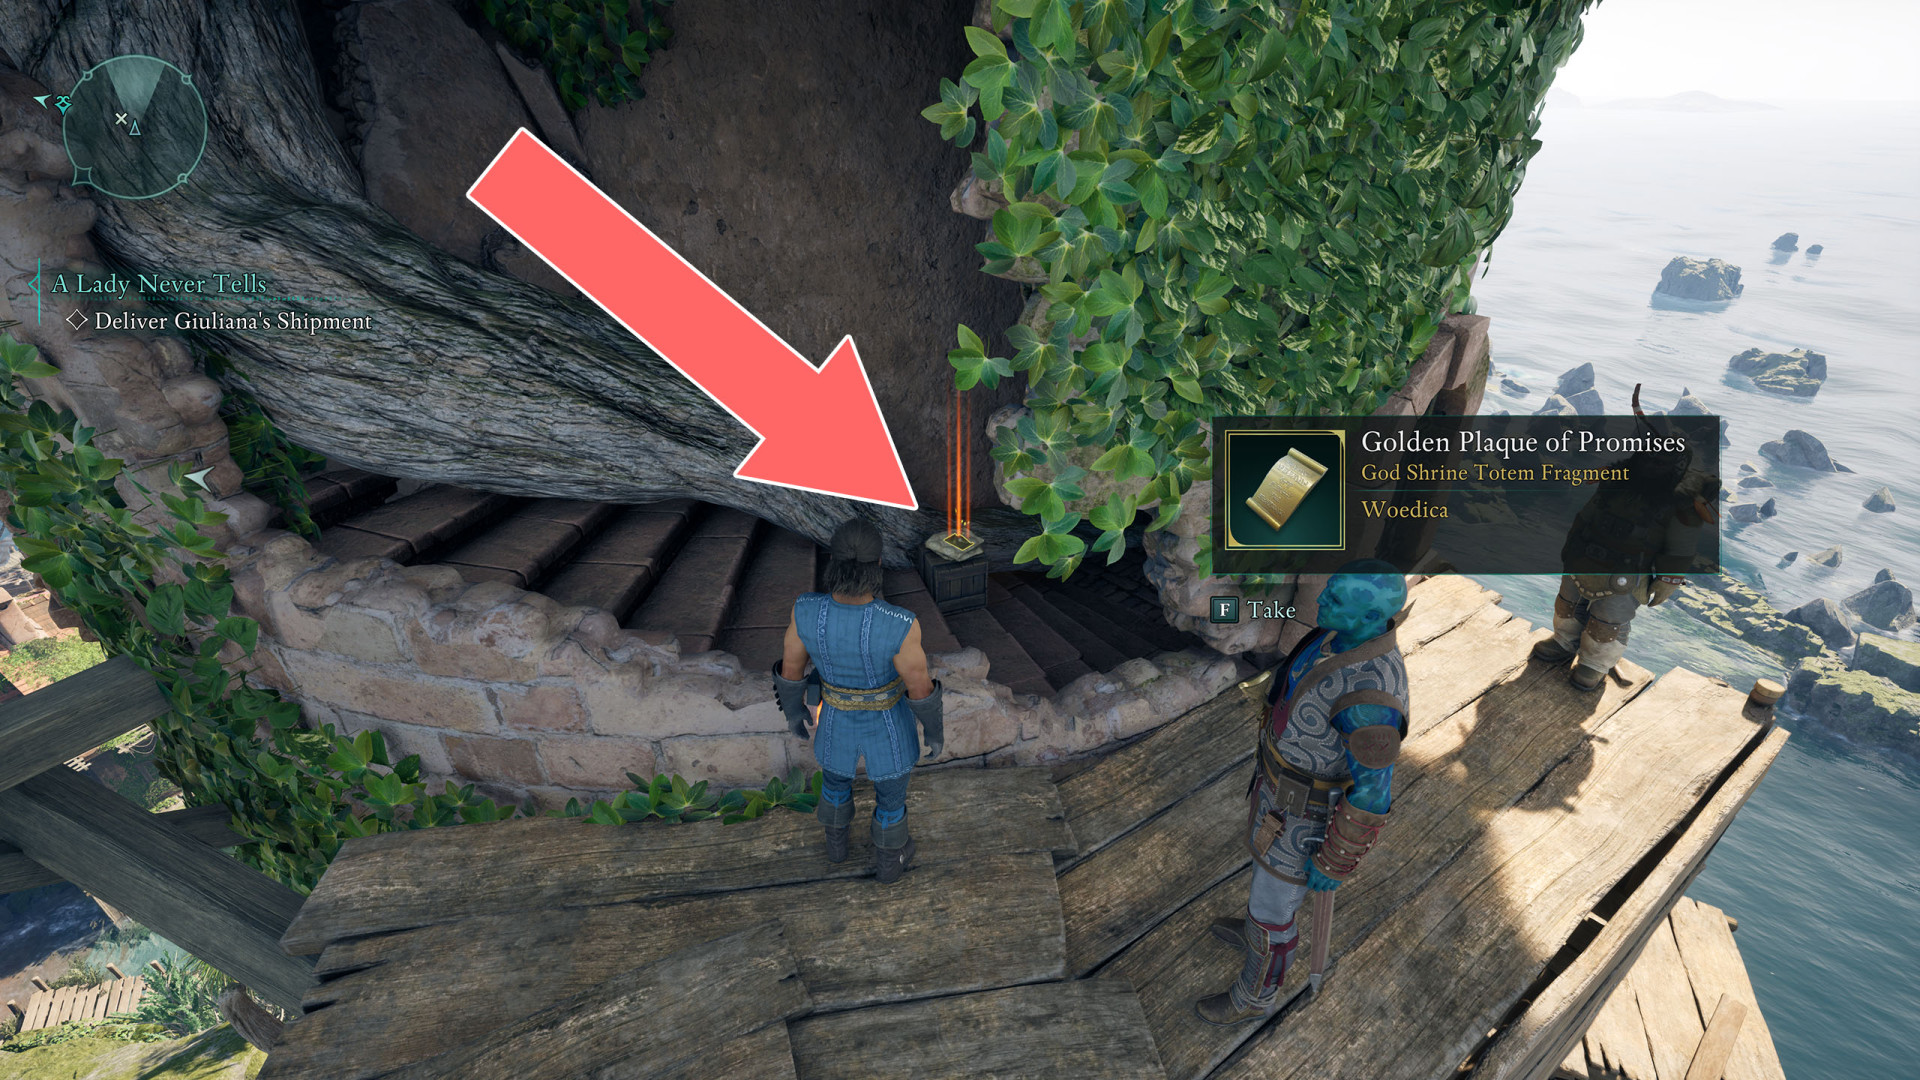
Description: A number of promises are etched into this solid gold plaque. All but one are scratched out.
Golden Scale of Justice▶ show the map ◀
Totem Fragment - Woedica. To get here for the first time, approach the place from the east, more or less from where the Grysca vendor is, jump onto the balcony where the Lockbox is, go inside, destroy the Cobweb and descend the ladder.
Effect:
- Sympathy for the Damned: Critical Hits deal high Fire Accumulation.
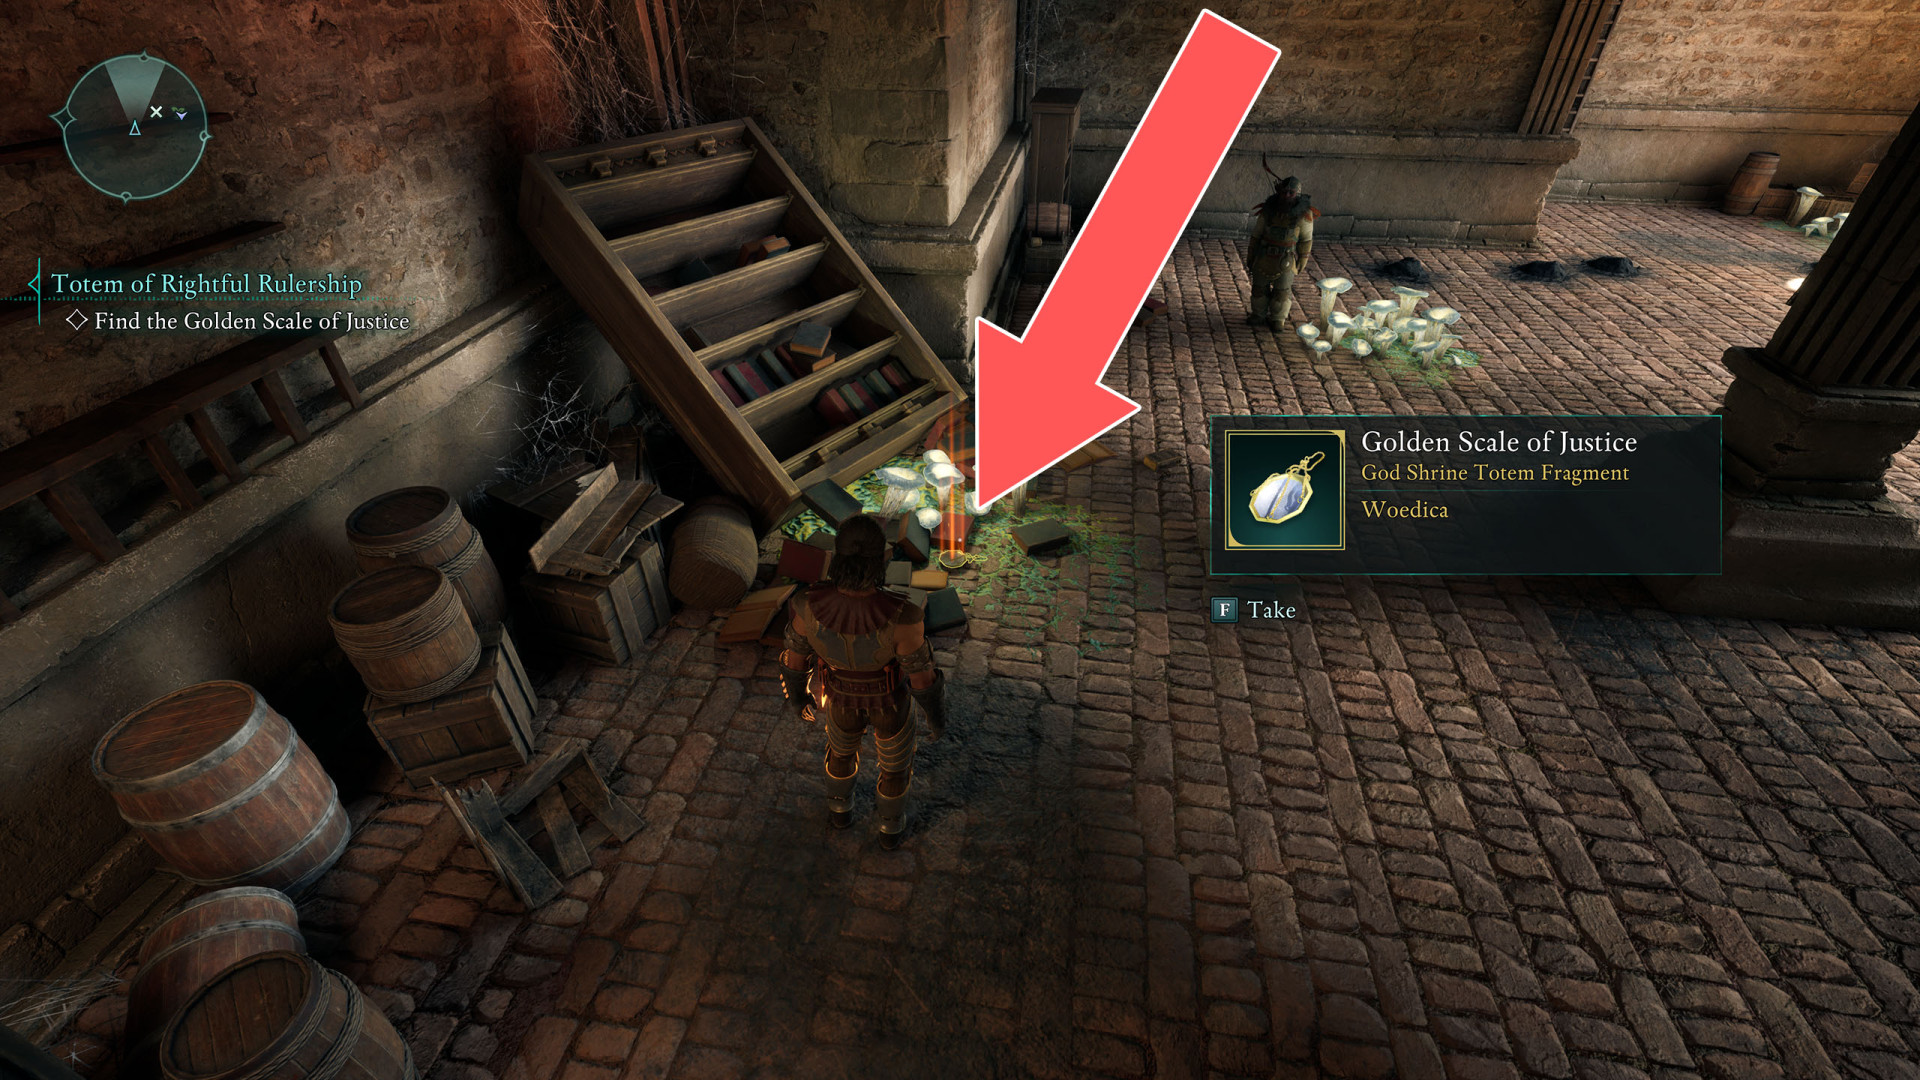
Description: This solid gold scale has an unmistakable aura of impartial judgment radiating from it.
Golden Scale of Order▶ show the map ◀
Totem Fragment - Woedica. In a nest on the rocks. You can get there by passing the Pargrun Cache ruins.
Effect:
- The Power of Command: Activating a Companion ability increases your damage for 5 seconds.
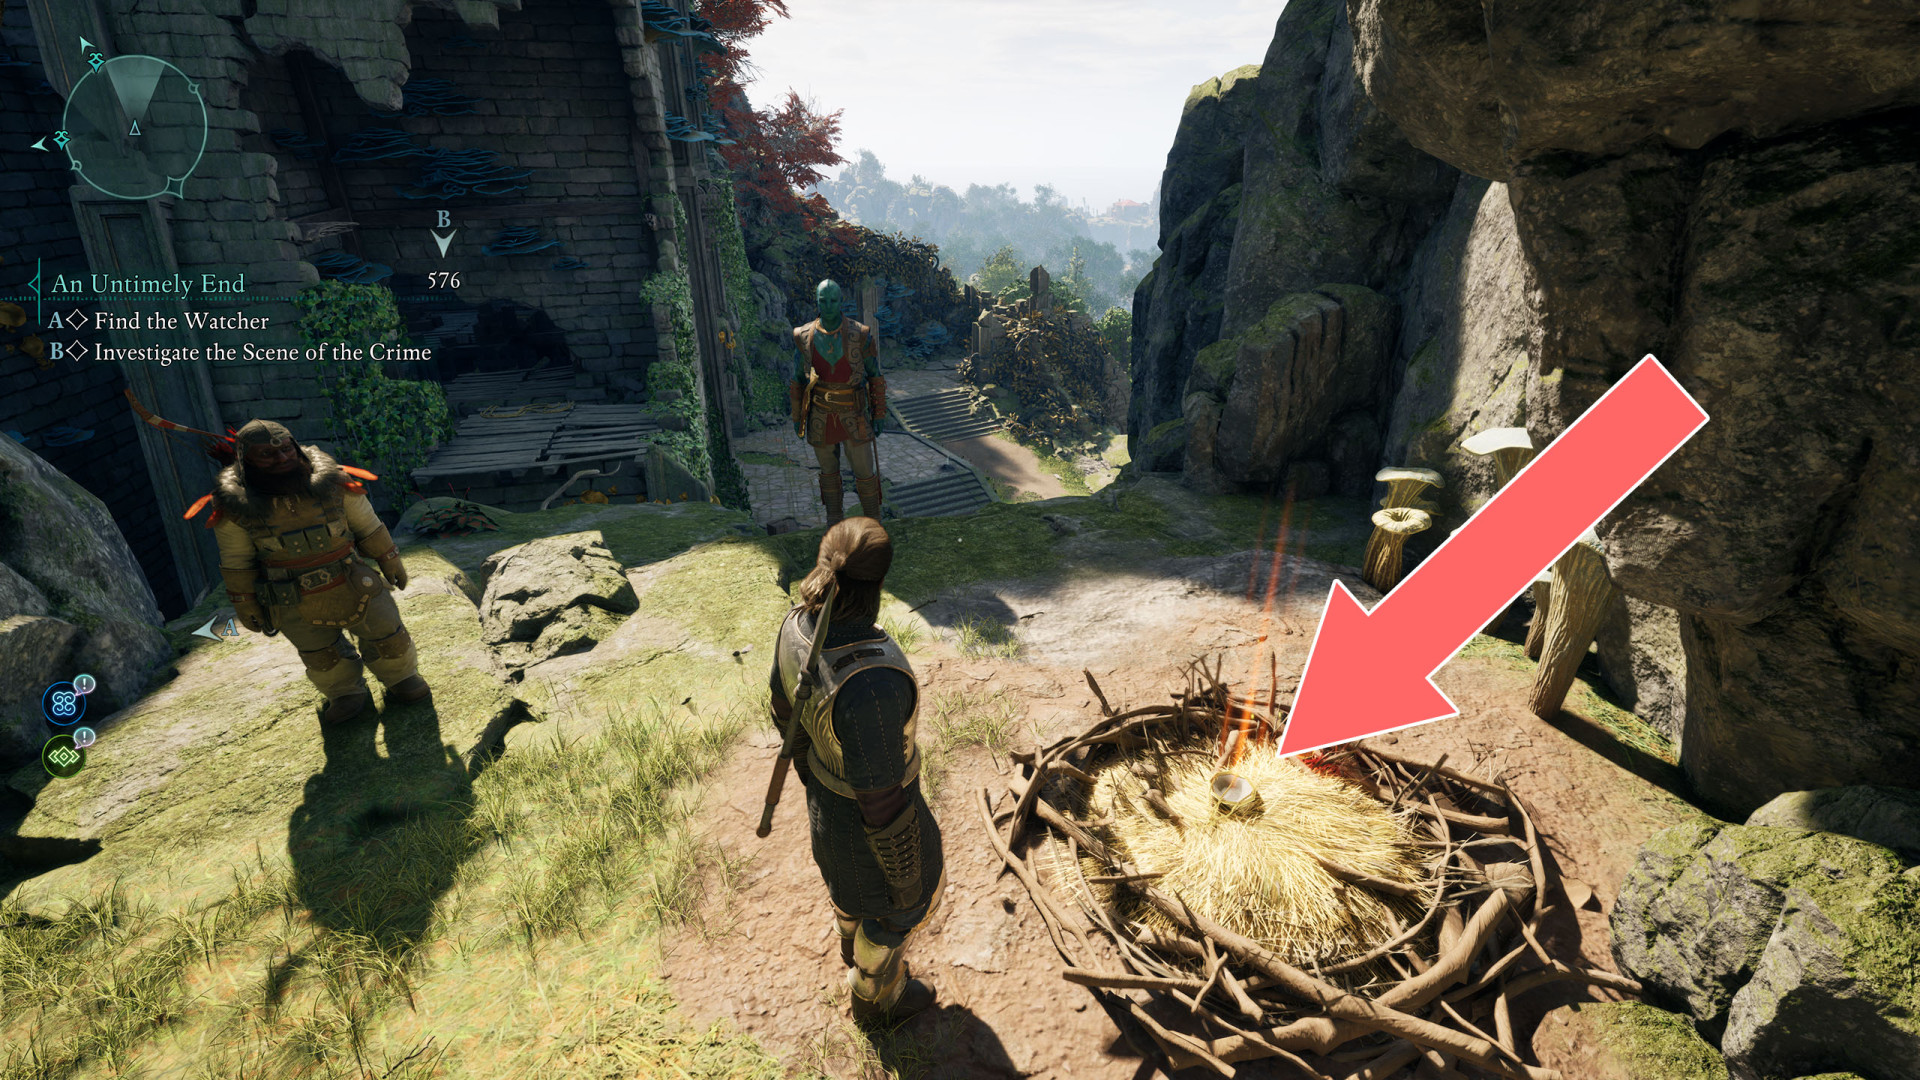
Description: The chains of this solid gold scale are surprisingly rigid, almost as if they resist being moved.
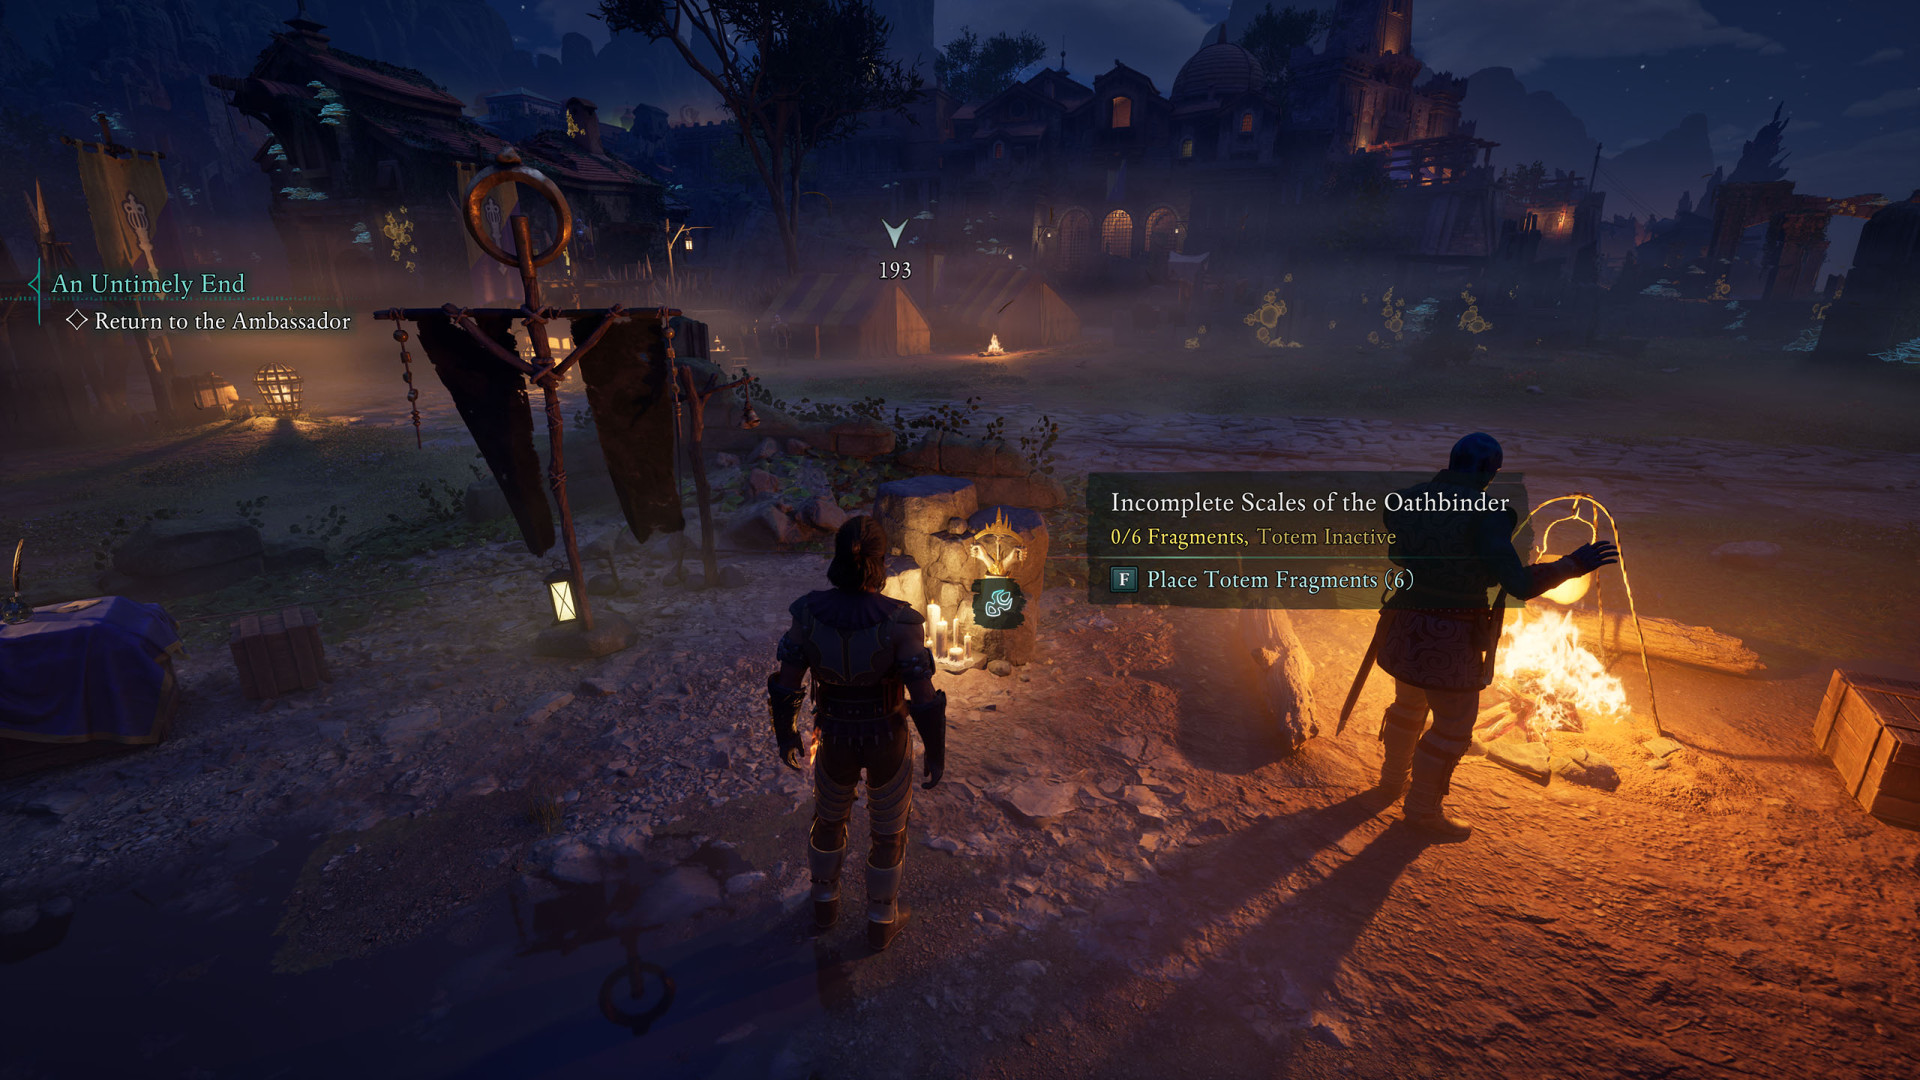
Scales of the Oathbinder▶ show the map ◀
Totem Base - Woedica. On the altar at the Shrine to Woedica.
Used to: Activate passive bonuses when placed at party camp and restored with missing fragments.
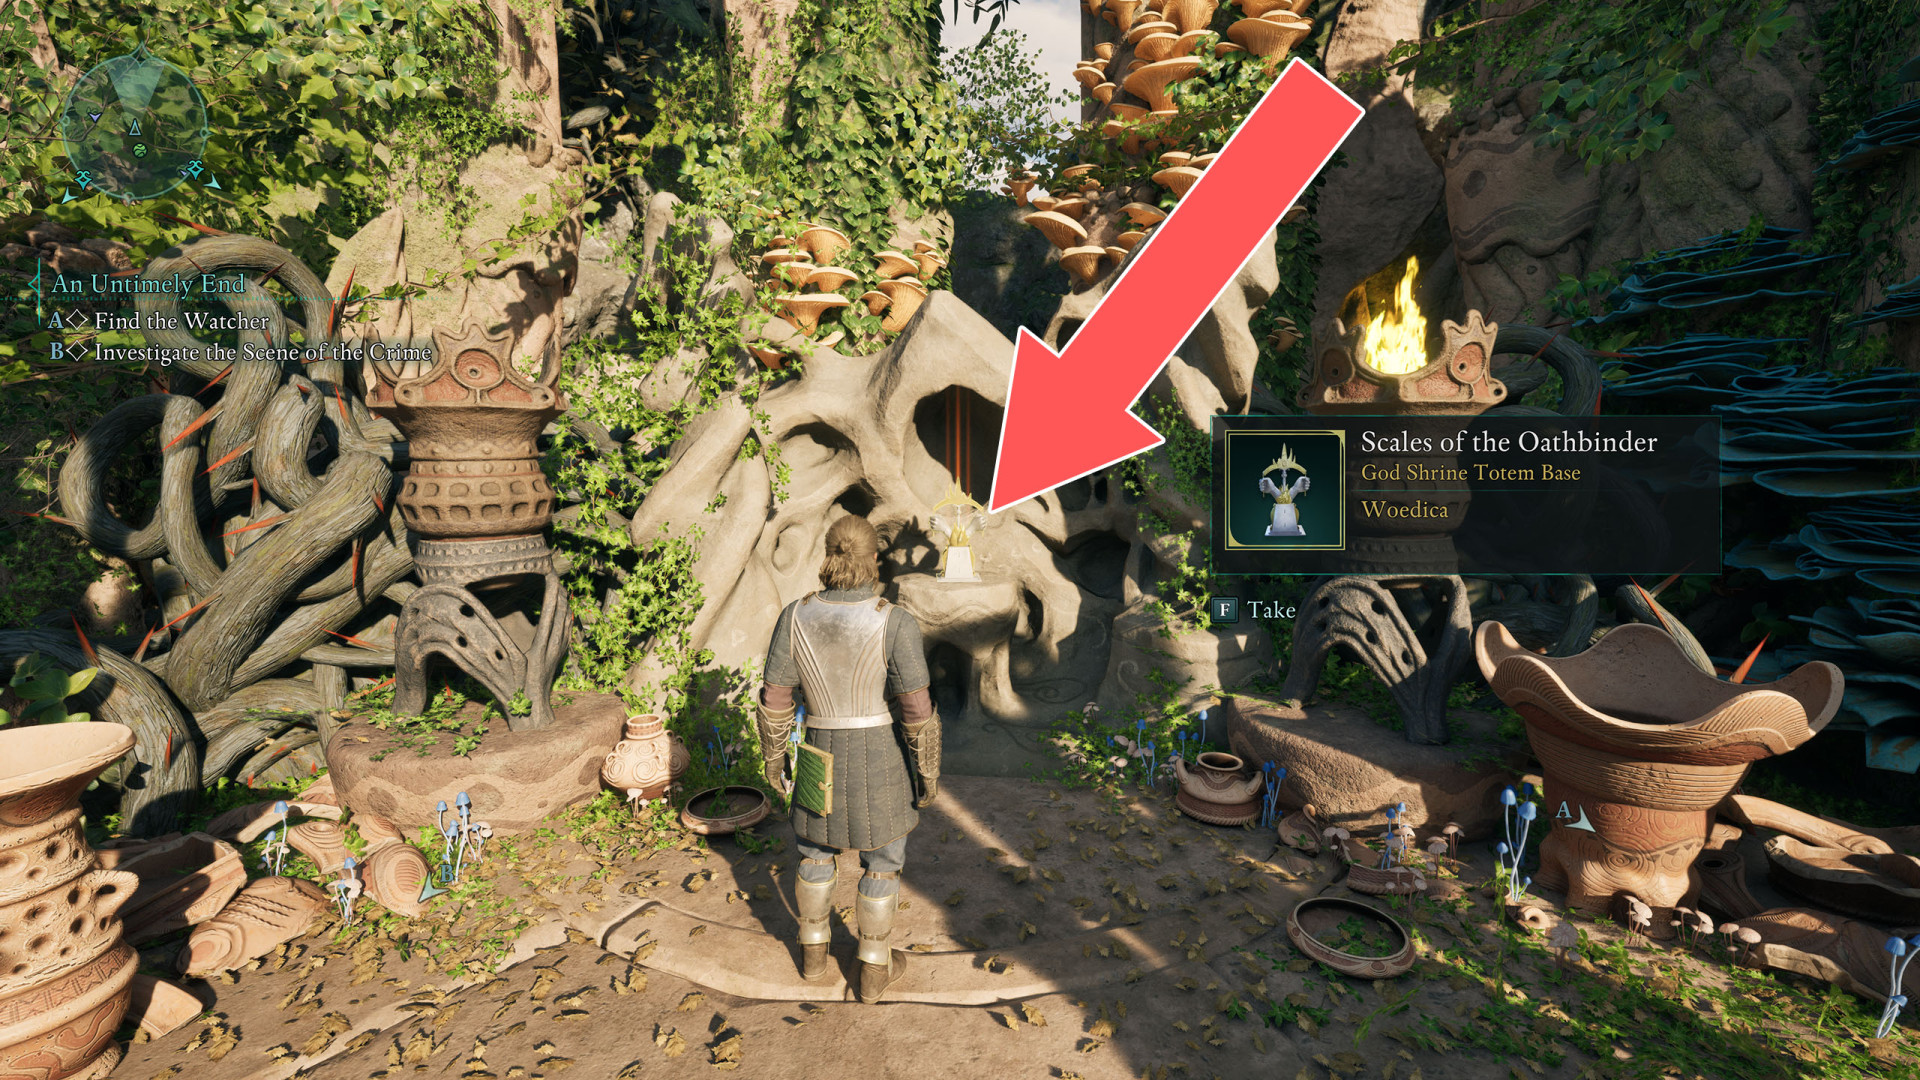
Description: This totem is made of expertly crafted marble and gold. Despite its incomplete state, you still feel a sense of unyielding justice radiating from it.
All known locations on the map Emerald Stair
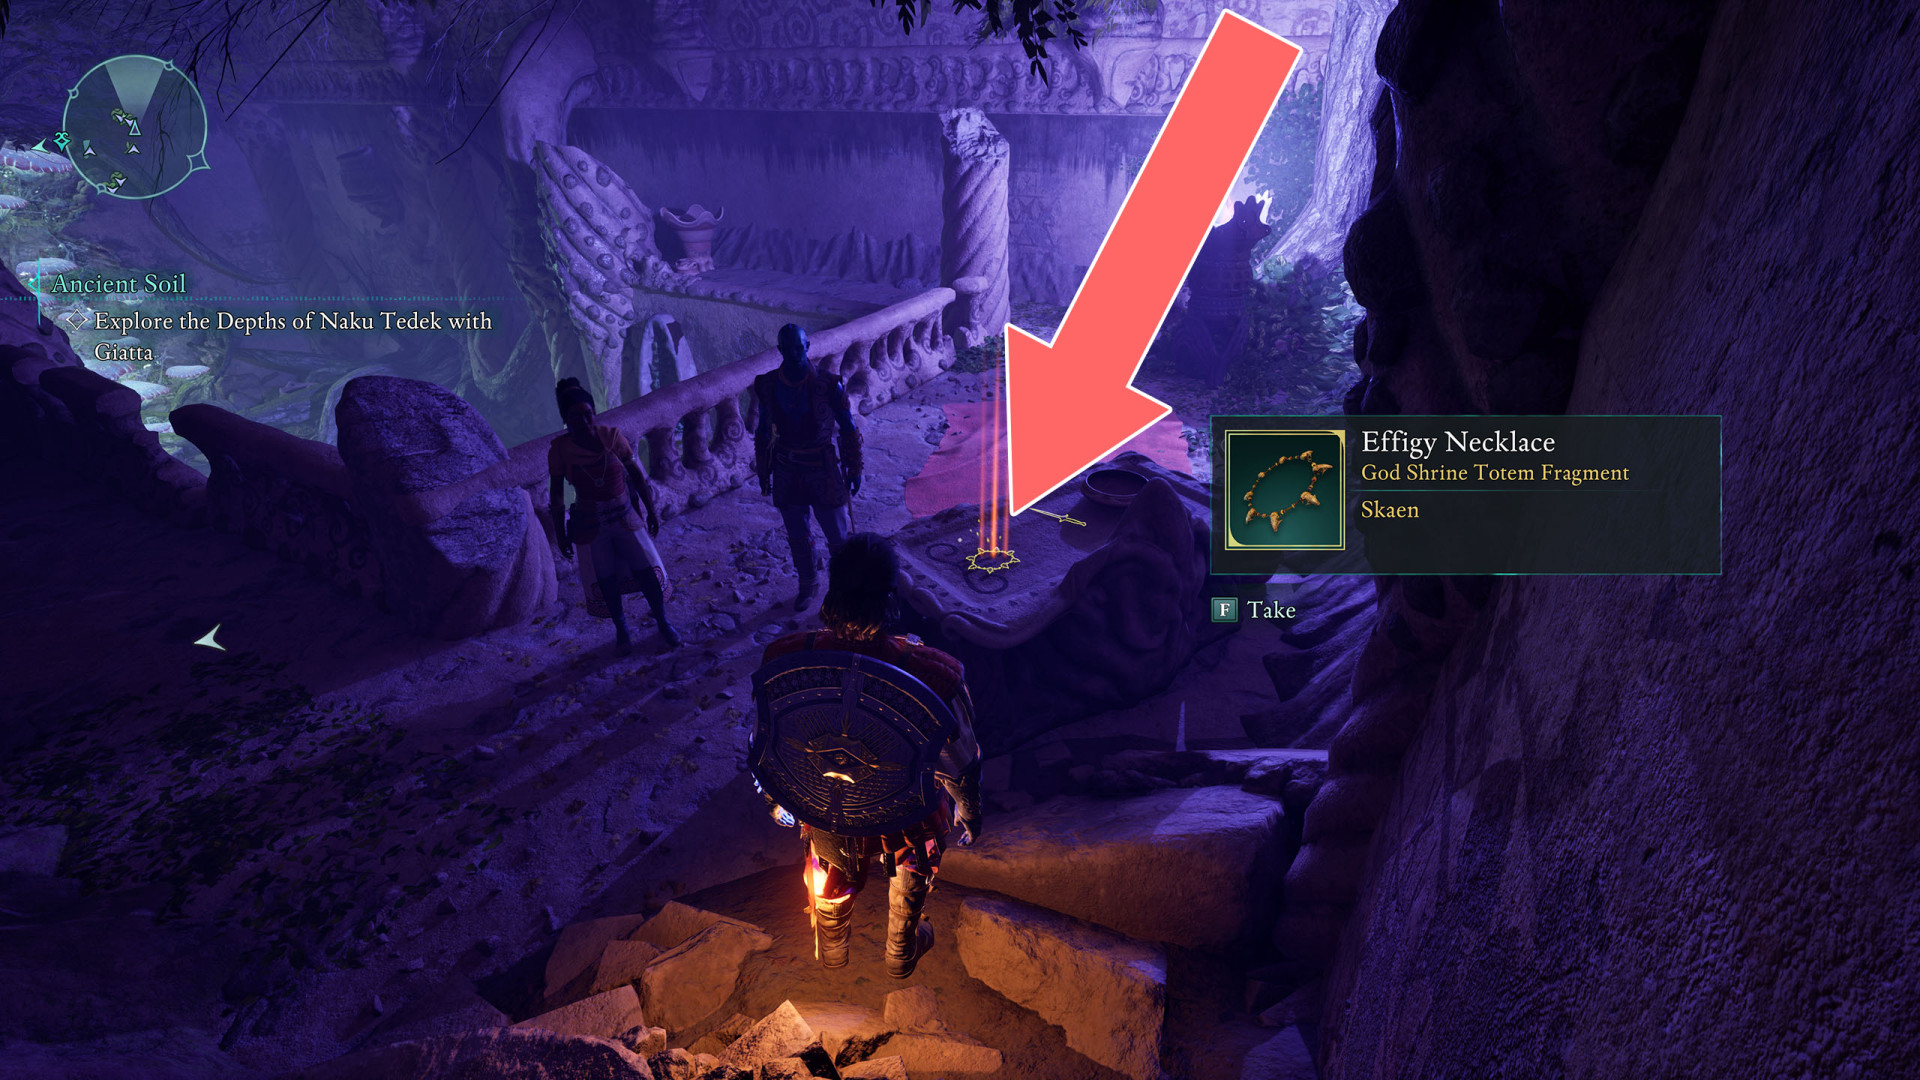
Effigy Necklace▶ show the map ◀
Totem Fragment - Skaen.
Effect:
- A Vengeful Victim: After taking damage from an enemy, your next attack within 10 seconds deals +20% of the original damage you received. Stacks with Retribution.
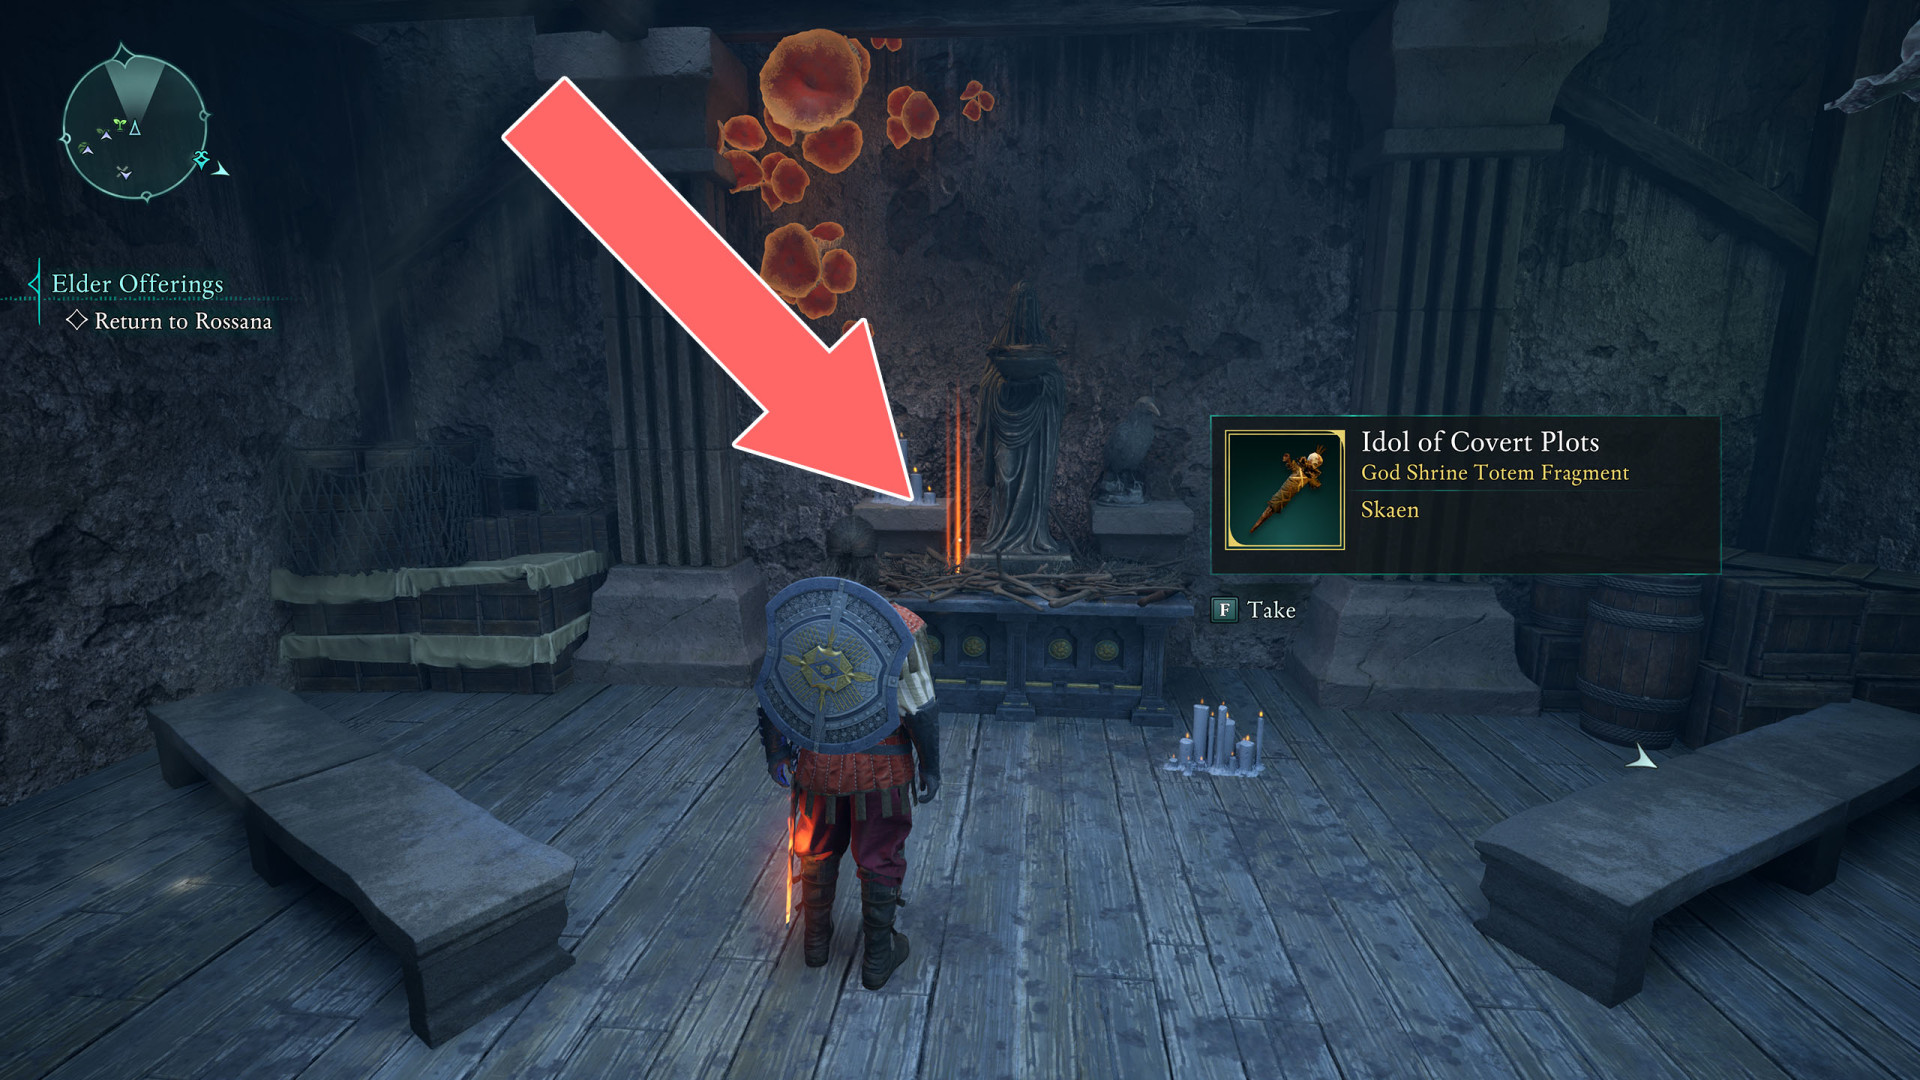
Idol of Covert Plots▶ show the map ◀
Totem Fragment - Skaen.
Effect:
- The Slave's Patience: +2 Constitution, +2 Dexterity.
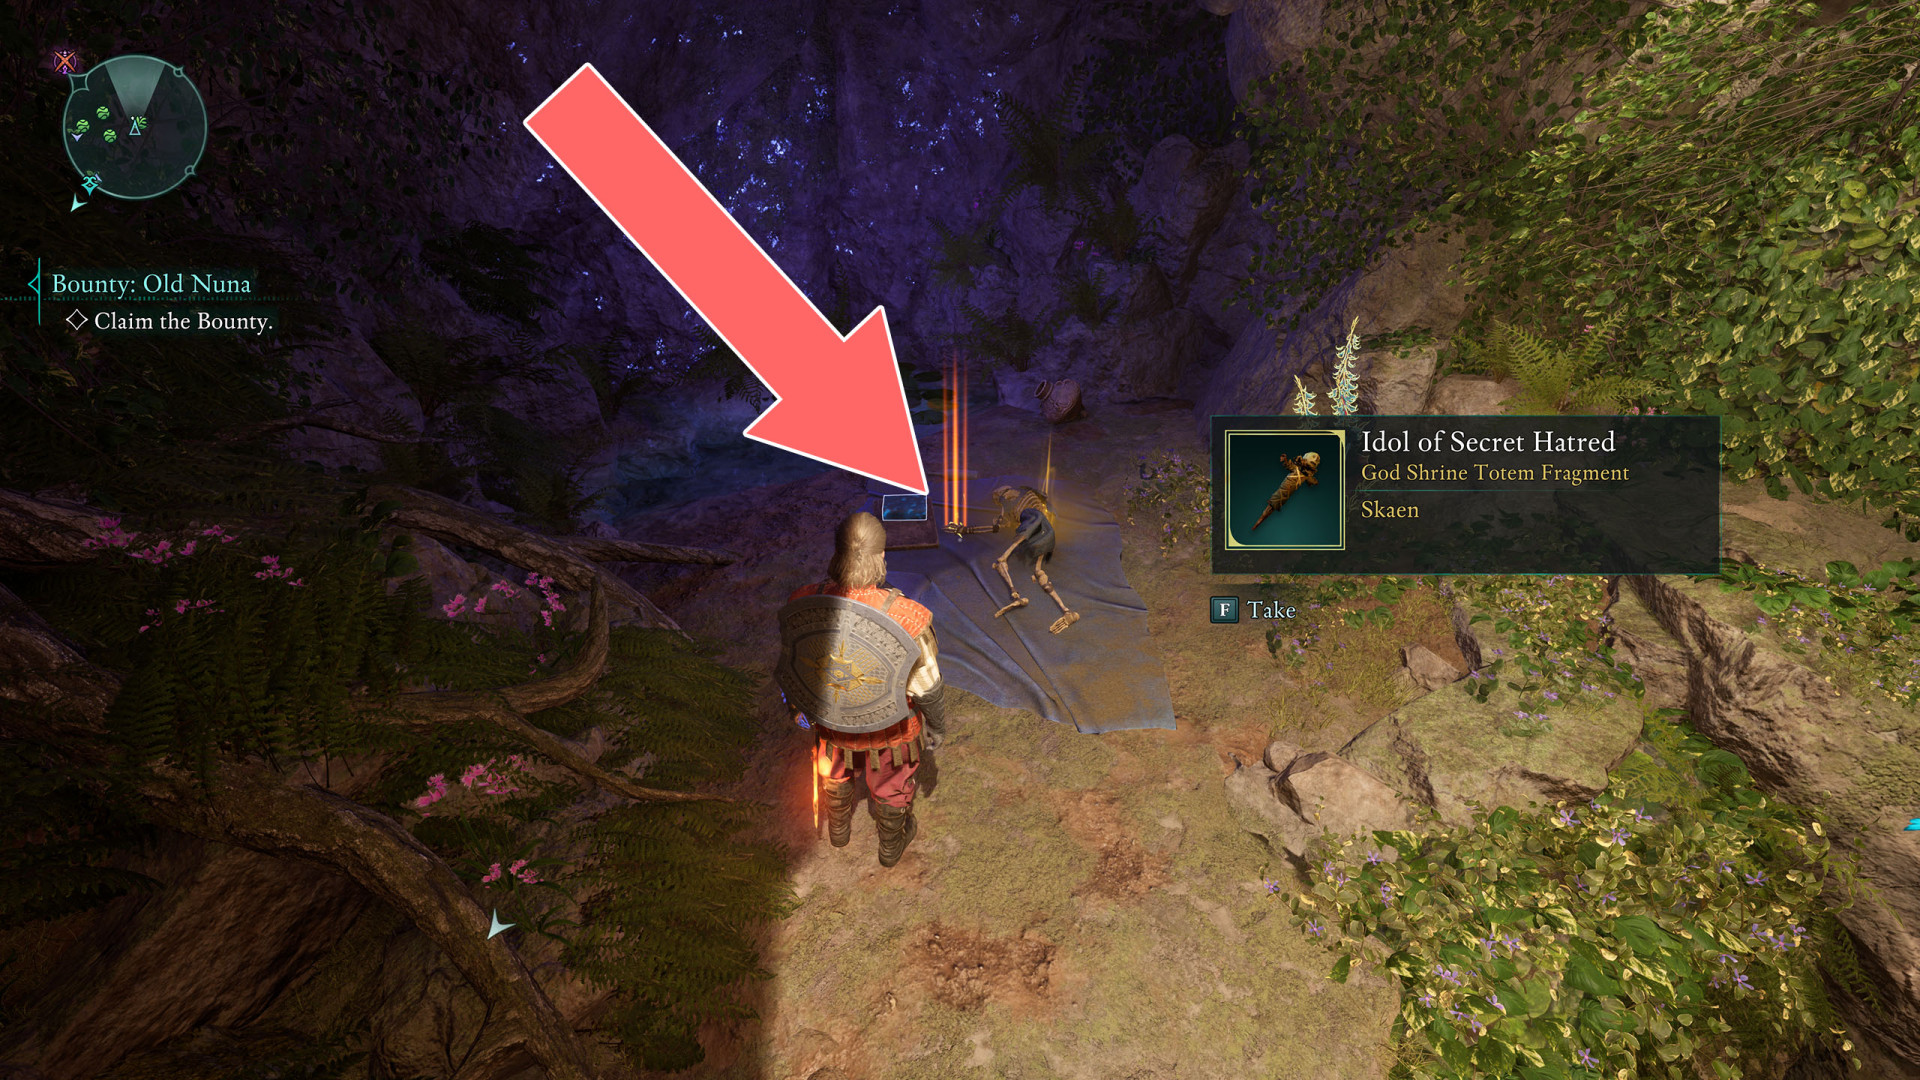
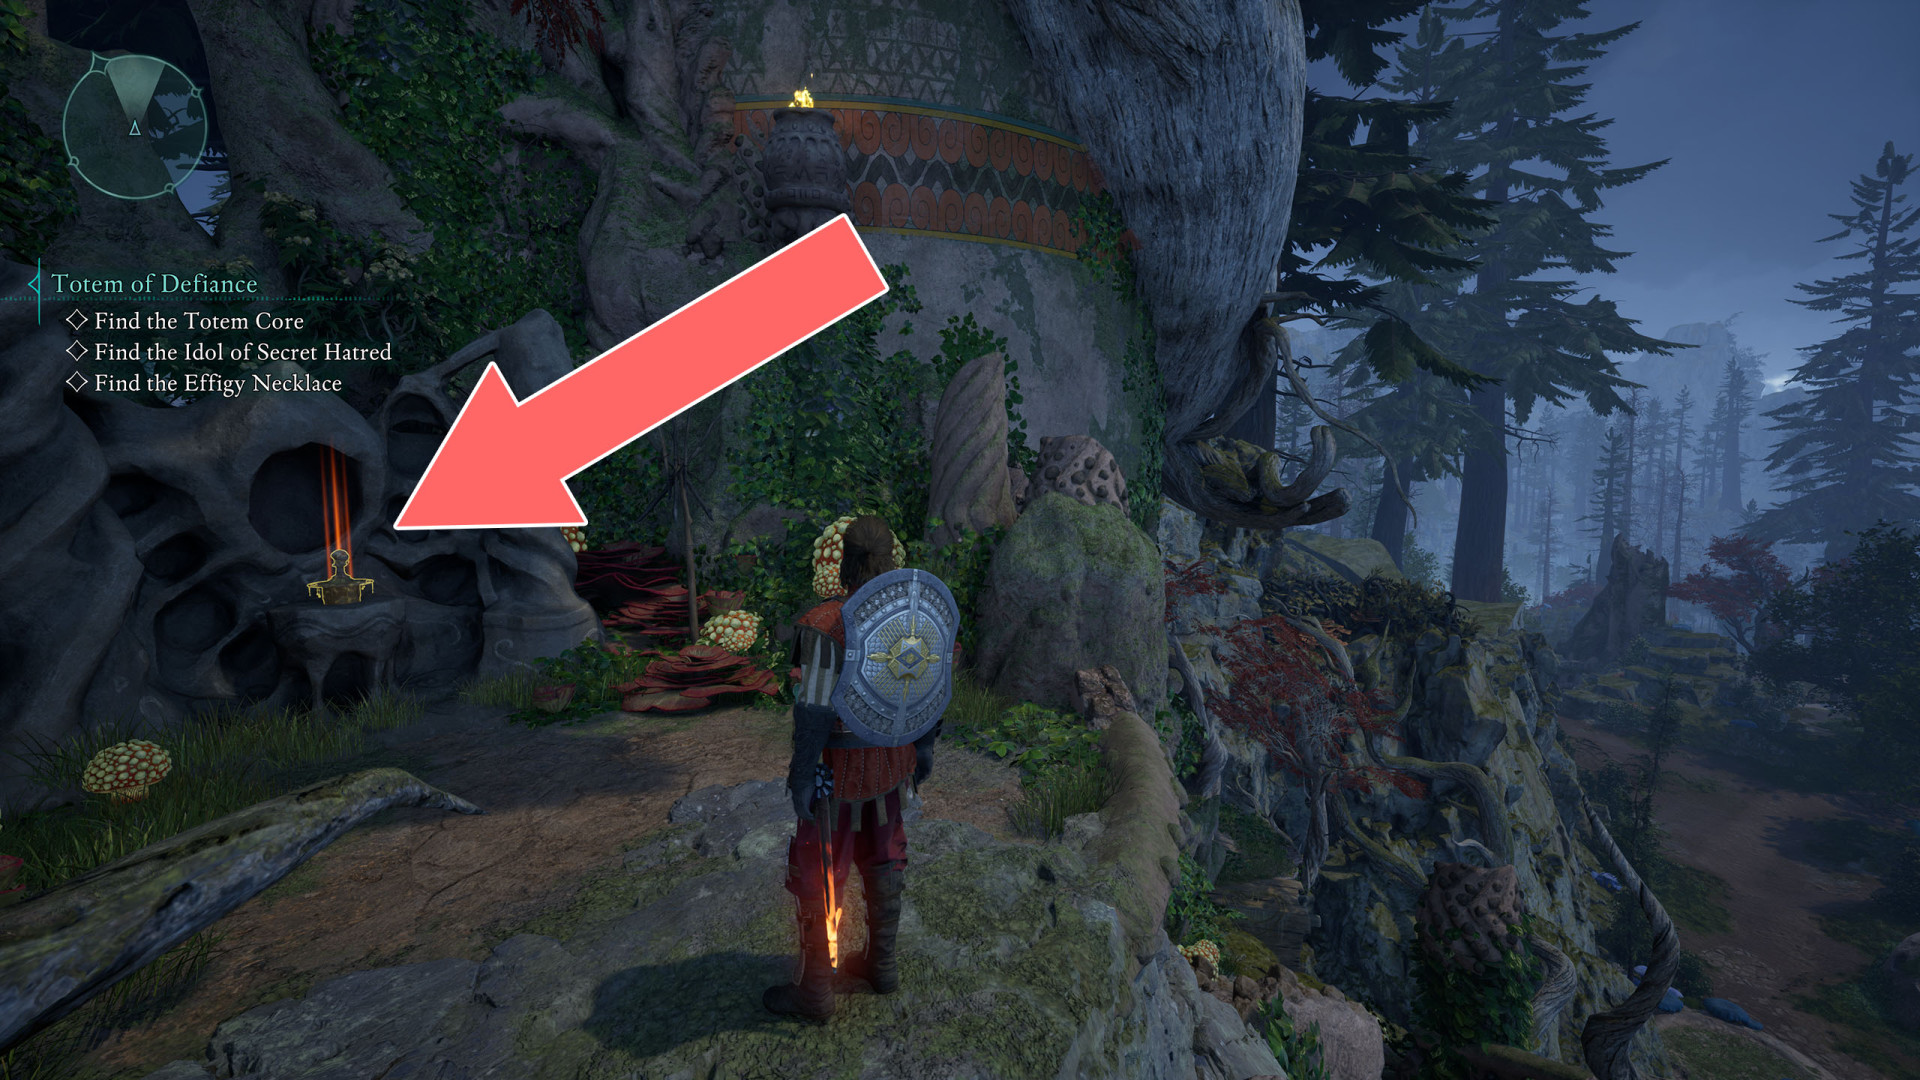
Idol of Secret Hatred▶ show the map ◀
Totem Fragment - Skaen.
Effect:
- Hidden Hatred: Increases your damage against unaware enemies by 25%.
Idol of Violent Rebellion▶ show the map ◀
Totem Fragment - Skaen.
Effect:
- Kill the Master: Increases your damage against "skull" enemies.

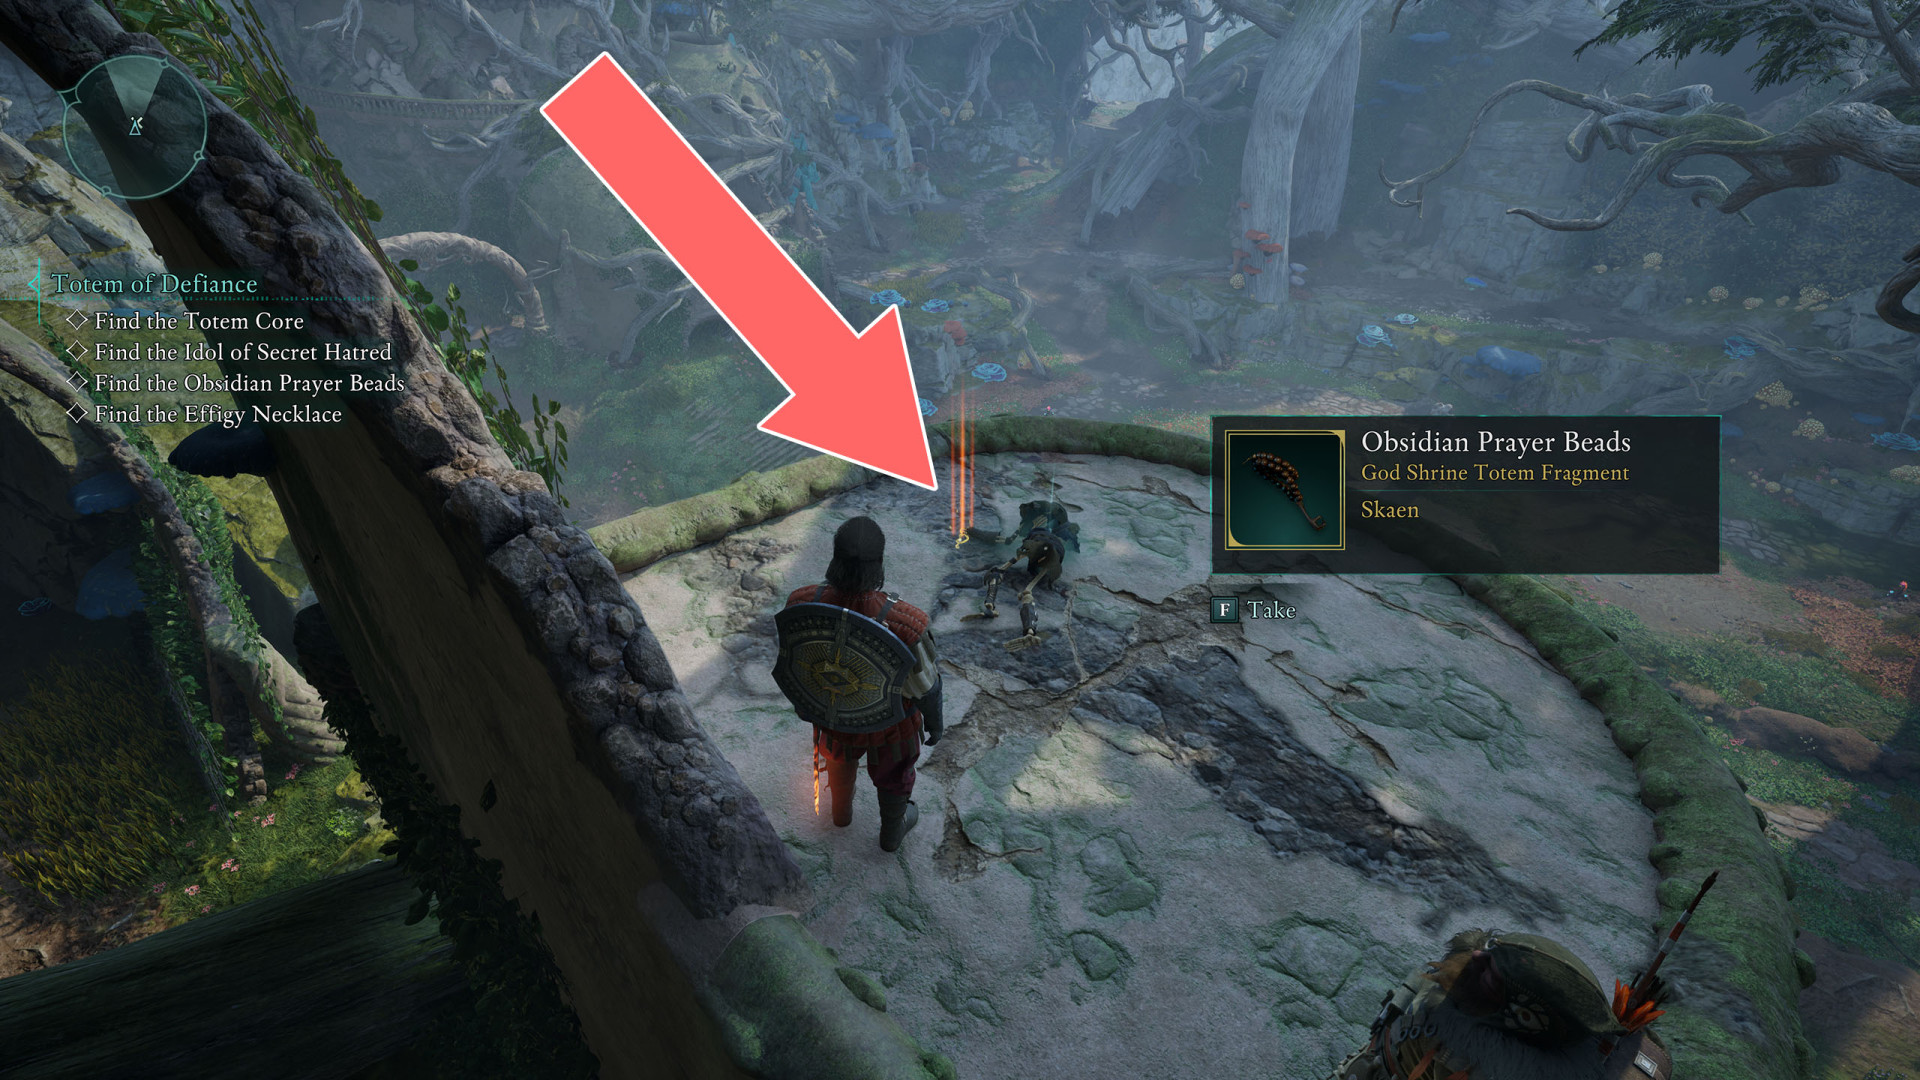
Obsidian Prayer Beads▶ show the map ◀
Totem Fragment - Skaen.
Effect:
- Bitter Thoughts: Critical Hits deal high Poison Accumulation.
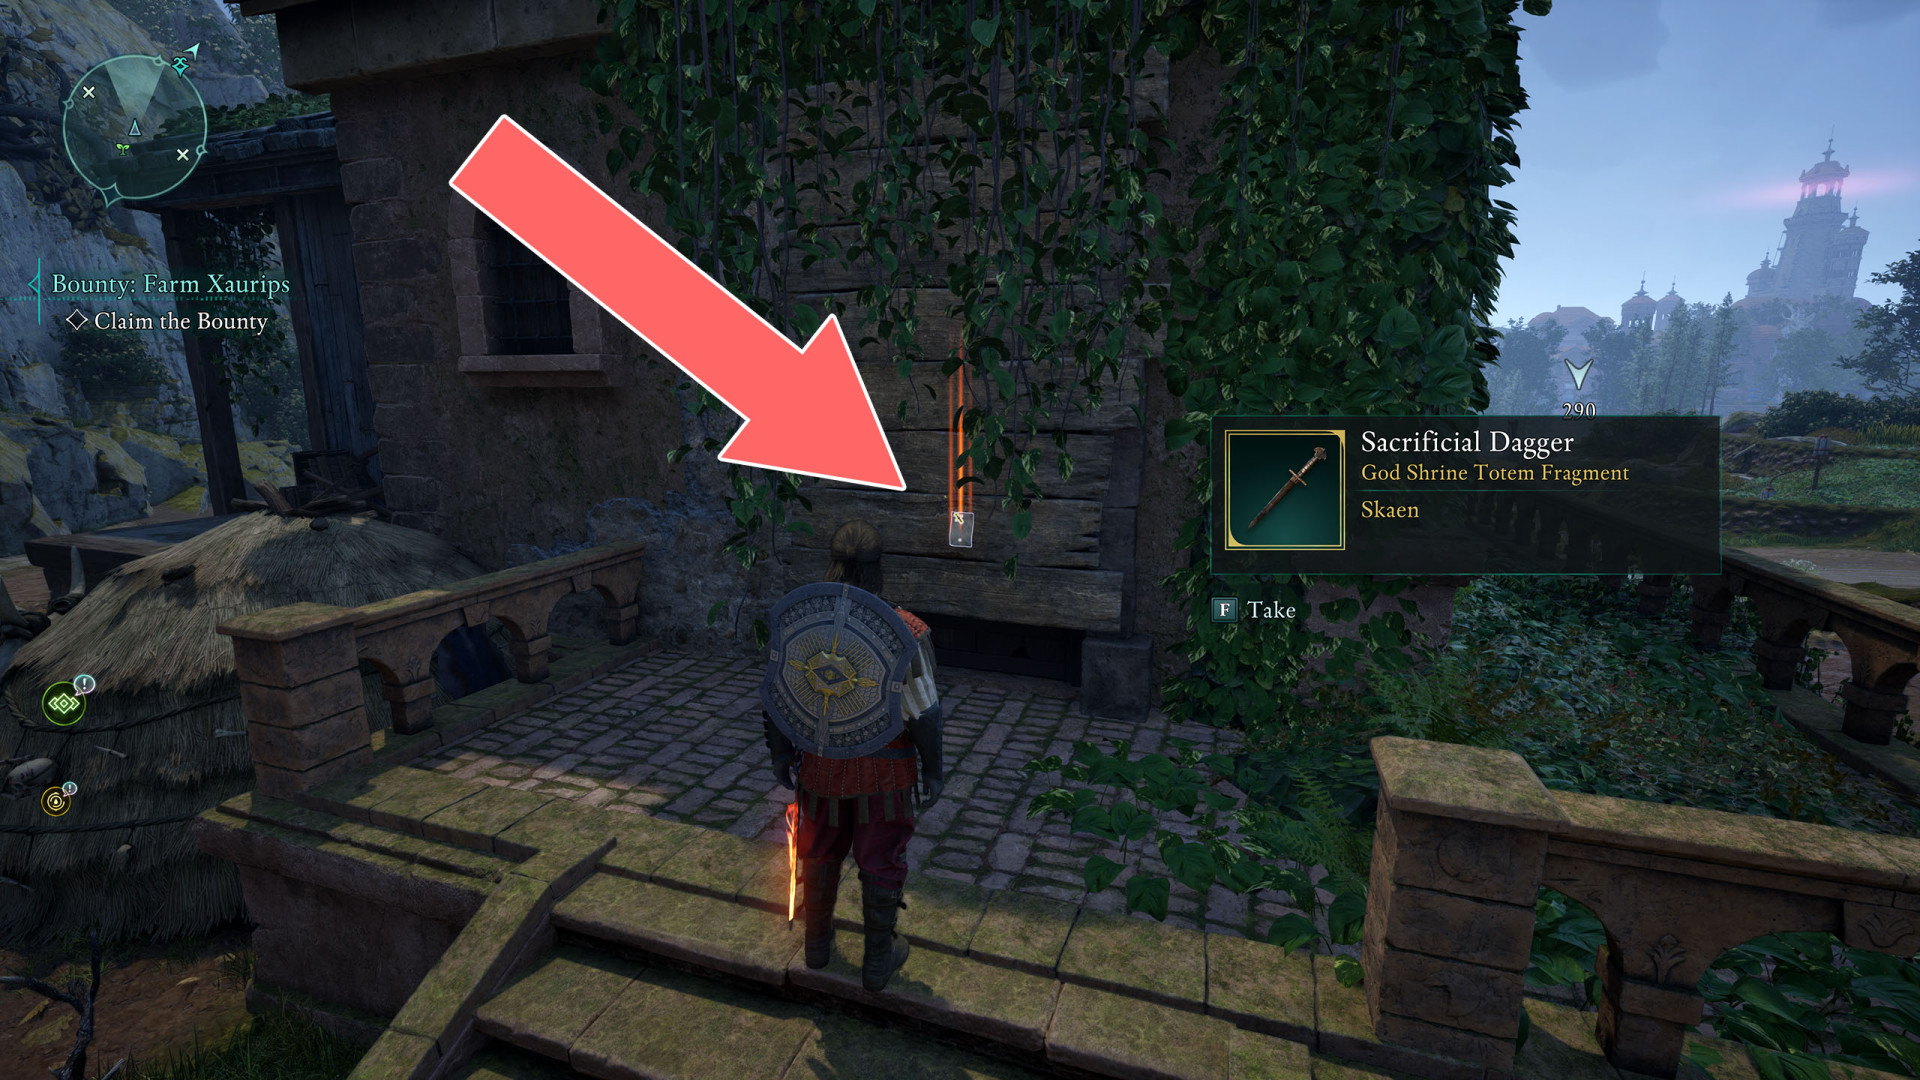
Sacrificial Dagger▶ show the map ◀
Totam Fragment - Skaen.
Effect:
- Furious Frenzy - Second Wind casts Flurry of Blows.
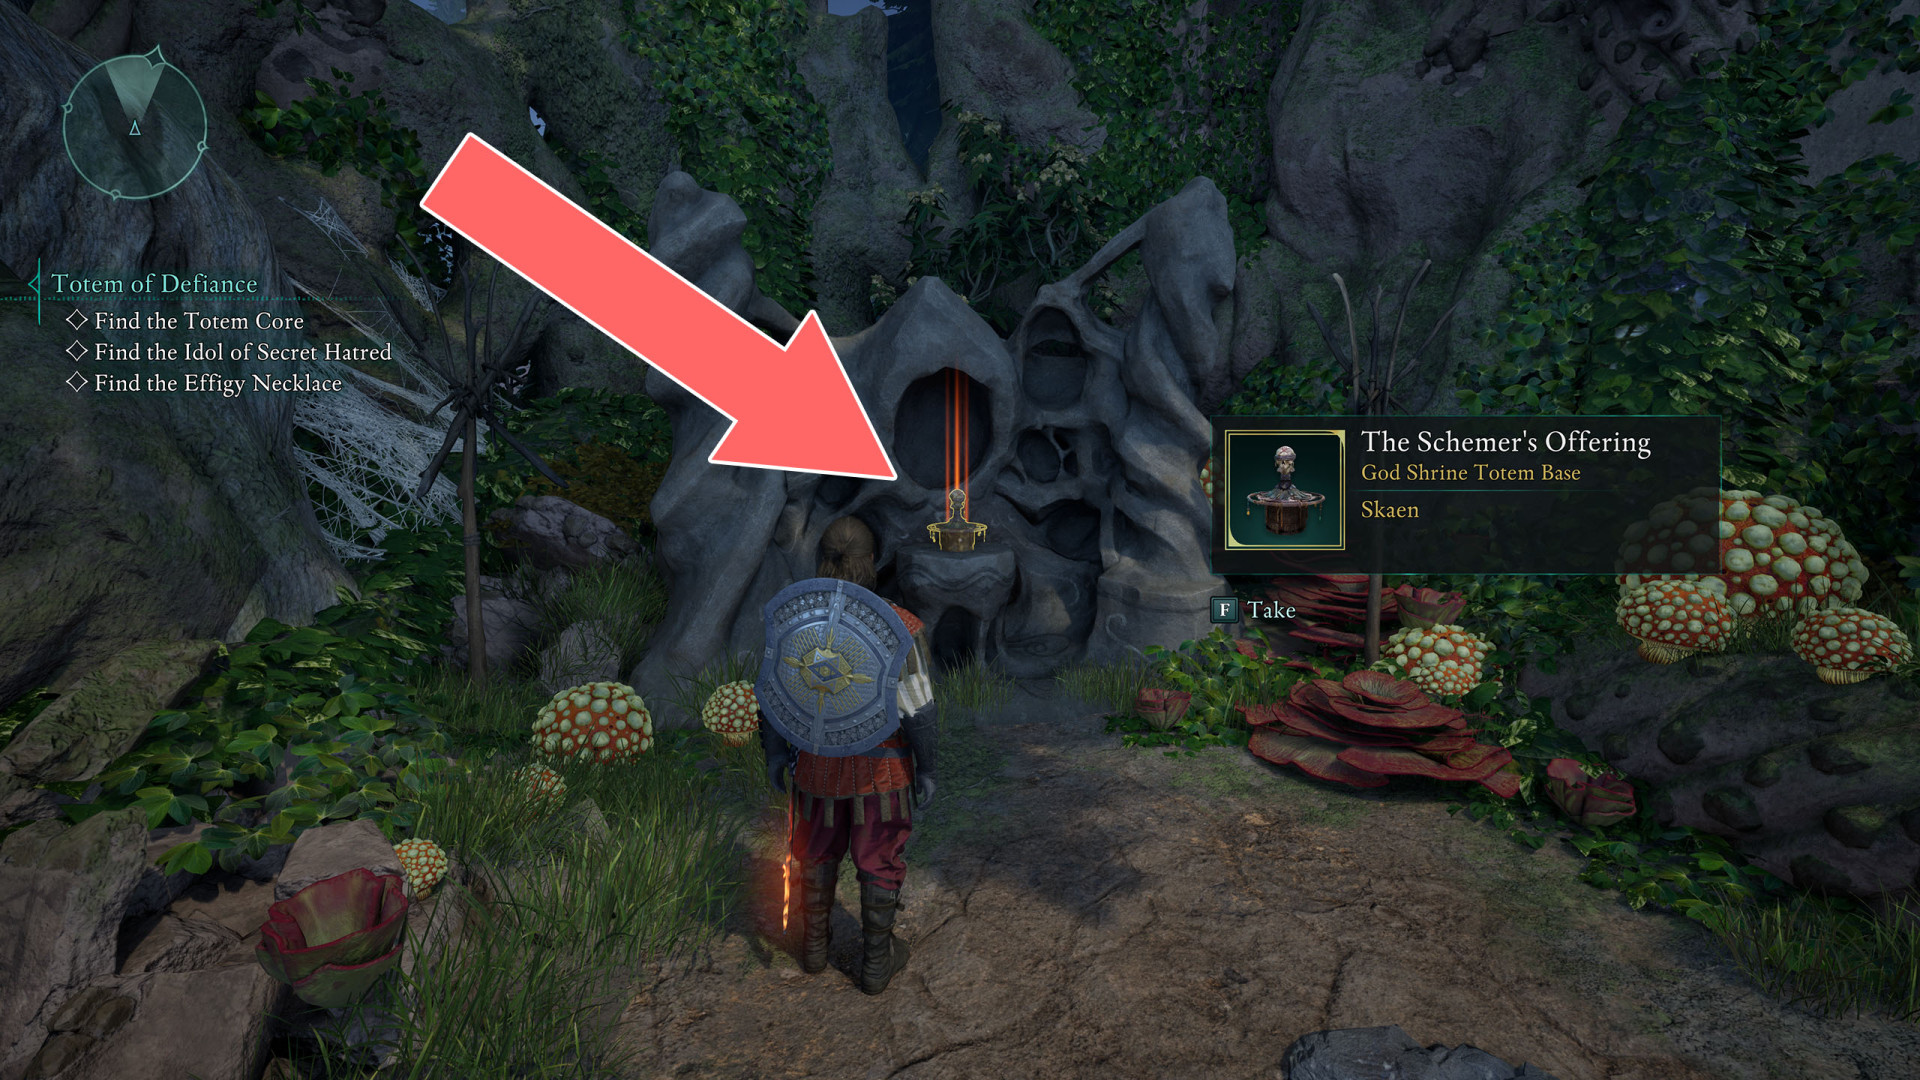
The Schemer's Offering▶ show the map ◀
Totem Base - Skaen.
Used to: Activate passive bonuses when placed at party camp and restored with missing fragments.
All known locations on the map Shatterscarp
Agate Eye▶ show the map ◀
Totem Fragment - Wael.
Effect:
- Enigmatic Shield: Activating a Level 15 or Level 20 ability grants +5% Damage Reduction for 10 seconds.

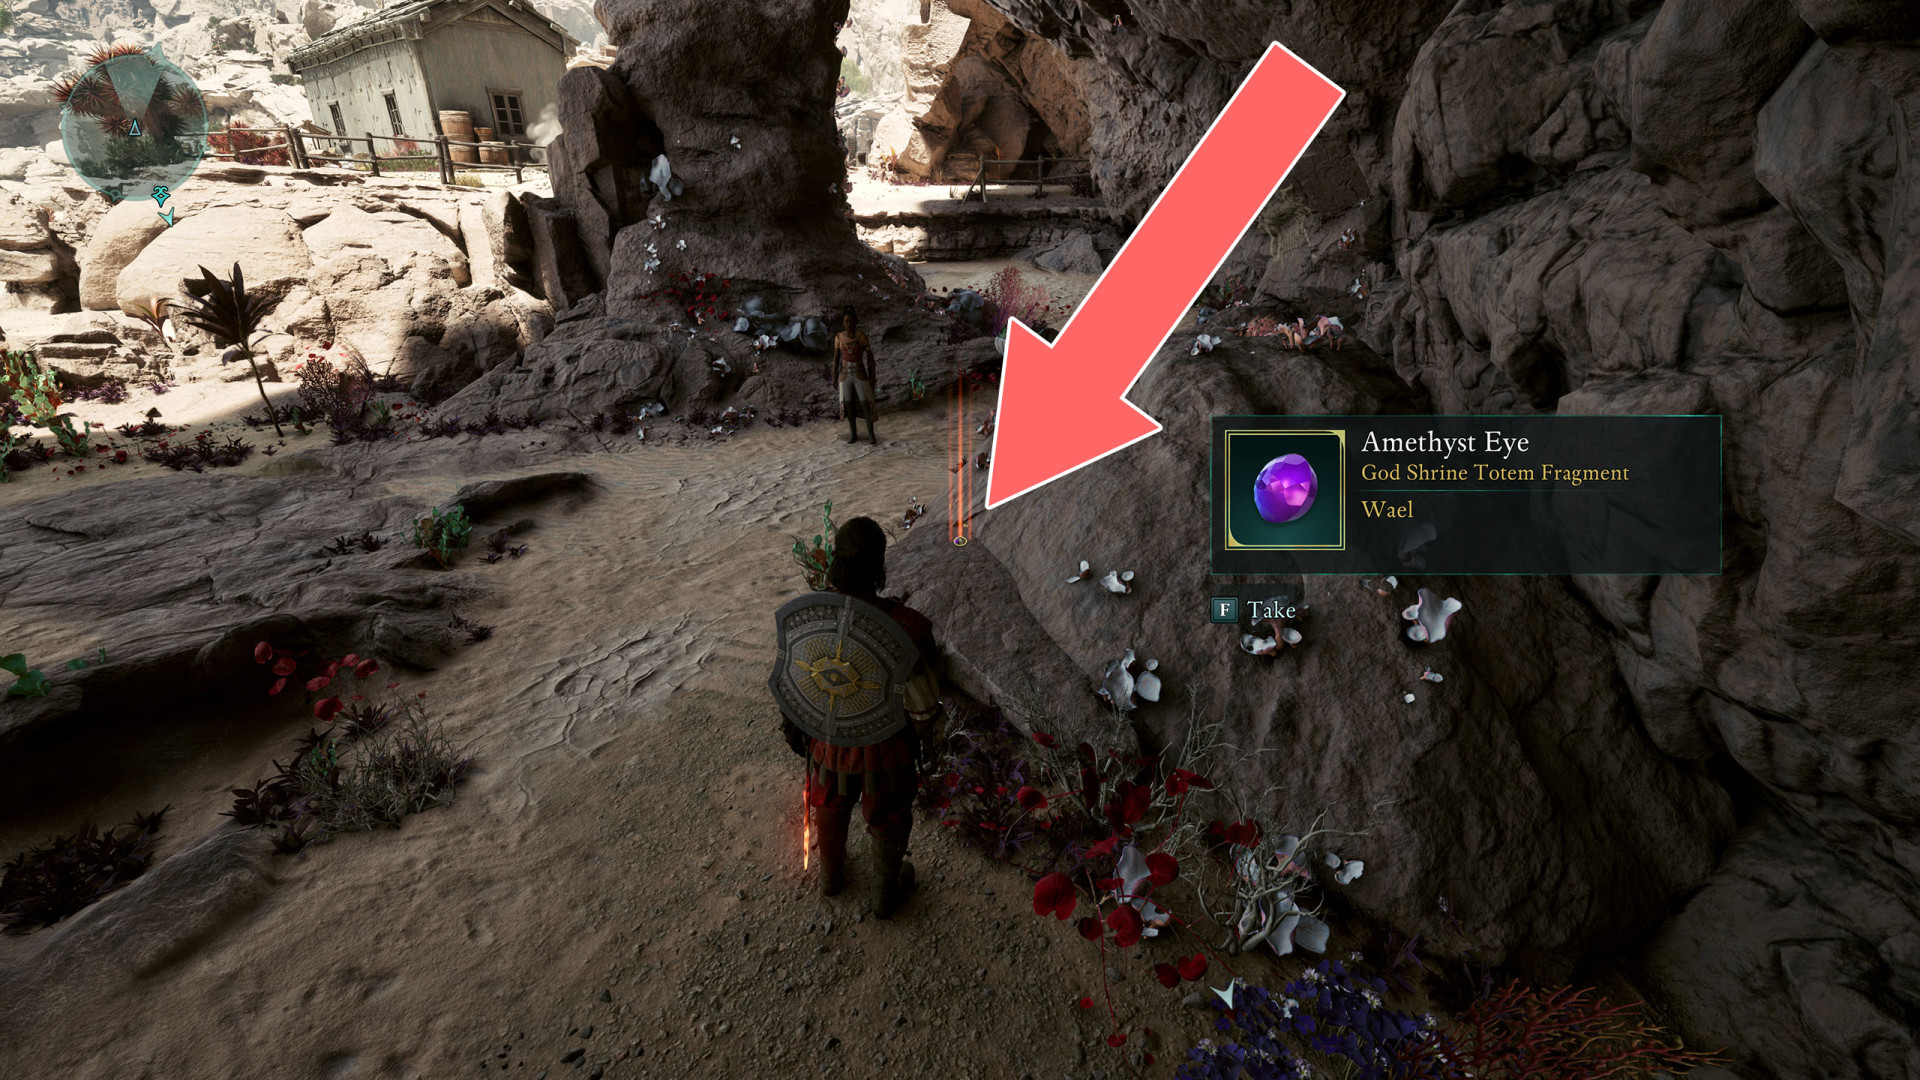
Amethyst Eye▶ show the map ◀
Totem Fragment - Wael.
Effect:
- Magic in the Blood: Restoring Essence also restores a small amount of Health.
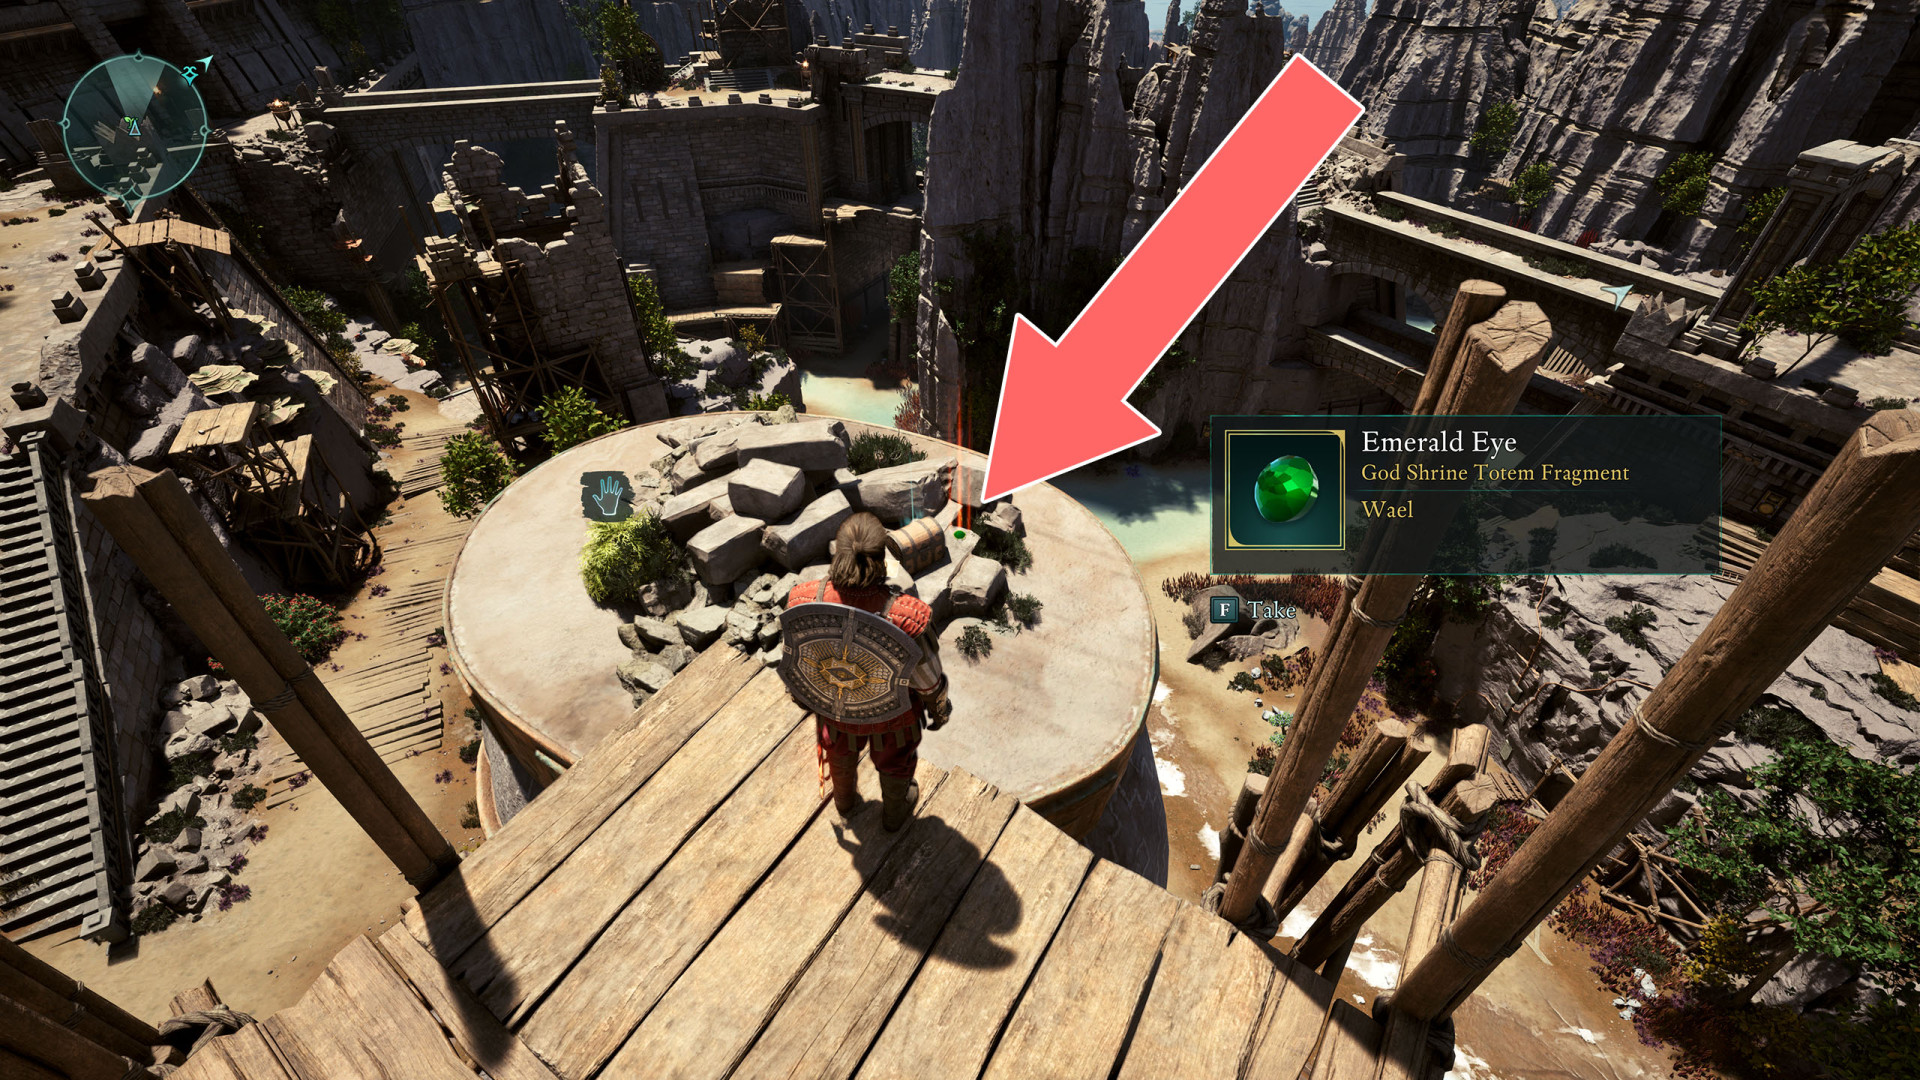
Emerald Eye▶ show the map ◀
Totem Fragment - Wael.
Effect:
- Sight Beyond Eyes: +5% Critical Hit Chance
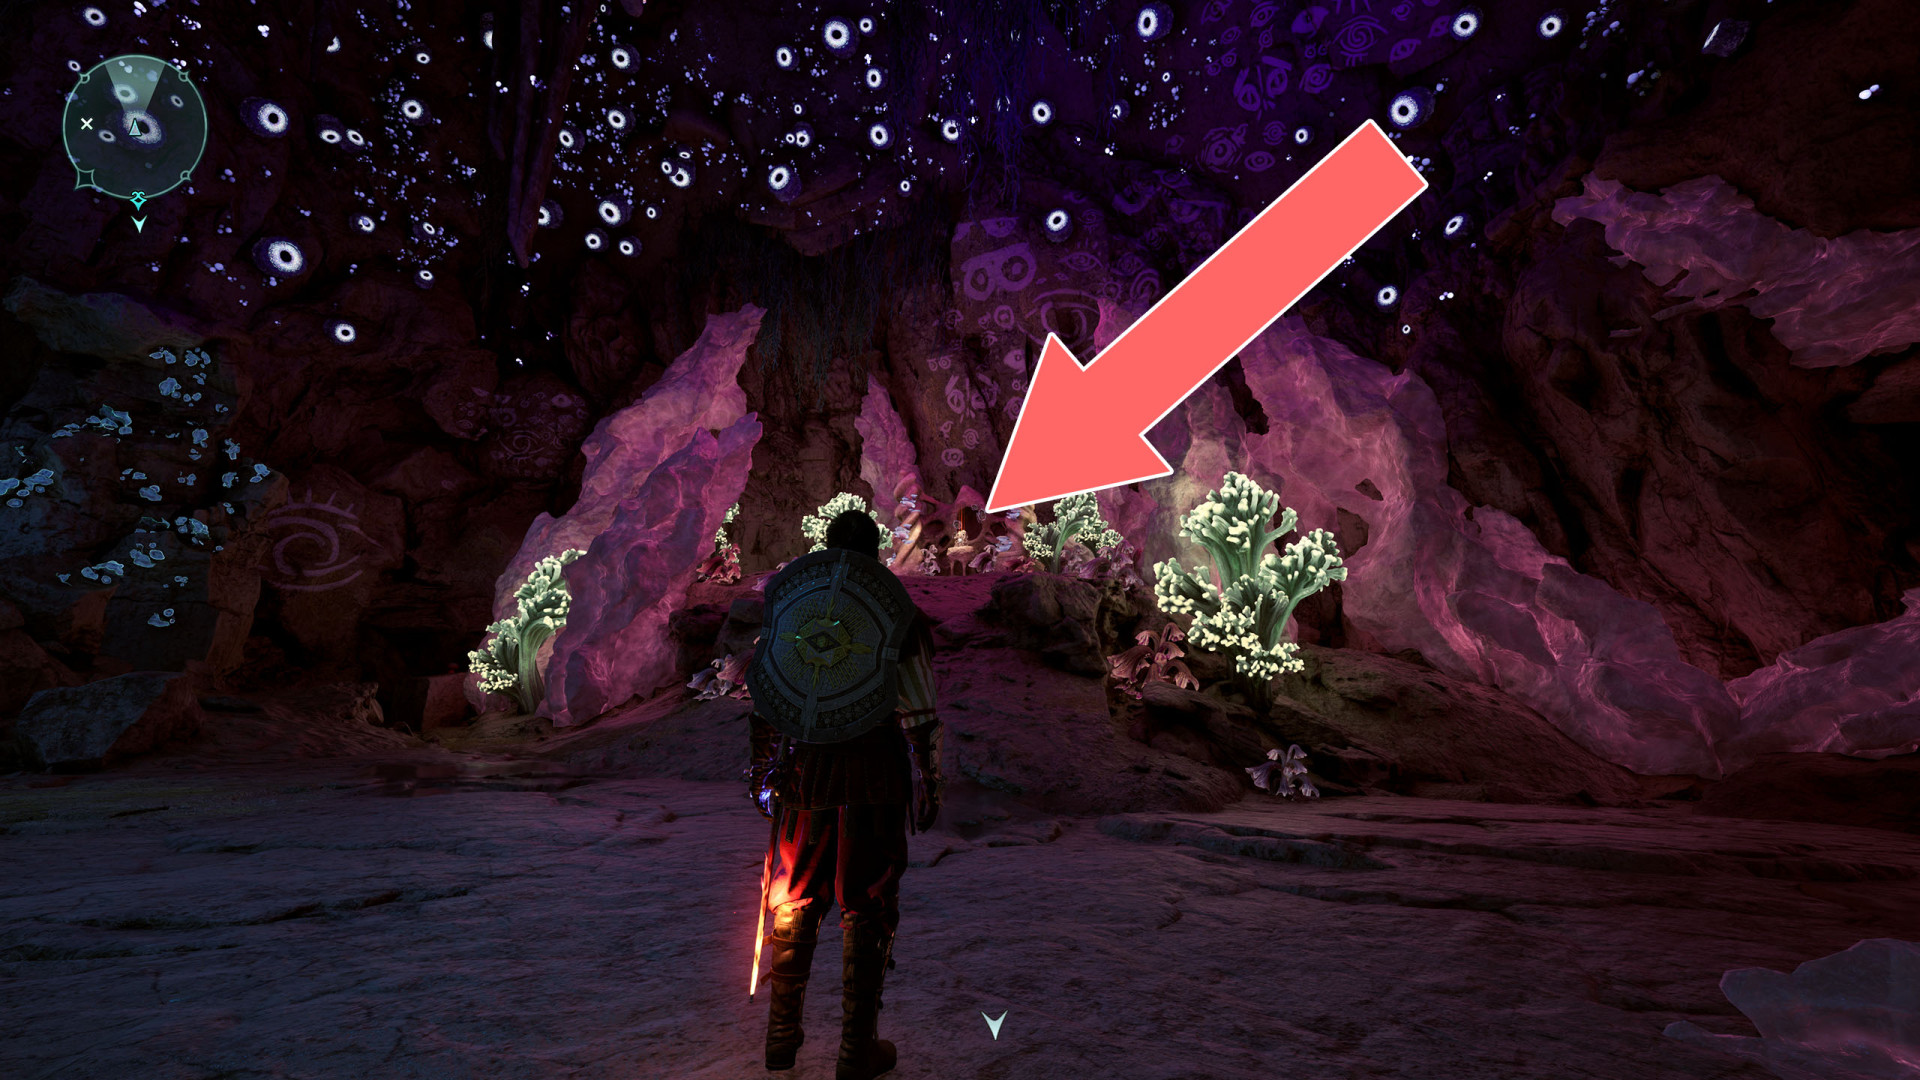
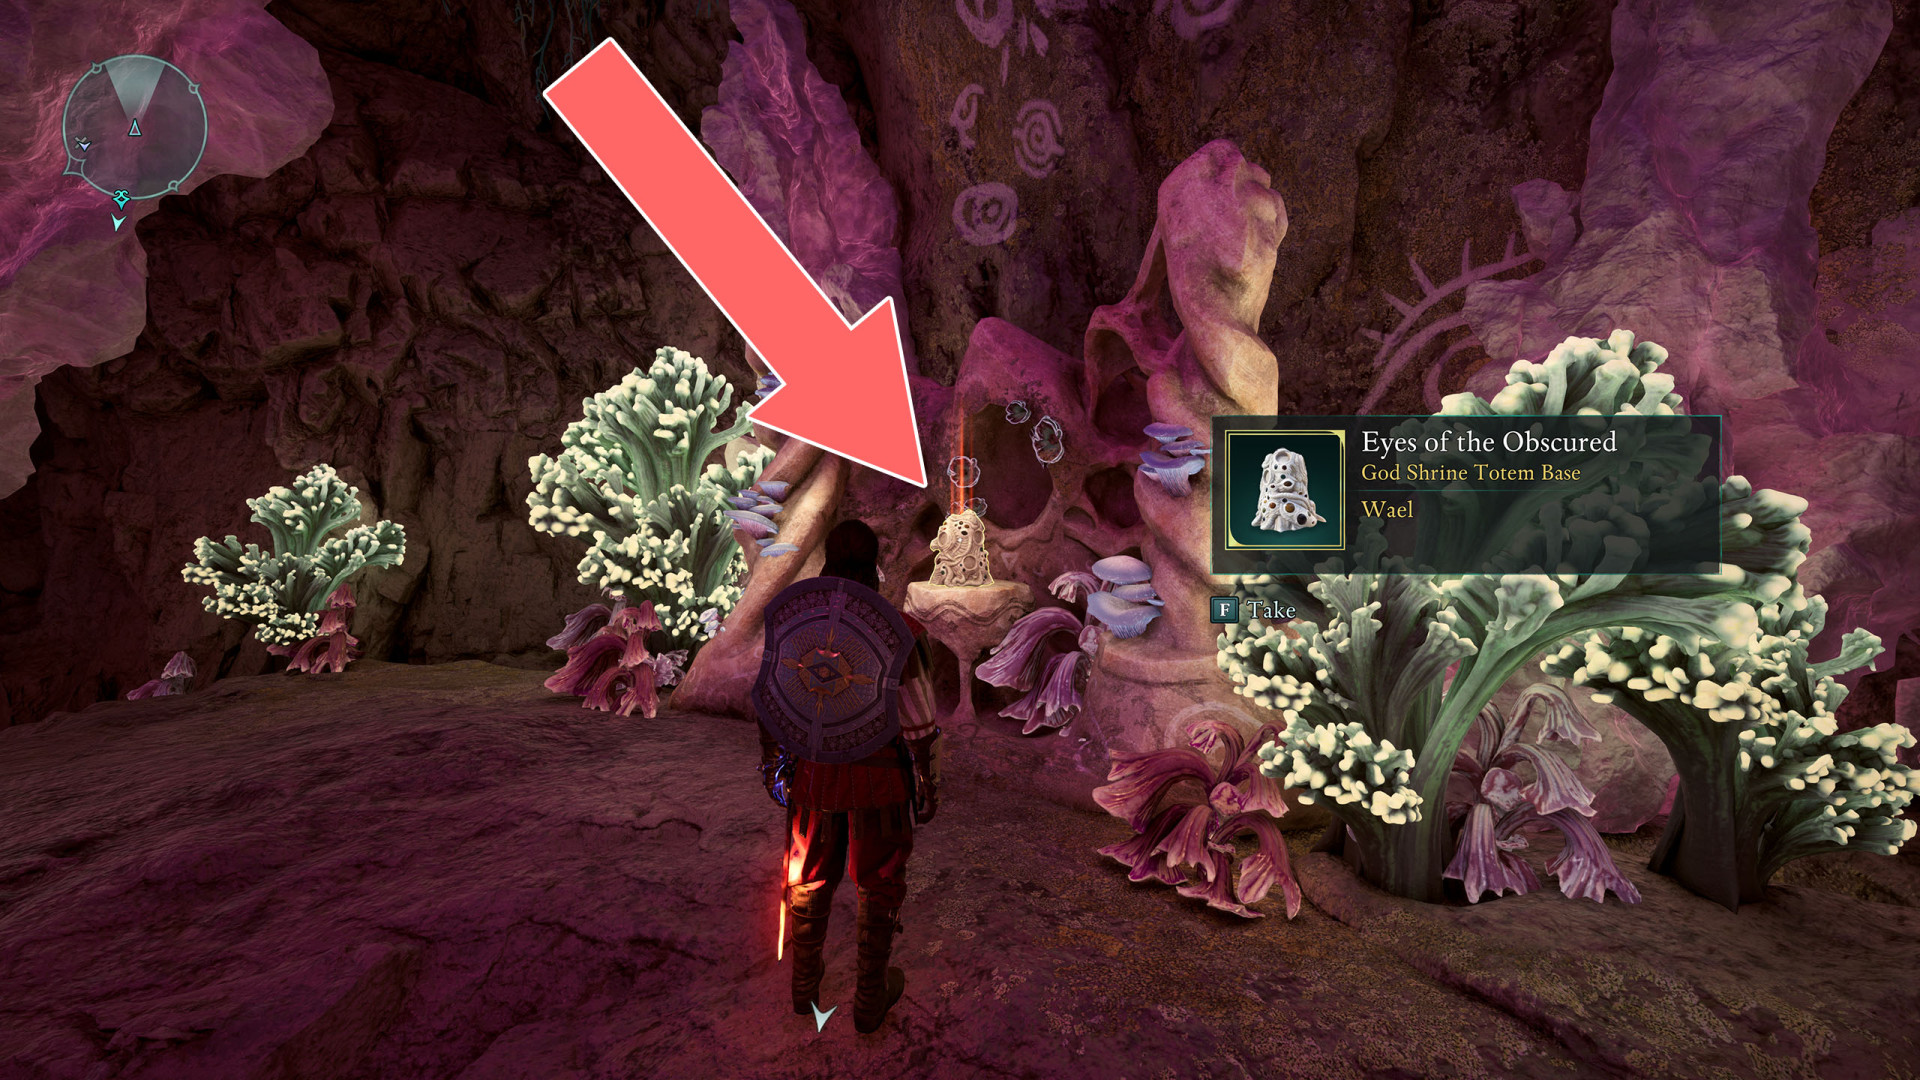
Eyes of the Obscured▶ show the map ◀
Totem Base - Wael.
Used to: Activate passive bonuses when placed at party camp and restored with missing fragments.
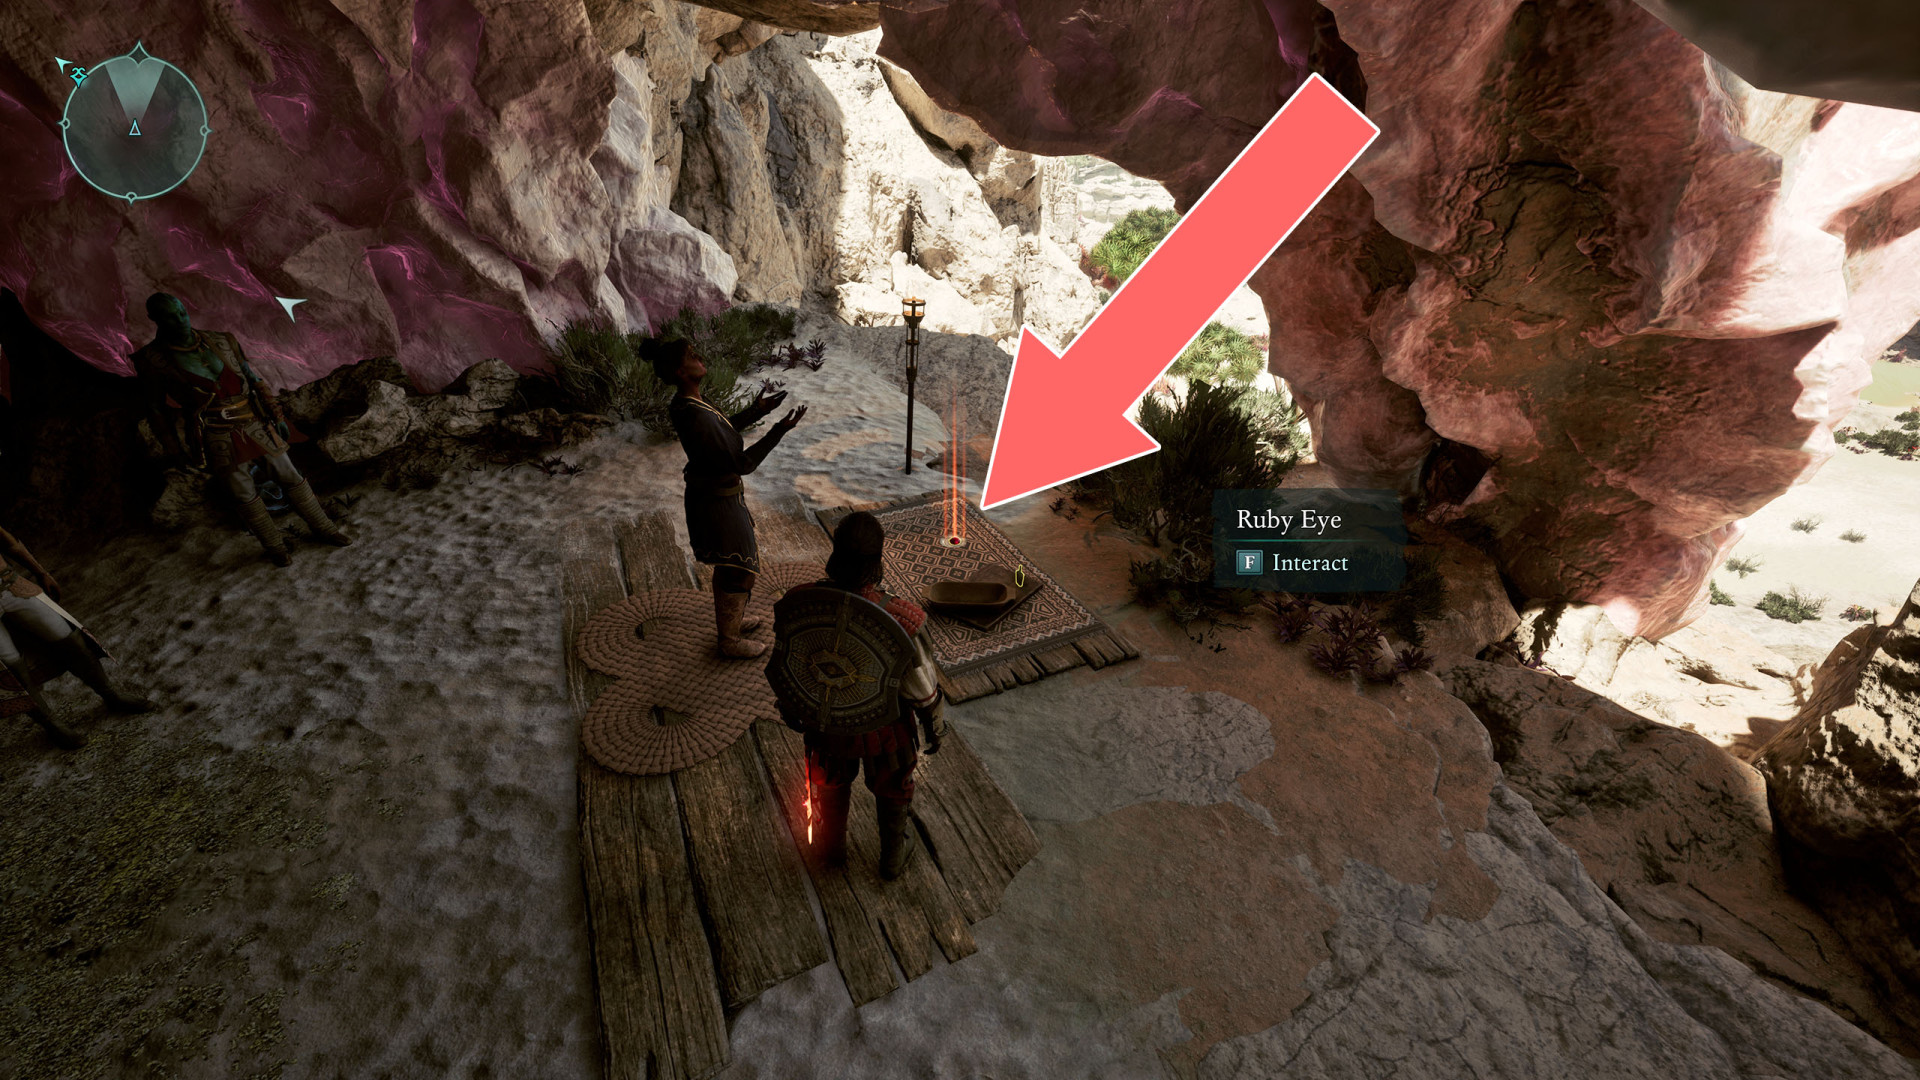
Ruby Eye▶ show the map ◀
Totem Fragment - Wael.
Effect:
- Disappearing Trick: Second Wind casts Shadowing Beyond.
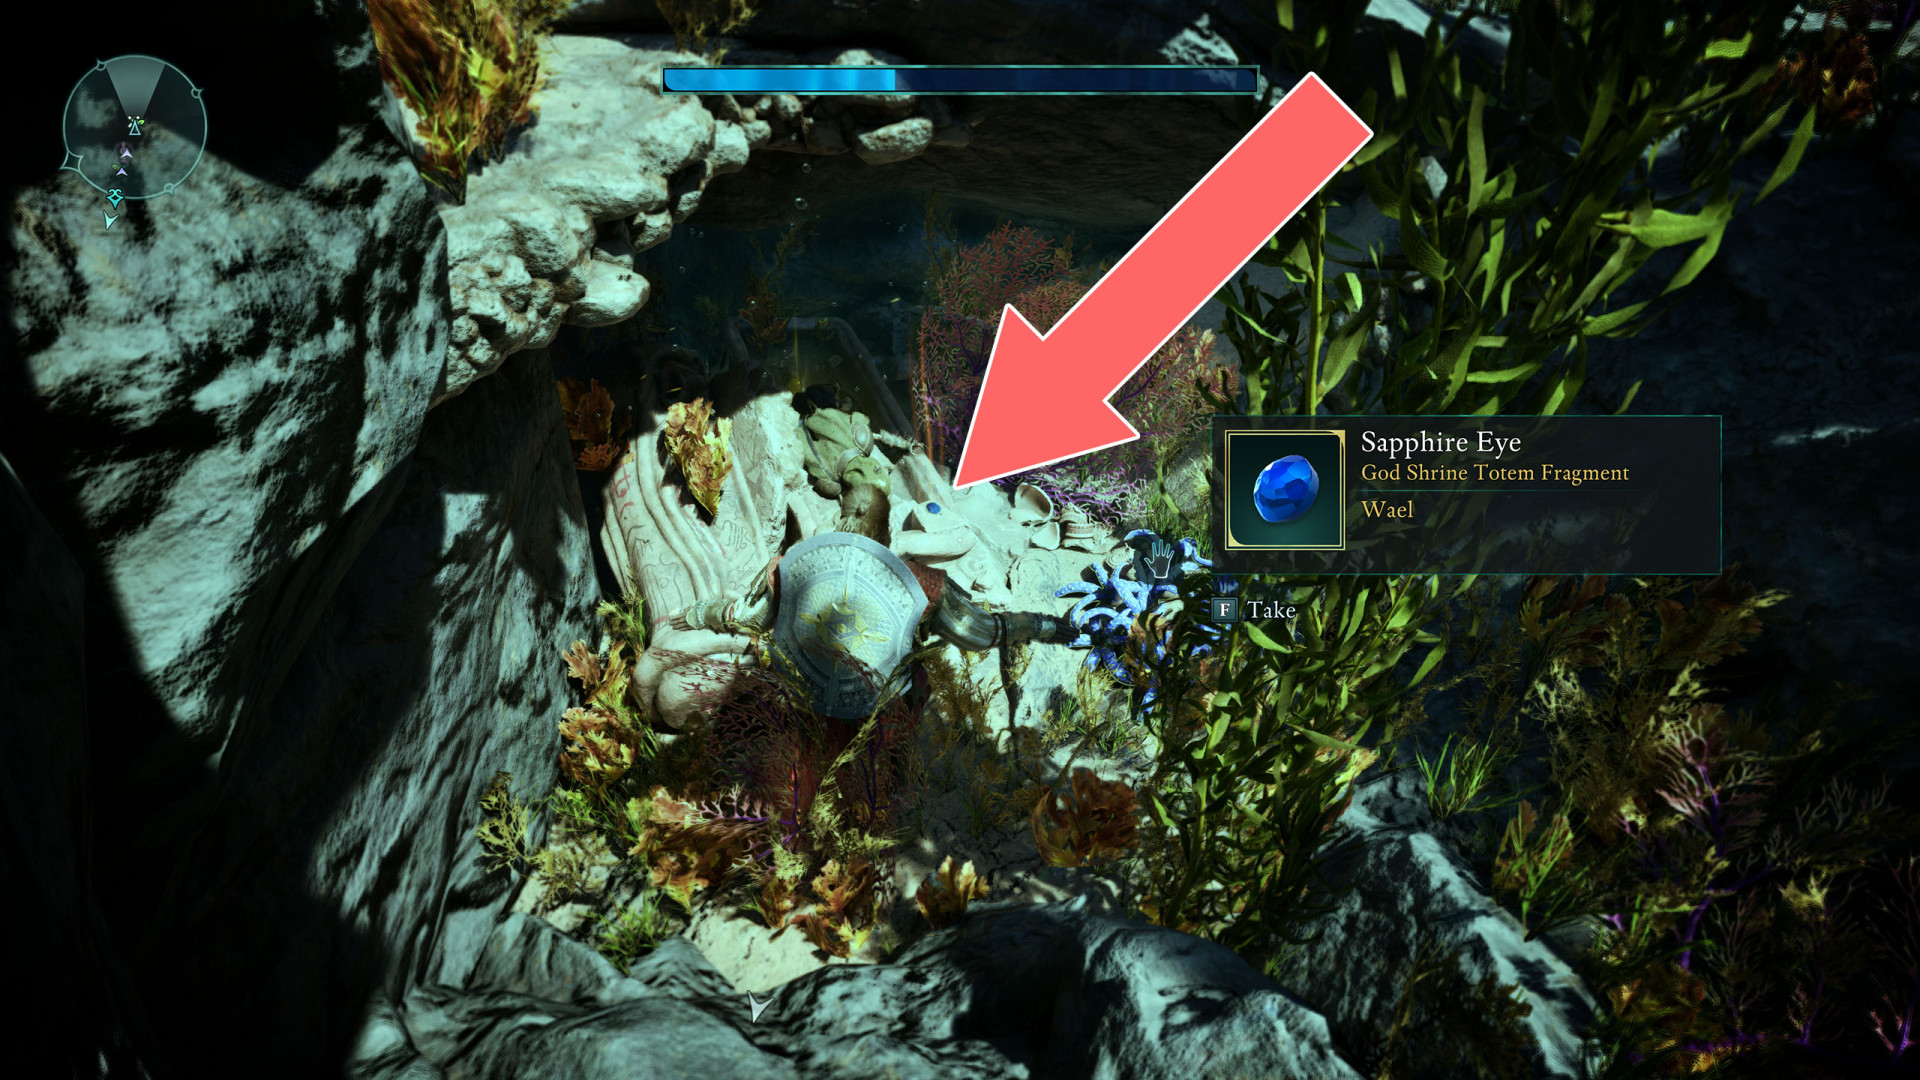
Sapphire Eye▶ show the map ◀
Totem Fragment - Wael. You will find this piece at the bottom of the lake.
Effect:
- Fickle Winds: Critical Hits deal high random accumulation.
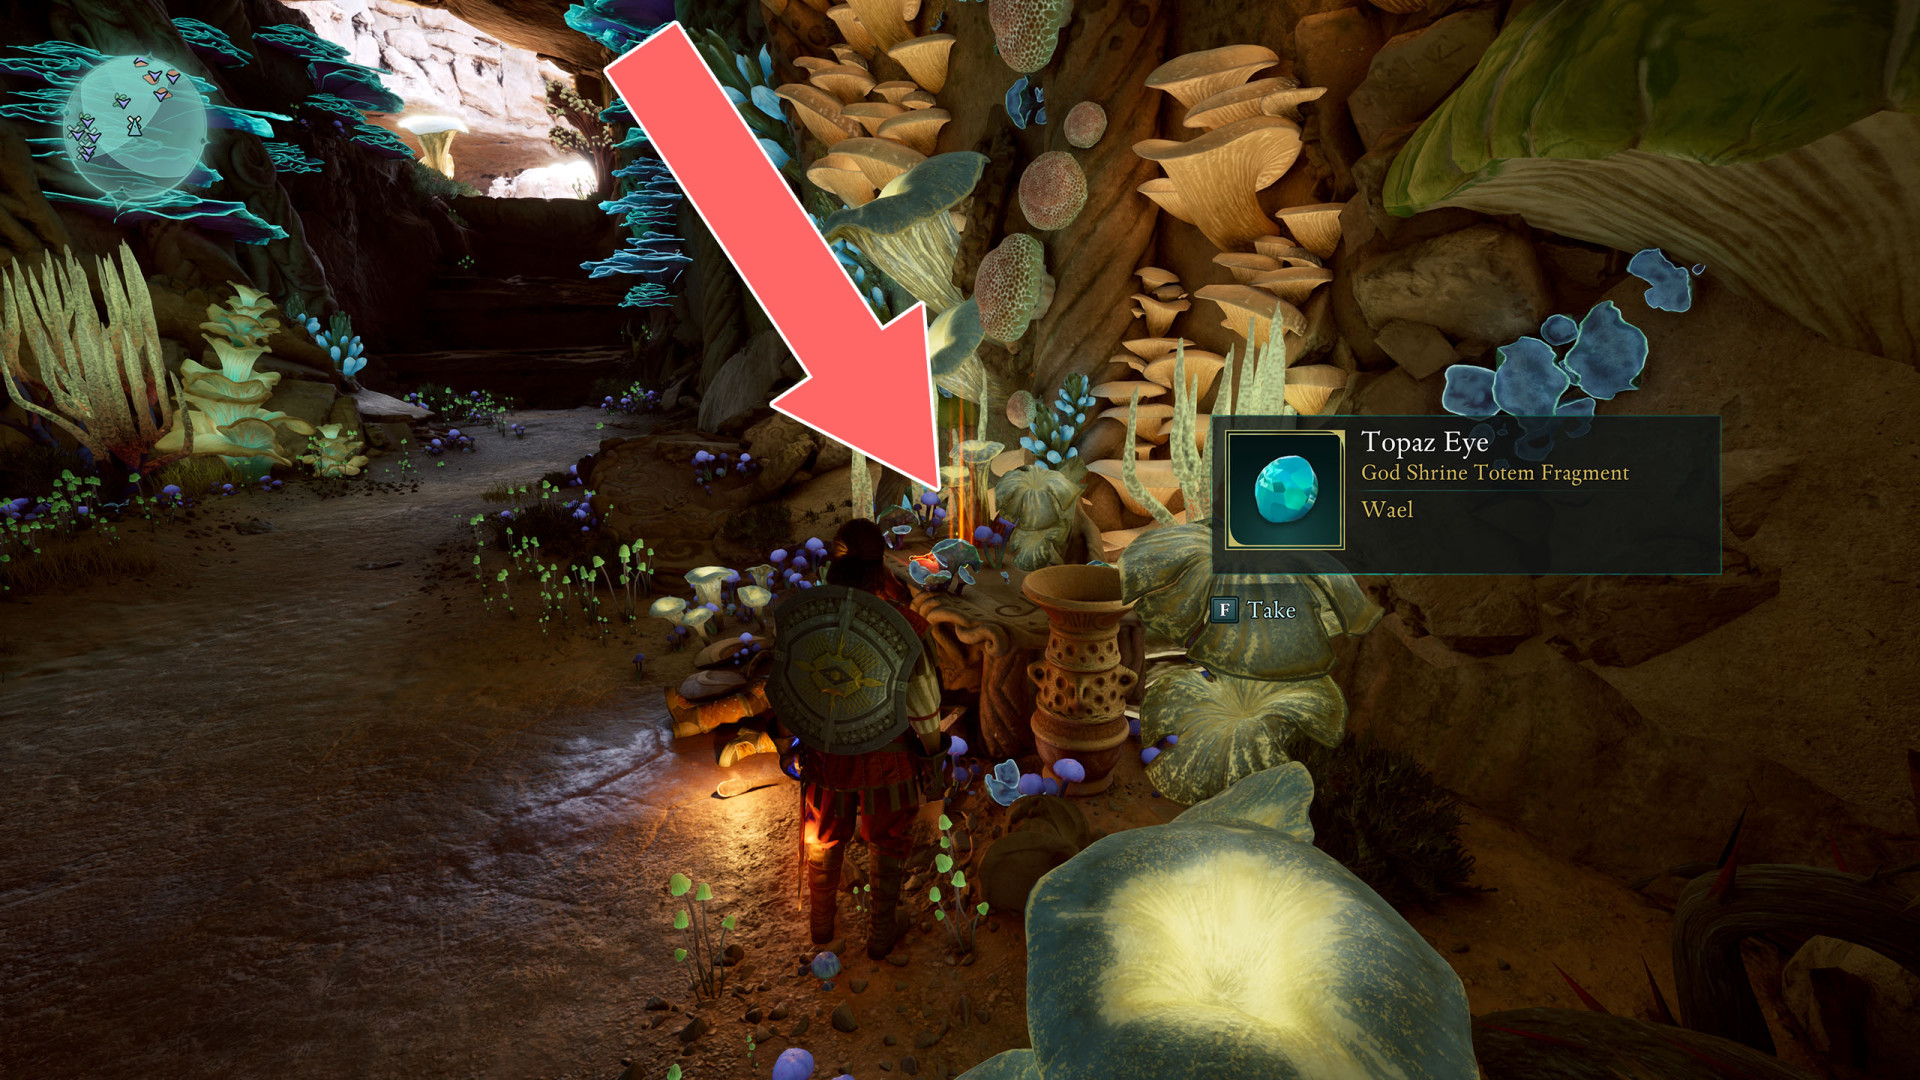
Topaz Eye▶ show the map ◀
Totem Fragment - Wael.
Effect:
- The Obscured's Vantage: +2 Intellect, +2 Perception
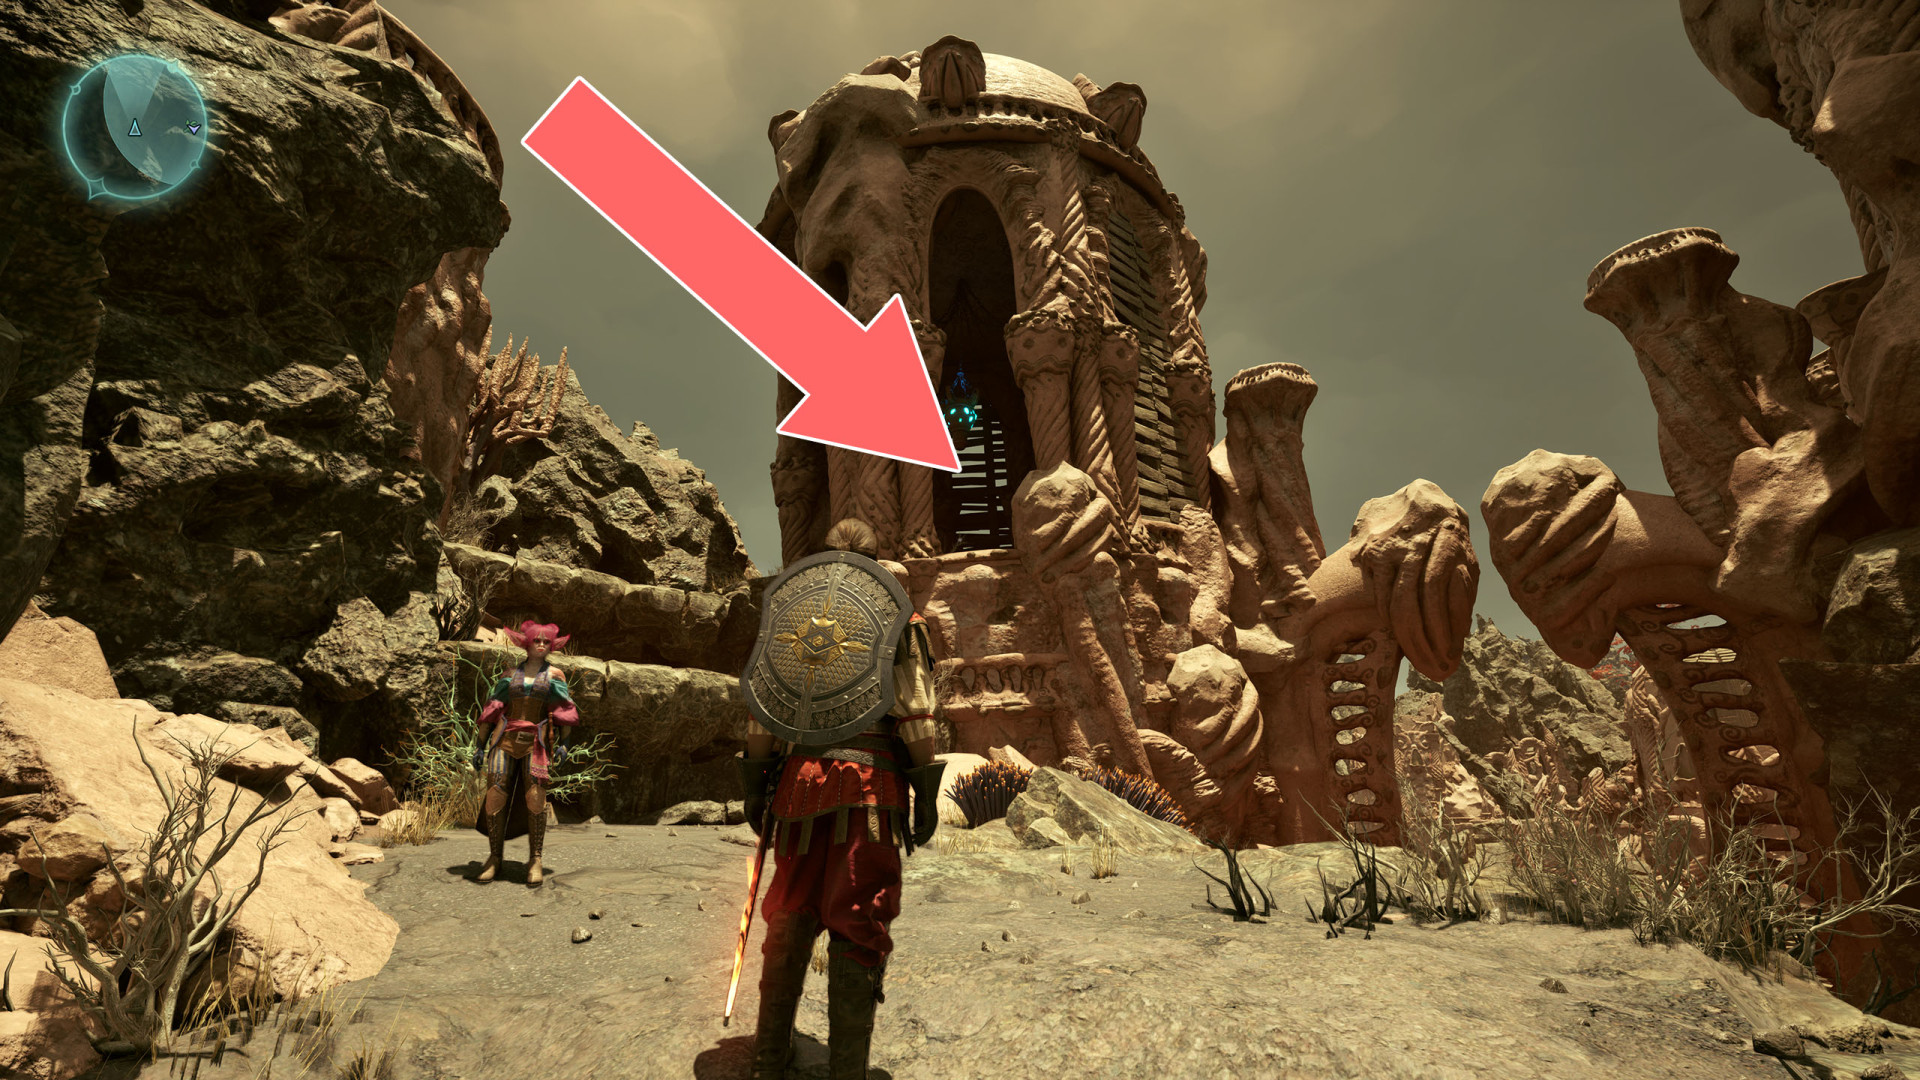
All known locations on the map Galawain's Tusks
Antler of the Persevering Stag▶ show the map ◀
Totem Fragment - Galawain.
Effect:
- Quarry to Slaughter: Increases your damage against prone enemies by 75%.

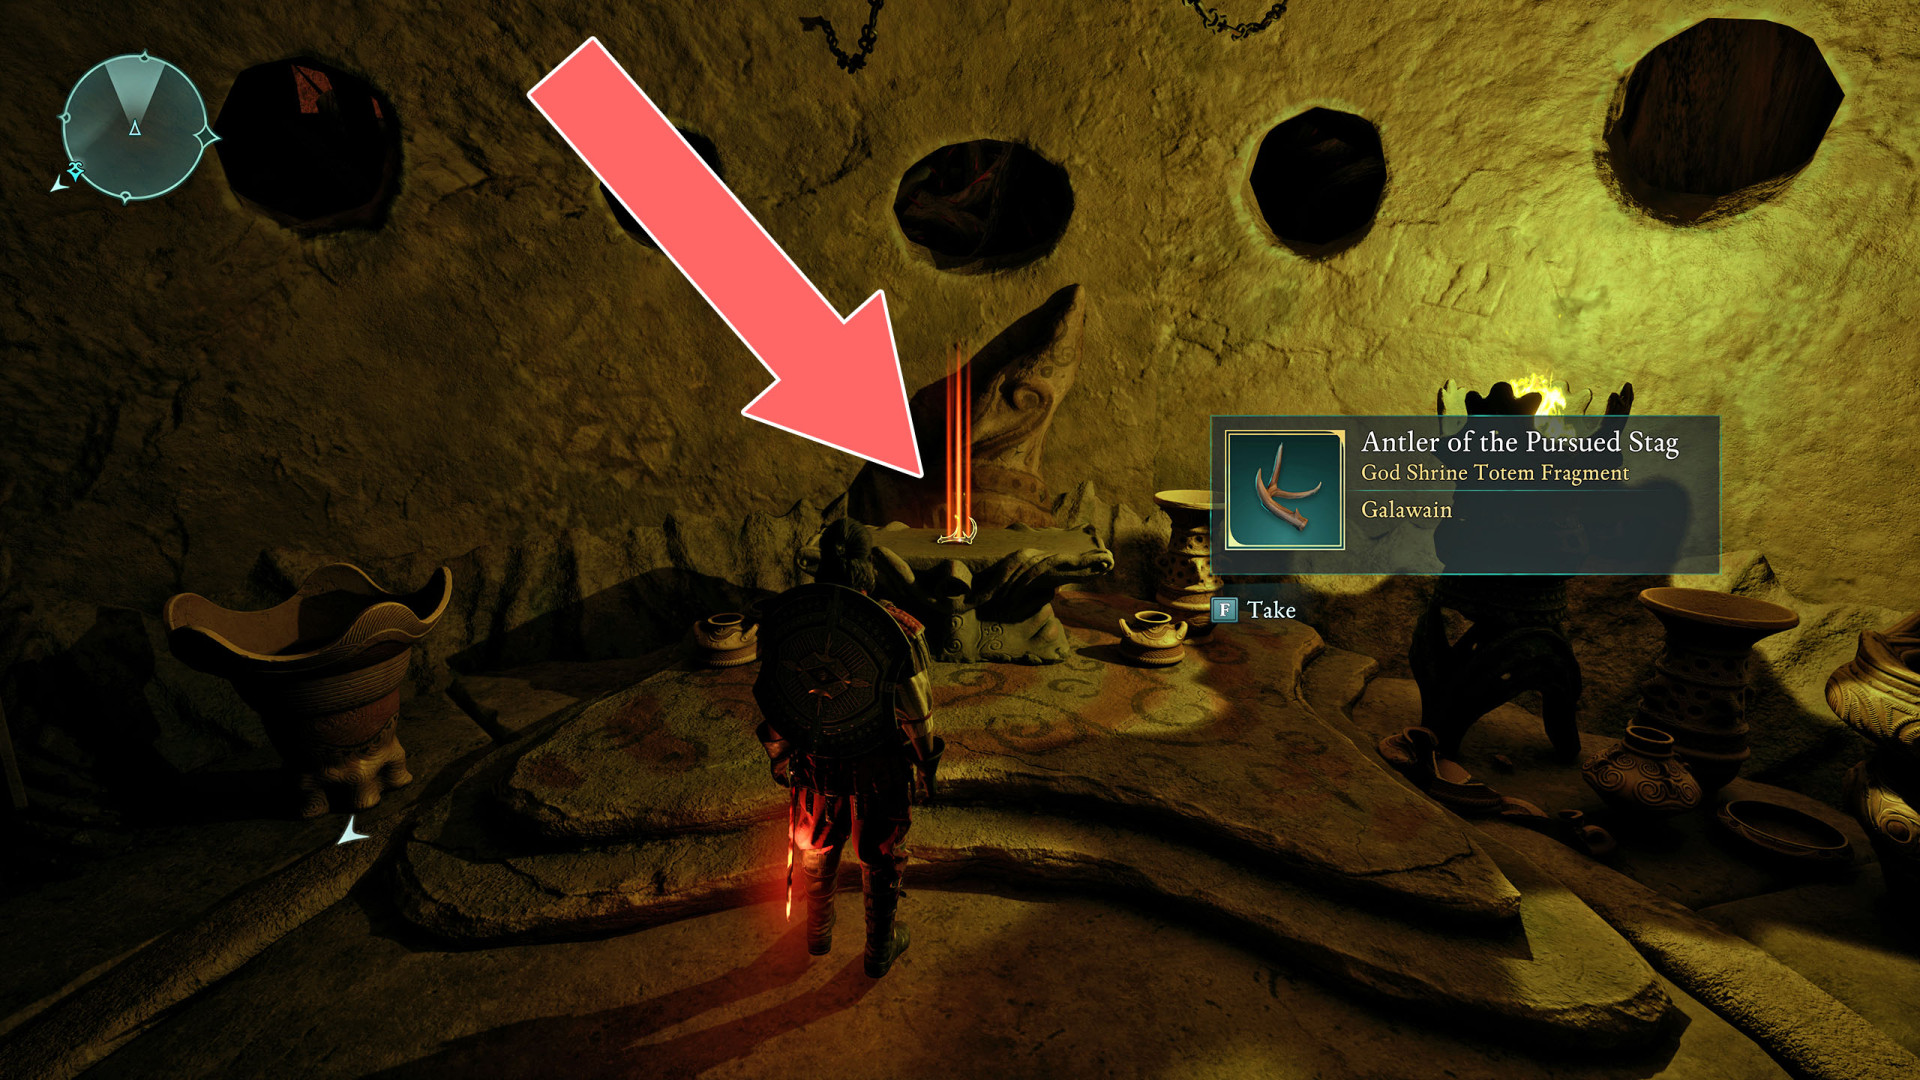
Antler of the Pursued Stag▶ show the map ◀
Totem Fragment - Galawain.
Effect:
- Bloodied Hands: Critical Hits deal high Bleed Accumulation.
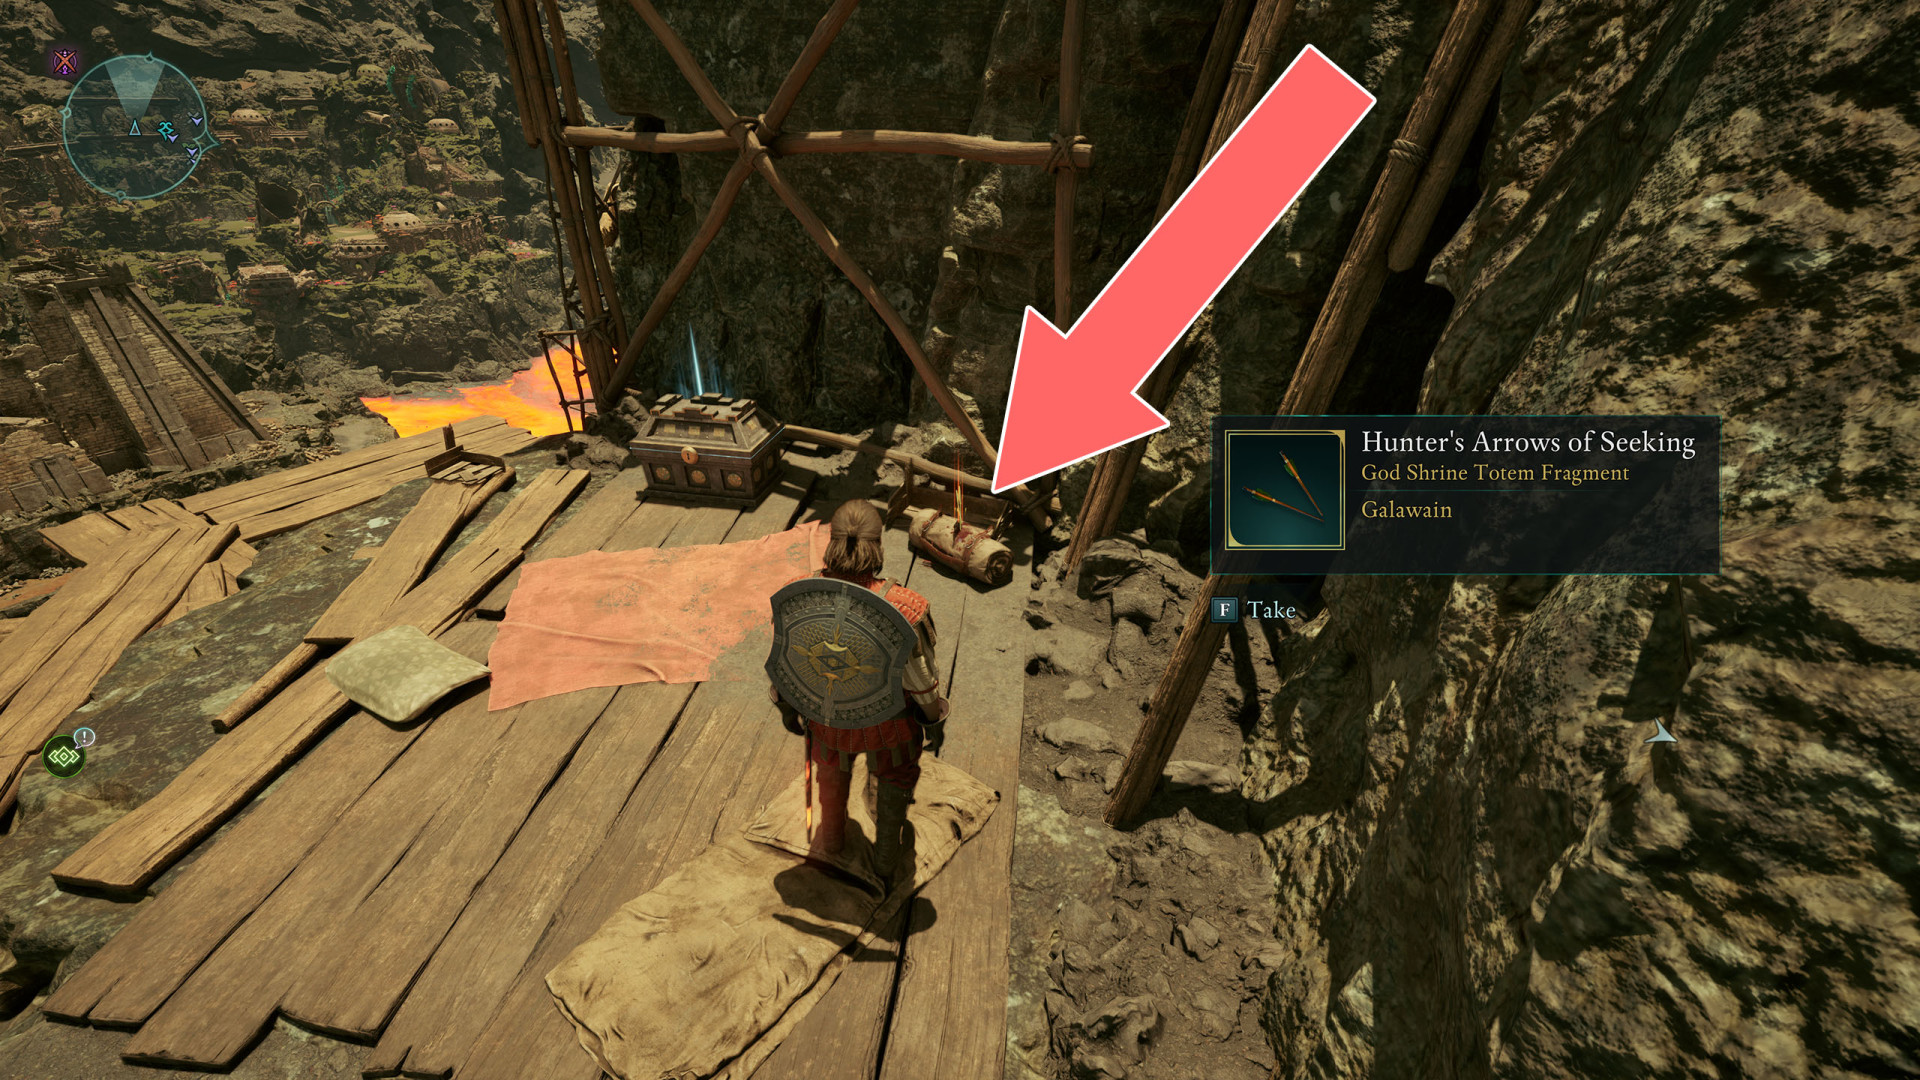
Hunter's Arrows of Seeking▶ show the map ◀
Totem Fragment - Galawain.
Effect:
- In Victory's Raiment: Killing an enemy gives you +4% Damage Reduction for 10 seconds
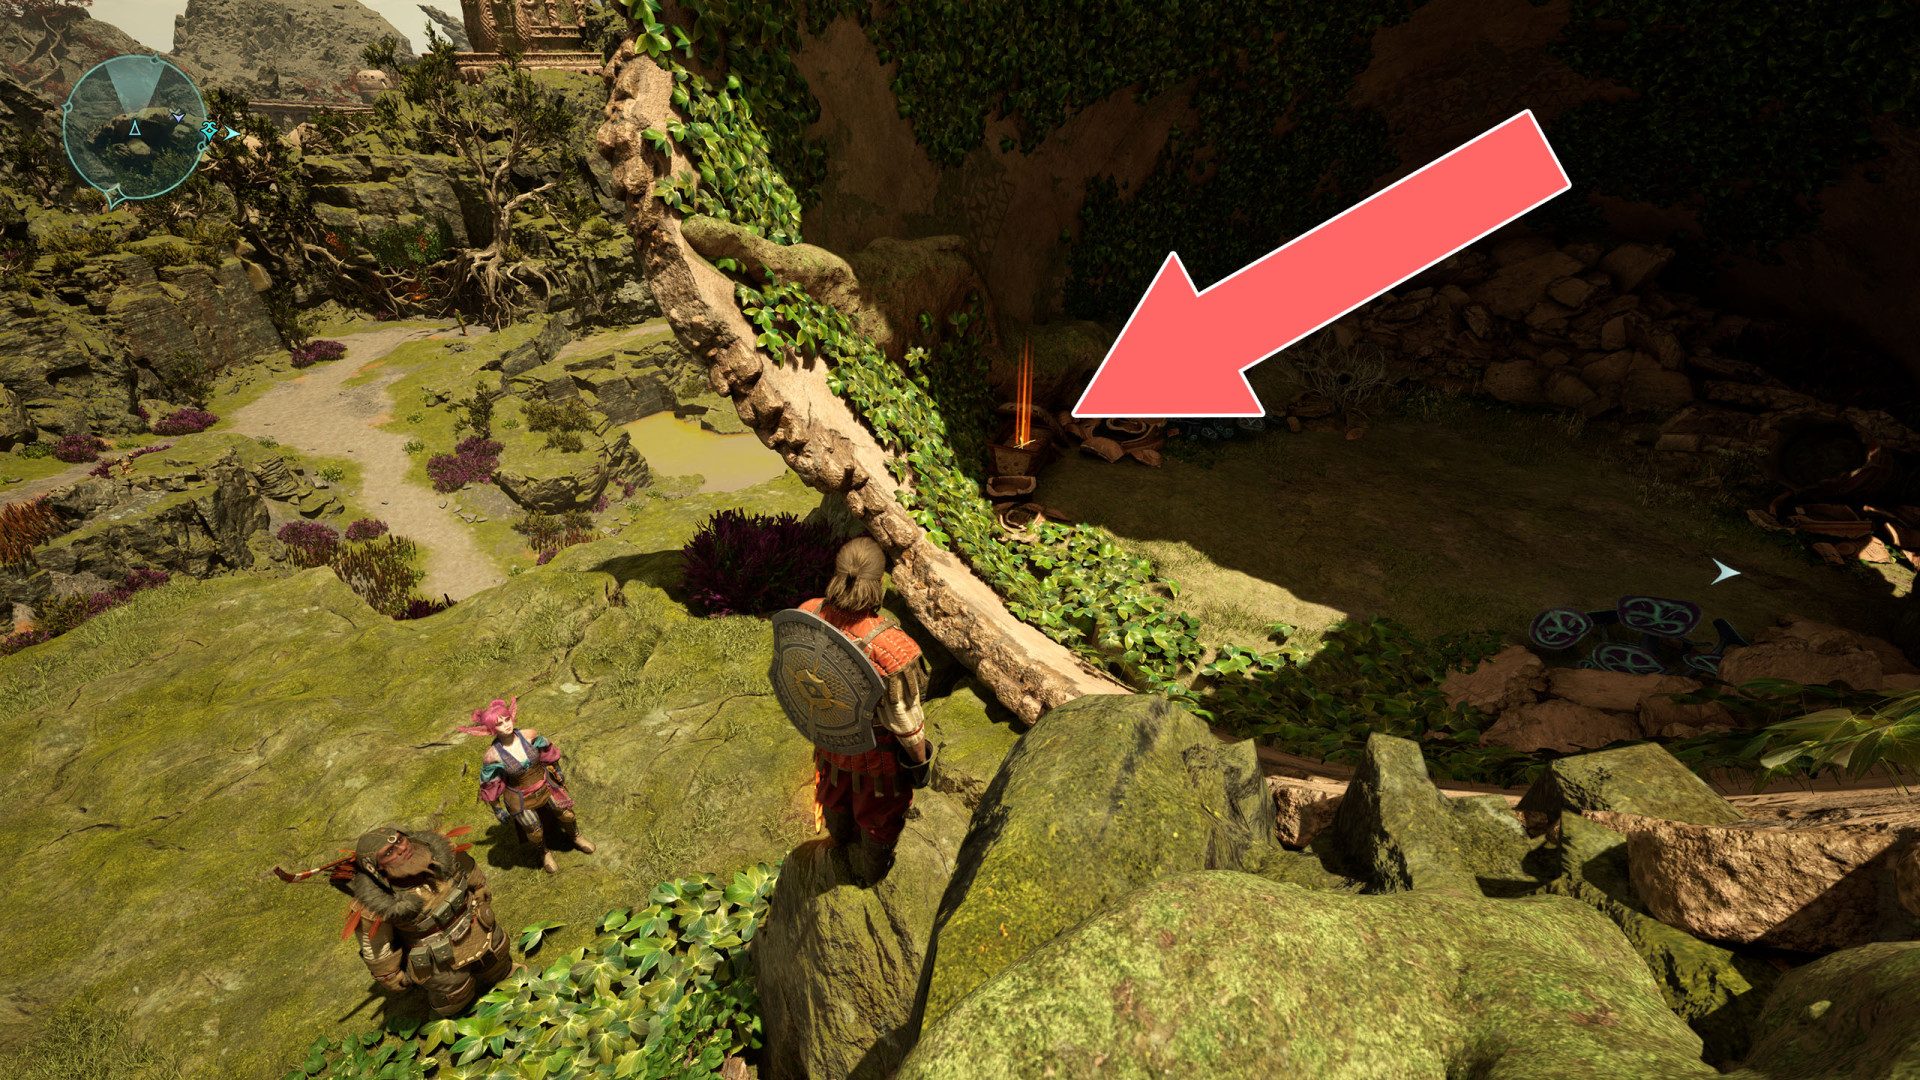
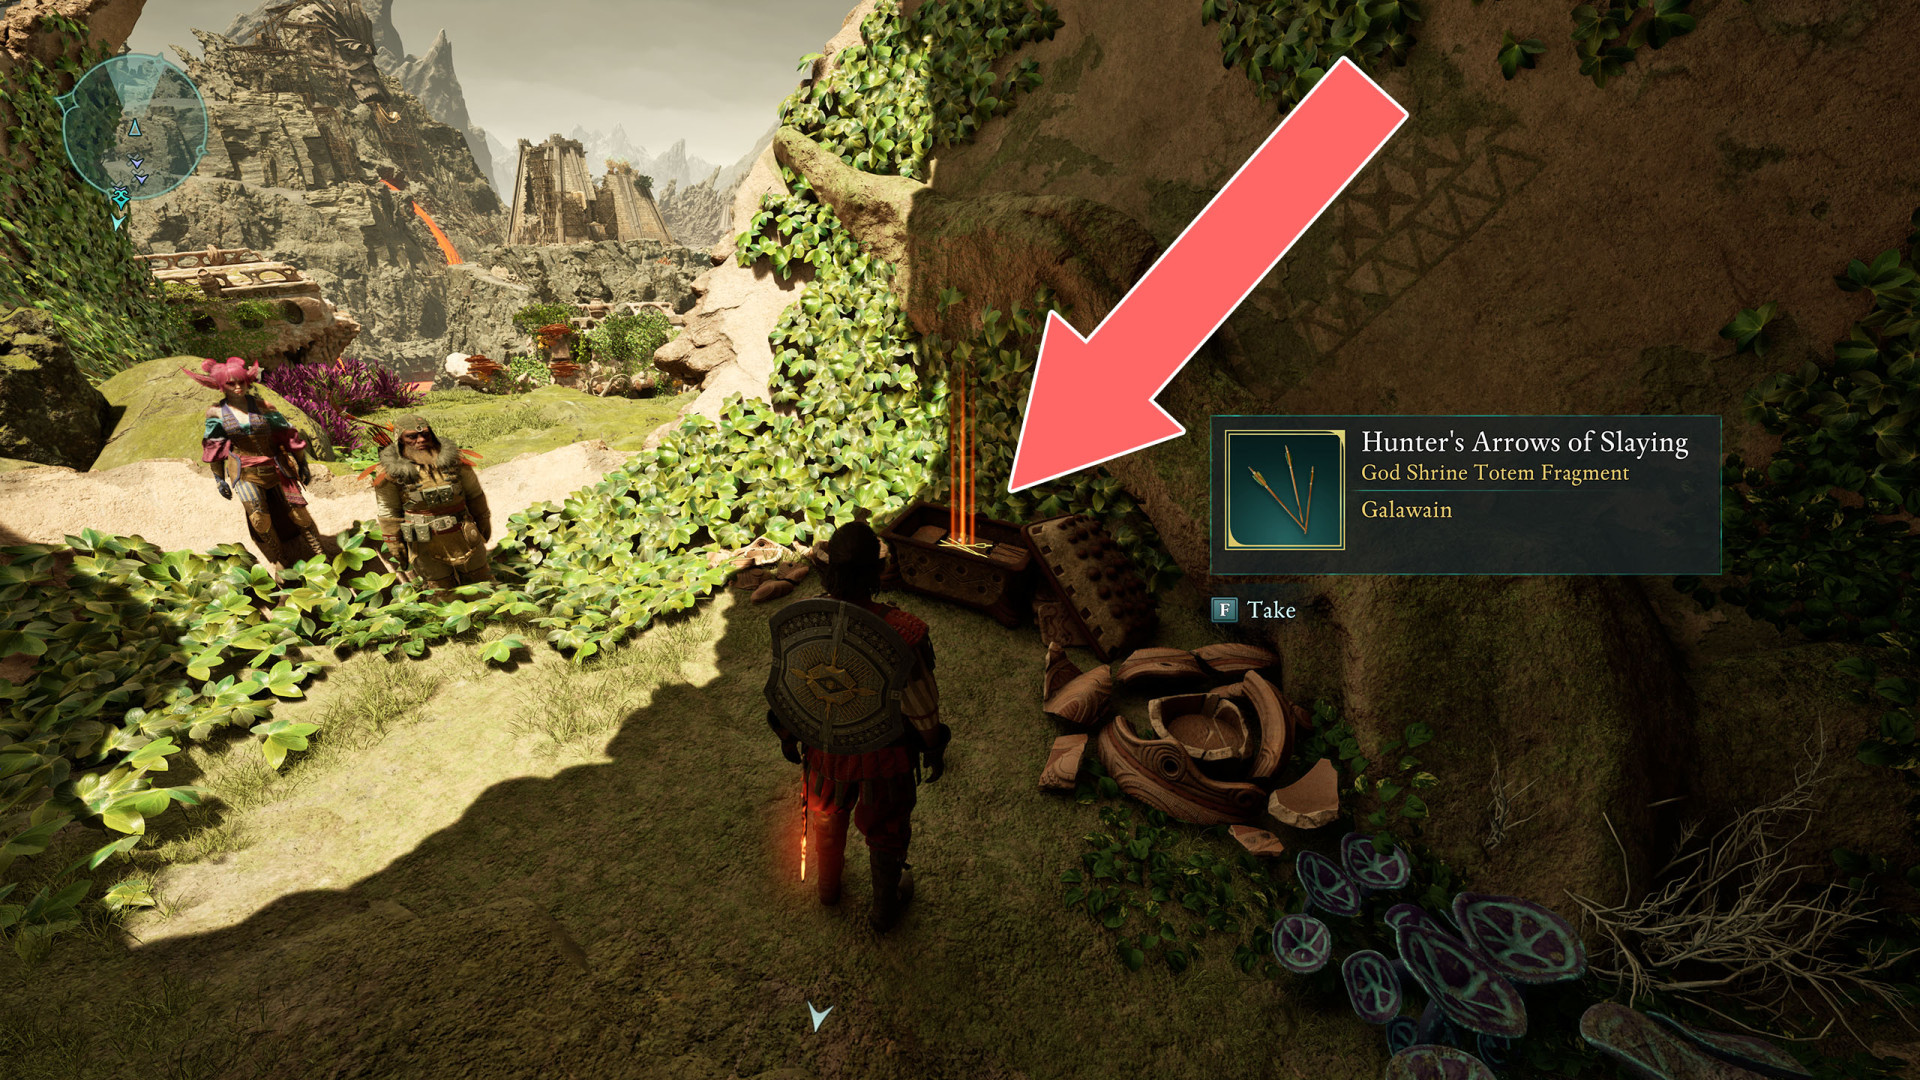
Hunter's Arrows of Slaying▶ show the map ◀
Totem Fragment - Galawain.
Effect:
- The Changeling's Power: +2 Might, +2 Constitution.
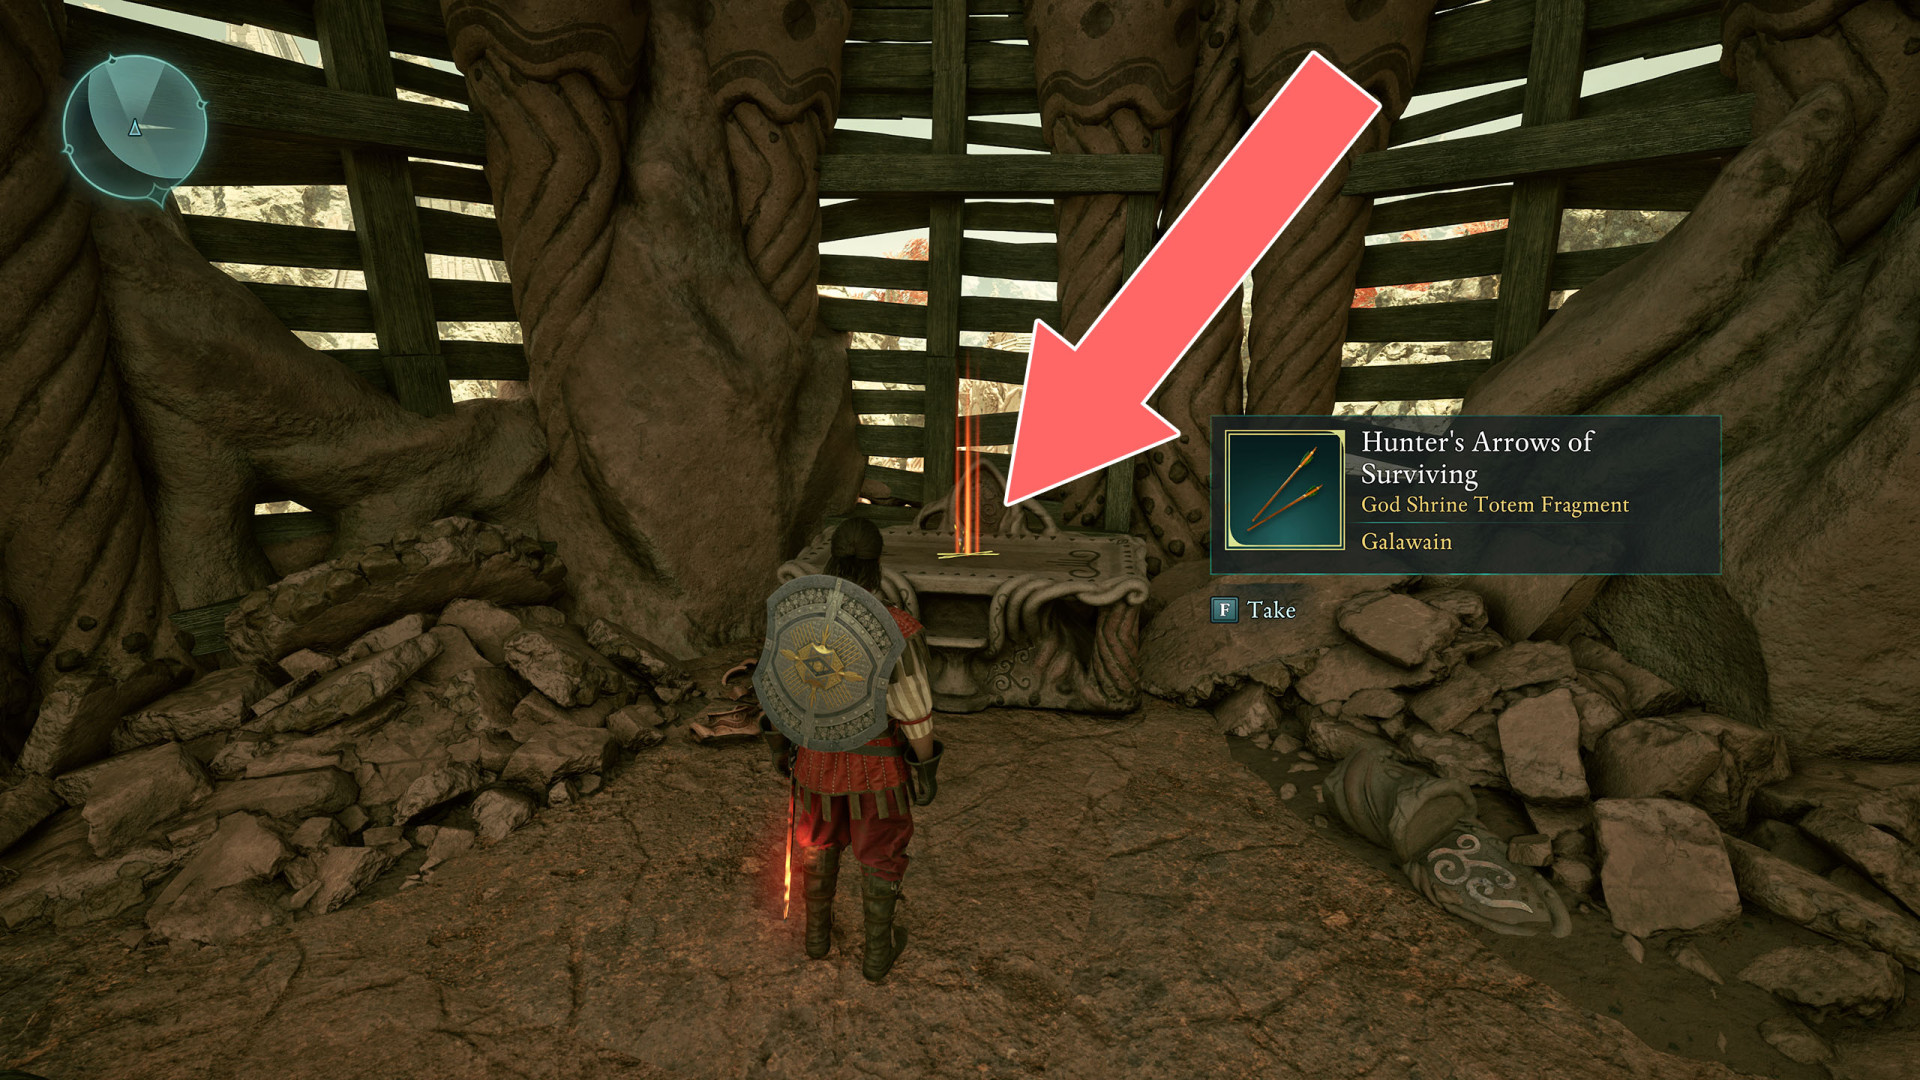
Hunter's Arrows of Surviving▶ show the map ◀
Totem Fragment - Galawain.
Effect:
- On Victory's Heels: Killing an enemy gives you +20% Move Speed for 10 seconds
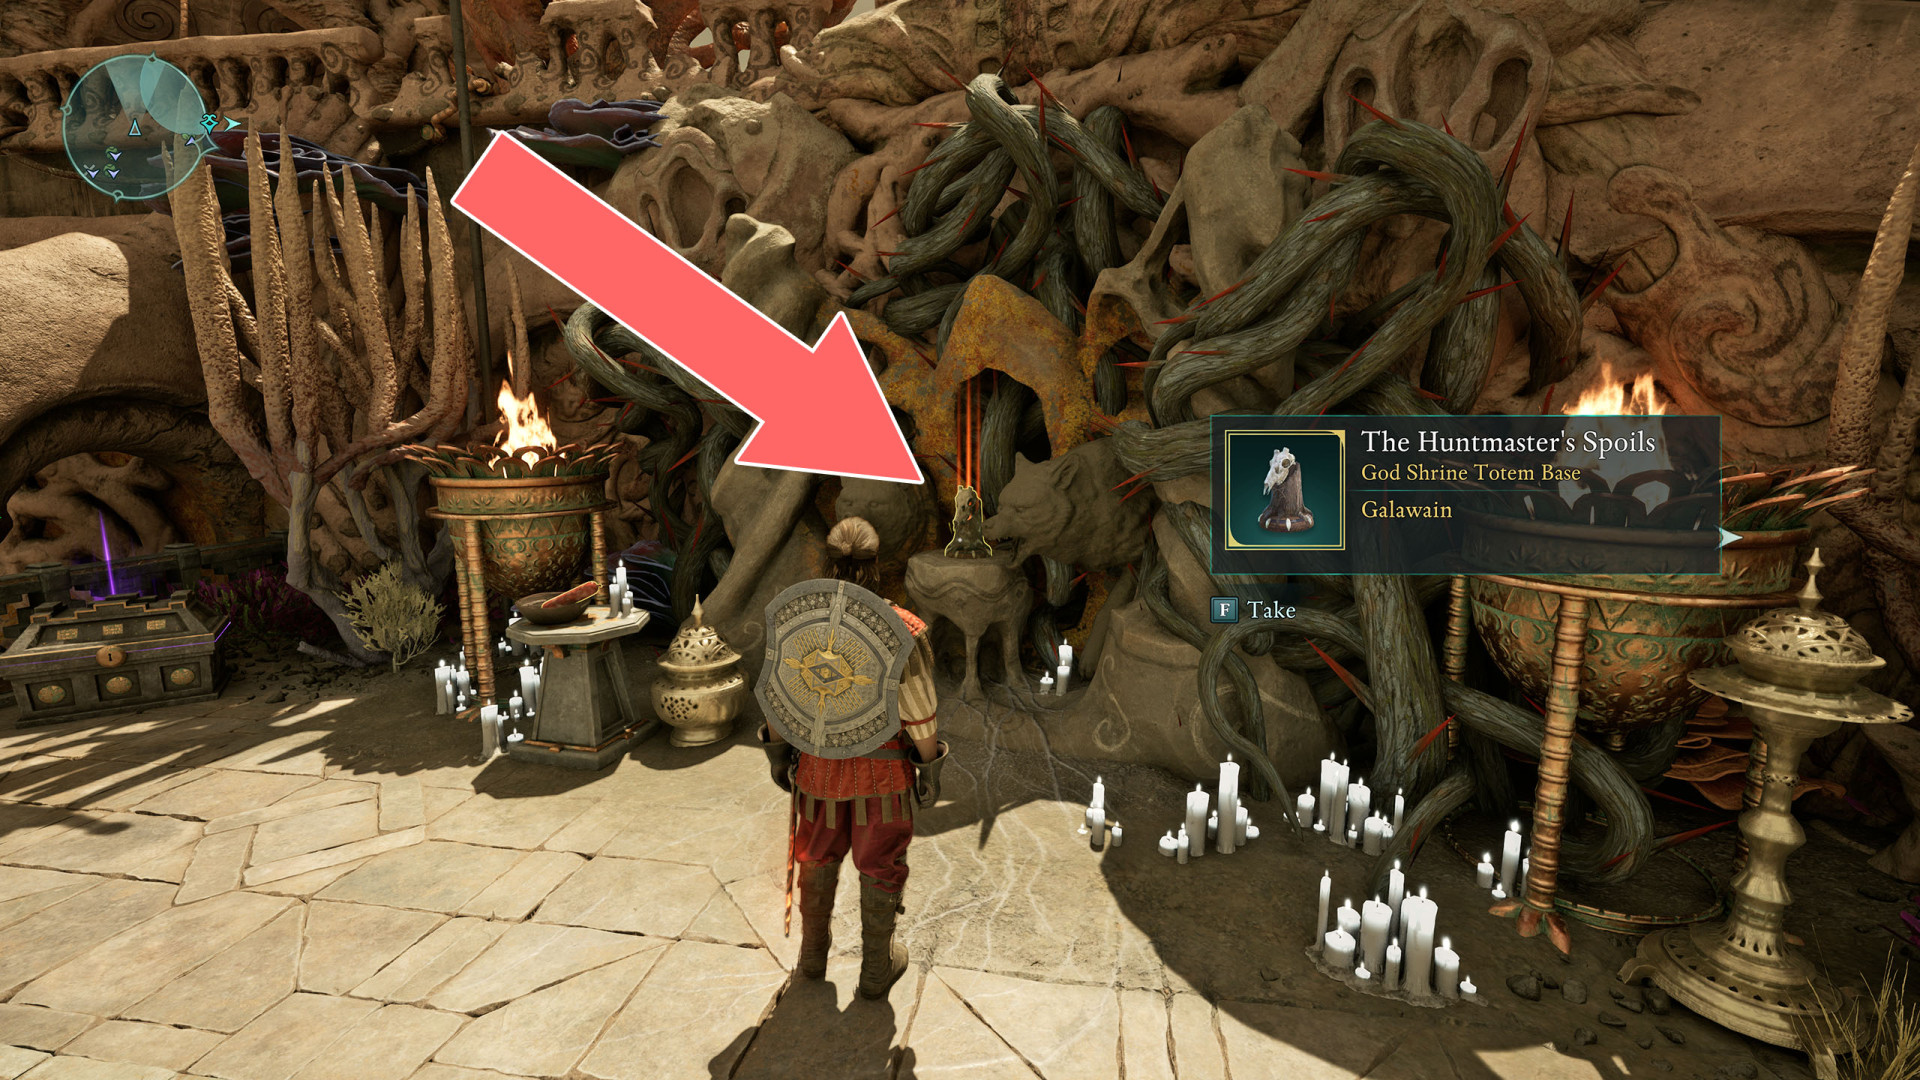
The Huntmaster's Spoils▶ show the map ◀
Totem Base - Galawain.
Used to: Activate passive bonuses when placed at party camp and restored with missing fragments.
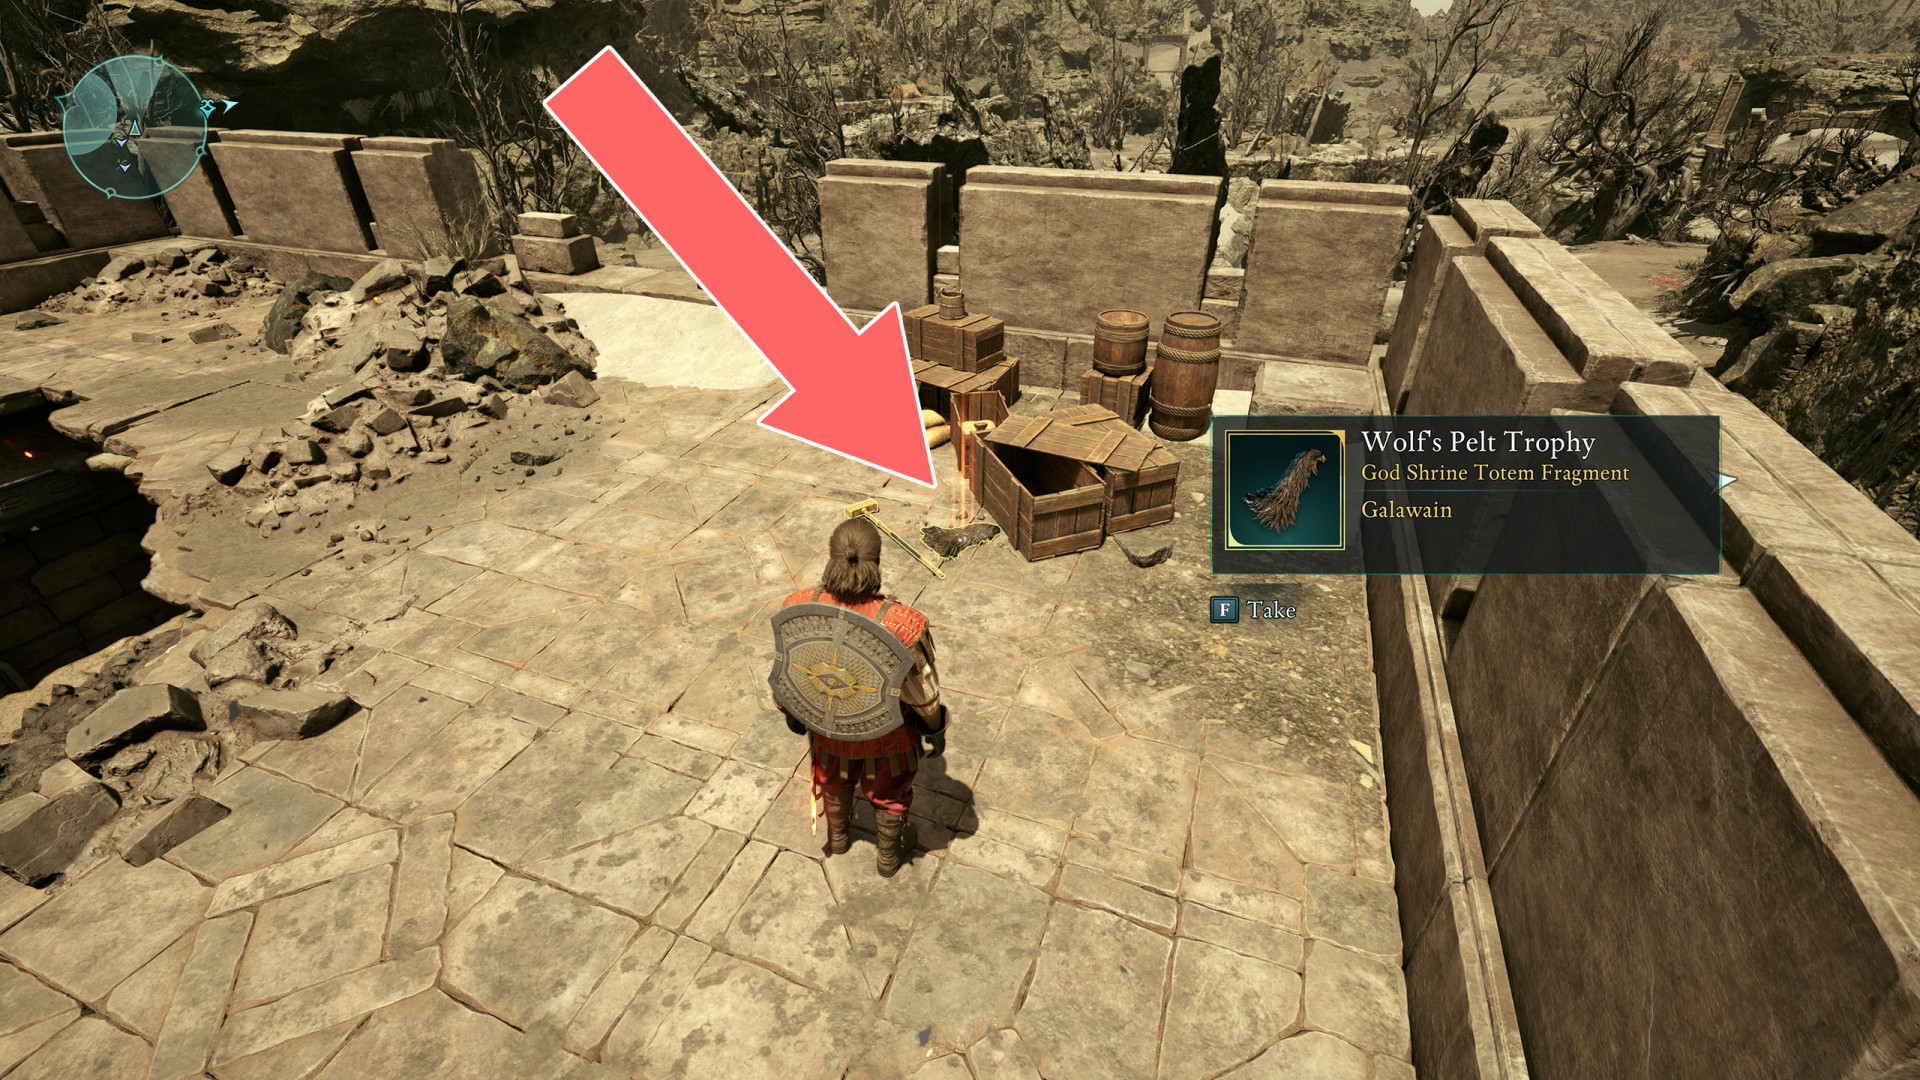
Wolf's Pelt Trophy▶ show the map ◀
Totem Fragment - Galawain.
Effect:
- Hunting Howl: Second Wind casts Barbaric Shout.